

This bluebell charger cover turns a plain white wall plug into a small spring flower. A periwinkle bell slips over the charger body, a green star-shaped calyx sits around the top opening, and three tiny bluebells with cream stamens hang from the shoulders. A green sleeve with small leaves wraps the charging cable so it looks like a vine.
The colors are soft periwinkle, fresh leaf green, and a little cream. The body uses waistcoat stitch, which makes vertical columns that look like knitting. It ends in a full ruffled hem that copies the flared lip of a real bluebell.
The pattern uses US crochet terms. The finished cover is 3.25 in (8.3 cm) tall and 4 in (10.2 cm) wide flat at the lower body. The top opening is 6 in (15.2 cm) around, and the cable sleeve is 36 in (91.4 cm) long.
You work the body top-down in joined rounds. Then you make the calyx, mini bells, leaves, and stems separately. After sewing everything together, you fit the cover on the charger, work the ruffled hem last, and crochet the sleeve directly around the cable.
Finished Size and Construction
- Finished size: 3.25 in (8.3 cm) tall, 4 in (10.2 cm) wide flat at the lower body, about 4.5 in (11.4 cm) across the ruffle
- Skill level: Intermediate
- Terminology: US
- Yarn weight: Sport (#2), cotton or cotton blend
- Hook: 3.0 mm
- Number of pieces: 12 (1 body, 1 calyx, 3 mini bells, 2 large leaves, 4 small leaves, 1 cable sleeve), plus 3 chain stems and 9 stamens
- Layout: one bell body with the calyx on top, mini bells spaced around the shoulders, leaves on the calyx and cable
- Body size before hem: 2.5 in (6.4 cm) tall, 3 in (7.6 cm) wide flat at the top, 4 in (10.2 cm) wide flat at the bottom
- Hem (border) depth: 0.75 in (1.9 cm)
The cover fits a compact wall charger with a body perimeter of up to about 6 in (15.2 cm) and a body height of about 2.5 in (6.4 cm). The prongs and the top face of the charger stay uncovered.
Materials
Use a smooth sport-weight cotton, either mercerized or matte. Cotton holds the ruffle and the leaf points well, and it is safer than acrylic near a warm charger.
- Periwinkle (A): 20 g / 60 m – body, mini bells
- Leaf green (B): 25 g / 75 m – calyx, leaves, stems, cable sleeve
- Cream (C): 2 g / 6 m – stamens
These amounts include a margin of about 25% for a test swatch and small differences in tension.
Tools:
– 3.0 mm crochet hook
– Tapestry needle
– 4 stitch markers
– Scissors
– Soft tape measure
– Spray bottle and pins for blocking
– A USB-C cable about 39 in (99.1 cm) long, and your wall charger
Abbreviations (US Terms)
- ch – chain
- sl st – slip stitch
- sc – single crochet
- hdc – half double crochet
- dc – double crochet
- tr – treble crochet
- BLO – back loop only
- sk – skip
- st(s) – stitch(es)
- rnd(s) – round(s)
Waistcoat stitch (ws): Look at a sc from the front. You will see a V made of two vertical legs. Insert your hook between the two legs of the V, under the top loops, and come out at the back. Yarn over and pull up a loop, then yarn over and pull through both loops. This makes the stacked, knit-look columns on the body.
Point (pt): Ch 6, sl st in 2nd ch from hook, sc in next ch, hdc in next ch, dc in next ch, tr in last ch.
Gauge and Checkpoints
Gauge: 12 ws and 12 rnds = 2 in (5.1 cm), worked in the round.
That is 6 sts and 6 rnds per 1 in (2.5 cm). Waistcoat stitch is dense, so keep your loops relaxed. Make the body first as your test piece, because fit on the charger matters most.
Checkpoints:
– After Rnd 3: 6 in (15.2 cm) around, 3 in (7.6 cm) wide flat, 0.5 in (1.3 cm) tall
– After Rnd 6: 1 in (2.5 cm) tall
– After Rnd 15: 2.5 in (6.4 cm) tall, 4 in (10.2 cm) wide flat
– After the hem: 3.25 in (8.3 cm) tall
Too big? Switch to a 2.75 mm hook. A loose top will slide down over the prongs.
Too small? Switch to a 3.25 mm hook. If the top won’t stretch over the charger, don’t force it, because that will distort the stitches.
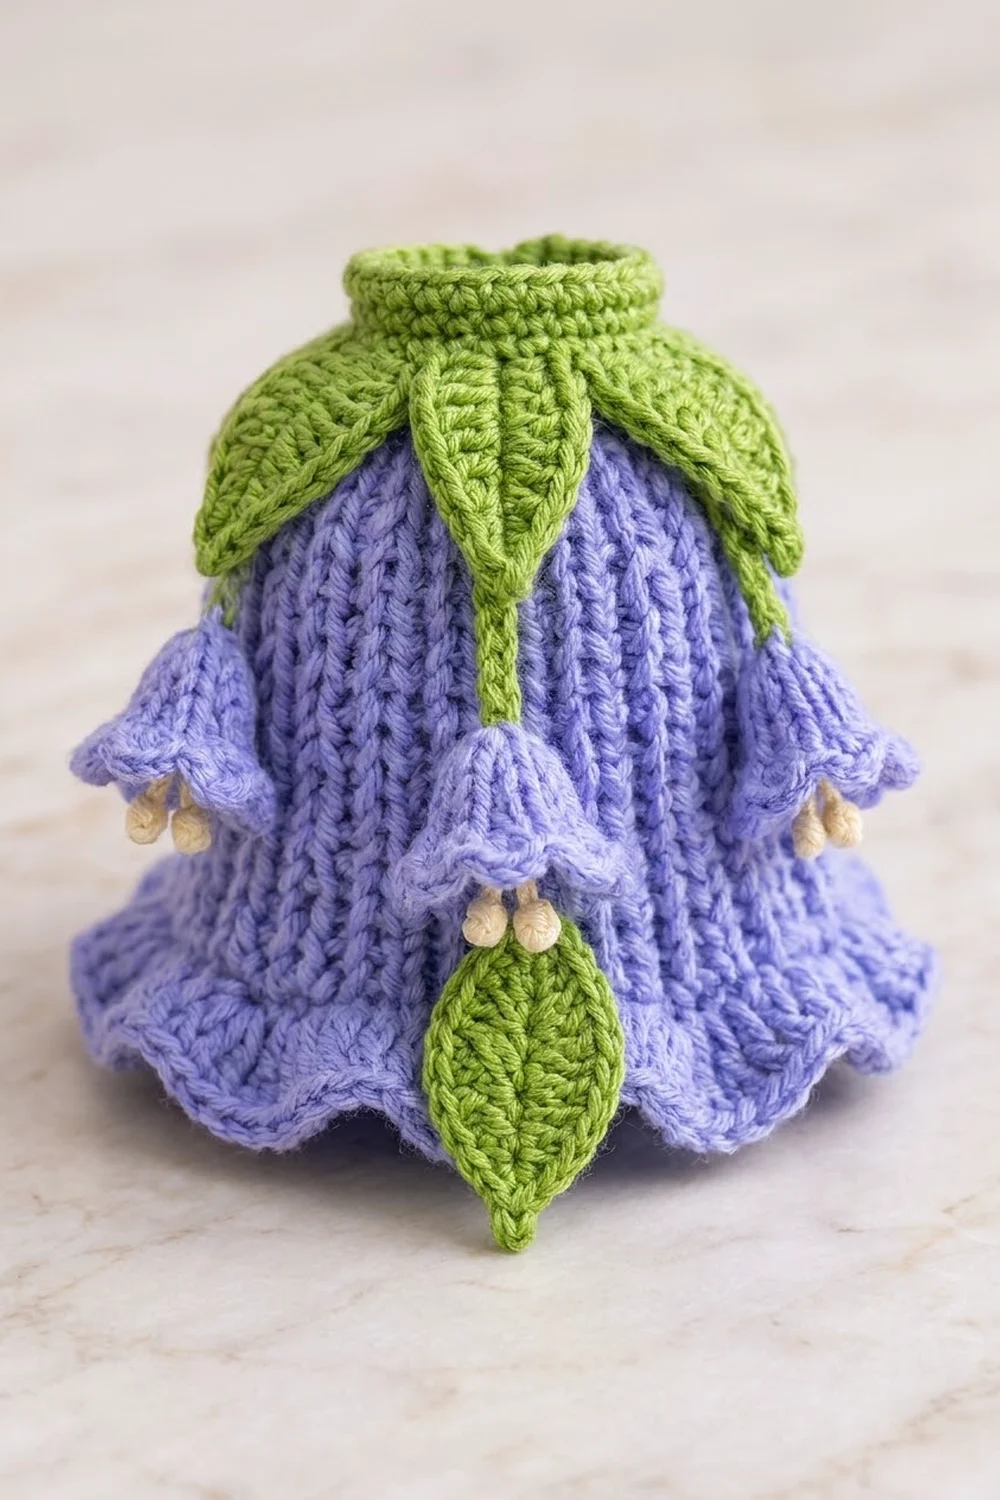
Bell Body
With A, work in joined rnds. Join each rnd with a sl st to the first st. The ch 1 at the start of each rnd does not count as a st.
Rnd 1: Ch 36 and join with a sl st to form a ring, taking care not to twist. Ch 1, sc in each ch around. (36 sts)
Rnds 2–3: Ch 1, sc BLO in each st around. (36 sts)
This makes the narrow ribbed band at the top. Check: 3 in (7.6 cm) wide flat, 18 sts per flattened side.
Rnds 4–7: Ch 1, ws in each st around. (36 sts)
Rnd 8: Ch 1, *ws in next 5 sts, 2 ws in next st; repeat from * 5 more times. (42 sts)
Rnds 9–11: Ch 1, ws in each st around. (42 sts)
Rnd 12: Ch 1, *ws in next 6 sts, 2 ws in next st; repeat from * 5 more times. (48 sts)
Rnds 13–15: Ch 1, ws in each st around. (48 sts)
Check: 2.5 in (6.4 cm) tall, 4 in (10.2 cm) wide flat, 24 sts per flattened side. Do not fasten off. Pull up a long loop, put a marker in it, and set the body aside. You will work the hem after assembly.
Calyx
With B.
Rnd 1: Ch 36 and join with a sl st to form a ring. Ch 1, sc in each ch around, join. (36 sts)
The ring has the same 36 sts as the body band, so it sits flat without puckering.
Rnd 2: Ch 1, *sc in next 6 sts, pt; repeat from * 5 more times, join to first sc. (36 sc and 6 points)
Fasten off, leaving a 12 in (30.5 cm) tail. The six points make the star shape.
Mini Bells (make 3)
With A.
Rnd 1: Make 6 sc in a magic ring, join. (6 sts)
Rnd 2: Ch 1, *sc in next st, 2 sc in next st; repeat from * 2 more times, join. (9 sts)
Rnds 3–4: Ch 1, sc in each st around, join. (9 sts)
Rnd 5: Ch 1, *sc in next 2 sts, 2 sc in next st; repeat from * 2 more times, join. (12 sts)
Rnd 6: Ch 1, *sc in next st, (hdc, dc, hdc) in next st; repeat from * 5 more times, join. (24 sts: 6 sc + 6 petals of 3 sts)
Fasten off and weave in the end at the mouth. Leave the magic-ring tail long for sewing. Each bell is about 1 in (2.5 cm) tall and 1 in (2.5 cm) across the mouth.
Stamens: Thread a needle with C and bring it out from inside the top of the bell. Let a 0.375 in (1.0 cm) strand hang below the mouth, and tie a double overhand knot at the end to make the round tip. Trim close to the knot. Make 3 stamens per bell, 9 in total.
Leaves
With B. You work each leaf along both sides of a foundation chain.
Large leaf (make 2): Ch 9. Sl st in 2nd ch from hook, sc in next ch, hdc in next ch, dc in next 2 chs, hdc in next ch, sc in next ch, 3 sc in last ch. Rotate and work along the other side of the chain: sc in next ch, hdc in next ch, dc in next 2 chs, hdc in next ch, sc in next ch, sl st in last ch. (17 sts) Fasten off. Size: 1.5 in (3.8 cm) long.
Small leaf (make 4): Ch 6. Sl st in 2nd ch from hook, sc in next ch, dc in next ch, sc in next ch, 3 sc in last ch. Rotate: sc in next ch, dc in next ch, sc in next ch, sl st in last ch. (11 sts) Fasten off. Size: 1 in (2.5 cm) long.
Stems (make 3): With B, ch 5 and fasten off. Each stem is about 0.75 in (1.9 cm) long.
Make All Pieces
| Color | Pieces |
|---|---|
| A (periwinkle) | 1 body, 3 mini bells |
| B (green) | 1 calyx, 2 large leaves, 4 small leaves, 3 stems, 1 cable sleeve |
| C (cream) | 9 stamens |
Layout (front view):
        [ charger prongs ]
   pt  pt  [calyx ring]  pt  pt
          [large leaf]
  stem      stem       stem
 [bell]    [bell]     [bell]
      ( waistcoat body )
 ~~~~~~~~ ruffled hem ~~~~~~~~
          | sleeve |
The second large leaf goes at center back. The 4 small leaves go on the cable sleeve.
Joining
Sew all the pieces together with the A or B tails and a tapestry needle.
- Calyx to body: Lay the calyx ring over Rnds 1–3 of the body. Whipstitch the ring to the body one stitch to one stitch: calyx st 1 to body st 1, and so on around all 36 sts. Both pieces have 36 sts, so every stitch has a partner. Tack each point down onto the body at its tip.
- Large leaves: Sew one leaf at center front and one at center back. Tuck the base under the calyx ring and point the tip down.
- Stems and bells: Sew one stem at the tip of the front leaf. Sew the other two under the side points, about 1 in (2.5 cm) below the top. Sew the top of each mini bell to the free end of a stem.
Keep your sewing tension firm but not tight. If the body puckers under the ring, loosen the stitches.
Size checkpoint: Slide the cover onto the charger now. The top should sit just below the charger face, and the body should cover 2.5 in (6.4 cm) of the sides.
Ruffled Hem (Border)
Put the live loop of A back on your hook. The hem has the same gauge as the body, about 6 sts per 1 in (2.5 cm), but it adds stitches so it ripples.
Rnd 16 (conversion round): Ch 1, *sc in next st, 2 sc in next st; repeat from * 23 more times, join. (48 sts worked 1 per stitch + 24 extra sts = 72 sts; 36 sts per flattened side)
Rnd 17 (scallop round): Ch 1, *sc in next st, sk 2 sts, 7 dc in next st, sk 2 sts; repeat from * 11 more times, join to first sc. (12 scallops; 12 sc + 84 dc = 96 sts; 6 scallops and 48 sts per flattened side)
Rnd 18 (trim round): Sl st loosely in each st around. (96 sts worked 1 per stitch + 0 extra = 96 sts) Fasten off.
Why the math works: Rnd 15 has 48 sts, which divides by 2, so the 1-and-2 repeat adds exactly 24 sts. The new total of 72 divides by 6, so the 6-st scallop repeat fits exactly 12 times with no stitches left over. When the cover is flattened, the 12 scallops split evenly into 6 per side. Rnds 16–18 add 0.75 in (1.9 cm) to the 2.5 in (6.4 cm) body, for a total height of 3.25 in (8.3 cm).
Cable Sleeve
With B, work directly around the cable. Start 1.5 in (3.8 cm) from the end that plugs into the charger.
Foundation: Ch 6, wrap the chain around the cable, and join with a sl st to the first ch.
Rnd 1: Ch 1, sc in each ch around. (6 sts) Place a marker.
Rnds 2–216: Work in a continuous spiral, with sc BLO in each st around. (6 sts per rnd) Slide the work along the cable as you go.
Check after every 36 rnds: each block should measure 6 in (15.2 cm). After 216 rnds, the sleeve measures 36 in (91.4 cm). Fasten off, leaving 1.5 in (3.8 cm) of cable free at the far end, and weave the tail into the tube.
Sew the 4 small leaves along the sleeve at about 6 in (15.2 cm), 14 in (35.6 cm), 22 in (55.9 cm), and 30 in (76.2 cm) from the start, alternating sides.
Final Blocking
- Take the cover off the charger.
- Lightly mist the leaves, calyx points, and ruffle with water.
- Pin each leaf flat and open, and shape the tip to a point.
- Shape the scallops with your fingers so all 12 waves are even.
- Stuff the body lightly with a cloth so it holds its bell shape.
- Let everything dry completely, at least 6 hours.
- Mist the cable sleeve and let it dry straight on a towel.
Final Quality-Control Checklist
- Body is 3.25 in (8.3 cm) tall and 4 in (10.2 cm) wide flat
- Top opening is 6 in (15.2 cm) around and fits the charger snugly
- Calyx has 6 points, all tacked down
- 3 mini bells, each with 3 cream stamens
- 12 even scallops on the hem
- Sleeve is 36 in (91.4 cm) long with 4 leaves
- All ends woven in, and no yarn near the prongs
Troubleshooting
Waistcoat stitch is too tight to work. Pull each loop up a little taller before you finish the stitch.
The body twists. Joined waistcoat rounds tend to drift a little. Turn the body so the join sits at center back.
The ruffle flips up. Mist it and pin the scallops downward while they dry.
Scallops come out uneven. Recount Rnd 16. You need exactly 72 sts.
The sleeve is loose on the cable. Use 5 sts per rnd instead of 6.
Mini bells droop sideways. Add a second tacking stitch at the base of each stem.
Care
Unplug the charger and take off the cover before washing. Hand wash in cool water with mild soap, press the water out in a towel, and dry flat.
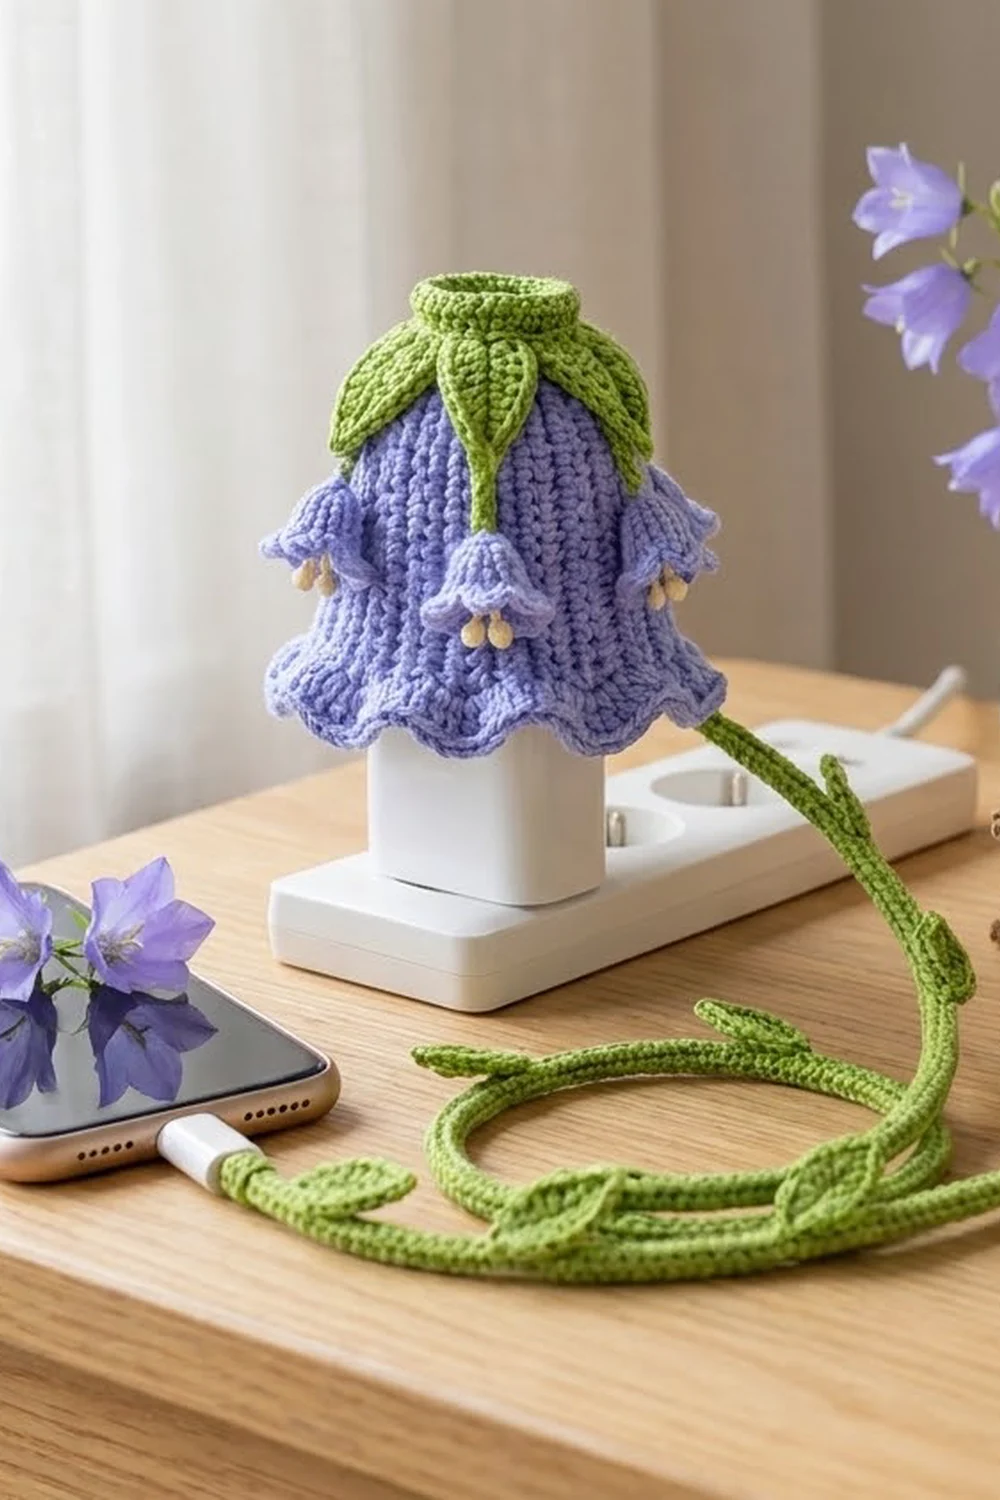
Final Notes
Every measurement in this pattern comes from the gauge. At 6 sts and 6 rnds per 1 in (2.5 cm), the 36-st top is 6 in (15.2 cm) around and the 48-st lower body is 4 in (10.2 cm) wide flat. The 36-st calyx matches the top band one stitch to one stitch. The hem turns 48 sts into 72 and then into 12 scallops, for a finished height of 3.25 in (8.3 cm). The sleeve’s 216 rnds give 36 in (91.4 cm). If you check each stage as you go, the bluebell will fit your charger the first time.
Happy crocheting!