

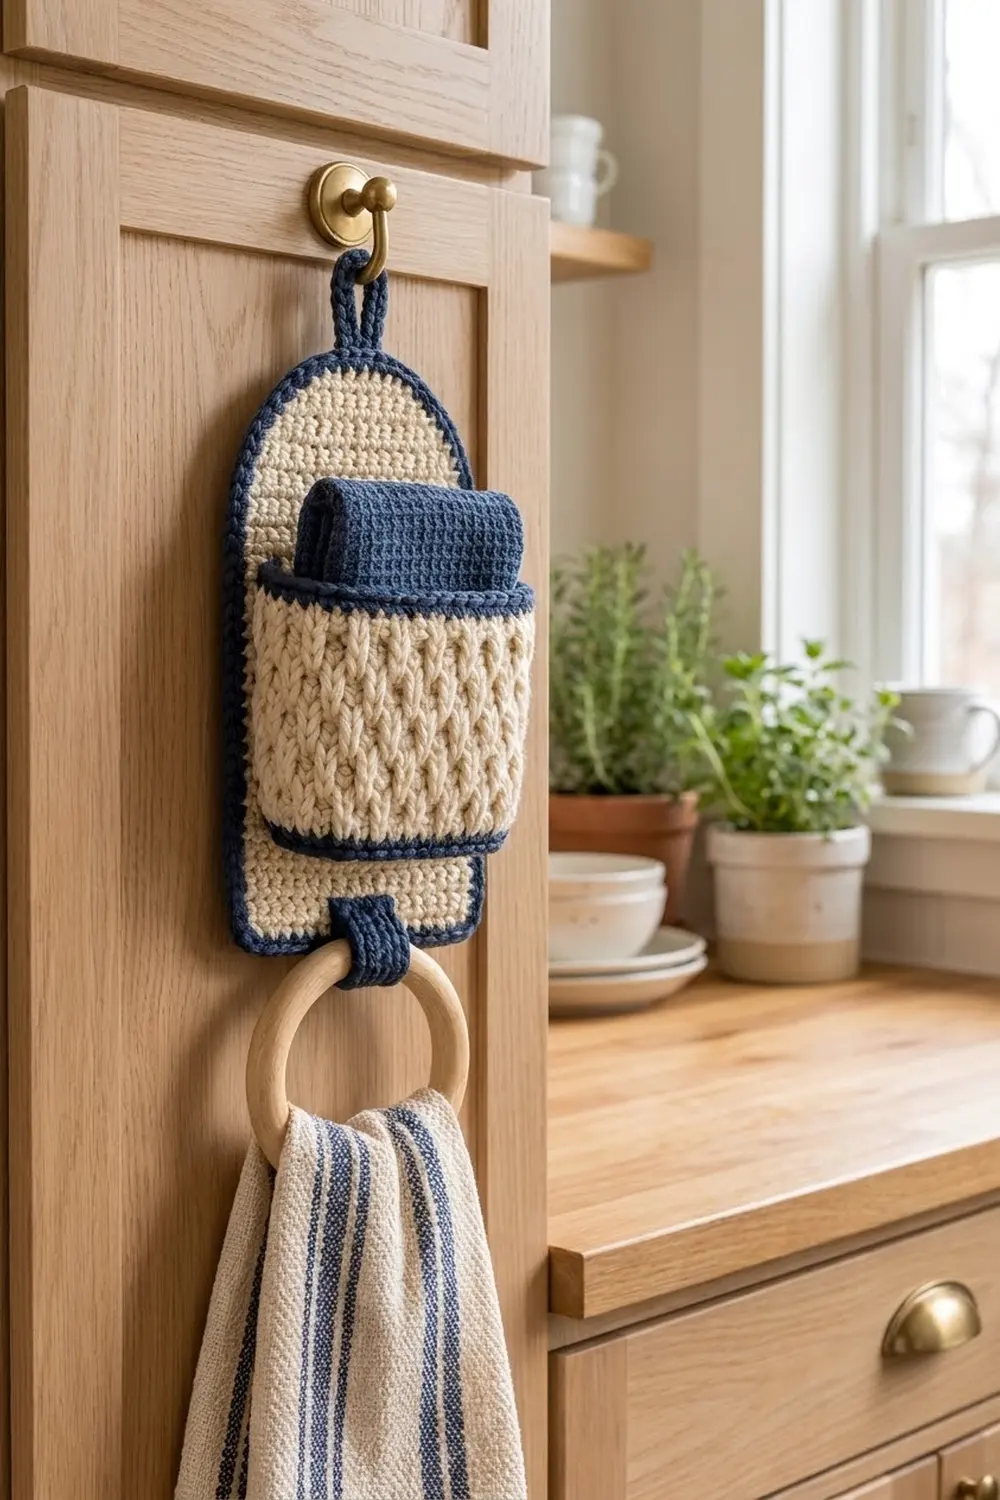
The Bluebell Cottage Towel Ring Holder is a small organizer for a kitchen cabinet or a bathroom hook. A cream arched backing holds a deep knit-look pocket for dishcloths or sponges, and a wooden ring at the bottom holds a hand towel.
The colors are simple: warm cream for the body and navy blue for the borders, rims, hanging loop and ring tab. The navy rope-like edges frame each part, and the chunky V-stitch texture on the pocket stands out against the flat single-crochet backing.
This pattern uses US crochet terms. The finished backing measures 7 in (17.8 cm) wide by 11 in (27.9 cm) tall, not counting the hanging loop or ring. The pocket measures about 5.5 in (14.0 cm) wide, 1.5 in (3.8 cm) deep and 4 in (10.2 cm) tall.
You work the backing in rows from the bottom up and decrease to form the arch, then add a two-round navy border. The pocket is worked from a flat base, then in rounds up the walls. A navy loop and a navy ring tab finish the piece, and everything is sewn together.
Finished Size and Construction
- Finished size: 7 in × 11 in (17.8 cm × 27.9 cm) backing; the ring hangs about 3.5 in (8.9 cm) below
- Skill level: Intermediate
- Terminology: US
- Yarn weight: Worsted (#4) cotton or cotton blend
- Hook: 5 mm (H-8)
- Number of pieces: 4 crocheted pieces (backing, pocket, hanging loop, ring tab) plus 1 wooden ring
- Layout: Loop at the top of the arch, pocket centered on the lower front, ring tab at the bottom center
- Backing size before border: 6 in × 10 in (15.2 cm × 25.4 cm)
- Border depth: 0.5 in (1.3 cm) on every side
- Pocket size: 5.5 in × 1.5 in × 4 in (14.0 cm × 3.8 cm × 10.2 cm)
Materials
Use a smooth, firm worsted-weight cotton. Cotton holds the pocket’s shape and stands up to damp towels. Avoid splitty or very soft acrylics, because they make the knit-look stitches hard to see and let the pocket sag.
- Cream: 90 g, about 153 m
- Navy: 45 g, about 77 m
These quantities include a margin of about 25% for swatching and joining.
Tools:
– 5 mm (H-8) crochet hook
– Wooden ring, 3 in (7.6 cm) inner diameter
– Tapestry needle
– 6 locking stitch markers
– Rust-proof pins and a blocking mat
– Scissors and a measuring tape
Abbreviations (US Terms)
- ch – chain
- sl st – slip stitch
- sc – single crochet
- hdc – half double crochet
- sc2tog – single crochet 2 together
- BLO – back loop only
- rev sc – reverse single crochet (crab stitch), worked left to right
- st(s) – stitch(es)
- rnd(s) – round(s)
- RS / WS – right side / wrong side
Special stitch – knit-look hdc (khdc): Yarn over and insert the hook between the two vertical posts of the stitch below, through the center of its V and under the horizontal strands. Then yarn over, pull up a loop, and yarn over and pull through all 3 loops. When you work khdc in rounds without turning, the stitches stack into vertical V columns.
Gauge and Checkpoints
- Sc gauge (backing, tab, loop, base): 16 sts × 18 rows = 4 in (10.2 cm), so 4 sts and 4.5 rows per inch.
- Khdc gauge (pocket walls): 16 sts × 12 rnds = 4 in (10.2 cm), so 4 sts and 3 rnds per inch.
Make the backing first, because it works as your gauge swatch. Check these measurements as you go:
- After Row 18, the backing measures 6 in (15.2 cm) wide and 4 in (10.2 cm) tall.
- After Row 45, it measures 10 in (25.4 cm) tall at the center.
- After the border, it measures 7 in × 11 in (17.8 cm × 27.9 cm).
- After pocket base Row 6, the base measures 5.5 in (14.0 cm) wide.
If the piece comes out too big, go down one hook size. If it is too small, go up one size. Don’t change stitch counts, because the pocket must line up with the backing stitch for stitch.

Backing Panel (Cream)
Ch 1 at the start of each row does not count as a stitch. Turn at the end of every row.
Row 1: Ch 25. Sc in the 2nd ch from the hook and in each ch across. (24 sts)
Rows 2–34: Ch 1, sc in each st across. (24 sts)
Checkpoint: after Row 18, the panel measures 4 in (10.2 cm) tall.
Next, shape the arch.
Row 35: Ch 1, sc2tog, sc in the next 20 sts, sc2tog. (22 sts)
Rows 36–37: Ch 1, sc in each st across. (22 sts)
Row 38: Ch 1, sc2tog, sc in the next 18 sts, sc2tog. (20 sts)
Row 39: Ch 1, sc in each st across. (20 sts)
Row 40: Ch 1, sc2tog, sc in the next 16 sts, sc2tog. (18 sts)
Row 41: Ch 1, sc in each st across. (18 sts)
Row 42: Ch 1, sc2tog, sc in the next 14 sts, sc2tog. (16 sts)
Row 43: Ch 1, sc2tog, sc in the next 12 sts, sc2tog. (14 sts)
Row 44: Ch 1, sc2tog, sc in the next 10 sts, sc2tog. (12 sts)
Row 45: Ch 1, sc2tog, sc in the next 8 sts, sc2tog. (10 sts)
Fasten off. The panel now has 34 straight rows and 11 arch rows, for 45 rows and 10 in (25.4 cm) total. The decreases are spaced out at first and then come every row, which gives a smooth rounded top instead of a point.
Pocket (Navy and Cream)
Base (navy), worked in rows:
Row 1: With navy, ch 23. Sc in the 2nd ch from the hook and in each ch across. (22 sts)
Rows 2–6: Ch 1, turn, sc in each st across. (22 sts)
The base measures 5.5 in (14.0 cm) wide and about 1.5 in (3.8 cm) deep.
Walls, worked in rnds. Don’t turn from here on. Keep the RS facing out.
Rnd 1 (navy): Ch 1. Sc in each of the 22 sts of Row 6. Work 6 sc evenly across the 6 row ends. Sc in each of the 22 foundation ch. Work 6 sc across the other 6 row ends. Join with a sl st. (22 + 6 + 22 + 6 = 56 sts)
There are no corner increases, so the base stays a flat rectangle.
Rnd 2 (navy): Ch 1, sc in the BLO of each st around. Join. (56 sts)
Working in the back loops turns the fabric upward and makes the navy base band. Place a marker in the 1st, 22nd, 29th and 50th sts of this round. These are the 4 corners. Fasten off navy.
Rnd 3 (cream): Join cream. Ch 1, hdc in each st around. Join. (56 sts)
Rnds 4–12: Ch 1, khdc in each st around. Join. (56 sts per rnd, 9 rnds)
Checkpoint: the khdc section measures 3 in (7.6 cm) tall. Fasten off cream.
Rnd 13 (navy): Join navy. Ch 1, sc in each st around. Join. (56 sts)
Rnd 14 (navy): Ch 1, rev sc in each st around. Join. (56 sts)
Fasten off. The pocket stands about 4 in (10.2 cm) tall. Squeeze the corners at the markers to set the box shape.
Hanging Loop (Navy)
Row 1: Ch 31. Sc in the 2nd ch from the hook and in each ch across. (30 sts)
Row 2: Ch 1, turn, sc in each st across. (30 sts)
Fasten off and leave a 10 in (25.4 cm) tail. The strip curls into a firm, rope-like cord.
Ring Tab (Navy)
Row 1: Ch 7. Sc in the 2nd ch from the hook and in each ch across. (6 sts)
Rows 2–14: Ch 1, turn, sc in each st across. (6 sts)
Fasten off and leave a 12 in (30.5 cm) tail. The tab measures 1.5 in (3.8 cm) wide and about 3 in (7.6 cm) long.
Make All Pieces
Make the following pieces:
- 1 backing panel: cream body (about 35 g) plus navy border (about 12 g)
- 1 pocket: navy base and rims (about 15 g) plus cream walls (about 40 g)
- 1 hanging loop: navy (about 3 g)
- 1 ring tab: navy (about 3 g)
- 1 wooden ring
Layout on the front of the backing:
        [ LOOP ]
     .-----------.
    /   BACKING   \
   |    (arch)     |
   |               |
   |  +---------+  |
   |  | POCKET  |  |
   |  | 22 sts  |  |
   |  +---------+  |
   |_____[TAB]_____|
         (RING)
Backing Border (Navy)
Border gauge: the same as the sc gauge, 4 sts per inch. Each of the two border rounds adds 0.25 in (0.6 cm) to every edge, so the border is 0.5 in (1.3 cm) deep in total.
Rnd 1: With the RS facing, join navy in the first st of Row 45. Work around the panel as follows, then join with a sl st to the first sc. (128 sts)
- Top: 2 sc in the first st, sc in the next 8 sts, 2 sc in the last st. (12 sts)
- Left arch: 1 sc in each row end of Rows 45–35. (11 sts)
- Left straight side: 1 sc in each row end of Rows 34–2. (33 sts)
- Bottom: 3 sc in the first foundation st, sc in the next 22 sts, 3 sc in the last foundation st. (28 sts, including both corners)
- Right straight side: 1 sc in each row end of Rows 2–34. (33 sts)
- Right arch: 1 sc in each row end of Rows 35–45. (11 sts)
Check the total: 12 + 11 + 33 + 28 + 33 + 11 = 128 sts.
Rnd 2: Ch 1, rev sc in each st around. Join. (128 sts)
Fasten off and weave in the ends.
Why the math works:
- Sides: one sc per row end matches how tall a sc row is, so the sides stay flat. Row 1’s edge is used by the 3-sc corners, so each straight side has 33 row ends, not 34.
- Bottom corners: the 3-sc corners turn a clean 90 degrees.
- Top: the 2-sc shoulders at the top ease the curve, so the arch doesn’t cup.
- Crab stitch: rev sc adds no stitches. It just rolls the edge into the navy cord look.
Joining
Use whipstitch with a tapestry needle and matching yarn: navy where navy meets the panel, cream for the pocket walls. Keep your stitches snug but not tight. The pocket should lie flat against the backing with no puckering.
1. Pocket to backing. Lay the backing RS up, with the arch at the top.
- Bottom edge: On Row 5 of the backing, skip the first stitch, then mark stitches 2 through 23. That is 22 sts, centered with 1 st free at each side. Place the back long edge of pocket Rnd 2 along those marked stitches. That edge is the 22 sts between the corner markers. Whipstitch one pocket stitch to one backing stitch, 22 to 22, so there’s no easing.
- Back corners: Sew each back corner of the pocket straight up the backing, following stitch columns 2 and 23 to the top rim.
- Top rim: Tack the back of the top rim down at both corners and at the center so the pocket doesn’t pull forward.
2. Ring tab. Pass the tab through the wooden ring and fold it in half. Center it at the bottom of the backing so the panel’s bottom edge sits between the two layers. Sew the front layer to the front of the panel over Rows 1–4 and the border, and sew the back layer to the WS. The ring hangs freely below.
3. Hanging loop. Fold the cord in half. Lay the two ends on the WS of the arch, overlapping the top 1 in (2.5 cm), and sew them down securely. The loop stands about 2 in (5.1 cm) above the border.
Size checkpoint: the backing still measures 7 in × 11 in (17.8 cm × 27.9 cm), and the pocket sits centered, about 0.75 in (1.9 cm) in from each outer edge.
Final Blocking
- Wet-block the backing before you sew anything on, if you can. Soak it in cool water for 10 minutes, then gently press the water out with a towel.
- Pin it to 7 in × 11 in (17.8 cm × 27.9 cm). Line up the straight sides, and pin the arch into a smooth curve.
- Let it dry completely, which usually takes 12–24 hours.
- Stuff the pocket with a folded towel cut to 5.5 in × 1.5 in (14.0 cm × 3.8 cm) so it dries square. Lightly mist it with water.
- After assembly, steam lightly from about 1 in (2.5 cm) away to relax the seams. Don’t let the iron touch the fabric.
Final Quality-Control Checklist
- The backing measures 7 in × 11 in (17.8 cm × 27.9 cm).
- The arch is symmetrical, with 11 arch rows on each side.
- The border has 128 sts and lies flat, with no ruffling.
- The pocket has 56 sts in every round and crisp corners.
- The khdc V columns run straight up with no spiral.
- The pocket is centered over backing stitches 2–23.
- The ring tab holds the ring firmly and is sewn through both layers.
- The hanging loop is secure and carries the weight without stretching.
- All ends are woven in on the WS.
Troubleshooting
- The arch comes to a point. You decreased too early. Check that Rows 36–37, 39 and 41 have no decreases.
- The border ruffles. You have too many stitches on the arch. Use exactly 1 sc per row end.
- The border cups. Your tension is too tight. Go up half a hook size for the border only.
- The pocket walls slant. Make sure your join stitch lands in the first st each round. Don’t work into the ch-1.
- The khdc looks flat. Insert the hook through the center of the V below, not into the top loops.
- The pocket sags forward. Add more tacking stitches along the top rim corners.
- The pocket is too wide for the backing. Your khdc gauge is loose. Rework the walls with a smaller hook.
Care
Hand wash in cool water and lay flat to dry, reshaping the pocket while it’s damp. Take the wooden ring off before washing, or keep it out of the water.
Final Notes
Here’s the measurement chain:
- The backing is 24 sts × 45 rows, which makes 6 in × 10 in (15.2 cm × 25.4 cm).
- The 128-st, two-round border brings it to 7 in × 11 in (17.8 cm × 27.9 cm).
- The 22 × 6 pocket base becomes a 56-st round that rises to 4 in (10.2 cm).
- The pocket’s 22-st back edge sews 1:1 to 22 backing stitches.
If every checkpoint matches, the holder will hang straight and hold its shape for years. Happy crocheting!