
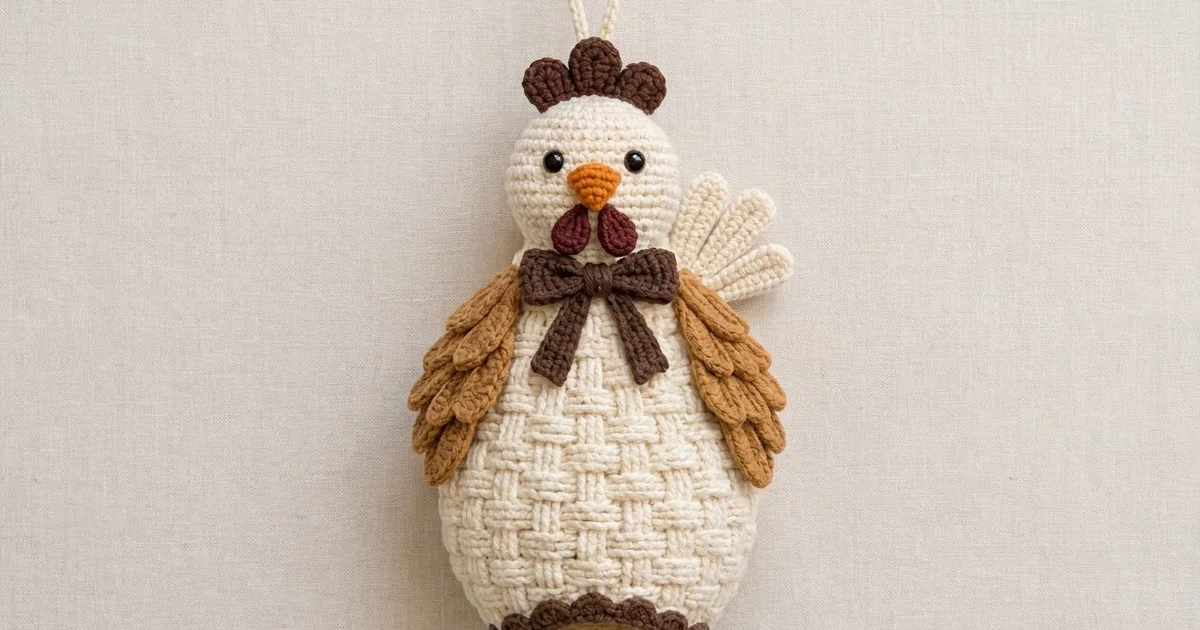
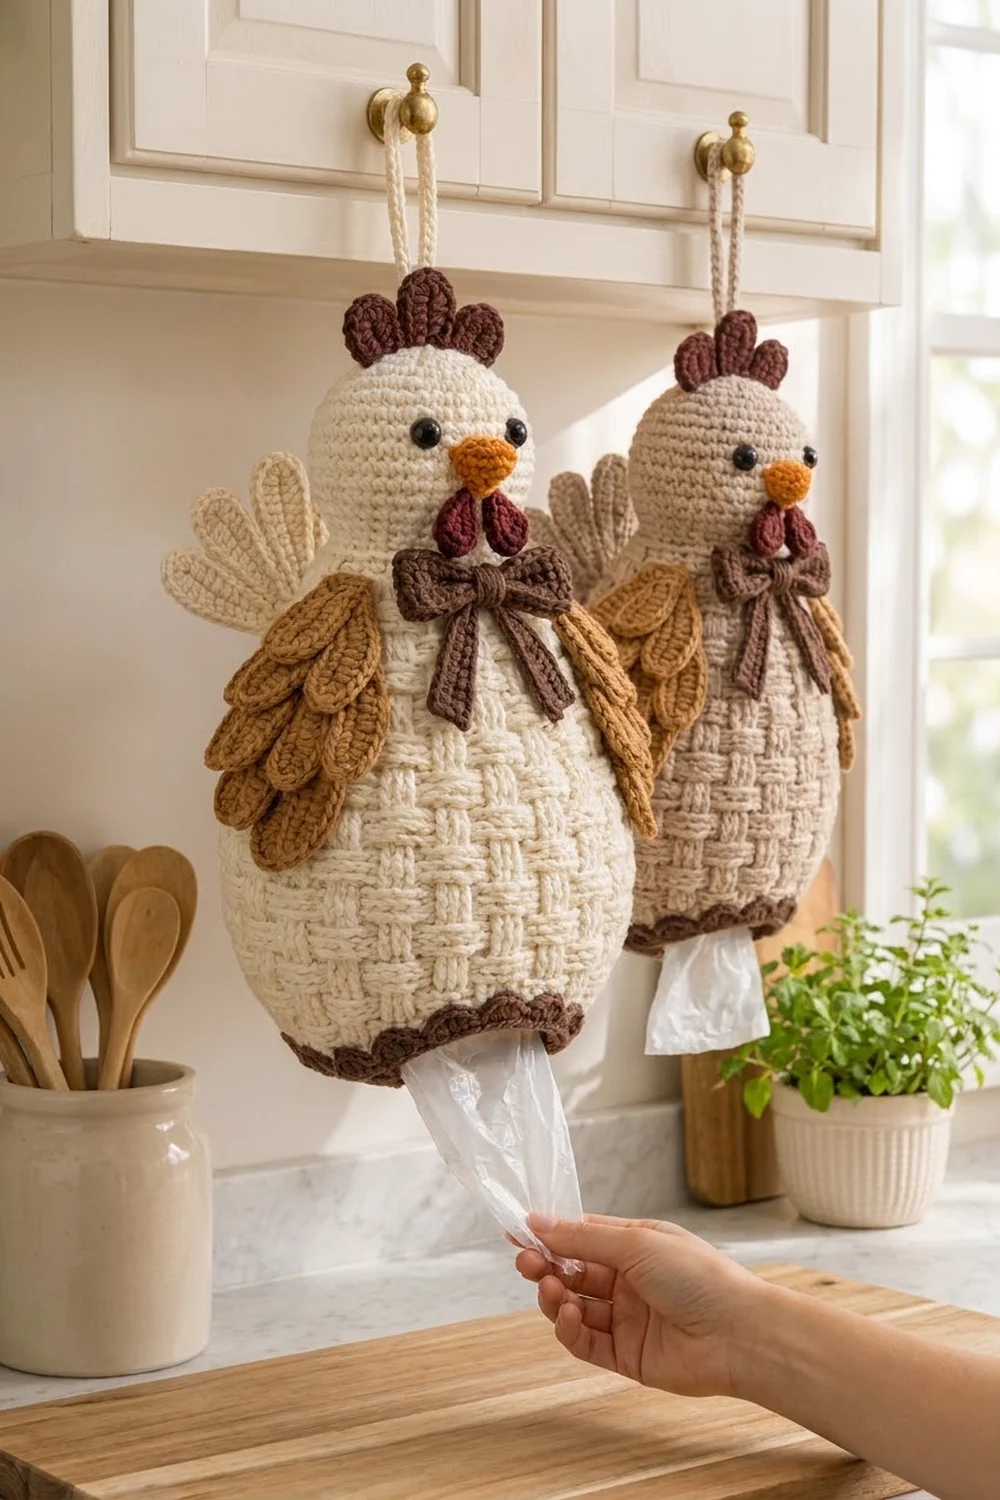
This hen is a working kitchen helper. Her teardrop body is covered in a deep basketweave texture, and a chocolate-brown scallop edges the bottom opening. Push bags in through the bottom, hang her on a hook, and pull them out one at a time.
The palette is warm farmhouse:
– Cream: body, head, tail, and loop
– Caramel: layered wings
– Chocolate brown: comb, bow, and border
– Orange: beak
– Burgundy: wattles
You can also make the body in beige.
The pattern uses US crochet terms. The finished hen is about 8 in (20.3 cm) wide at the widest part of the body, measured flat without the wings. She is about 14.75 in (37.5 cm) tall from the scallop tips to the top of the head, not counting the comb or loop.
The body is one piece worked in joined rounds:
1. Start at the bottom opening and increase to full width.
2. Work straight in basketweave.
3. Shape the shoulders by narrowing the weave blocks.
4. Finish with a short single crochet neck.
A stuffed sphere head closes the top. All the other parts are small flat pieces that you sew on.
Finished Size and Construction
- Finished size: 8 in (20.3 cm) wide x 14.75 in (37.5 cm) tall
- Skill level: Intermediate
- Terminology: US
- Yarn weight: Worsted (#4 medium)
- Hooks:
- 5.0 mm (H-8) for the body, wings, tail, and loop
- 4.0 mm (G-6) for the head, comb, beak, wattles, and bow
- Number of pieces: One holder, assembled from 13 crocheted parts
- Layout: The head is centered on the neck, the bow sits at the front, a wing is on each side, and the tail is at the back right.
- Body size: 16 in (40.6 cm) around at the widest point
- Size before border: The body is 11.25 in (28.6 cm) tall.
- Border depth: 0.75 in (1.9 cm), which makes the body 12 in (30.5 cm) tall
Materials
Choose a smooth, tightly plied worsted yarn in acrylic or a cotton blend. Fuzzy yarn hides the weave. The amounts below assume about 190 m per 100 g.
- Cream: 150 g / 285 m
- Caramel: 25 g / 48 m
- Chocolate brown: 25 g / 48 m
- Orange: 5 g / 10 m
- Burgundy: 5 g / 10 m
All quantities include a margin of about 15 percent.
Tools:
– 5.0 mm and 4.0 mm hooks
– two 10 mm black safety eyes
– about 25 g of fiberfill
– stitch markers
– tapestry needle
– pins
– scissors
– measuring tape
Abbreviations (US Terms)
- ch: chain
- sl st: slip stitch
- sc: single crochet
- hdc: half double crochet
- dc: double crochet
- FPdc: front post dc. Yarn over, insert the hook front to back to front around the post of the stitch below, and complete as a dc.
- BPdc: back post dc. Work like FPdc, but insert the hook back to front to back.
- FPdc2tog / BPdc2tog: Work 2 post stitches of that type, leaving the last loop of each on the hook. Yarn over and pull through all 3 loops.
- sc2tog: single crochet 2 together
- inc: 2 sc in the same stitch
- BLO / FLO: back loop only / front loop only
- MR: magic ring
Special stitch: Feather (F-N)
1. Ch N.
2. Work 4 hdc in the 2nd ch from the hook. This makes the rounded tip.
3. Dc in each of the next N−3 ch.
4. Sc in the last ch.
Each F-N has N+2 stitches. For example, F-13 is 4 hdc + 10 dc + 1 sc = 15 stitches.
Gauge and Checkpoints
Body gauge: 16 sts and 8 rnds = 4 in (10.2 cm) in basketweave in the round with the 5.0 mm hook. Each round is 0.5 in (1.3 cm) tall.
Head gauge: 18 sc = 4 in (10.2 cm) with the 4.0 mm hook.
The body is your test piece. Work through Rnd 7, check your gauge, then continue.
| After | Height | Size |
|---|---|---|
| Rnd 3 | — | 16 in (40.6 cm) around, 8 in (20.3 cm) flat |
| Rnd 11 | 5.5 in (14.0 cm) | — |
| Rnd 19 | 9.5 in (24.1 cm) | 6 in (15.2 cm) flat |
| Rnd 21 | 10.5 in (26.7 cm) | 4 in (10.2 cm) flat |
| Rnd 24 | 11.25 in (28.6 cm) | — |
If your piece is too big, use a hook 0.5 mm smaller. If it’s too small, use a hook 0.5 mm larger. Don’t change the stitch counts, because the weave blocks rely on exact multiples.

Body
Use cream and the 5.0 mm hook. Join each round with a sl st to the first stitch. The ch 2 at the start of a round doesn’t count as a stitch. Don’t turn.
Foundation: Ch 32 and join into a ring without twisting. This is the bottom opening. It is about 2.5 in (6.4 cm) across when rounded.
Rnd 1: Ch 2, dc in each ch around. (32 dc)
Rnd 2: Ch 2, dc in next st, 2 dc in next st; repeat around. (48 dc)
Rnd 3: Ch 2, dc in next 2 sts, 2 dc in next st; repeat around. (64 dc) These flaring rounds make the rounded base.
Rnd 4 (conversion round): Ch 2, FPdc in next 4 sts, BPdc in next 4 sts; repeat around. (64 worked 1-per-stitch + 0 added = 64 sts; 8 blocks)
Rnd 5: Ch 2, FPdc in next 4 sts, BPdc in next 4 sts; repeat around. (64)
Rnds 6–7: Ch 2, BPdc in next 4 sts, FPdc in next 4 sts; repeat around. (64) The raised and recessed blocks now swap places, which creates the weave.
Rnds 8–15: Repeat Rnds 4–7 twice. (64)
Rnd 16 (shoulder decrease): Ch 2, FPdc in next 2 sts, FPdc2tog, BPdc in next 2 sts, BPdc2tog; repeat around. (48 sts; each 8-st repeat becomes 6)
Rnd 17: Ch 2, FPdc in next 3 sts, BPdc in next 3 sts; repeat around. (48)
Rnds 18–19: Ch 2, BPdc in next 3 sts, FPdc in next 3 sts; repeat around. (48)
Rnd 20: Ch 2, FPdc in next st, FPdc2tog, BPdc in next st, BPdc2tog; repeat around. (32 sts; each 6-st repeat becomes 4)
Rnd 21: Ch 2, FPdc in next 2 sts, BPdc in next 2 sts; repeat around. (32)
The blocks narrow from 4 stitches to 3 to 2, so the weave stays unbroken while the body tapers into a teardrop.
Rnd 22 (neck): Ch 1, sc in next 2 sts, sc2tog; repeat around. (24 sc)
Rnds 23–24: Ch 1, sc in each st around. (24) Fasten off.
The neck is 3 in (7.6 cm) wide laid flat.
Head
Use cream and the 4.0 mm hook. Work in a continuous spiral and mark the first stitch of each round.
- Rnd 1: 6 sc in MR. (6)
- Rnd 2: Inc in each st around. (12)
- Rnd 3: Sc 1, inc; repeat around. (18)
- Rnd 4: Sc 2, inc; repeat around. (24)
- Rnd 5: Sc 3, inc; repeat around. (30)
- Rnd 6: Sc 4, inc; repeat around. (36)
- Rnd 7: Sc 5, inc; repeat around. (42)
- Rnd 8: Sc 6, inc; repeat around. (48) The flat circle should be about 3.5 in (8.9 cm) across.
- Rnds 9–15: Sc in each st around. (48)
- Rnd 16: Sc 6, sc2tog; repeat around. (42)
- Rnd 17: Sc 5, sc2tog; repeat around. (36)
- Rnd 18: Sc 4, sc2tog; repeat around. (30)
- Rnd 19: Sc 3, sc2tog; repeat around. (24)
Before you continue, insert the eyes between Rnds 11 and 12, with 7 sts between them. Stuff the head firmly.
- Rnd 20: Sc 2, sc2tog; repeat around. (18)
- Rnd 21: Sc 1, sc2tog; repeat around. (12)
- Rnd 22: Sc2tog around. (6)
Close the opening and leave a long tail for sewing.
Small Parts
Use the 4.0 mm hook unless another hook is given.
Comb (chocolate brown)
– Ch 8.
– Row 1: Sc in 2nd ch from hook and in each ch across. (7)
– Row 2: Ch 1, turn. Sl st in first st, then [5 dc in next st, sl st in next st] 3 times. (3 lobes; 15 dc + 4 sl st = 19 sts)
The comb is about 2 in (5.1 cm) wide.
Beak (orange)
– Ch 5.
– Row 1: Sc in 2nd ch from hook and in each ch across. (4)
– Row 2: Ch 1, turn, sc2tog, sc 2. (3)
– Row 3: Ch 1, turn, sc2tog, sc 1. (2)
– Row 4: Ch 1, turn, sc2tog. (1)
The beak is a triangle about 1 in (2.5 cm) tall.
Wattles (burgundy, make 2)
1. Ch 5.
2. Sl st in 2nd ch from hook.
3. Sc in next ch, hdc in next ch, then 5 dc in last ch.
4. Working along the other side of the chain, hdc, sc, sl st. (11 sts)
Each wattle is a teardrop about 1 in (2.5 cm) long.
Bow (chocolate brown)
– Band: Ch 30 and join into a ring without twisting. Rnds 1–5: Sc in each st around. (30) Flatten so the join sits at the center back. The band is about 3.25 in (8.3 cm) wide.
– Tails: Ch 21. Row 1: Sc in 2nd ch from hook and in each ch across. (20) Row 2: Ch 1, turn, sc across. (20) Fold the strip into an upside-down V.
– Center: Ch 6. Row 1: Sc in 2nd ch from hook and in each ch across. (5) Rows 2–4: Ch 1, turn, sc across. (5)
To assemble, pinch the band at the middle. Wrap the center around the band and the point of the tails, then sew it closed at the back.
Wings (caramel, 5.0 mm hook, make 2)
– Row 1 (shoulder): Ch 11. Sc in 2nd ch from hook and in each ch across. (10)
– Row 2 (long feathers): Ch 1, don’t turn. Sl st in BLO of first sc. F-13, sl st in BLO of next 2 sc; repeat from * 3 more times. F-13, sl st in BLO of last sc. (5 feathers of 15 sts each; 10 sl st)
– Row 3 (short feathers): Work back across the unused front loops. Sl st in next 2 FLO. F-9, sl st in next 2 FLO; repeat from * 3 more times. (4 feathers of 11 sts each; 10 sl st)
The short feathers lie on top of the long ones, in the gaps between them, so each wing has two stacked tiers. Each wing is about 2.5 in (6.4 cm) wide x 3.75 in (9.5 cm) long.
Tail (cream, 5.0 mm hook)
– Row 1: Ch 6. Sc in 2nd ch from hook and in each ch across. (5)
– Row 2: Ch 1, turn. [Sl st in next sc, then work a feather] 5 times. Use F-9, F-11, F-13, F-11, F-9, in that order. (Feathers of 11, 13, 15, 13, and 11 sts)
The tail fan is about 3 in (7.6 cm) tall.
Loop (cream, 5.0 mm hook)
– Ch 41.
– Row 1: Sc in 2nd ch from hook and in each ch across. (40)
The strip is 10 in (25.4 cm) long. Folded in half, it makes a loop 5 in (12.7 cm) tall.
Make All Pieces
| Color | Parts | Count |
|---|---|---|
| Cream | body, head, tail, loop | 4 |
| Caramel | wings | 2 |
| Chocolate brown | comb, bow band, bow tails, bow center | 4 |
| Orange | beak | 1 |
| Burgundy | wattles | 2 |
That’s 13 parts in total.
            [ loop ]
            [ comb ]
        [ head + eyes ]
            [ beak ]
          [ wattles ]
[ wing ]    [  bow  ]    [ wing ] [tail, behind]
       [ basketweave body ]
       [ scalloped border ]
Joining
Sew every part on with whipstitch in matching yarn.
Head: Place the head on the neck with Rnd 1 facing up and the eyes facing front. Sew each of the 24 neck stitches to one head stitch, spaced evenly around Rnds 18–19 of the head. This closes the top of the body. The head overlaps the neck by about 0.75 in (1.9 cm).
Face: Center the beak point-down just below the eyes. Sew the two wattles side by side under the beak.
Comb and loop: Sew the comb upright across Rnds 1–4 of the head. Sew both ends of the loop just behind the comb, through several stitches so it can carry weight.
Bow, wings, and tail:
– Sew the bow at Rnds 20–21 on the front of the body.
– Pin each wing by its Row 1 to the side of the body at Rnds 17–19, angled slightly back. Sew along the shoulder only so the feathers hang free.
– Sew the tail by its Row 1 at the back right, also at Rnds 17–19.
Tension: Keep your stitches snug but not tight. Pulling too hard flattens the weave.
Size checkpoint: After joining, the body should still measure 8 in (20.3 cm) wide at Rnd 10.
Border
Border gauge: Use the 5.0 mm hook. The scallop round is 0.5 in (1.3 cm) deep, and the whole border is 0.75 in (1.9 cm) deep.
Turn the body upside down. Join chocolate brown in the free loops of the foundation chain.
Rnd 1 (conversion round): Ch 1, sc in next ch, 2 sc in next ch; repeat around. Sl st to join. (32 worked 1-per-stitch + 16 added = 48 sc; 24 sc per side laid flat)
Rnd 2: Sc in next st, skip 1, 5 dc in next st, skip 1; repeat around. Sl st to join. (12 scallops; 12 sc + 60 dc = 72 sts; 6 scallops per side)
Fasten off and weave in the ends.
Why the math works:
– Each scallop uses exactly 4 stitches, and 48 ÷ 4 = 12, so nothing is left over.
– The 16 added stitches let the scallops flare outward instead of cupping.
– Rnd 1 is worked into the unchanged 32-chain foundation, so the opening stays the same size.
Final Blocking
- Lightly mist the wings, tail, bow, and comb.
- Pin them flat with the feathers evenly spread.
- Fill the body loosely with a rolled towel to round out the teardrop. Don’t press the weave.
- Pin the scallops so they point evenly downward, then mist them.
- Let everything dry overnight, then remove the towel and pins.
Final Quality-Control Checklist
- The widest part of the body has 64 sts, in 4-stitch blocks.
- The shoulders go from 48 to 32 sts, and the neck has 24 sts.
- The weave switches every 2 rounds with no broken columns.
- The eyes are level and secure, with 7 sts between them.
- The border has 12 even scallops.
- The loop is firmly anchored.
- The hen measures 8 in (20.3 cm) x 14.75 in (37.5 cm).
Troubleshooting
- The weave looks flat: Your post stitches are too tight. Go up a hook size.
- Your count is off after a decrease round: Check each repeat. Rnd 16 should have 6 sts per repeat, and Rnd 20 should have 4.
- The blocks drift into a spiral: Always work the first stitch of each round into the same stitch as the join.
- The border ruffles: Work Rnd 2 with a hook 0.5 mm smaller.
- The head wobbles: Add stuffing and sew a second pass around the neck.
Care
Hand wash in cool water and lay flat to dry. Reshape the scallops and feathers while the piece is damp.
Final Notes
Here’s how the measurements build on each other:
1. 32 foundation stitches make an opening about 2.5 in (6.4 cm) across.
2. 64 stitches make the body 8 in (20.3 cm) wide.
3. The shoulders taper to 48 sts and then 32, and the neck has 24.
4. The body is 11.25 in (28.6 cm) tall before the border and 12 in (30.5 cm) after.
5. The 3.5 in (8.9 cm) head brings the hen to 14.75 in (37.5 cm).
Check your gauge at Rnd 7 and every later number will follow.
Happy crocheting!