

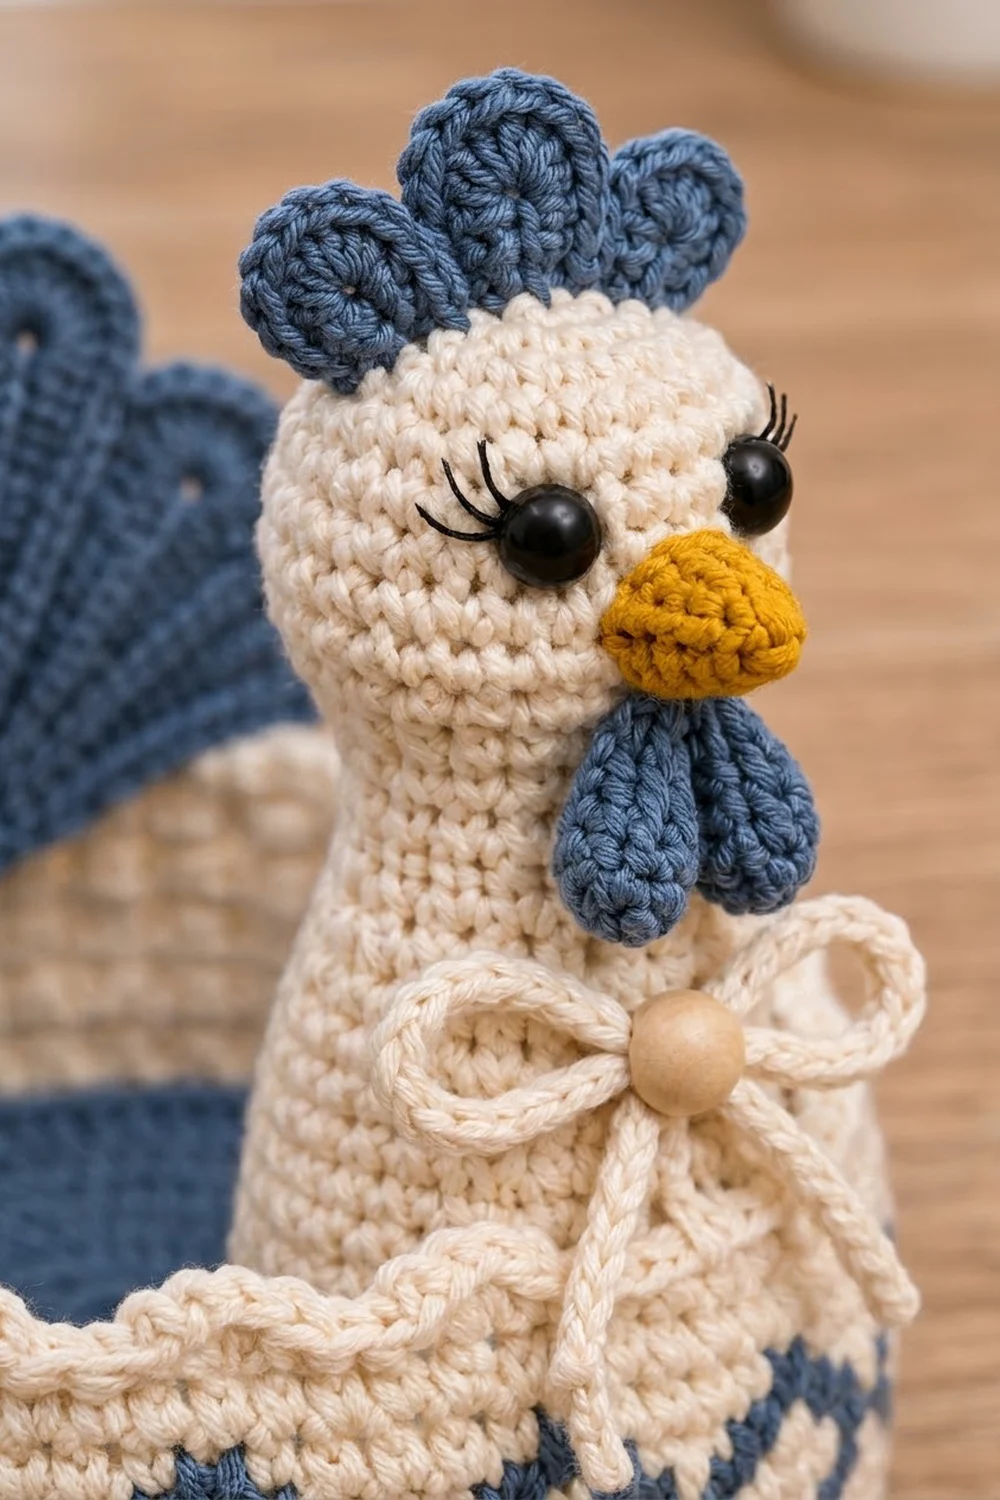
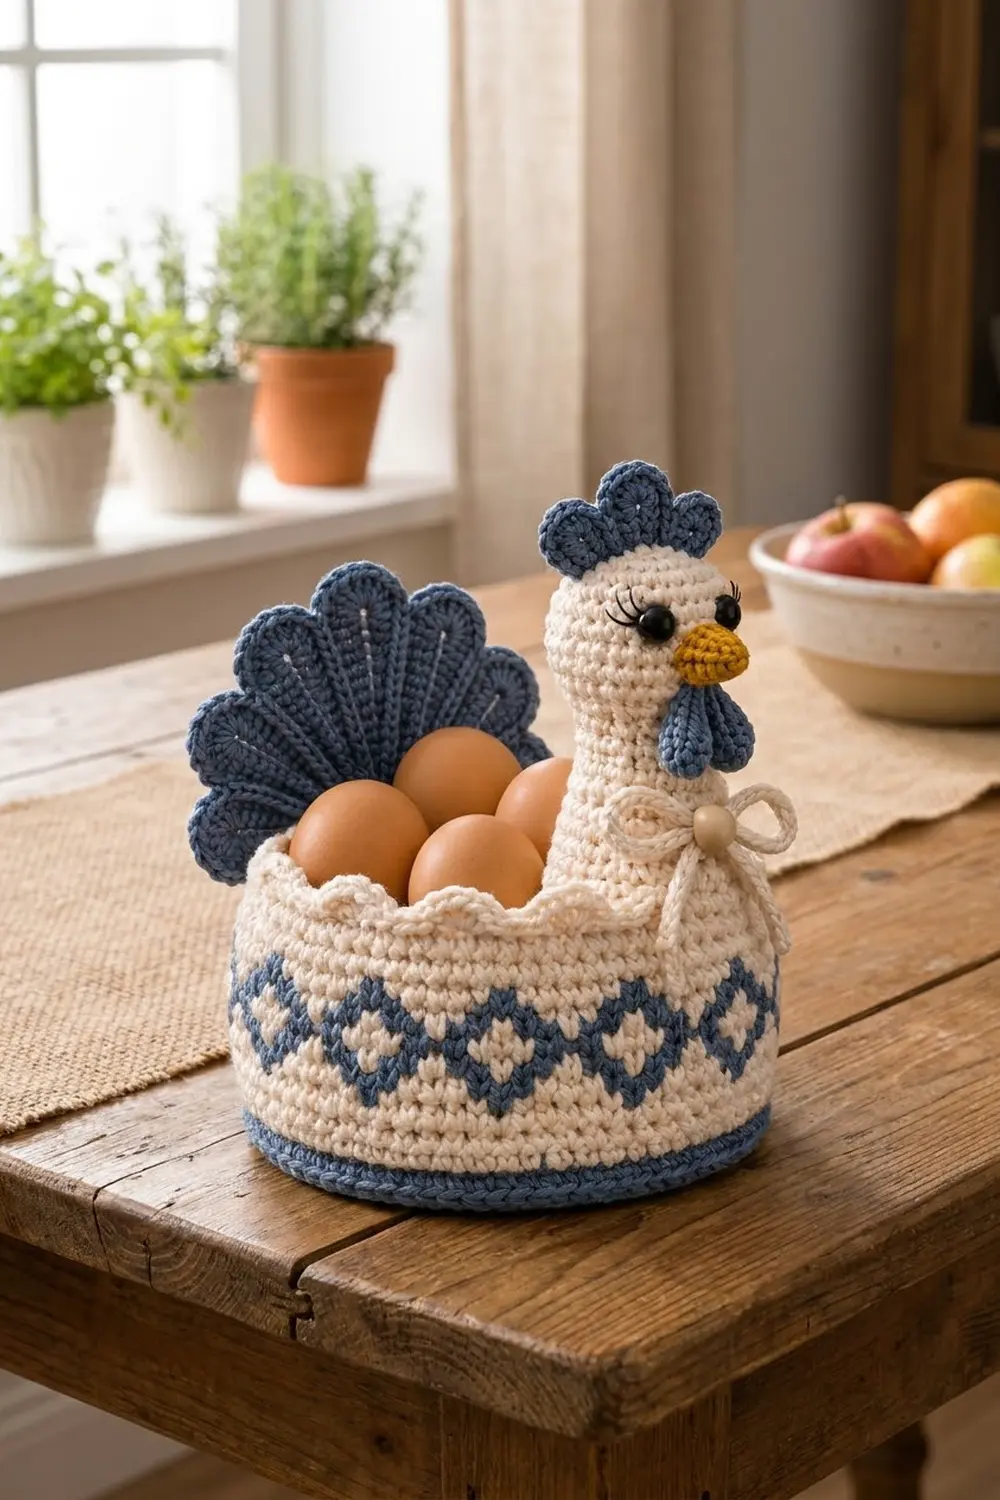
The Bluebell Hen is a small oval egg basket shaped like a sitting hen. A cream head and neck stand up at one end, a dusty-blue fan tail rises at the other, and a band of blue diamonds runs around the middle of the basket wall.
The colors are soft and farmhouse-style: cream for the body, head and bow, dusty denim blue for the base, tail, comb and wattles, and a mustard beak. Black safety eyes with stitched lashes and a wooden bead in the bow finish the face.
This pattern uses US crochet terms. The finished basket is about 7.25 in (18.4 cm) long, 4 in (10.2 cm) wide and 4 in (10.2 cm) tall at the rim. The hen stands about 9.75 in (24.8 cm) tall at the top of the comb.
You crochet an oval base first. Then you work the walls upward in a continuous spiral, using tapestry crochet for the diamonds. The head and neck are one stuffed tube, the tail is a flat fan worked in rows, and the small face pieces are made separately. Everything is sewn on at the end, and a cord bow is tied around the neck.
Finished Size and Construction
- Finished size: 7.25 x 4 in (18.4 x 10.2 cm) base; walls 4 in (10.2 cm) tall; 9.75 in (24.8 cm) overall height
- Skill level: Intermediate (tapestry crochet, amigurumi shaping)
- Terminology: US
- Yarn weight: Worsted (#4) cotton
- Hook: 4.0 mm (G-6)
- Number of pieces: 8 crocheted pieces sewn into one basket (body, head/neck, tail, comb, beak, 2 wattles, bow cord)
- Layout: head and neck at one narrow end, tail at the opposite narrow end
- Piece sizes: head/neck 6 in (15.2 cm) tall; tail 5.5 in (14.0 cm) wide x 2.75 in (7.0 cm) tall
- Wall height before border: 3.3 in (8.4 cm)
- Border depth: 0.7 in (1.8 cm)
Materials
Choose a smooth worsted-weight cotton or cotton blend. Cotton keeps the walls firm and the diamonds crisp. A yarn of about 190 m per 100 g suits the gauge below.
- Dusty blue (B): 50 g, about 95 m
- Cream (C): 70 g, about 133 m
- Mustard (M): 5 g, about 10 m
- Black embroidery floss: about 1 m, for the eyelashes
These amounts include a margin of about 25 percent for your gauge swatch and for the yarn carried inside the stitches during tapestry crochet.
Tools and notions:
- 4.0 mm (G-6) crochet hook
- Pair of 10 mm black safety eyes
- One 16 mm wooden bead
- About 20 g polyester fiberfill
- Stitch markers, tapestry needle, pins and scissors
Abbreviations (US Terms)
- ch – chain
- sl st – slip stitch
- sc – single crochet
- hdc – half double crochet
- dc – double crochet
- tr – treble crochet
- inc – 2 sc in the same stitch
- dec – sc2tog (an invisible decrease through the front loops is recommended)
- BLO – back loop only
- MR – magic ring
- sk – skip
- st(s) – stitch(es)
- Rnd – round
- FO – fasten off
Special technique – tapestry color change: Work the last sc before a color change until 2 loops remain on the hook. Yarn over with the new color and pull through. Lay the unused color along the tops of the stitches and work over it, so it is hidden inside the stitches.
Gauge and Checkpoints
Gauge: 16 sc x 18 rnds = 4 in (10.2 cm) in sc worked in the round. One sc is 0.25 in (0.6 cm) wide, and one rnd is about 0.22 in (0.6 cm) tall.
Make the base first and use it as your test piece. Every other measurement in the pattern depends on it.
- After Rnd 5 of the base: about 2.2 x 5.5 in (5.6 x 14.0 cm)
- After Rnd 9 of the base: 4 x 7.25 in (10.2 x 18.4 cm), lying flat
- After Rnd 14: 1.1 in (2.8 cm) of wall above the base
- After Rnd 21 (diamond band finished): 2.7 in (6.9 cm) of wall
- After Rnd 24: 3.3 in (8.4 cm) of wall
- After head Rnd 10: head 2.4 in (6.1 cm) across
If your base comes out too big, go down 0.5 mm. If it comes out too small, go up 0.5 mm. Tapestry crochet often works up tighter, so if the diamond band pulls in, go up one hook size for Rnds 15–21 only.
Pattern
Part 1: Oval Base (B)
Work in continuous spiral rnds. Mark the first st of each rnd.
Foundation: With B, ch 16.
Rnd 1: Sc in 2nd ch from hook, sc in next 13 ch, 3 sc in last ch. Turn the work and continue along the other side of the chain: sc in next 13 ch, 2 sc in the first ch (it already has 1 sc). (32 sts: 13 on each long side, 3 at each end)
Rnd 2: Sc 13, inc in next 3 sts twice. (38)
Rnd 3: Sc 13, (sc 1, inc) 3 times twice. (44)
Rnd 4: Sc 13, (sc 2, inc) 3 times twice. (50)
Rnd 5: Sc 13, (sc 3, inc) 3 times twice. (56)
Rnd 6: Sc 13, (sc 4, inc) 3 times twice. (62)
Rnd 7: Sc 13, (sc 5, inc) 3 times twice. (68)
Rnd 8: Sc 13, (sc 6, inc) 3 times twice. (74)
Rnd 9: Sc 13, (sc 7, inc) 3 times twice. (80: 13 on each long side, 27 at each end)
Each rnd adds 6 sts, all of them at the curved ends. The base should lie flat.
Part 2: Walls and Diamond Band
Rnd 10 (B): Sc in BLO of each st around. (80) Working in the back loops makes a crisp ridge where the wall turns up from the base.
Rnds 11–12 (B): Sc around. (80) At the end of Rnd 12, change to C using the tapestry color change.
Rnds 13–14 (C): Sc around, carrying B inside the stitches. (80)
The diamond band is an 8-st repeat, worked 10 times around (80 ÷ 8 = 10). Keep carrying the unused color the whole way.
Rnd 15: C 3, B 1, C 4 10 times. (80: 10 B, 70 C)
Rnd 16: C 2, B 3, C 3 10 times. (80: 30 B, 50 C)
Rnd 17: C 1, B 2, C 1, B 2, C 2 10 times. (80: 40 B, 40 C)
Rnd 18: B 2, C 3, B 3 10 times. (80: 50 B, 30 C)
Rnd 19: Repeat Rnd 17.
Rnd 20: Repeat Rnd 16.
Rnd 21: Repeat Rnd 15. Cut B, leaving a 6 in (15.2 cm) tail to weave in.
This makes blue diamonds with cream centers. On Rnd 18, the blue sts at the end of each repeat run into the blue sts at the start of the next, so the diamonds touch point to point.
Rnds 22–24 (C): Sc around. (80) Keep the start of the rnd at one narrow end, where the neck will hide the small jog in the spiral. Do not fasten off. Work the Rim Border next, before any sewing.
Part 3: Head and Neck (C)
Work in continuous spiral rnds, starting at the top of the head.
Rnd 1: 6 sc in MR. (6)
Rnd 2: Inc in each st. (12)
Rnd 3: (Sc 1, inc) 6 times. (18)
Rnd 4: (Sc 2, inc) 6 times. (24)
Rnd 5: (Sc 3, inc) 6 times. (30)
Rnds 6–10: Sc around. (30)
Put the safety eyes in between Rnds 7 and 8 on the front of the head, with 6 sts between them.
Rnd 11: (Sc 3, dec) 6 times. (24)
Rnd 12: (Sc 2, dec) 6 times. (18) Stuff the head firmly.
Rnds 13–22: Sc around. (18) Stuff the neck firmly as you go.
Rnd 23: (Sc 2, inc) 6 times. (24)
Rnd 24: (Sc 3, inc) 6 times. (30)
Rnds 25–27: Sc around. (30) FO, leaving a 20 in (50.8 cm) tail.
Don’t stuff the flare (Rnds 23–27). It has to stay open so it can fit over the rim. The finished piece is 6 in (15.2 cm) tall.
Part 4: Fan Tail (B)
Work in rows, turning at the end of each row.
Row 1: Ch 4, 11 dc in 4th ch from hook. Turn. (12 sts, counting the skipped ch as the first dc)
Row 2: Ch 3 (counts as dc), dc in the same st, 2 dc in each remaining st. Turn. (24)
Row 3: Ch 3 (counts as dc), dc in the same st, (dc in next st, 2 dc in next st) 11 times, 2 dc in last st. Turn. (37: 2 + 33 + 2)
Row 4 (lobes): Ch 1, sc in first st, sk 2, 9 tr in next st, sk 2, sc in next st 6 times. Turn. (6 lobes: 7 sc + 54 tr) Each repeat uses 6 sts, and 1 + (6 x 6) = 37.
Row 5 (outline): Ch 1, sl st in first sc, sc in next 3 tr, 2 sc in each of next 3 tr, sc in next 3 tr, sl st in next sc 6 times. (72 sc + 7 sl st) FO, leaving a 16 in (40.6 cm) tail.
The dc and tr columns spread out from the center to give the ribbed look, and Row 5 firms up the edge of each rounded lobe.
Part 5: Comb, Beak and Wattles
Comb (B): Ch 10. Sl st in 2nd ch from hook, 5 dc in next ch, sl st in next ch 4 times. (25 sts, 4 scallops) FO, leaving a tail. The comb is 2 in (5.1 cm) wide and 0.75 in (1.9 cm) tall.
Beak (M): Rnd 1: 4 sc in MR. (4) Rnd 2: (Sc 1, inc) twice. (6) Rnd 3: (Sc 1, inc) 3 times. (9) Rnd 4: Sc around. (9) FO, leaving a tail. Stuff lightly.
Wattles (B, make 2): Ch 6. Starting in 2nd ch from hook: sc, hdc, dc, dc, 5 dc in last ch. Continue along the other side of the chain: dc, dc, hdc, sc. (13 sts) FO, leaving a tail.
Part 6: Bow Cord (C)
Ch 90. Sl st in the back bump of each ch back to the start. (89 sl st) FO. The cord is about 18 in (45.7 cm) long.
Make All Pieces
- Blue (B): base and lower walls (part of the body), 1 tail, 1 comb, 2 wattles
- Cream (C): upper walls and rim (part of the body), 1 head/neck, 1 bow cord
- Mustard (M): 1 beak
Layout from above:
[TAIL] ===== oval basket body ===== [HEAD/NECK]
 back end       7.25 x 4 in          front end
           (18.4 x 10.2 cm)
Joining
Finish the Rim Border before you sew anything. Sew with the matching yarn tails, a tapestry needle and a firm whipstitch.
Neck: Center the open flare over the middle of one narrow end, so the wall runs straight through the opening. Fifteen of the flare’s 30 edge sts sit outside the wall and 15 sit inside. Pin the lowest point of the flare 1 in (2.5 cm) below the top of the rim. Sew one whipstitch into each flare st, catching one wall st at the same height each time.
Tail: Place the straight edge of the tail (the row ends of Rows 1–3) against the inside of the other narrow end. The lowest point should sit 0.75 in (1.9 cm) below the rim, with the lobes fanning up and out. Whipstitch along the straight edge, with one stitch per row end and one through the center ring.
Face: Sew the comb along the center line on top of the head, from Rnd 1 to Rnd 4, with the scallops standing up. Sew the beak centered just below the eyes, across Rnds 8–10. Sew the two wattles side by side just under the beak. With black floss, stitch 3 short lashes at the upper outer edge of each eye.
Bow: Wrap the cord around the base of the neck at rim level and tie a bow toward the front. Thread the bead onto a short length of C and sew it through the knot.
Keep the sewing snug but even. If the fabric dimples, your stitches are too tight; if you can see gaps, they are too loose. Checkpoint: the hen should measure about 9.75 in (24.8 cm) from the table to the top of the comb.
Rim Border
The border uses the same gauge as the body: 4 sc per 1 in (2.5 cm). Each scallop uses 4 sts, about 1 in (2.5 cm) of rim. The rim is an oval with no corners, so the counts are given per rnd and per section: 13 sts on each long side and 27 at each end, as set in Rnd 9.
Rnd 25 (C): Sc around, then sl st to the first sc to close off the spiral. (80: 13 per long side, 27 per end)
Rnd 26 (C): Ch 1, sc in next st, sk 1, 3 dc in next st, sk 1 20 times, sl st to first sc. (80 sts: 20 sc + 60 dc; 20 scallops) FO and weave in the end.
Why the math works: 80 ÷ 4 = 20, so the scallops repeat evenly with none cut short. Each repeat uses 4 sts and makes 4 sts, so the rim stays at 80 sts and neither flares nor pulls in. The border adds 0.7 in (1.8 cm), bringing the walls to 4 in (10.2 cm).
Final Blocking
- Weave in all ends.
- Stuff a rolled hand towel into the basket so the walls stand straight.
- Mist the body with water, or hold a steam iron just above it. Don’t press, and keep steam away from the safety eyes.
- Shape the oval by hand, keeping the long sides 4 in (10.2 cm) apart.
- Mist the tail and pin it flat on a towel, spreading each lobe evenly.
- Let everything dry completely, then take out the towel.
Final Quality-Control Checklist
- The base lies flat at 4 x 7.25 in (10.2 x 18.4 cm)
- Every wall rnd has 80 sts, with 10 evenly spaced diamonds
- No blue shows through the cream sections
- The rim has 20 even scallops
- The neck stands upright and the head faces forward
- The eyes are level and secure, and the beak is centered
- The tail stands upright with all 6 lobes showing
- The bow is tied firmly and the bead is sewn on
- All ends are woven in
Troubleshooting
- Base cups: The increases are too tight. Go up a hook size, and check that each rnd adds exactly 6 sts.
- Base ruffles: There are extra sts. Recount: Rnd 9 must have 80.
- Walls flare outward: Make sure Rnd 10 is worked in BLO, and keep your tension even through the colorwork.
- Diamonds don’t line up: Recount to 80 sts. Each rnd needs exactly 10 repeats of 8.
- Carried yarn shows: Keep the carried strand at the back of the stitch tops, and give it a gentle tug every few sts.
- Neck flops: Add stuffing down to Rnd 22, or sew the flare higher on the wall.
- Tail curls: Wet-block it flat. If it still curls, work Row 5 more loosely.
Care
Hand wash in cool water with mild soap, then press out the water with a towel. Reshape the basket and let it dry with a towel inside.
Final Notes
Every measurement in this pattern follows from the gauge. At 16 sc per 4 in (10.2 cm), the 80-st base measures 4 x 7.25 in (10.2 x 18.4 cm). Fifteen wall rnds bring the wall to 3.3 in (8.4 cm), and the scallop border finishes it at 4 in (10.2 cm). The 6 in (15.2 cm) head and neck, the 5.5 in (14.0 cm) tail and the small face pieces bring the hen to 9.75 in (24.8 cm) tall. Check each stage before you move on and your basket will come out to these sizes.
For a second hen, swap the blue for a rust shade.
Happy crocheting!