

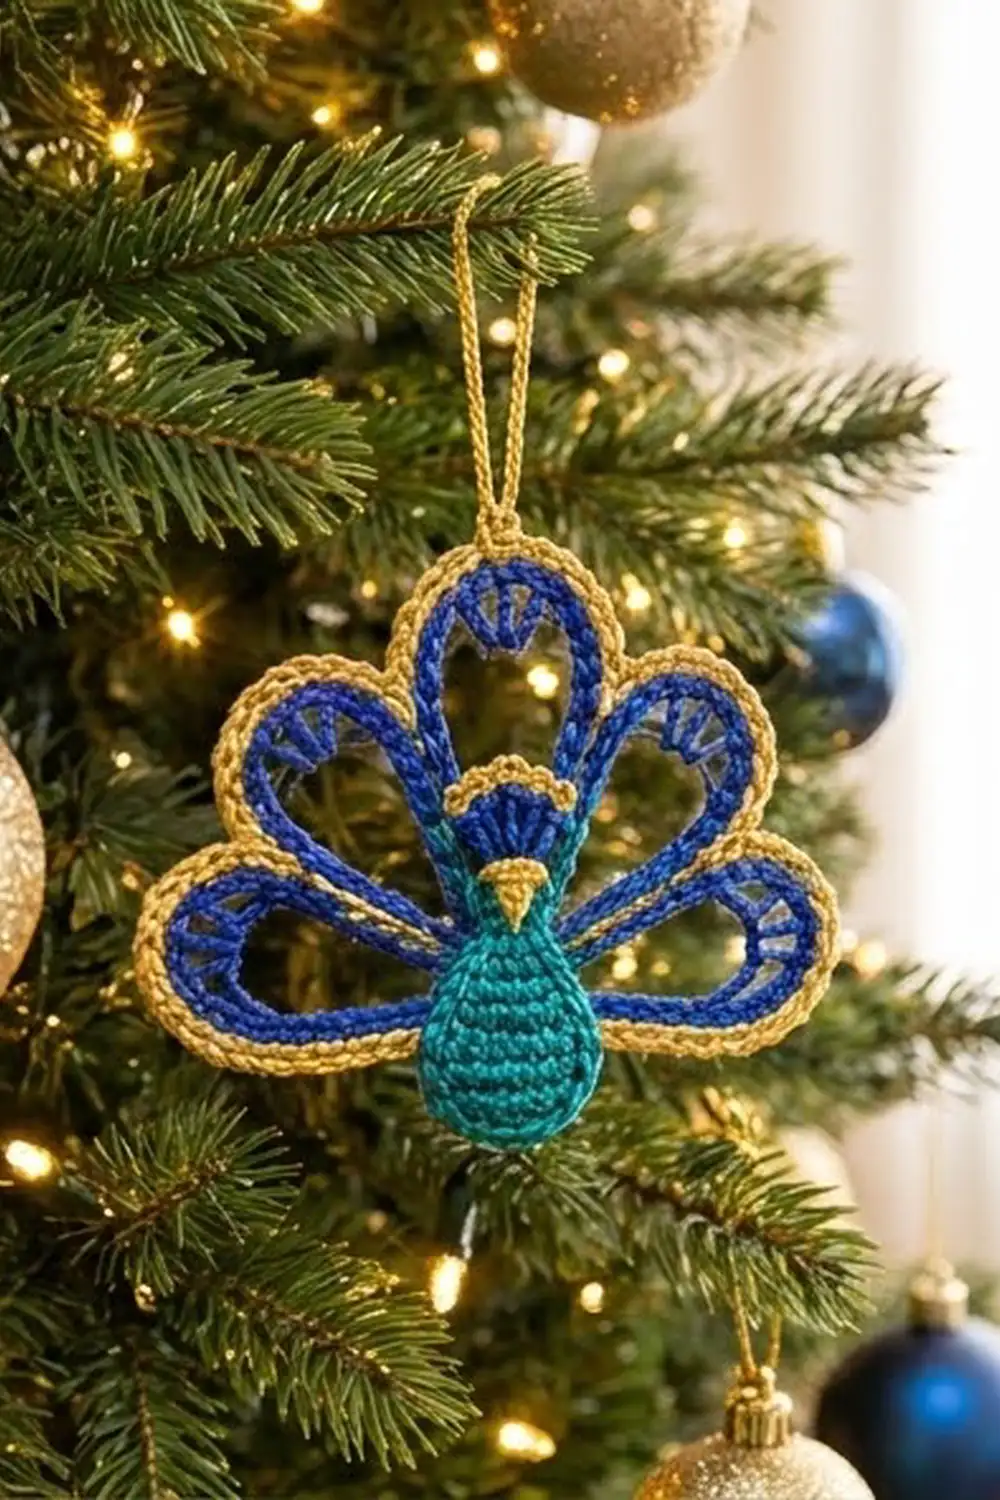
The Royal Plume Peacock is a small, lacy Christmas ornament with a solid teal body and five open tail feathers fanned around it. Each feather is a simple chain loop. A royal-blue band and a little fan of blue “eye” spokes bring it to life, and a twisted gold edge outlines the whole tail.
The palette is teal, royal blue and gold, which looks rich against green branches and warm lights. The style is light and airy, a bit like lace. It still holds its shape well because it is worked in mercerized cotton.
This pattern uses US crochet terms. The finished ornament measures about 4.5 in (11.4 cm) wide and 3.5 in (8.9 cm) tall, not counting the hanging loop.
Construction is simple and done in order. First you work the teardrop body in the round around a foundation chain. Next you chain the five feather loops right off the body’s edge. Then you add the blue eye fans and the blue outer band, followed by the collar and crest. Finally you work a gold reverse single crochet edge and the hanging loop.
Finished Size and Construction
- Finished size: 4.5 in (11.4 cm) wide x 3.5 in (8.9 cm) tall
- Skill level: Intermediate (you need to work into chain loops and do reverse sc)
- Terminology: US
- Yarn weight: Fine (2) / sport-weight mercerized cotton
- Hook: US C-2 (2.75 mm)
- Number of pieces: 1 (single motif)
- Layout: Teardrop body with five feather loops fanned above it
- Body size: 1.25 in (3.2 cm) wide x 1.5 in (3.8 cm) tall
- Size before border: 4.25 in (10.8 cm) wide x 3.375 in (8.6 cm) tall
- Border depth: about 0.125 in (0.3 cm) of gold reverse sc
Materials
Yarn: Use a smooth, mercerized sport-weight cotton. The shine shows off the stitch definition, and cotton keeps the open loops crisp. Wool or acrylic will give a softer, fuzzier peacock.
- Teal: 5 g, about 15 m (body and feather loops)
- Royal blue: 4 g, about 12 m (eye fans, feather band, crest)
- Gold: 4 g, about 12 m (collar, beak, border, hanging loop)
These quantities include a safety margin of about 30%.
Tools:
– US C-2 (2.75 mm) crochet hook
– Tapestry needle
– Scissors
– Stitch markers (2–3)
– Blocking mat and rust-proof pins
– Spray bottle with water
– Optional: diluted fabric stiffener
Abbreviations (US Terms)
- ch – chain
- sl st – slip stitch
- sc – single crochet
- hdc – half double crochet
- dc – double crochet
- rsc – reverse single crochet (crab stitch)
- BLO / FLO – back loop only / front loop only
- st(s) – stitch(es)
- RS – right side
Reverse single crochet (rsc): Work from left to right (left-handers work right to left). Insert the hook into the next stitch to the right, yarn over, pull up a loop, yarn over and draw through both loops. This makes the twisted, rope-like gold edge. “2 rsc in next st” means you work two rsc into the same stitch.
Gauge and Checkpoints
Gauge: 13 sc x 14 rows = 2 in (5.1 cm) in sc with the 2.75 mm hook.
Chain gauge: 7 ch = about 1 in (2.5 cm).
This is a small project, so the ornament itself is your gauge test. Make the body first and measure it before you go on.
Checkpoints:
– After body Rnd 1: about 0.5 in (1.3 cm) wide x 1.25 in (3.2 cm) long
– After body Rnd 2: about 0.875 in (2.2 cm) x 1.375 in (3.5 cm)
– After body Rnd 3: 1.25 in (3.2 cm) x 1.5 in (3.8 cm)
– An 18-ch loop laid straight: about 2.6 in (6.6 cm). A 22-ch loop: about 3.1 in (7.9 cm).
– After the blue band: 4.25 in (10.8 cm) x 3.375 in (8.6 cm)
– After the gold border: 4.5 in (11.4 cm) x 3.5 in (8.9 cm)
If the body is too big, go down to a 2.5 mm hook. If it’s too small, go up to 3.0 mm. If only your chains are too loose, chain with a hook 0.25 mm smaller and switch back for the stitches.
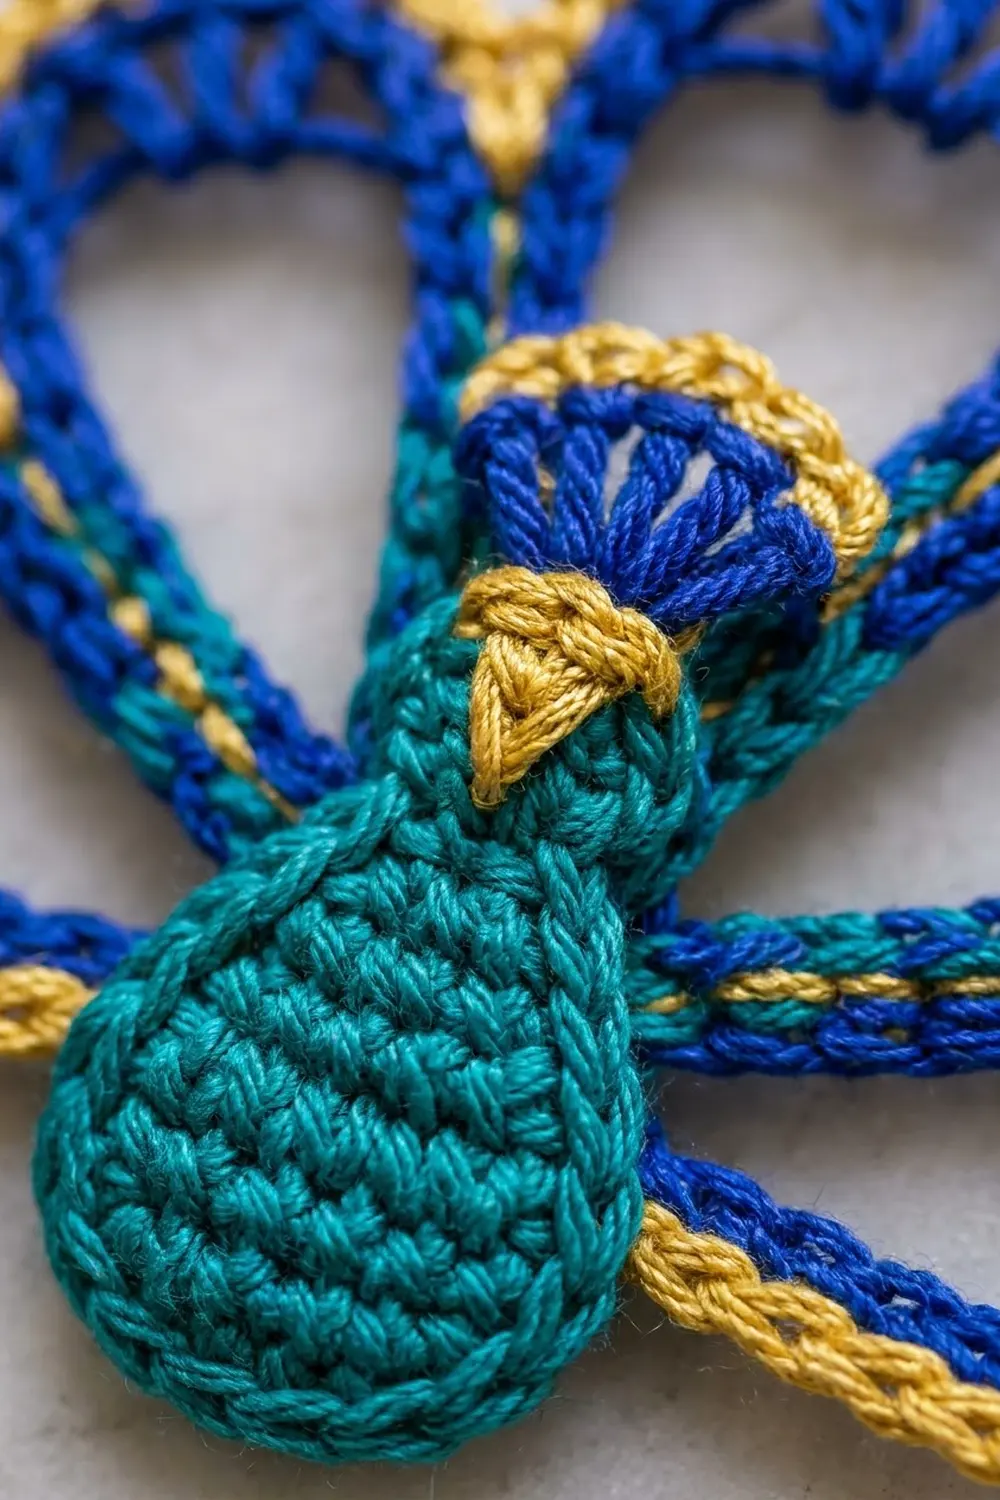
Body (Teal)
The body is worked in joined rounds around a foundation chain. The top end (where you start) becomes the narrow neck, and the far end becomes the rounded bottom of the teardrop.
With teal, ch 7.
Rnd 1: Sc in 2nd ch from hook and in next 2 ch, hdc in next 2 ch, 6 dc in last ch. Rotate the piece and work along the other side of the foundation chain: hdc in next 2 ch, sc in next 3 ch (the last sc goes into the same ch as the first sc). Join with sl st to first sc. (16 sts: 6 sc, 4 hdc, 6 dc)
Rnd 2: Ch 1 (does not count as a stitch here or later), sc in first 5 sts, 2 sc in each of next 6 dc, sc in last 5 sts. Join. (22 sts)
Rnd 3: Ch 1, sc in first 5 sts, sc in next st, 2 sc in next st; repeat from * to * 6 times, sc in last 5 sts. Join. (28 sts)
Fasten off and weave in the starting tail.
Numbering the stitches: Number the Rnd 3 stitches 1–28, starting from the first sc. Sts 1–5 run down one side, sts 6–23 form the round bottom, and sts 24–28 come back up the other side. The top center of the body sits between st 28 and st 1. Mark st 1 and st 21.
Feather Loops (Teal)
All five loops are worked in one pass, with RS facing. Each loop is a chain that is closed with a sl st back into the stitch it started from. You travel between loops with sl sts in the BLO, which keeps the front loops free for the crest later.
- Loop E (right side): Join teal with sl st in BLO of st 21. Ch 18, sl st in same st.
- Sl st in BLO of sts 22–25 (4 sl sts).
- Loop D (right diagonal): Ch 22, sl st in same st (st 25).
- Sl st in BLO of sts 26, 27, 28 and 1 (4 sl sts).
- Loop C (center): Ch 22, sl st in same st (st 1).
- Sl st in BLO of sts 2–4 (3 sl sts).
- Loop B (left diagonal): Ch 22, sl st in same st (st 4).
- Sl st in BLO of sts 5–8 (4 sl sts).
- Loop A (left side): Ch 18, sl st in same st (st 8). Fasten off.
Loop check: You should have 5 loops (18, 22, 22, 22, 18 ch). Fan them out flat: A and E point sideways, B and D point diagonally, and C points straight up. Loop C sits half a stitch off-center. Blocking hides this completely.
Eye Fans (Blue)
Each feather gets a small fan of 8 dc spokes that hang inward from the loop tip. Work the fans into the back bumps of the chain, on the inner edge of the loop, so the top loops of the chain are left free for the outer band.
- 18-ch loops (A and E): The tip is ch 9–10. Join blue in back bump of ch 8, ch 3 (counts as dc), dc in same ch, 2 dc in back bump of each of ch 9, 10 and 11. Fasten off. (8 dc)
- 22-ch loops (B, C and D): The tip is ch 11–12. Join blue in back bump of ch 10, ch 3, dc in same ch, 2 dc in back bump of each of ch 11, 12 and 13. Fasten off. (8 dc)
Let the spokes fall toward the body. They make the fanned “eye” inside each feather.
Blue Feather Band
Work one continuous round along the outer edge of all five loops, using the free top loops of each chain. Go straight from one loop into the next. Don’t add any stitches at the valleys between loops.
Join blue in the first ch of Loop E (next to st 21).
For each 18-ch loop (E and A): Sc in first 2 ch, hdc in next 4 ch, 2 hdc in each of next 6 ch, hdc in next 4 ch, sc in last 2 ch. (24 sts)
Check: 2 + 4 + 6 + 4 + 2 = 18 ch worked; 2 + 4 + 12 + 4 + 2 = 24 sts.
For each 22-ch loop (D, C and B): Sc in first 2 ch, hdc in next 6 ch, 2 hdc in each of next 6 ch, hdc in next 6 ch, sc in last 2 ch. (28 sts)
Check: 2 + 6 + 6 + 6 + 2 = 22 ch worked; 2 + 6 + 12 + 6 + 2 = 28 sts.
Work the loops in order E, D, C, B, A, then fasten off.
Band total: 24 + 28 + 28 + 28 + 24 = 132 sts.
The teal chain stays visible as a thin line between the blue band and the eye fan, just like a real feather.
Collar, Crest and Beak
Gold collar: With RS facing, join gold in FLO of st 27. Sc in FLO of st 27, 2 sc in FLO of st 28, 2 sc in FLO of st 1, sc in FLO of st 2. Fasten off. (6 sc)
Blue crest: Join blue in the first collar sc. Sc in first sc, 2 dc in each of next 4 sc, sl st in last sc. Fasten off. (10 sts: 1 sc, 8 dc, 1 sl st)
The crest sits in front of the base of Loop C because it is worked in the front loops.
Beak: Thread gold onto the tapestry needle. Just below the collar, centered on Rnd 1, embroider a small downward-pointing triangle with 3 straight stitches. Each stitch is about 0.25 in (0.6 cm) long, and they all meet at the bottom point.
Gold Border
Border gauge: About 8 rsc = 1 in (2.5 cm) along the curve.
Work with RS facing and go from left to right. Join gold in the first blue st of Loop A (at the body, next to st 8). Work rsc into the blue band, loop by loop, in this order: A, B, C, D, E.
Each 24-st band (A and E): Rsc in first 6 sts, 2 rsc in next st, rsc in next st; repeat from * to * 6 times, rsc in last 6 sts. (30 sts)
Check: 6 + 12 + 6 = 24 sts worked; 6 + 18 + 6 = 30 sts.
Each 28-st band (B, C and D): Rsc in first 8 sts, 2 rsc in next st, rsc in next st; repeat from * to * 6 times, rsc in last 8 sts. (34 sts)
Check: 8 + 12 + 8 = 28 sts worked; 8 + 18 + 8 = 34 sts.
Border total: 30 + 34 + 34 + 34 + 30 = 162 sts. Fasten off at the base of Loop E. The bottom of the body is left without gold.
Why the math works: On the straight sides of each feather, the gold edge is no longer than the band below it, so 1 rsc per stitch lies flat. Around the tip, the outer curve is about 1.5 times as long as the band edge. That’s why the 12 tip stitches become 18 (3 rsc for every 2 sts). With fewer stitches the tips cup. With more stitches they ruffle.
Hanging loop: Cut 10 in (25.4 cm) of gold. Pull it through Loop C’s border between sts 17 and 18 (the center of 34). Chain 20 with both ends held together, then sl st back into the border at the same spot. Secure the ends. The loop stands about 1.5 in (3.8 cm) tall.
Final Blocking
- Weave in all ends along same-color stitches. Keep them out of the open loop centers.
- Spray the ornament until it is evenly damp, but not soaked.
- Pin the body flat and pull the bottom into a smooth teardrop.
- Fan out the loops. Point A and E straight out to the sides, B and D at about 45 degrees, and C straight up.
- Pin each feather tip so the piece measures 4.5 in (11.4 cm) wide and 3.5 in (8.9 cm) tall.
- Push the eye-fan spokes inward with a pin so they lie evenly.
- If you want, dab on diluted stiffener for a firmer tree ornament.
- Let it dry completely (6–12 hours) before you unpin it.
Final Quality-Control Checklist
- Body Rnd 3 has 28 sts and measures 1.25 in x 1.5 in (3.2 x 3.8 cm)
- The loops are 18, 22, 22, 22 and 18 ch, in order A to E
- Each loop has one 8-dc eye fan centered at its tip
- Blue band counts are 24, 28, 28, 28 and 24 (132 total)
- Gold border counts are 30, 34, 34, 34 and 30 (162 total)
- The collar has 6 sc and the crest has 10 sts
- The beak is centered under the collar
- The finished piece is 4.5 in x 3.5 in (11.4 x 8.9 cm) and lies flat
- The hanging loop is centered on Loop C
Troubleshooting
The body cups: Your Rnd 3 tension is too tight. Loosen up, or redo the round with a hook 0.25 mm larger.
The body ruffles at the bottom: You have extra increases. Recount Rnd 2 (22) and Rnd 3 (28).
The loops twist: Check that the chain isn’t twisted before you sl st it closed. Blocking also helps.
The eye fans flip outward: You worked into the top loops instead of the back bumps. Redo the fan on the inner edge.
Feather tips cup after the border: Your rsc is too tight. Work it more loosely. Don’t add stitches.
Gold gaps at the valleys: Pull the yarn snug when you move from one loop to the next, and tidy the gap with the yarn tail.
The piece is lopsided: Re-block, and measure from the body’s center line out to each side tip.
Care
Spot clean with cool water and mild soap, then reshape and pin flat to dry. Store it flat or hanging, away from heavy ornaments that could crush the loops.
Final Notes
The measurement chain is easy to follow. A 28-st body of 1.25 in x 1.5 in (3.2 x 3.8 cm) sets the base. Five chain loops fan it out, and the 132-st blue band brings the piece to 4.25 in x 3.375 in (10.8 x 8.6 cm). Then the 162-st gold border finishes it at 4.5 in x 3.5 in (11.4 x 8.9 cm). If each checkpoint matches, your peacock will lie flat and look balanced. Make one for your tree, or a whole flock to give as gifts.
Happy crocheting!