

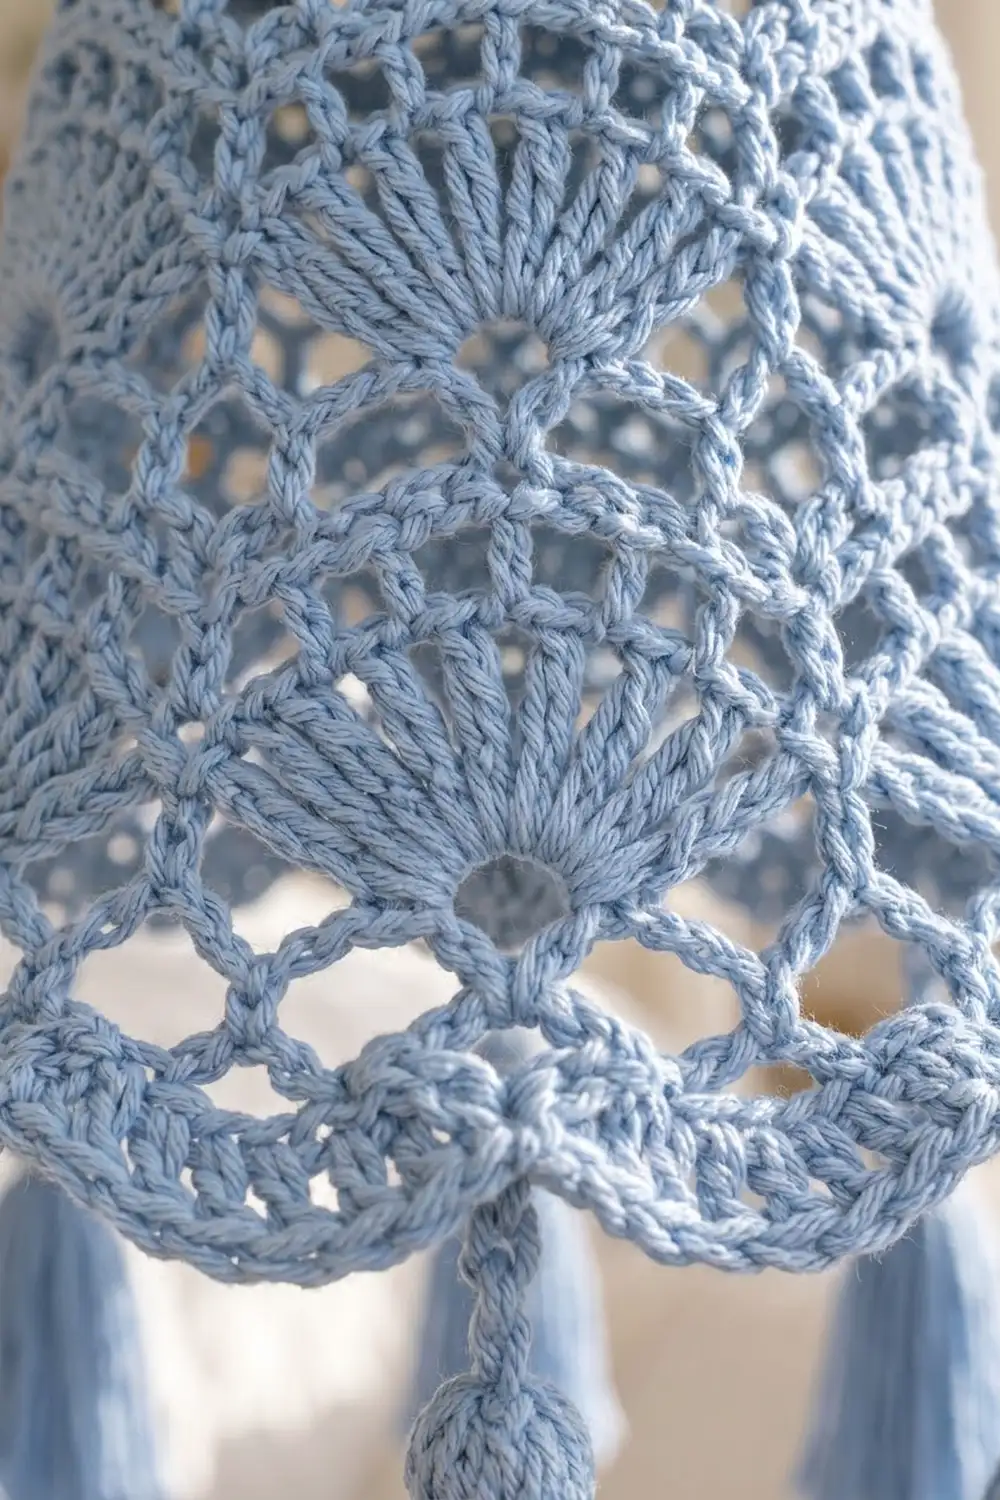
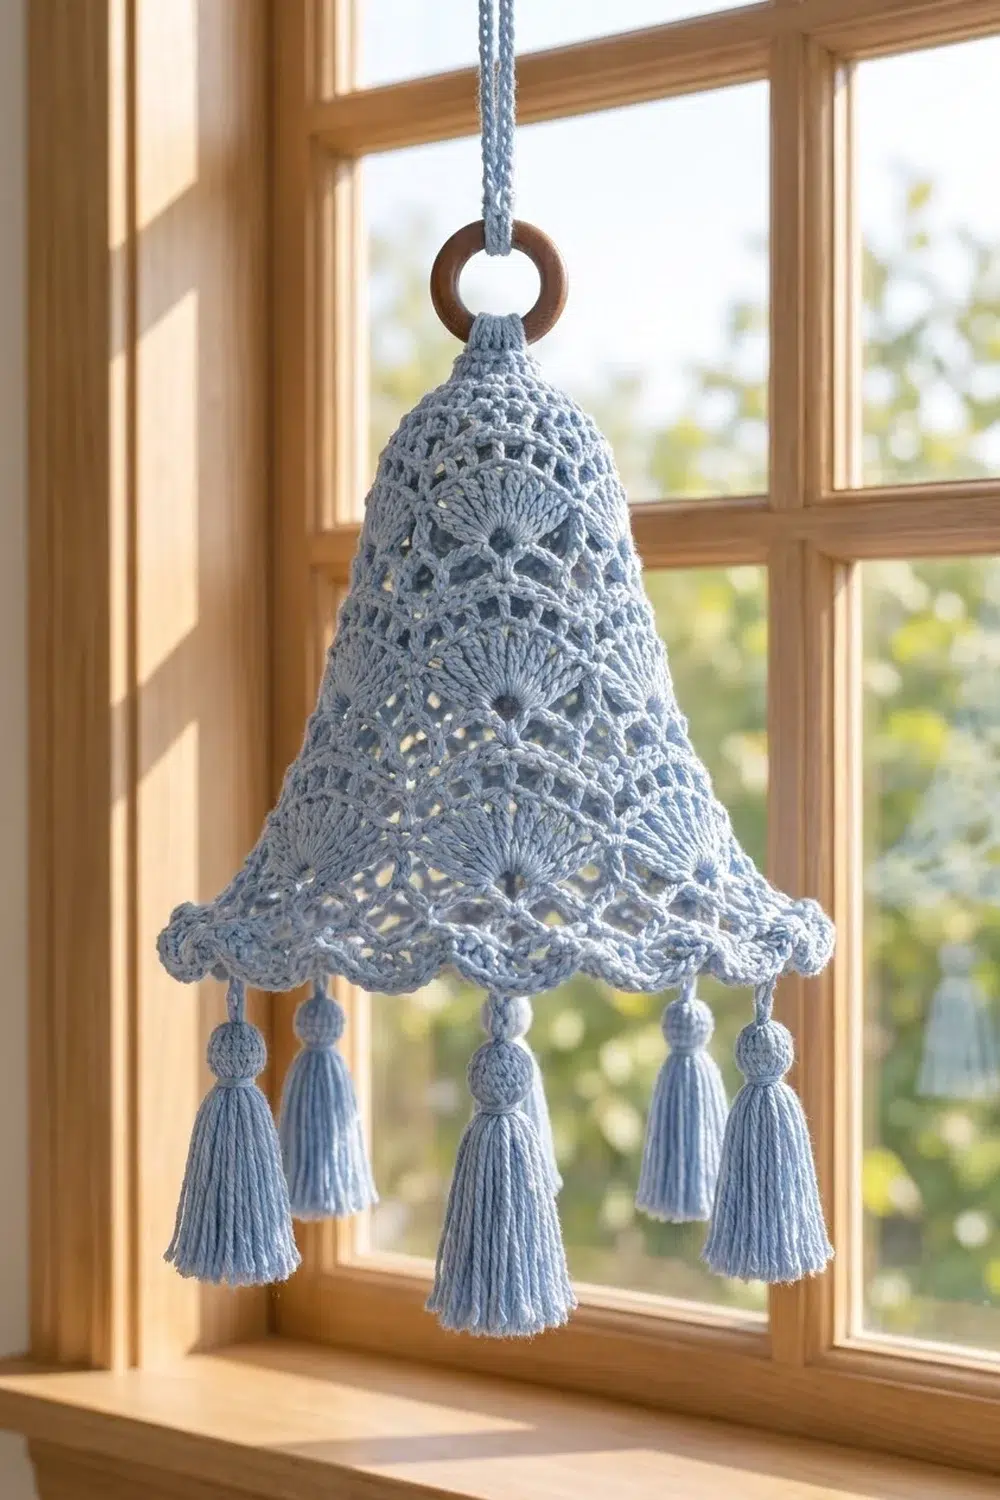
This lacy bell hanging is worked in one soft powder-blue cotton. Tiers of fan shells and open netting flare out from a small solid top to a scalloped hem. Eight beaded tassels sway from the edge. It looks light and airy in a sunny window, a nursery corner or a bedroom wall.
The style is cottage-classic. Each tier of fans sits between the fans of the tier above, so the lace reads like overlapping scales as the bell widens. A plain wooden ring at the top keeps the look natural and simple.
The pattern uses US crochet terms. The finished bell is 8.5 in (21.6 cm) tall from the top to the hem edge, and the hem is 8 in (20.3 cm) across. With the tassels, the whole piece is about 13.5 in (34.3 cm) long, not counting the hanging cord.
The bell is worked top down in joined rounds as one single piece. You start with a small solid sc cap and then work four tiers of fans with netting between them. Next come three hem rounds and a ring tab. Last, you make and attach eight small beads and eight tassels.
Finished Size and Construction
- Finished size: 8.5 in (21.6 cm) tall; 8 in (20.3 cm) hem diameter
- Total length with tassels: 13.5 in (34.3 cm)
- Skill level: Intermediate
- Terminology: US crochet terms
- Yarn weight: DK (3), cotton or cotton blend
- Hook: US G-6 (4.0 mm)
- Number of pieces: 1 bell body, plus a small ring tab, 8 beads and 8 tassels
- Layout: Single piece worked in the round, top down
- Piece size: 8 in (20.3 cm) tall after Rnd 15, before the hem
- Size before border (hem): 7.5 in (19.1 cm) tall, 7 in (17.8 cm) across
- Border (hem) depth: 1 in (2.5 cm)
Materials
Yarn: Use a smooth mercerized or soft matte DK cotton. Cotton holds the shape of the fans and blocks crisply. Avoid fuzzy yarns, because they blur the netting.
- Powder Blue: 100 g, about 230 m (DK cotton at roughly 115 m per 50 g). The bell uses about 35 g, the tassels about 32 g, the beads about 8 g, and the tab, cord and hangers about 5 g.
Tools:
- US G-6 (4.0 mm) crochet hook
- Wooden ring, 1.5 in (3.8 cm) across
- A small handful of fiberfill for the beads
- Tapestry needle
- Stitch marker
- Sharp scissors
- Stiff card, 4 in (10.2 cm) tall, for wrapping tassels
- Rust-proof pins, a blocking mat, and a spray bottle or fabric stiffener
The quantities above include a margin of about 20 g, so you have extra for gauge swatching and fuller tassels.
Abbreviations (US Terms)
- ch – chain
- sl st – slip stitch
- sc – single crochet
- hdc – half double crochet
- dc – double crochet
- sc2tog – single crochet 2 together
- MR – magic ring
- st(s) – stitch(es)
- sk – skip
- rep – repeat
- Rnd(s) – round(s)
Fan: A group of dc worked into one ch-loop. The pattern always states how many dc go in each fan (7, 9, 11 or 13). The center dc is the middle stitch of the fan, for example the 5th dc of a 9-dc fan.
Net round A: sc in the center dc of each fan and in each sc between fans, with a chain loop between every pair of sc. This gives 16 loops.
Net round B: sc in each loop of Net round A, with a slightly longer chain loop between. This also gives 16 loops, but they are shifted half a step from Net round A.
Gauge and Checkpoints
Gauge is checked on the piece itself. Work Rnds 1–6 first and measure before you go on.
- Base gauge: 5 sc = 1 in (2.5 cm).
- After Rnd 4: The cap is 1.5 in (3.8 cm) across and 0.75 in (1.9 cm) tall.
- After Rnd 6: The bell is 2 in (5.1 cm) tall and about 3 in (7.6 cm) across the fan edge.
- After Rnd 9: 4 in (10.2 cm) tall, 4.5 in (11.4 cm) across. One 9-dc fan plus its sc spans about 1.75 in (4.4 cm).
- After Rnd 12: 6 in (15.2 cm) tall, 6 in (15.2 cm) across.
- After Rnd 15: 7.5 in (19.1 cm) tall, 7 in (17.8 cm) across.
- After Rnd 18: 8.5 in (21.6 cm) tall, 8 in (20.3 cm) across.
If the cap is too big: Go down to a US F-5 (3.75 mm) hook. If it is still large, tighten your chains, since loose chains add width fast in lace.
If the cap is too small: Go up to a US 7 (4.5 mm) hook.
Small differences in height are fine. Width matters more, because the hem must flare evenly and lie smoothly.
Bell Body
Work in joined rounds. Do not turn. The right side faces you throughout.
Solid Cap
Rnd 1: Make a MR, ch 1, 8 sc in the ring, sl st to first sc. Pull the ring fully closed. (8 sts)
Rnd 2: Ch 1, 2 sc in each st around, sl st to first sc. (16 sts)
Rnd 3: Ch 1, [sc in next st, 2 sc in next st] 8 times, sl st to first sc. (24 sts)
Rnd 4: Ch 1, sc in each st around, sl st to first sc. (24 sts)
The cap stays narrow at 1.5 in (3.8 cm) across and makes the solid “stem” at the top of the bell.
First Fan Tier
Rnd 5: Ch 1, sc in first st, ch 5, sk 2 sts, [sc in next st, ch 5, sk 2 sts] 7 times, sl st to first sc. (8 sc, 8 ch-5 loops)
Rnd 6: Sl st into first ch-5 loop, ch 3 (counts as first dc), 6 dc in same loop, sc in next sc, [7 dc in next loop, sc in next sc] 7 times, sl st to top of beginning ch-3. (8 fans of 7 dc + 8 sc = 64 sts)
Check the measurements now: 2 in (5.1 cm) tall and about 3 in (7.6 cm) across.
Second Fan Tier
Rnd 7 (Net A): Sl st in next 3 dc to reach the center dc (4th dc). Ch 1, sc in same st, ch 4, sc in next sc, ch 4, [sc in center dc of next fan, ch 4, sc in next sc, ch 4] 7 times, sl st to first sc. (16 sc, 16 ch-4 loops)
Rnd 8 (Net B): Sl st into first ch-4 loop, ch 1, sc in same loop, ch 5, [sc in next loop, ch 5] 15 times, sl st to first sc. (16 sc, 16 ch-5 loops)
Every other loop now sits above a sc from Rnd 6, between two fans. The loops in between sit above the fan centers. The first loop of this round sits between two fans.
Rnd 9 (Fan): Sl st into first ch-5 loop, ch 3 (counts as dc), 8 dc in same loop, sc in next loop, [9 dc in next loop, sc in next loop] 7 times, sl st to top of ch-3. (8 fans of 9 dc + 8 sc = 80 sts)
The new fans sit between the old fans, which gives the offset scale effect.
Third Fan Tier
Rnd 10 (Net A): Sl st in next 4 dc to reach the center dc (5th dc). Ch 1, sc in same st, ch 5, sc in next sc, ch 5, [sc in center dc of next fan, ch 5, sc in next sc, ch 5] 7 times, sl st to first sc. (16 sc, 16 ch-5 loops)
Rnd 11 (Net B): Sl st into first loop, ch 1, sc in same loop, ch 6, [sc in next loop, ch 6] 15 times, sl st to first sc. (16 sc, 16 ch-6 loops)
Rnd 12 (Fan): Sl st into first loop, ch 3, 10 dc in same loop, sc in next loop, [11 dc in next loop, sc in next loop] 7 times, sl st to top of ch-3. (8 fans of 11 dc + 8 sc = 96 sts)
Check the measurements: 6 in (15.2 cm) tall and 6 in (15.2 cm) across.
Fourth Fan Tier
Rnd 13 (Net A): Sl st in next 5 dc to reach the center dc (6th dc). Ch 1, sc in same st, ch 6, sc in next sc, ch 6, [sc in center dc of next fan, ch 6, sc in next sc, ch 6] 7 times, sl st to first sc. (16 sc, 16 ch-6 loops)
Rnd 14 (Net B): Sl st into first loop, ch 1, sc in same loop, ch 7, [sc in next loop, ch 7] 15 times, sl st to first sc. (16 sc, 16 ch-7 loops)
Rnd 15 (Fan): Sl st into first loop, ch 3, 12 dc in same loop, sc in next loop, [13 dc in next loop, sc in next loop] 7 times, sl st to top of ch-3. (8 fans of 13 dc + 8 sc = 112 sts)
Check the measurements: 7.5 in (19.1 cm) tall and 7 in (17.8 cm) across. Do not fasten off.
Ring Tab, Cord, Beads and Tassels
Ring Tab
Attach the yarn to the wooden ring with a standing sc and work 5 more sc around the ring, for 6 sc. Turn. Work 3 rows of ch 1, sc in each st across (6 sts). The tab is about 0.75 in (1.9 cm) deep. Fasten off, leaving a 12 in (30.5 cm) tail.
Hanging Cord
Ch 40, about 6 in (15.2 cm). Fold the chain in half, pass the fold through the top of the ring and pull both ends through the fold (a lark’s head knot). Knot the ends together and weave them in.
Beads (make 8)
Rnd 1: 6 sc in MR. (6 sts)
Rnd 2: 2 sc in each st. (12 sts)
Rnds 3–4: Sc in each st. (12 sts)
Rnd 5: [Sc2tog] 6 times. (6 sts)
Stuff lightly, leave the 6-st hole open, and fasten off. Each bead is about 0.75 in (1.9 cm) across.
Tassels (make 8)
Wrap the yarn 25 times around the 4 in (10.2 cm) card. Slide a 10 in (25.4 cm) strand under the wraps at the top and tie tightly. Cut the wraps open at the bottom. The tie tails come out of the tassel top. Thread them up through the bottom of a bead and out of the top hole, pull the bead down snug onto the tassel head, and let the tails hang free for joining.
Trim the tassel to 3.5 in (8.9 cm) below the bead.
Border (Hem)
Border gauge: The 3 hem rounds add 1 in (2.5 cm) of depth and about 1 in (2.5 cm) of width. Each finished scallop spans about 1.5 in (3.8 cm) along the hem.
A round bell has no sides or corners, so the counts below are given per repeat. There are 8 repeats around, and each repeat is one fan of Rnd 15 plus the sc beside it.
Rnd 16 (Net A, hem loops): Sl st in next 6 dc to reach the center dc (7th dc). Ch 1, sc in same st, ch 7, sc in next sc, ch 7, [sc in center dc of next fan, ch 7, sc in next sc, ch 7] 7 times, sl st to first sc. (16 sc, 16 ch-7 loops; per repeat: 2 sc, 2 loops)
Rnd 17 (Scallops): Sl st into first loop. In each ch-7 loop around work (sc, hdc, 7 dc, hdc, sc), sl st to first sc. (16 scallops of 11 sts = 176 sts; per repeat: 22 sts)
The sc at the end of one scallop sits beside the sc that starts the next one. These 16 meeting points are the junctions.
Rnd 18 (Edge, trim round): Ch 1. In each scallop, sc in next 5 sts, 2 sc in the center dc (6th st), sc in next 5 sts. Sl st to first sc. (176 sts worked 1-per-st + 16 extra = 192 sts; per scallop: 12 sts; per repeat: 24 sts) Fasten off.
Why the math works: Each fan from Rnd 15 gives 2 anchor sc in Rnd 16, so 8 fans × 2 = 16 loops. Each loop holds one 11-st scallop: 16 × 11 = 176. The edge round adds exactly 1 st at each scallop peak: 176 + 16 = 192, or 24 per repeat across 8 repeats. The single extra stitch gives each peak enough slack to curve without cupping. At a hem circumference of about 25 in (63.5 cm), that works out to roughly 7.7 sts per inch, which suits a flared sc edge.
Attach the tassels: Find the 8 junctions that sit directly below a fan center of Rnd 15. These are every other junction. At each one, join the yarn between the two sc, ch 6 (about 0.75 in or 1.9 cm), and fasten off. Tie a tassel’s tails tightly to the end of the chain, then hide the tails inside the bead.
Attach the bell: Push the ring tab into the MR center at the top of the bell. Use the tab tail to sew it securely through Rnds 1–2.
Final Blocking
- Lightly mist the bell, or dip it in diluted fabric stiffener and squeeze out the excess.
- Set the bell over a cone-shaped form, such as a paper cone stuffed with plastic bags, about 8 in (20.3 cm) across at the base.
- Line up the fans so each tier sits centered between the fans above it.
- Open each net loop with your fingers so the diamonds look even.
- Pin each of the 16 scallop peaks so the hem measures 8 in (20.3 cm) across.
- Comb the tassels straight with your fingers and mist them.
- Let everything dry completely, then unpin and trim the tassels evenly to 3.5 in (8.9 cm).
Final Quality-Control Checklist
- [ ] The bell measures 8.5 in (21.6 cm) tall and 8 in (20.3 cm) across the hem.
- [ ] There are 8 fans in every fan tier, and each tier is offset from the one above.
- [ ] Rnd 18 has 192 sts and 16 even scallops.
- [ ] There are 8 tassels at evenly spaced junctions.
- [ ] Every bead is snug against its tassel head.
- [ ] The ring tab is sewn firmly, and the bell hangs straight.
- [ ] All ends are woven in and invisible through the lace.
Troubleshooting
Fans tilt to one side: You started a fan round from the wrong loop. In each Net B round, the first loop must sit between two fans.
Bell flares too early: Your chains are loose. Go down one hook size for the Net rounds only.
Bell looks narrow and straight-sided: Your chains are too tight. Go up one hook size for Rnds 13–18.
Hem ruffles: Rnd 18 was worked too loosely. Redo it with a smaller hook, or skip the extra peak stitch on every other scallop.
Hem cups inward: Work Rnd 17 more loosely and block the peaks firmly outward.
Bead slides up the tails: Tie a second knot under the bead, or make the tassel head fuller with a few extra wraps.
Care
Hand wash in cool water and press out the water in a towel; do not wring. Reshape over the cone form and let it air dry. Re-stiffen if needed.
Final Notes
The measurement chain is simple to follow. The cap measures 1.5 in (3.8 cm) after Rnd 4. Each fan tier adds about 2 in (5.1 cm) of height and about 1.5 in (3.8 cm) of width, so Rnd 15 measures 7.5 in (19.1 cm) tall by 7 in (17.8 cm) across. The hem takes it to 8.5 in (21.6 cm) by 8 in (20.3 cm), with 192 edge stitches split evenly into 8 repeats of 24. The eight tassels hang below fan centers to finish the silhouette.
Check each measurement as you go and the bell will flare evenly every time.
Happy crocheting!