

These lace curtain panels are built from small flower motifs. Each motif has a navy eight-petal flower that sits on a scalloped periwinkle ring, all inside a square of open cream chain lace. When you join the motifs, the cream lace links up into a light lattice, so daylight comes through and the blue flowers show up clearly against the window.
The palette is navy, periwinkle and cream, which gives a calm cottage look. Each panel has a scalloped bottom edge and four tabs across the top, so it slides straight onto a curtain rod. The pattern makes a matching pair.
This pattern uses US crochet terms. Each finished panel measures 16 in (40.6 cm) wide by 36.75 in (93.3 cm) long from the top border to the tips of the scallops. The tab loops add 2.5 in (6.4 cm) above that, so the total hanging length is 39.25 in (99.7 cm).
Here is how it’s made. You work 21 square motifs per panel in the round and join them in a 3 x 7 grid with slip-stitch seams. Then you add a two-round single crochet border, a row of shell scallops along the bottom and four folded tabs along the top.
Finished Size and Construction
- Finished size (each panel): 16 in x 36.75 in (40.6 cm x 93.3 cm), plus 2.5 in (6.4 cm) tab loops
- Skill level: Intermediate
- Terminology: US
- Yarn weight: Worsted (#4) cotton
- Hook: 5.0 mm (H-8)
- Number of pieces: 42 motifs in total, 21 per panel, made into 2 panels
- Layout: 3 motifs wide x 7 motifs tall per panel
- Motif size: 5 in (12.7 cm) square
- Panel size before border: 15 in x 35 in (38.1 cm x 88.9 cm)
- Border depth: 0.5 in (1.3 cm) on all sides, plus 0.75 in (1.9 cm) of scallops on the bottom edge
Materials
Use a smooth, mercerized or combed worsted-weight cotton. Cotton holds a crisp edge, blocks well and doesn’t stretch much when it hangs. Avoid fuzzy yarn because it hides the lace.
- Navy (Color A): 200 g / approx. 320 m
- Periwinkle (Color B): 200 g / approx. 320 m
- Cream (Color C): 600 g / approx. 960 m
All quantities are for the pair of panels and include a margin of about 15% for gauge swatches and differences in tension.
Tools:
- 5.0 mm (H-8) crochet hook
- Tapestry needle
- Stitch markers
- Rust-proof pins and a blocking mat or towel
- Spray bottle
- Measuring tape
- Scissors
Abbreviations (US Terms)
- ch – chain
- sl st – slip stitch
- sc – single crochet
- hdc – half double crochet
- dc – double crochet
- tr – treble crochet
- BPsc – back post single crochet
- sp(s) – space(s)
- st(s) – stitch(es)
- RS / WS – right side / wrong side
Special stitch – BPsc: Insert the hook from the back to the front around the post of the stitch, then out to the back again. Yarn over, pull up a loop, yarn over and draw through both loops on the hook.
Gauge and Checkpoints
Gauge: 17 sc x 16 rows = 4 in (10.2 cm) in a sc swatch.
Make one complete motif before you start the rest. These are the checkpoints, measured flat and lightly pressed:
- After Round 3 (navy flower): 2.25 in (5.7 cm) across
- After Round 5 (periwinkle ring): 3.5 in (8.9 cm) across
- After Round 7 (lace square): 4.5 in (11.4 cm) per side
- After Round 8 (finished motif): 5 in (12.7 cm) per side
If your motif is bigger than 5.25 in (13.3 cm), go down to a 4.5 mm hook. If it’s smaller than 4.75 in (12.1 cm), go up to a 5.5 mm hook. A difference of 0.25 in (0.6 cm) per motif adds up to 1.75 in (4.4 cm) over the length of the panel, so take the time to match gauge.
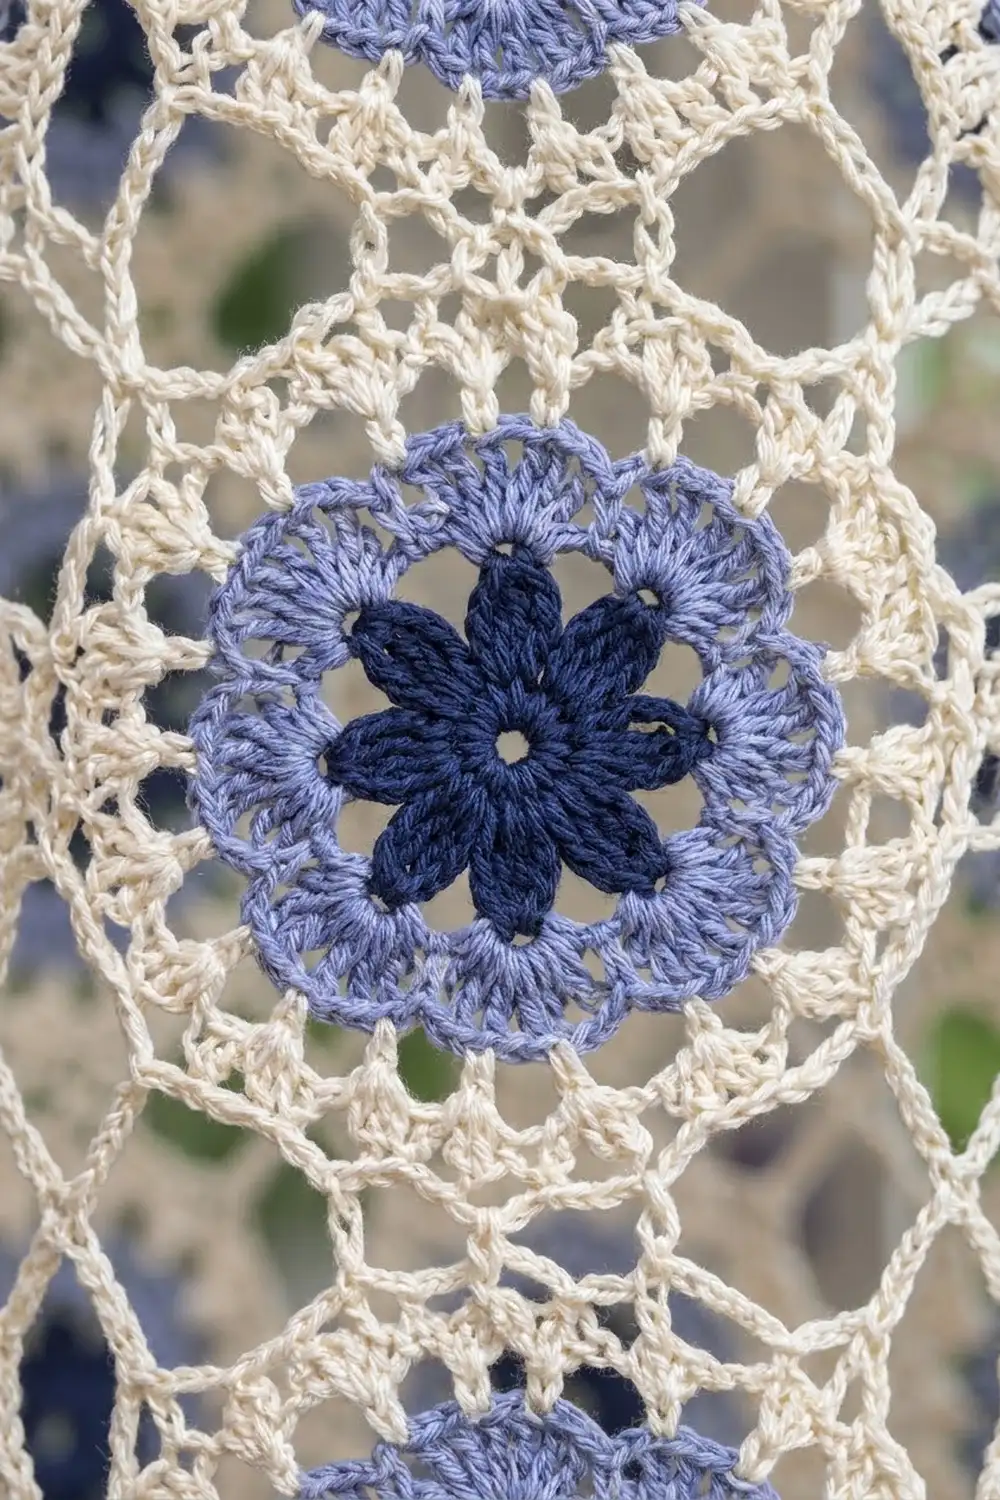
Motif (Make 42)
Round 1 (Color A)
Make a magic ring. Ch 3 (counts as dc), then work 15 dc into the ring. Join with a sl st to the top of the ch-3, then pull the ring closed. (16 dc)
Round 2 (Color A)
Ch 1, sc in the same st. Ch 3, skip 1 st, sc in the next st. Repeat from * to * 6 more times, then ch 3, skip the last st and join with a sl st to the first sc. (8 sc, 8 ch-3 sps)
Round 3 – Petals (Color A)
Sl st into the first ch-3 sp. In each ch-3 sp work (sc, hdc, dc, tr, dc, hdc, sc). Join with a sl st to the first sc. Fasten off. (8 petals, 56 sts)
The tr in the middle of each petal makes the pointed tip you see on the navy flower.
Round 4 – Back Loops (Color B)
Join Color B with a BPsc around any Round 2 sc. Working behind the petals, ch 5, BPsc around the next Round 2 sc. Repeat around, and finish with ch 5 and a sl st to the first BPsc. (8 BPsc, 8 ch-5 loops)
The loops sit behind the petals, so the navy flower stays in front.
Round 5 – Scallops (Color B)
Sl st into the first ch-5 loop. In each loop work (sc, hdc, 5 dc, hdc, sc). Join with a sl st to the first sc. Fasten off. (8 scallops, 72 sts)
Round 6 – Lace Ring (Color C)
Join Color C with a sc in the center dc (the 3rd of 5) of any scallop. Ch 6, sc in the center dc of the next scallop. Repeat around, and finish with ch 6 and a sl st to the first sc. (8 sc, 8 ch-6 loops)
Round 7 – Squaring the Lace (Color C)
Sl st into the first ch-6 loop. Ch 3 (counts as dc), then work (2 dc, ch 3, 3 dc) in the same loop for the first corner. Ch 5, sc in the next loop, ch 5, (3 dc, ch 3, 3 dc) in the next loop. Repeat 2 more times. Ch 5, sc in the last loop, ch 5, and join with a sl st to the top of the ch-3.
(24 dc, 4 sc, 8 ch-5 sps, 4 ch-3 corner sps)
Each side now reads: 3 dc, ch-5 sp, sc, ch-5 sp, 3 dc. The ch-5 spaces make the open cream lace between the flowers.
Round 8 – Edge (Color C)
This is a conversion round. Sl st across to the first corner ch-3 sp. Ch 1, then work (2 sc, ch 2, 2 sc) in the corner sp. Along each side work:
- sc in each of the 3 dc
- 5 sc in the ch-5 sp
- sc in the sc
- 5 sc in the next ch-5 sp
- sc in each of the 3 dc
Then work (2 sc, ch 2, 2 sc) in the next corner sp. Repeat around and join with a sl st to the first sc. Fasten off and weave in all ends.
Count per side: 7 sts worked 1-per-existing-stitch (3 dc + 1 sc + 3 dc) + 10 sc worked into the two ch-5 sps + 4 corner sc (2 from each corner group) = 21 sc per side. The ch-2 corner spaces aren’t counted as stitches. Total: 84 sc + 4 ch-2 corner sps.
Lightly steam or spray-block the first motif to 5 in (12.7 cm) square and check it against your gauge.
Make All Pieces
For the pair you need 42 motifs, 21 per panel. Every motif uses all three colors:
- Color A (navy): Rounds 1–3, 42 times
- Color B (periwinkle): Rounds 4–5, 42 times
- Color C (cream): Rounds 6–8, 42 times
Layout for each panel (3 wide x 7 tall, M = motif):
Row 1:  M  M  M   <- top (tabs)
Row 2:  M  M  M
Row 3:  M  M  M
Row 4:  M  M  M
Row 5:  M  M  M
Row 6:  M  M  M
Row 7:  M  M  M   <- bottom (scallops)
Block all the motifs to the same size before joining. It makes the seams much easier to match.
Joining
Method: slip-stitch seam through the back loops only.
- Place two motifs with their RS together and their edges lined up.
- Join Color C in the matching corner ch-2 sps, going through both layers.
- Sl st through the back loop of each sc on both motifs, matching them one to one. That’s 21 sl sts per seam.
- Finish in the next pair of corner ch-2 sps.
Because both edges have 21 sc, the stitches line up exactly and you don’t need to ease anything in.
Start by joining the motifs into 7 horizontal rows of 3. Then join the rows together along the long horizontal seams, working across all 3 motifs in one continuous seam: 21 sl sts, then a sl st through the 4 meeting corner sps, then 21 sl sts, and so on.
Tension: Your slip stitches should match the width of the sc. If a seam puckers, use a 5.5 mm hook just for joining.
Checkpoint: The joined panel should measure 15 in x 35 in (38.1 cm x 88.9 cm). If it’s off by more than 0.5 in (1.3 cm), check the seams for tightness before you start the border.
Border
Border gauge: Same as the motif sc, 17 sc = 4 in (10.2 cm) and 2 rounds = 0.5 in (1.3 cm).
Starting counts:
- Top and bottom edges: 3 motifs x 21 sc = 63 sts
- Side edges: 7 motifs x 21 sc = 147 sts
At each seam, the joined corner ch-2 sps are skipped. Don’t work any stitches into them, so nothing gets added per seam.
Round 1 (Color C)
With the RS facing, join in the top-right outer corner ch-2 sp. Ch 1. Work 1 sc in each of the 4 outer corner sps of the panel (these are the corner centers) and 1 sc in each sc along the edges. Join with a sl st.
Count: Top and bottom: 1 + 63 + 1 = 65 sts, counting both corner centers. Sides: 1 + 147 + 1 = 149 sts. Total: 424 sts (126 + 294 + 4 corner centers).
Round 2 (Color C)
Ch 1. Sc in each st and work 3 sc in each corner center st. Join with a sl st.
Count: Top and bottom: 67 sts. Sides: 151 sts, counting both corner centers each time. Total: 432 sts (424 + 2 extra at each of the 4 corners).
Why the math works: The seams add no stitches, so the border follows the motif count exactly. Two rounds of sc add 0.25 in (0.6 cm) per round on every side. That takes the width from 15 in to 16 in (38.1 cm to 40.6 cm) and the length from 35 in to 36 in (88.9 cm to 91.4 cm).
Bottom Scallops (Color C, bottom edge only)
With the RS facing, join in the corner center st at one end of the bottom edge. Ch 1, sc in the same st. Skip 2 sts, 7 dc in the next st, skip 2 sts, sc in the next st. Repeat across to the corner center st at the other end. Fasten off.
Count: 67 sts = 11 repeats of 6 + 1. That gives 11 scallops, each anchored by a sc at both ends. The scallops add 0.75 in (1.9 cm).
Top Tabs (Color C, make 4 per panel)
The top edge has 67 sts. Place a marker on sts 1, 21, 41 and 61. Each tab is 7 sts wide (sts 1–7, 21–27, 41–47, 61–67), with 13-st gaps between them: 4 x 7 + 3 x 13 = 67.
For each tab: With the RS facing, join in the marked st. Ch 1 and sc in the same st and the next 6 sts (7 sc). Turn. Work sc in each st for 19 more rows, 20 rows in total, which measures 5 in (12.7 cm). Fasten off and leave a 12 in (30.5 cm) tail.
Fold the tab to the WS and whipstitch the last row to the WS of the border, right at the base of the tab. This makes a 2.5 in (6.4 cm) loop that fits a rod up to 1.25 in (3.2 cm) across.
Repeat everything for the second panel.
Final Blocking
- Wash each panel gently in cool water, or mist it thoroughly.
- Press out the water in a towel. Don’t wring it.
- Lay the panel flat on a mat and pin it out to 16 in x 36 in (40.6 cm x 91.4 cm), not counting the scallops.
- Pin out each scallop into an even curve.
- Open the ch-5 lace spaces with your fingertips so the lattice is even.
- Leave the tabs flat and unpinned.
- Let the panel dry completely before unpinning it, which takes about 24 hours.
Final Quality-Control Checklist
- 21 motifs per panel, each 5 in (12.7 cm) square
- All the navy petals are in front of the periwinkle loops
- The seams are flat with 21 sl sts each and no puckering
- The border counts are 67 sts top and bottom and 151 sts per side
- There are 11 even scallops on the bottom edge
- There are 4 tabs, evenly spaced, each 7 sts wide
- Both panels measure 16 in x 36.75 in (40.6 cm x 93.3 cm)
- All the ends are woven in securely
Troubleshooting
- Petals flare or ruffle: Your Round 1 is too loose. Pull the magic ring tighter and keep it to 16 dc.
- Periwinkle shows in front of the petals: You worked Round 4 into the front posts. Redo it as BPsc behind the petals.
- The motif cups: The Round 6 chains are too short for your tension. Try ch 7.
- The motif ruffles: Your Round 8 is too loose. Work it with a hook 0.5 mm smaller.
- Seams pull in: Your joining is too tight. Use a larger hook for the seams.
- The border waves: Recount Round 1. It should have exactly 65 sts top and bottom and 149 sts on each side, counting the corner centers.
- Tabs twist: Line up the folded end squarely before you sew it down.
Care
Hand wash or machine wash cool on a gentle cycle in a mesh bag, then dry flat. Reshape the scallops while the panels are damp, and rehang them once they’re fully dry.
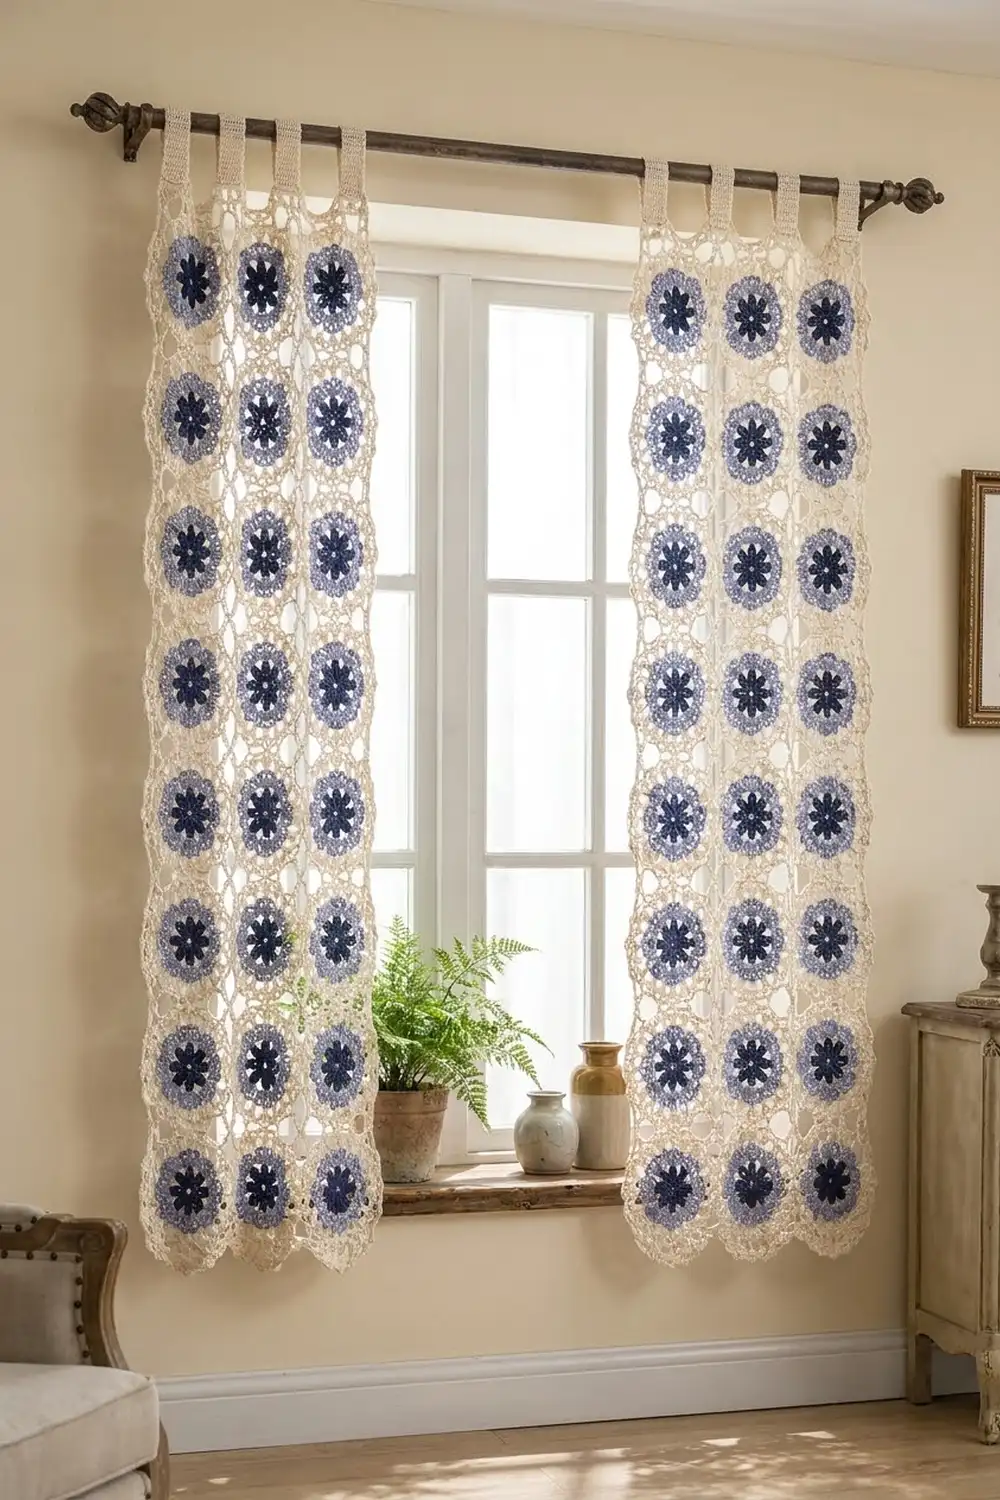
Final Notes
Each stage builds on the measurement before it. The gauge of 17 sc = 4 in (10.2 cm) gives a 5 in (12.7 cm) motif with 21 sc per side. Twenty-one joined motifs make a 15 in x 35 in (38.1 cm x 88.9 cm) panel. The border adds 0.5 in (1.3 cm) all around for 16 in x 36 in (40.6 cm x 91.4 cm). The scallops bring the length to 36.75 in (93.3 cm), and the tabs add 2.5 in (6.4 cm) above for a hanging length of 39.25 in (99.7 cm). If you check your motif early, the rest of the panel follows from it.
Happy crocheting!