
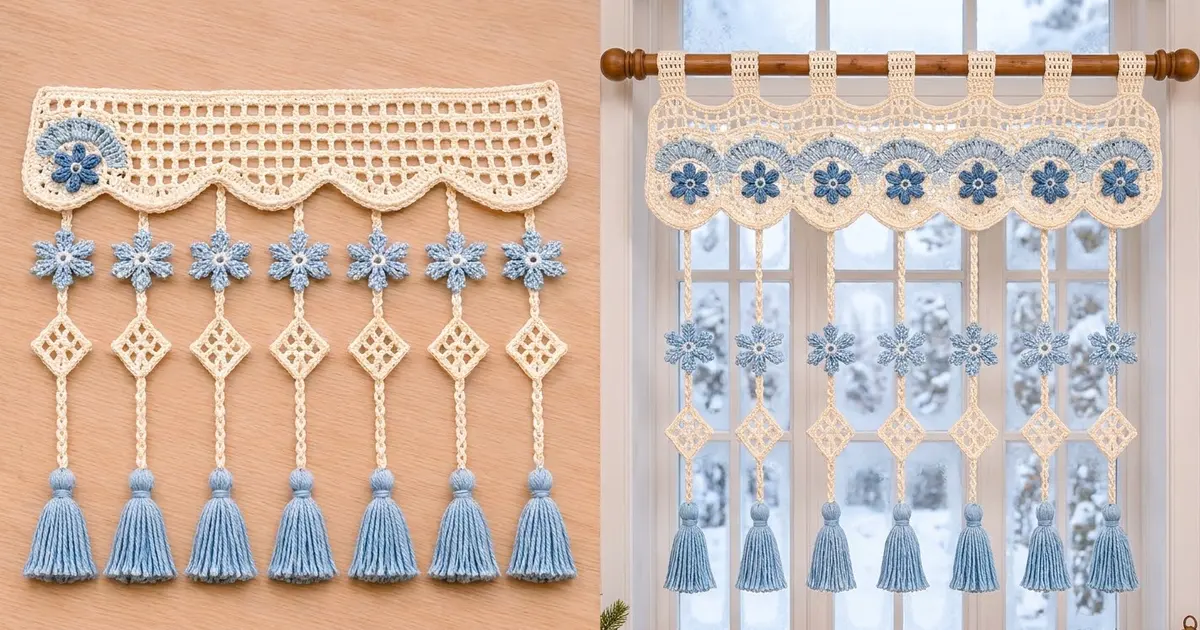
The Frost Garden Valance is a short, lacy window topper for winter. A cream filet-mesh header sits on a row of seven round medallions. Each medallion has a powder-blue arch and a deep denim-blue flower. Under every scallop hangs a cord with a snowflake, a lattice diamond and a soft blue tassel.
The colors are cream, light powder blue, dark denim blue and a little white. The style is cottage meets Nordic: neat geometry with soft edges, and open enough to let light through.
This pattern uses US crochet terms. After the border, the header is 28.75 in (73.0 cm) wide and 7.75 in (19.7 cm) deep. From the top of the header to the tassel tips, the valance is 25.75 in (65.4 cm) long, not counting the tab loops.
You’ll make seven medallions and join them into a strip. Then you work the mesh header straight across their tops, add the tabs and a two-round border, and attach the hanging strands.
Finished Size and Construction
- Finished header: 28.75 in x 7.75 in (73.0 cm x 19.7 cm)
- Total drop: 25.75 in (65.4 cm), plus tabs
- Skill level: Intermediate
- Terminology: US
- Yarn weight: DK / light (#3) cotton
- Hook: 3.5 mm (E-4)
- Number of pieces: 7 medallions, 7 flowers, 7 snowflakes, 7 diamonds, 7 cords and 7 tassels. You work the header and tabs directly onto the joined medallions.
- Layout: 1 row of 7 medallions, with 7 strands hanging below
- Medallion size: 4 in (10.2 cm) across
- Size before border: 28 in x 7 in (71.1 cm x 17.8 cm)
- Border depth: 0.375 in (1.0 cm)
Materials
Use a smooth DK cotton. It keeps the mesh crisp and helps the tassels hang straight. Avoid fuzzy yarns, because they hide the lattice.
- Cream: 150 g, about 345 m
- Light powder blue: 60 g, about 138 m (arches, snowflakes, tassels)
- Dark denim blue: 15 g, about 35 m (flowers)
- White: 5 g, about 12 m (centers)
Tools: 3.5 mm (E-4) hook, tapestry needle, 14 stitch markers, a stiff card 4.5 in (11.4 cm) tall, rust-proof pins, a blocking mat, a spray bottle, scissors and a tape measure.
All quantities include a margin of about 15%.
Abbreviations (US Terms)
- ch – chain; sl st – slip stitch
- sc – single crochet; hdc – half double crochet
- dc – double crochet; tr – treble crochet
- dtr – double treble (yarn over 3 times, then work off the loops in pairs)
- sc2tog – single crochet 2 together
- fsc – foundation single crochet
- rev sc – reverse single crochet
- BLO / FLO – back loop only / front loop only
- st(s), sp, RS, WS – stitch(es), space, right side, wrong side
Special stitch, fsc: Ch 2. Insert your hook in the 2nd ch from the hook, yo, pull up a loop, yo, draw through 1 loop to make the “chain,” yo, draw through 2 loops. For each next fsc, insert the hook into the previous “chain.”
Special stitch, rev sc: Work sc from left to right, going into the next st to the right each time.
Gauge and Checkpoints
Gauge: 22 dc and 10 rows = 4 in (10.2 cm). One filet square (dc, ch 2) is 0.545 in (1.4 cm) wide.
Make one medallion first. It’s your real gauge test.
- After Rnd 3: 2.75 in (7.0 cm) across
- After Rnd 4: 3.6 in (9.1 cm)
- After Rnd 5: 4 in (10.2 cm)
If the medallion is too big, go down 0.25 mm. If it’s too small, go up 0.25 mm. Every width in this pattern comes from 7 medallions x 4 in = 28 in (71.1 cm).

Part 1: Medallion (make 7)
Rnd 1 (cream): Magic ring, ch 3 (counts as dc), 11 dc in ring, sl st to top of ch-3. (12 dc)
Rnd 2: Ch 3, dc in same st, 2 dc in each st around, join. (24 dc)
Rnd 3: Ch 3, 2 dc in next st, dc in next, 2 dc in next 11 times, join. (36 dc) Fasten off.
Rnd 4 (color-change round): Join light blue in any dc. Ch 3 (counts as dc), 2 dc in next st, then dc in next, 2 dc in next 8 times. That makes 27 light-blue dc over 18 sts. Change to cream on the last yo. With cream, work dc in next, 2 dc in next 9 times (27 dc), then join. (54 dc) Fasten off light blue.
The light-blue half becomes the ribbed arch. The cream half becomes the lower scallop.
Rnd 5 (cream): Ch 1, sc in each st around, join. (54 sc) Fasten off, leaving a 10 in (25.4 cm) tail.
Marking: St 1 sits above the first light-blue dc and is the right side point. St 28 is the left side point. Sts 2–27 form the top half (26 sts), and sts 29–54 form the bottom half (26 sts).
Part 2: Flower Appliqué (make 7)
Rnd 1 (white): Magic ring, 6 sc, join. (6 sc) Fasten off.
Rnd 2 (dark blue): Join, ch 1, 2 sc in each st, join. (12 sc)
Rnd 3: Sl st in next st, (hdc, dc, ch 2, dc, hdc) in next st 6 times, join. (6 petals) Leave a long tail.
The flower is 1.75 in (4.4 cm) across. A cream ring and the blue arch stay visible around it.
Part 3: Snowflake (make 7)
Rnd 1 (white): Magic ring, 6 sc, join. (6 sc) Fasten off.
Rnd 2 (light blue): Join, ch 3 (counts as dc), dc in same st, 2 dc in each st around, join. (12 dc)
Rnd 3: Sc in next st, ch 6, sl st in 4th ch from hook, [ch 3, sl st in same ch] twice, sl st in next 2 ch, sc in next st 6 times, join. (12 sc, 6 arms)
Each arm ends in a three-loop tip. The snowflake is 2.5 in (6.4 cm) across.
Part 4: Lattice Diamond (make 7)
Row 1 (cream): 10 fsc, turn. (10 sts)
Row 2: Ch 5 (counts as dc + ch 2), skip 2, dc in next, ch 2, skip 2, dc in next twice, turn. (4 dc + 3 ch-2 sps = 10 sts)
Rows 3–4: Ch 5, dc in next dc, ch 2 twice, dc in 3rd ch of turning ch, turn. (3 open squares)
Row 5: Ch 1, sc in each dc and 2 sc in each ch-2 sp. (4 + 6 = 10 sc)
Edging round: Work all the way around:
- 3 sc in the first st, sc in the next 8, 3 sc in the last st
- 2 sc in each of the 3 mesh row-ends
- Along the foundation: 3 sc in the first st, sc in the next 8, 3 sc in the last st
- 2 sc in each of the 3 mesh row-ends on the other side
Join. (14 + 6 + 14 + 6 = 40 sc)
This makes a 2 in (5.1 cm) square with 9 open windows. Hung on point, it’s 2.8 in (7.1 cm) tall.
Part 5: Cord (make 7)
Cream: Ch 74. Sl st in the back bump of the 2nd ch from the hook and in each ch across. (73 sl st)
The cord should measure 14.5 in (36.8 cm) and look firm and rope-like. Add or remove 5 ch for every inch it’s off.
Part 6: Tassel (make 7)
- Wrap light blue 40 times around the 4.5 in (11.4 cm) card.
- Tie the top tightly with a 10 in (25.4 cm) strand, then cut the bottom loops.
- Wrap a strand 6 times around the bundle, 0.75 in (1.9 cm) below the top, to form the head. Knot it and bury the ends.
- Trim to 4 in (10.2 cm).
Make All Pieces
- Cream: 7 cords and 7 diamonds, plus the cream rounds of all 7 medallions
- Light blue: 7 medallion arches, 7 snowflakes, 7 tassels
- Dark blue: 7 flowers
- White: 7 flower centers and 7 snowflake centers
Layout (front view, medallions numbered right to left as worked):
[ 7 tabs ......... filet mesh header ......... ]
  M7   M6   M5   M4   M3   M2   M1
  |    |    |    |    |    |    |    cord
  *    *    *    *    *    *    *    snowflake
  <>   <>   <>   <>   <>   <>   <>   diamond
  T    T    T    T    T    T    T    tassel
Block every medallion to 4 in (10.2 cm) before joining.
Joining and Header
Step 1: Join the medallions. Lay the medallions in a row with the arches up and RS facing. Use a cream tail to sew st 28 of M1 to st 1 of M2, going through both loops of both stitches with 3 tight passes. Repeat for each pair, for 6 joins in total. Each join uses only one stitch, so every scallop keeps its round shape. Keep the tension firm but don’t pull, or the strip will cup.
Checkpoint: The strip measures 28 in (71.1 cm).
Row 1 (RS, leveling): Join cream at st 1 of M1 and ch 5 (counts as dtr). Skip sts 2–4. In sts 5–24, work: dtr, tr in next 2, dc in next 3, hdc in next 2, sc in next 4, hdc in next 2, dc in next 3, tr in next 2, dtr (20 sts). Then repeat 6 times: ch 2 across the V, and work the same 20-st sequence in sts 5–24 of the next medallion. Finish with dtr in st 28 of M7, turn.
Count: 1 + (7 x 20) + (6 x 2) + 1 = 154 sts.
Row 2 (WS): Ch 1, sc in each st and each ch, turn. (154 sc)
Row 3 (RS, mesh): Ch 5 (counts as dc + ch 2), skip 2, dc in next, ch 2, skip 2, dc in next across, turn. (52 dc + 51 ch-2 sps = 154 sts; 51 squares)
Rows 4–8: Ch 5, dc in next dc, ch 2 across, ending with dc in 3rd ch of turning ch, turn. (51 squares)
Row 9 (WS, conversion): Ch 1, sc in each dc and 2 sc in each ch-2 sp. (52 + 102 = 154 sc)
Checkpoint: 28 in x 7 in (71.1 cm x 17.8 cm).
Tabs (make 7): With RS facing, count Row 9 sts from the right. Work each tab over sts 9–14, 31–36, 53–58, 75–80, 97–102, 119–124 or 141–146. That leaves 8 sts at each end and 16 sts between tabs (8 + 42 + 96 + 8 = 154), and centers each tab over a medallion.
- Row 1: Join cream, 6 sc in BLO, turn. (6 sc)
- Row 2: Ch 3 (counts as dc), dc in next, ch 2, skip 2, dc in last 2, turn. (6 sts, 1 window)
- Row 3: Ch 1, sc in 2 dc, 2 sc in ch-2 sp, sc in 2 dc, turn. (6 sc)
- Rows 4–15: Repeat Rows 2–3 six times. (7 windows)
Each tab is 4.4 in (11.2 cm) long. Fold it to the WS and sew Row 15 to the back of Rows 8–9. The loop fits a rod up to 1.25 in (3.2 cm) thick.
Border
Border gauge: 5.5 sc per 1 in (2.5 cm), the same as the dc gauge.
Rnd 1 (cream sc), RS facing:
- Top: Work in the FLO left free under the tabs. Make 3 sc in st 1, sc in the next 152 sts, and 3 sc in st 154. (158 sc)
- Each side: 2 sc in each of the 6 mesh row-ends, 1 sc in the Row 2 row-end and 4 sc in the Row 1 row-end. (17 sc)
- Bottom: 1 sc in the outer side point. Over each medallion’s 26 bottom-half sts, work sc in next 12, 2 sc in next twice (28 sc). At each of the 6 joins, sc2tog through both joined side points. End with 1 sc in the last outer side point. (1 + 7 x 28 + 6 + 1 = 204 sc)
Join. (158 + 17 + 17 + 204 = 396 sc)
Rnd 2: Ch 1, rev sc in each st around, join. (396 sts) Fasten off.
Why the math works: The top edge has 1 sc per stitch, so its 154 sts still measure 28 in (71.1 cm). The extra 2 sc at each top corner turn it without flaring. Two increases per half-circle keep the curves flat. The sc2tog at each join keeps the V between scallops sharp.
Assembly:
- Sew a flower to the center of each medallion through flower Rnd 2. Leave the petals free.
- Sew the top 0.5 in (1.3 cm) of each cord to the WS at the bottom center of a medallion, between border sts 14 and 15 of that medallion.
- Sew a snowflake over the cord, centered 4.25 in (10.8 cm) below the border.
- Sew a diamond on point over the cord, 0.75 in (1.9 cm) below the snowflake.
- Tie a tassel to the cord end. The visible cord is 14 in (35.6 cm).
Final Blocking
- Soak the valance in cool water for 10 minutes, then roll it in a towel to press the water out.
- Pin the header to 28.75 in x 7.75 in (73.0 cm x 19.7 cm), keeping the top edge straight.
- Pin each scallop round, and open every mesh square and diamond window.
- Pin each strand straight, with 14 in (35.6 cm) of visible cord.
- Let it dry fully. Then steam the tassels and comb them.
Final Quality-Control Checklist
- [ ] 7 medallions, each 4 in (10.2 cm) across
- [ ] Header rows have 154 sts, and each mesh row has 51 squares
- [ ] 7 tabs, each centered over a medallion
- [ ] Both border rounds have 396 sts
- [ ] All strands are equal, with 14 in (35.6 cm) of visible cord
- [ ] All tassels are 4 in (10.2 cm)
- [ ] All ends are woven in
Troubleshooting
- Top edge dips at the joins: The ch-2 bridges are too loose. Rework them more firmly.
- Medallion cups: Go up a hook size.
- Medallion ruffles: Recount Rnd 4. It should have 54 sts.
- Mesh squares lean: Pin them square while blocking.
- Strands twist: Wet-block them hanging, with a light weight on each tassel.
- Tabs too tight: Add one more repeat of tab Rows 2–3.
Care
Hand wash in cool water and dry flat. Reshape the scallops and comb the tassels while damp.

Final Notes
Here’s how the measurements connect. One medallion is 4 in (10.2 cm), and seven make a 28 in (71.1 cm) strip. Row 1 sets that width at 154 sts, and the 51 mesh squares keep it. The border brings the header to 28.75 in x 7.75 in (73.0 cm x 19.7 cm). Each strand adds 14 in (35.6 cm) of cord and a 4 in (10.2 cm) tassel, for a total drop of 25.75 in (65.4 cm).
Happy crocheting!