

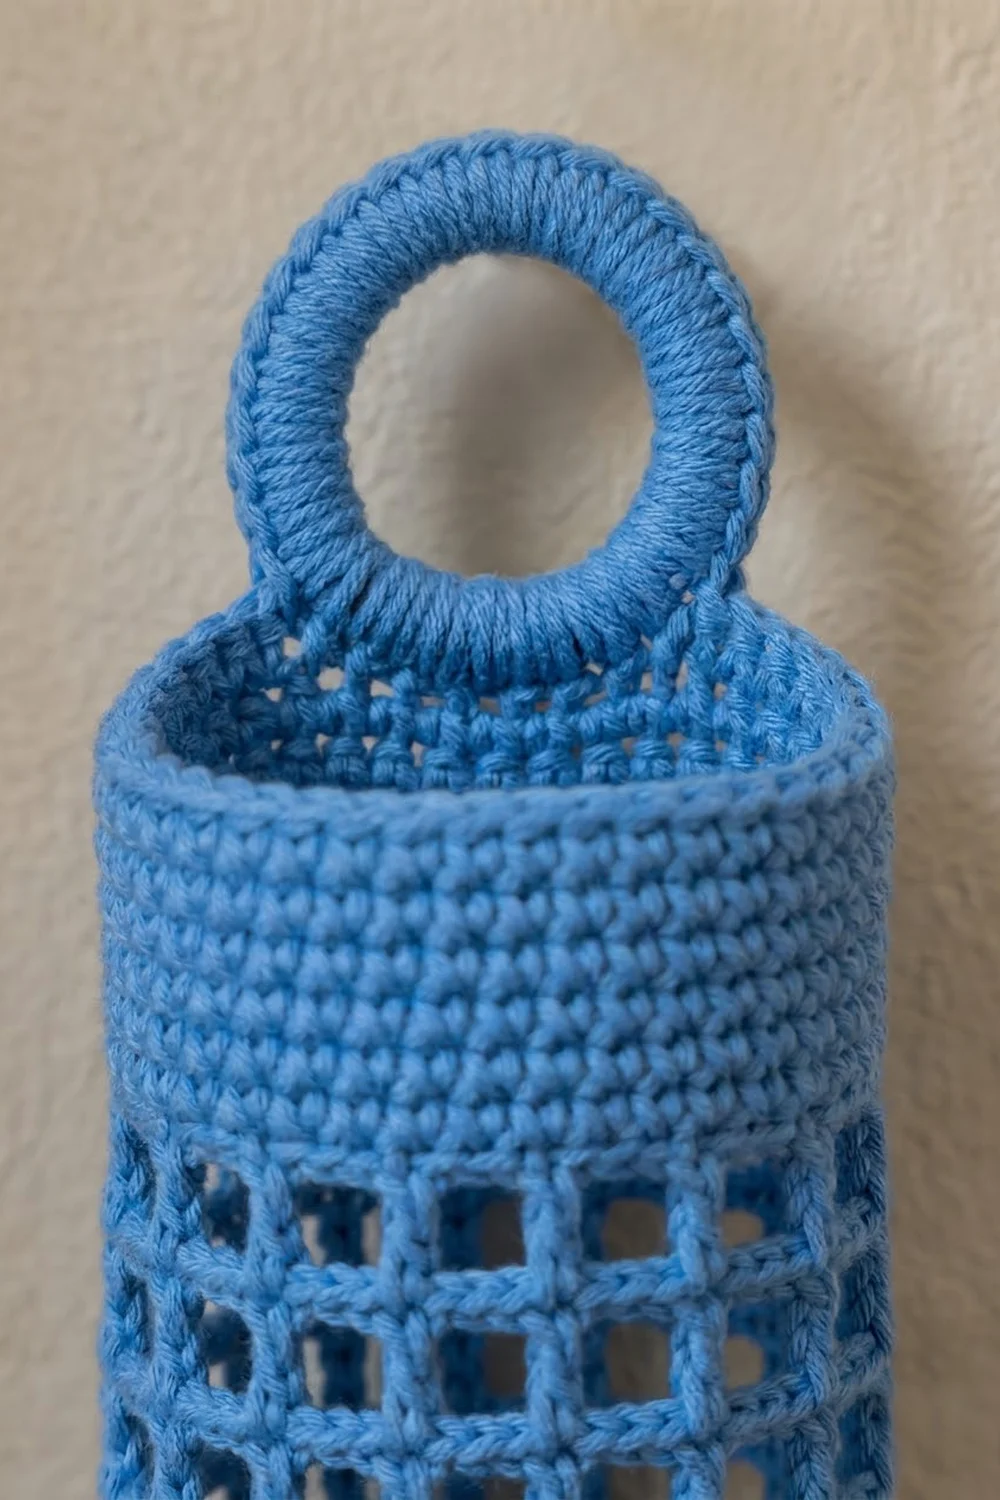
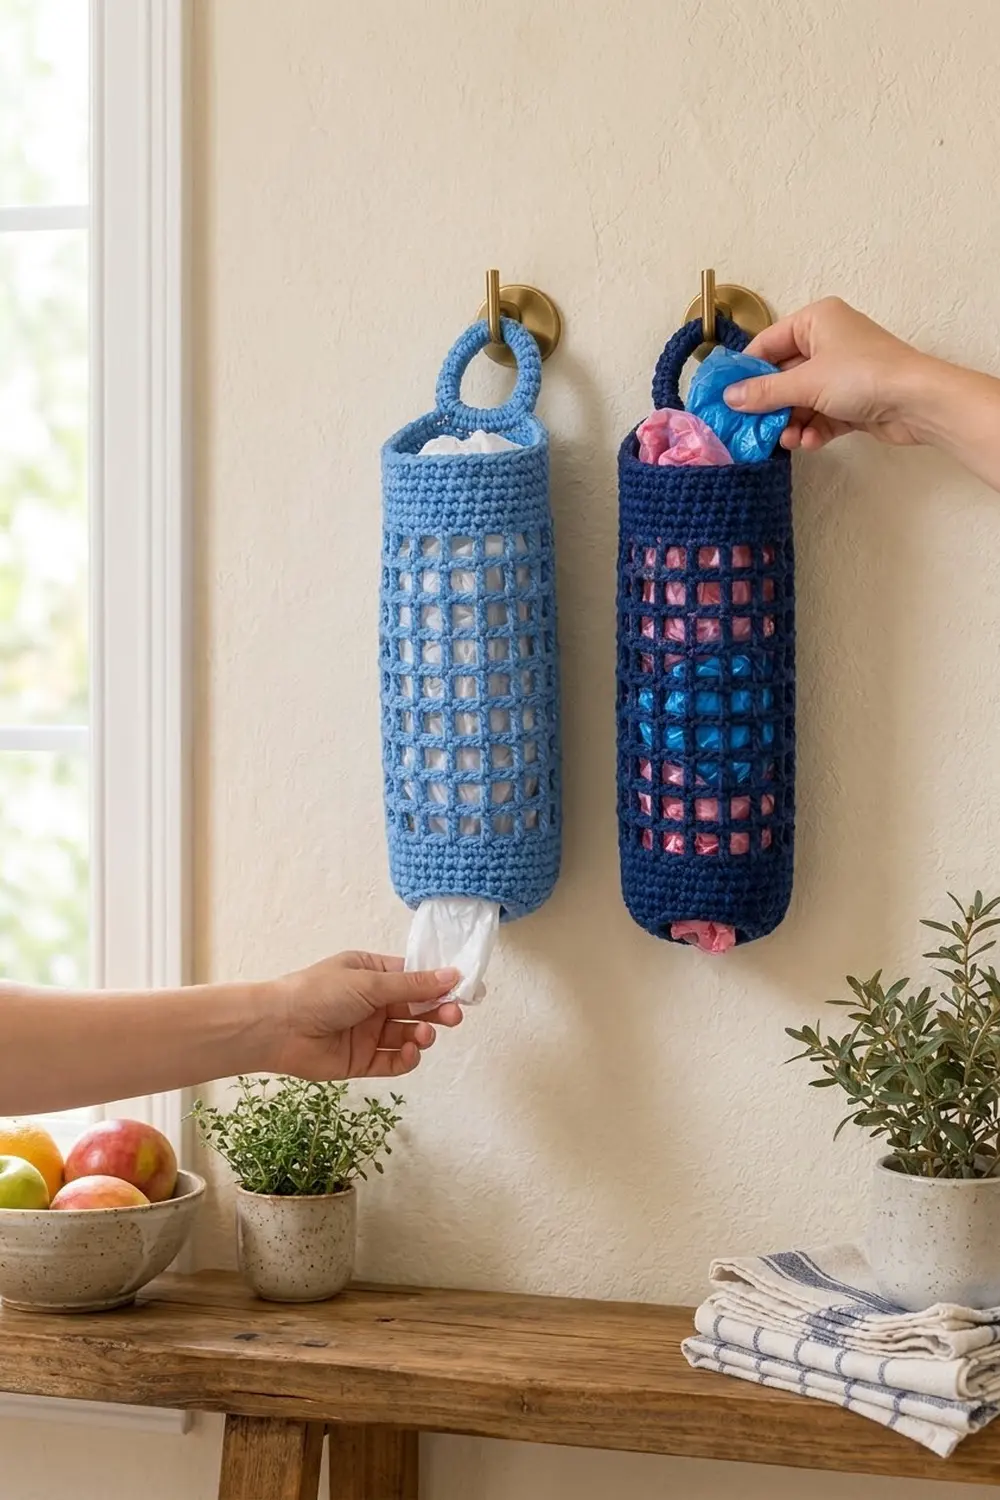
This holder turns a messy drawer of grocery bags into one tidy column on the wall. It is a simple tube with a solid band at the bottom, a tall section of open filet mesh, a matching solid band at the top, and a sturdy ring for hanging.
The sample is worked in a medium cornflower blue cotton. It looks just as good in navy, and a pair in two shades makes it easy to keep different kinds of bags apart. Because of the mesh, you can see at a glance when you are running low.
The pattern uses US crochet terms. The finished holder measures 12 in (30.5 cm) around, 6 in (15.2 cm) wide when flat, and 14 in (35.6 cm) tall. The ring adds about 2.25 in (5.7 cm).
You work the whole tube in joined rounds from the bottom edge up, so there is no side seam. The hanging ring is worked straight off the last round, which makes the holder one piece with only two ends to weave in.
Finished Size and Construction
- Finished size: 12 in (30.5 cm) around, 6 in (15.2 cm) flat width, 14 in (35.6 cm) tall; 16.25 in (41.3 cm) including the ring
- Skill level: Easy
- Terminology: US crochet terms
- Yarn weight: Worsted (#4), cotton or cotton blend
- Hook: US H-8 (5.0 mm)
- Number of pieces: 1
- Layout: Single vertical tube, worked bottom to top in joined rounds
- Piece size: 48 stitches around (24 per flattened side)
- Size before border: 12 in (30.5 cm) around x 12 in (30.5 cm) tall (bottom band plus mesh)
- Border depth: 2 in (5.1 cm) top band, plus a hanging ring about 2.5 in (6.4 cm) across
Materials
Choose a smooth worsted cotton or cotton blend. Cotton holds its shape, doesn’t stretch much under the weight of the bags, and is easy to wash. Acrylic also works, but the tube may get a little longer over time as the bags pull on it.
- Main color (cornflower blue): 80 g, about 136 m (149 yd)
- Optional variant (navy blue): 80 g, about 136 m (149 yd) for a second holder
These amounts include a margin of about 25 percent for checking gauge and weaving in ends. One standard 100 g ball of most worsted cottons makes one holder. For a darker shade like navy, work in good light so you can see the stitches clearly at the tops of the double crochet bars.
Tools:
- US H-8 (5.0 mm) crochet hook
- Locking stitch marker
- Tapestry needle
- Scissors
- Tape measure
- Rolled towel or cardboard tube about 3.75 in (9.5 cm) across, for blocking
Abbreviations (US Terms)
- ch – chain
- sl st – slip stitch
- sc – single crochet
- dc – double crochet
- st(s) – stitch(es)
- sp – space
- fsc – foundation single crochet
- BLO – back loop only
Special stitch – Foundation single crochet (fsc): Ch 2 and insert the hook in the 2nd ch from the hook. Yarn over and pull up a loop. Yarn over and pull through 1 loop (this is the “chain”). Yarn over and pull through both loops (this is the “sc”). For each fsc after that, insert the hook under the 2 loops of the previous “chain” and repeat. This makes a stretchy, even bottom edge.
Mesh square: 1 dc plus the ch-2 sp after it. Each square uses 3 stitches of the round below.
Gauge and Checkpoints
Single crochet gauge: 16 sc x 18 rounds = 4 in (10.2 cm) in joined rounds.
Mesh gauge: 4 mesh squares = 3 in (7.6 cm) wide, and 3 mesh rounds = 2 in (5.1 cm) tall. Each square is about 0.75 in (1.9 cm) wide and 0.67 in (1.7 cm) tall.
Test gauge on the holder itself instead of a separate swatch. Work the bottom band first and measure it before you go on. To measure the mesh, lay the tube flat and count squares across one flat side. Eight squares should measure 6 in (15.2 cm).
Checkpoints:
- After Round 1: the ring of 48 fsc lies flat and measures 12 in (30.5 cm) around.
- After Round 9: the bottom band is 2 in (5.1 cm) tall and still 12 in (30.5 cm) around.
- After Round 24: the piece is 12 in (30.5 cm) tall from the bottom edge.
- After Round 33: the tube is 14 in (35.6 cm) tall.
If too big: change to a 4.5 mm hook. If too small: change to a 5.5 mm hook. Fix this at Checkpoint 1 or 2. Don’t change the stitch count, because the mesh repeat needs exactly 48 stitches (16 repeats of 3).
Bottom Band
Leave a 6 in (15.2 cm) tail.
Round 1: Work 48 fsc. Without twisting, sl st to the first fsc to join into a ring. (48 sc)
The join sits at the center back of the holder. Place a marker in the first st of each round.
Round 2: Ch 1 (does not count as a st), sc in each st around, sl st to first sc to join. (48 sc)
Rounds 3–9: Repeat Round 2. (48 sc in each round)
The bottom band is now 9 rounds, or 2 in (5.1 cm), tall. The full-width opening at this end is where you’ll pull the bags out.
Mesh Body
Round 10 (first mesh round): Ch 5 (counts as 1 dc plus ch 2), skip next 2 sts, dc in next st, ch 2, skip next 2 sts; repeat from * to * 14 more times, sl st to 3rd ch of beginning ch-5. (16 dc and 16 ch-2 sps)
Check: 16 squares x 3 sts = 48 sts, so each stitch of Round 9 is used once.
Round 11: Ch 5 (counts as dc plus ch 2), dc in next dc, ch 2; repeat from * to * 14 more times, sl st to 3rd ch of beginning ch-5. (16 dc and 16 ch-2 sps)
Each new dc sits directly on top of the dc below it. This keeps the bars vertical and the windows square.
Keep the ch-2 spaces relaxed but not loose. If the chains are tight, the round pulls in and the windows narrow. If they are loose, the bars lean and the mesh sags when the holder is full.
Rounds 12–24: Repeat Round 11. (16 dc and 16 ch-2 sps in each round)
You now have 15 mesh rounds, or 10 in (25.4 cm) of mesh. Measure from the bottom edge. The piece should be 12 in (30.5 cm) tall.
Border: Top Band and Hanging Ring
The top band and the ring act as the border. They give the opening a firm rim, so the tube keeps its shape while you push bags in from the top.
Border gauge: the same as the bottom band, 16 sc x 18 rounds = 4 in (10.2 cm).
Round 25 (conversion round): Ch 1, sc in same st as join, 2 sc in next ch-2 sp, sc in next dc, 2 sc in next ch-2 sp; repeat from * to * 14 more times, sl st to first sc to join. (16 sc worked 1 per dc + 32 sc worked 2 per ch-2 sp = 48 sc)
When you flatten the tube with the join at center back, each side has 24 sc: 8 dc bars (8 sc) plus 8 spaces (16 sc).
Round 26: Ch 1, sc in each st around, sl st to first sc to join. (48 sc; 24 per flattened side)
Rounds 27–33: Repeat Round 26. (48 sc in each round)
The top band is 9 rounds, or 2 in (5.1 cm). The tube is now 14 in (35.6 cm) tall.
Why the math works: The bands and the mesh use the same 48-stitch base. The mesh splits those 48 sts into 16 squares of 3. The conversion round puts back exactly 3 sts per square (1 on the bar and 2 in the space), so the top band matches the bottom band at 48 sts and 12 in (30.5 cm) around. Nothing flares out or pulls in.
Hanging ring: The ring sits centered over the join at the back. Number the Round 33 sts starting at the join: st 1 is the first sc and st 48 is the last.
- Do not fasten off. Sl st in st 2.
- Ch 24. Without twisting the chain, sl st in st 46. The chain now forms a loop with its base spanning sts 46 to 2 (5 sts, centered on the join).
- Ring Round 1: Work 40 sc around the chain loop. Work over the chain (into the loop, not into the chain stitches), and push the stitches together so they cover the chain completely. Sl st in st 2. (40 sc)
- Ring Round 2: Turn. Sl st in BLO of each of the 40 sc of the ring, then sl st in st 46. (40 sl st)
- Fasten off, leaving an 8 in (20.3 cm) tail.
Working 40 sc over 24 ch packs the outer edge tightly, which gives the ring its thick, rounded look. Ring Round 2 adds a neat chain ridge and makes the ring stiffer.
Thread the tail on a needle and whipstitch twice through base sts 46, 47, 48, 1, and 2. This spreads the weight of a full load of bags so no single stitch carries it.
Ring checkpoint: The ring is about 2.5 in (6.4 cm) across the outside, with an opening about 1.5 in (3.8 cm) across. It rises about 2.25 in (5.7 cm) above the top edge. If the ring stands crooked, the chain was twisted in step 2. Pull the stitches out back to step 2 and chain again.
Final Blocking
- Weave in both ends through the solid bands, where they won’t show.
- Soak the holder in cool water for 10 minutes. Squeeze it gently and don’t wring it.
- Roll it in a dry towel to remove extra water.
- Slide it over a rolled towel or a cardboard tube about 3.75 in (9.5 cm) across.
- Line up the dc bars so they run straight up and down, and nudge each window into a square.
- Check the height. The tube should be 14 in (35.6 cm) tall. Pat the bands to 12 in (30.5 cm) around.
- Shape the ring into a circle and let everything dry completely, standing upright.
Final Quality-Control Checklist
- Circumference is 12 in (30.5 cm) at the bottom band, the mesh, and the top band
- Flat width is 6 in (15.2 cm) all the way up
- Tube height is 14 in (35.6 cm), and total height with the ring is 16.25 in (41.3 cm)
- Every mesh round has 16 dc and 16 ch-2 sps
- Both bands have 48 sc per round, 24 per flattened side
- Bottom and top bands are both 9 rounds, 2 in (5.1 cm) deep
- Dc bars line up in straight vertical columns
- The line of joins runs straight up the center back
- Ring is centered over the join and firmly attached
- All ends are woven in securely
Troubleshooting
The tube twists into a spiral. Joined rounds tend to drift. End each round with a sl st into the first st, and start the next round in that same st. Blocking also straightens a slight twist.
The mesh windows look like rectangles. Your dc are taller or shorter than the gauge. Pull up the dc loop a little less (or a little more) so each square stays close to 0.75 in (1.9 cm).
The top band flares out or pulls in. Recount Round 25. It must have exactly 48 sc: 1 in each dc and 2 in each space.
The mesh section is too short. Add 1 or 2 mesh rounds (each about 0.67 in / 1.7 cm), and note that this changes the final height.
Bags slide out too easily. The bottom opening is full width by design. For a snugger opening, work one extra sc round into the foundation edge with a 4.5 mm hook.
The ring stretches. Pack the 40 sc more tightly, and don’t skip Ring Round 2 or the base reinforcement.
The join line looks lumpy. Make sure the ch-1 at the start of each sc round doesn’t count as a stitch and isn’t worked into on the next round.
Care
Machine wash cold on a gentle cycle inside a laundry bag, then reshape it and lay it flat or hang it to dry. Avoid hot tumble drying, which can shrink cotton.
Final Notes
Every measurement in this holder starts from one number: 48 stitches at 16 sc per 4 in (10.2 cm), which gives 12 in (30.5 cm) around. The 9-round bottom band adds 2 in (5.1 cm), the 15 mesh rounds of 16 squares add 10 in (25.4 cm), and the 9-round top band adds another 2 in (5.1 cm), for a tube 14 in (35.6 cm) tall. The ring brings the total height to 16.25 in (41.3 cm).
Check your gauge at the first two checkpoints, and the rest of the measurements will follow. Fill the holder loosely from the top, pull bags from the bottom, and it will keep its shape for years.
Happy crocheting!