

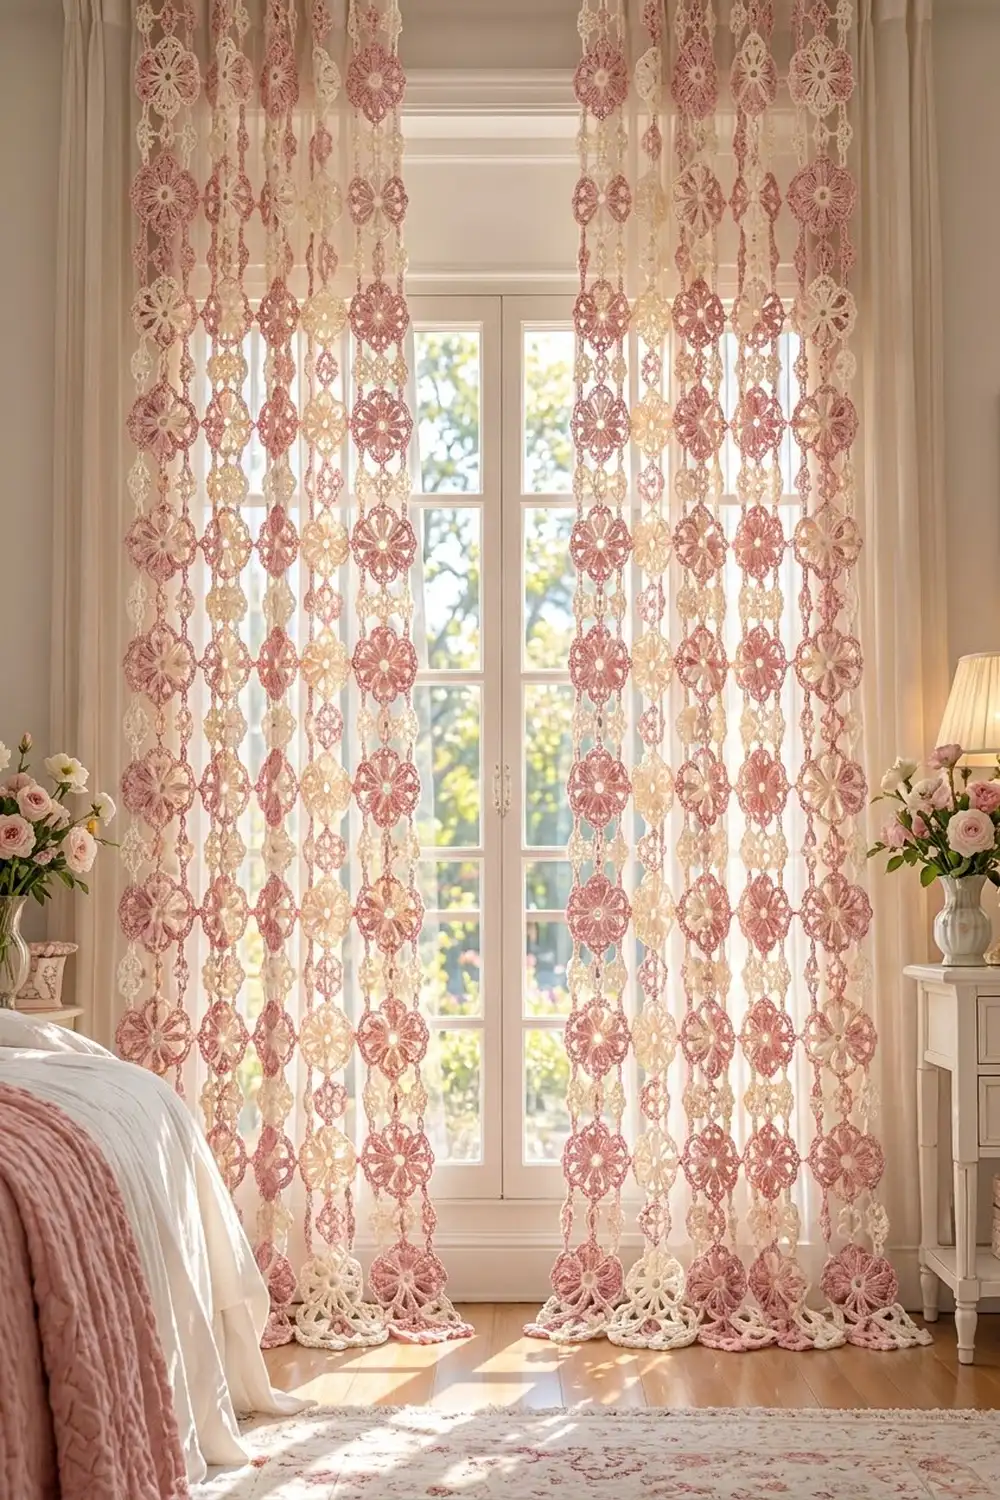
This curtain is made from six-petal flower motifs in blush pink and soft cream. They hang in long vertical strands from a simple header band. Each flower has an open cream center ring, a round of cream spokes, and six fan-shaped petals that alternate between the two colors. Chain arches in the second color outline the petals of the first color, which gives each flower a layered, lacy look.
The motifs come in two colorways that alternate down each strand. Motif A is mostly cream with pink accents, and Motif B is mostly pink with cream accents. Neighboring strands start with different motifs, so a checkerboard of pink and cream runs across the window. The style is light and romantic. The curtain lets daylight through while it softens the view.
The pattern uses US crochet terms. One finished panel measures 44 in (111.8 cm) wide and 80 in (203.2 cm) long, including the header. The curtain in the photos is a pair, so make two panels.
You crochet the header band first and then build each strand downward from it. Each strand has 12 flower motifs linked by short corded connectors. Every motif is worked in the round in 4 rounds.
Finished Size and Construction
- Finished panel size: 44 in (111.8 cm) wide x 80 in (203.2 cm) long
- Skill level: Intermediate
- Terminology: US crochet terms
- Yarn weight: DK (light worsted, #3) cotton or cotton blend
- Hook: 4.0 mm (G-6)
- Number of pieces per panel: 96 flower motifs (48 Motif A, 48 Motif B), 96 connectors, 1 header band
- Layout: 8 vertical strands of 12 motifs each
- Motif size: 5 in (12.7 cm) across, measured tip to tip
- Size before border (strands only): 8 strands of 78 in (198.1 cm), spaced 5.5 in (14.0 cm) apart, center to center
- Border (header band) depth: about 2 in (5.1 cm), folded into a rod pocket
Materials
Choose a smooth, tightly plied cotton. It gives crisp stitch definition and hangs straight. Avoid stretchy acrylic, because a long, heavy curtain in a stretchy yarn can grow several inches after you hang it.
The amounts below assume a DK cotton with about 115 m per 50 g. They are for one pair (two panels):
- Color 1, Cream: 1,200 g (about 2,760 m), or 24 balls of 50 g
- Color 2, Blush Pink: 560 g (about 1,288 m), or 12 balls of 50 g
For a single panel, use 600 g (1,380 m) of cream and 280 g (644 m) of pink.
Tools:
- 4.0 mm (G-6) crochet hook
- Tapestry needle
- Locking stitch markers (at least 10)
- Measuring tape
- Blocking mats, rustproof pins, and a spray bottle
- Curtain rod up to 1.5 in (3.8 cm) in diameter
These quantities include a margin of about 10 percent for swatches, color changes, and weaving in ends.
Abbreviations (US Terms)
- ch – chain
- sl st – slip stitch
- sc – single crochet
- hdc – half double crochet
- dc – double crochet
- sk – skip
- sp(s) – space(s)
- st(s) – stitch(es)
- beg – beginning
- rep – repeat
- RS – right side
Special term: tip. A tip is the ch-3 space at the point of each petal on Round 4. Each finished motif has 6 tips. Opposite tips are 3 tips apart.
Special stitch: corded connector. Ch 10 from the starting tip or stitch, then sl st into the target tip. Turn and work 14 sc over the ch-10, going around the chain instead of into it. Sl st into the starting point. This makes a firm, rounded bar about 1.5 in (3.8 cm) long.
Gauge and Checkpoints
Motif gauge: One finished motif measures 5 in (12.7 cm) tip to tip after light blocking.
Header gauge: 16 hdc and 12 rows = 4 in (10.2 cm).
Make one Motif A as a test piece before anything else, and check it at each stage:
- After Round 1: 1.5 in (3.8 cm) across, with a center hole about 0.75 in (1.9 cm) wide
- After Round 2: 2.75 in (7.0 cm) across
- After Round 3: 4 in (10.2 cm) across the cream petals
- After Round 4: 5 in (12.7 cm) tip to tip
If your motif is bigger than 5 in (12.7 cm), change to a 3.75 mm hook. If it’s smaller, change to a 4.5 mm hook. Even 1/4 in (0.6 cm) per motif adds up to 3 in (7.6 cm) over a 12-motif strand.
Check the header gauge with a swatch of 20 hdc worked over 12 rows. If you get more than 16 stitches in 4 in (10.2 cm), go up a hook size for the header only. If you get fewer, go down a size.
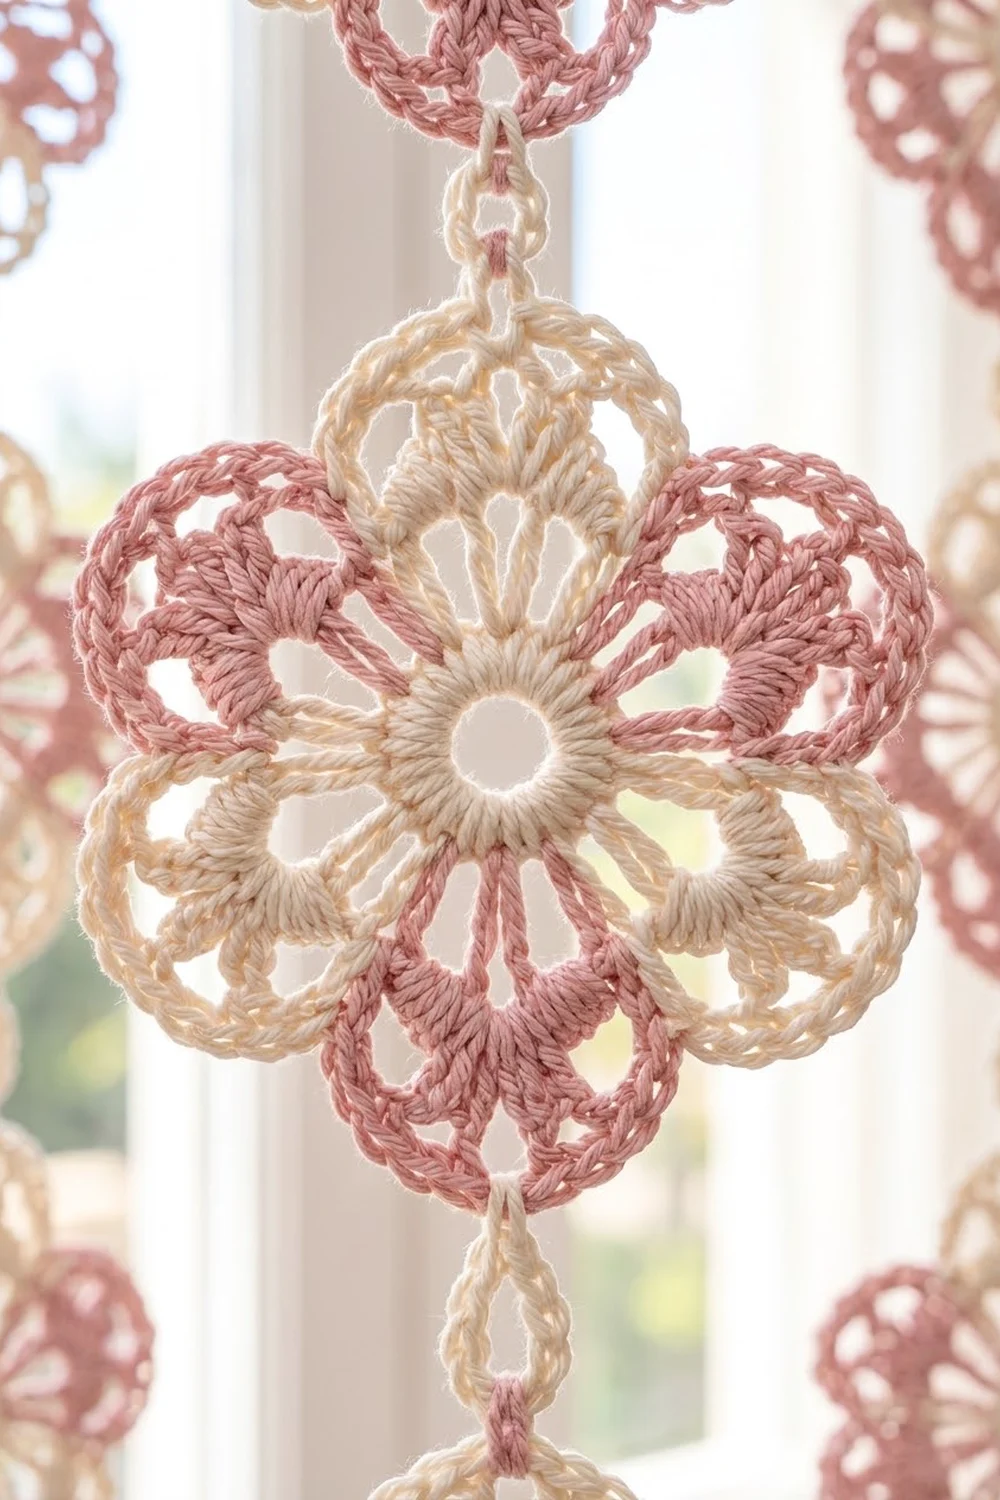
Motif A (Cream-Dominant)
Rounds 1 to 3 are cream and Round 4 is pink. Don’t turn at the end of any round. Keep the RS facing you throughout.
Round 1 (cream): Ch 8 and sl st to the first ch to form a ring. Ch 1 and work 24 sc into the ring. Sl st to the first sc. (24 sc)
Round 2 (cream): Ch 5 (counts as dc + ch 2) and sk the next sc. Dc in the next sc, ch 2, sk the next sc. Rep from * 10 more times. Sl st to the 3rd ch of the beg ch-5. (12 dc, 12 ch-2 sps)
This round makes the spokes. Each ch-2 sp sits over 1 skipped sc, so 12 dc + 12 skipped sc uses all 24 stitches of Round 1.
Round 3 (cream petals): Sl st into the first ch-2 sp. Ch 3 (counts as dc) and work 3 dc in the same sp. Ch 2, then work 4 dc in the next ch-2 sp. This is the first petal. Ch 6 and sk the next 2 ch-2 sps. Work 4 dc in the next ch-2 sp, ch 2, and 4 dc in the next ch-2 sp. Ch 6 and sk the next 2 ch-2 sps. Rep from * once more. Sl st to the top of the beg ch-3 and fasten off.
(3 petals of 8 dc each = 24 dc, 3 ch-2 tips, 3 ch-6 bridges)
Check the space math: 3 petals x 2 sps + 3 bridges x 2 skipped sps = 12 sps, which matches Round 2. The ch-6 bridges mark where the pink petals go in Round 4.
Round 4 (pink petals and outlines): Join pink with a sl st in any ch-6 bridge. Ch 3 (counts as dc), then work (4 dc, ch 3, 5 dc) in the same bridge. This is the first pink petal.
Outline the next cream petal: Ch 5, work (sc, ch 3, sc) in the ch-2 tip of the cream petal, then ch 5.
Work (5 dc, ch 3, 5 dc) in the next ch-6 bridge. Ch 5, work (sc, ch 3, sc) in the next ch-2 tip, then ch 5. Rep from * once more. Sl st to the top of the beg ch-3 and fasten off.
(3 pink petals of 10 dc each = 30 dc, 6 sc, 6 ch-5 arches, 6 ch-3 tips)
You now have six petals in alternating colors: three solid pink fans and three cream fans framed by pink chain arches. Each petal ends in a ch-3 tip.
Motif B (Pink-Dominant)
Motif B uses the same stitches as Motif A. Only the colors of Rounds 3 and 4 change.
Rounds 1–2 (cream): Work as for Motif A and fasten off at the end of Round 2. (12 dc, 12 ch-2 sps)
Round 3 (pink): Join pink with a sl st in any ch-2 sp. Ch 3, then work as for Motif A Round 3 from “3 dc in the same sp.” Fasten off. (24 dc, 3 ch-2 tips, 3 ch-6 bridges)
Round 4 (cream): Join cream in any ch-6 bridge and work as for Motif A Round 4. Fasten off. (30 dc, 6 sc, 6 ch-5 arches, 6 ch-3 tips)
The center stays cream on both motifs, so every flower shows the same pale ring.
Weave in the ends on each motif as you finish it. Run them through the backs of the dc so they don’t show through the open lace.
Make All Pieces
For one panel, make:
- 48 Motif A (each uses about 4.5 g cream and 2.5 g pink)
- 48 Motif B (each uses about 4.5 g cream and 2.5 g pink)
For the pair, double these numbers to 96 Motif A and 96 Motif B.
Layout grid for one panel (columns are strands S1 to S8, and rows are motif positions counted from the top):
        S1 S2 S3 S4 S5 S6 S7 S8
Row 1:   A  B  A  B  A  B  A  B
Row 2:   B  A  B  A  B  A  B  A
Rows 3-12: repeat Rows 1-2 five more times
Each strand has 6 A and 6 B. Across 8 strands, that makes 48 of each.
Border: Header Band
The header band is the border of this curtain. It holds the rod and sets the spacing for every strand, so make it before you join anything.
Border gauge: 16 hdc = 4 in (10.2 cm), so 4 hdc = 1 in (2.5 cm).
Foundation: With cream, ch 178.
Row 1 (RS): Hdc in the 3rd ch from the hook. The 2 skipped ch don’t count as a stitch. Hdc in each ch across and turn. (176 hdc)
Rows 2–12: Ch 2 (doesn’t count as a stitch). Hdc in each st across and turn. (176 hdc each row)
The band now measures 44 in (111.8 cm) wide and 4 in (10.2 cm) tall.
Row 13 (closing row): Fold the band in half lengthwise so the foundation chain lines up behind Row 12. Ch 1. Working through each st of Row 12 and the matching foundation ch together, sc across. Fasten off. (176 sc)
This closes the rod pocket, which is about 2 in (5.1 cm) deep. Leave both short ends open for the rod.
Counts per side of the finished header:
- Top long side (the fold between Rows 6 and 7): 176 sts wide
- Bottom long side (Row 13): 176 sc
- Each short side: left open, with 6 row-ends on each layer
Mark the strand points: Divide Row 13 into 8 sections of 22 sts. Place a marker in the 11th sc of each section: sts 11, 33, 55, 77, 99, 121, 143, and 165.
Why the math works: 8 strands x 22 sts = 176 sts. At 4 sts per inch, 22 sts = 5.5 in (14.0 cm) and 176 sts = 44 in (111.8 cm). Each strand hangs near the center of its own section. A 5 in (12.7 cm) motif in a 5.5 in (14.0 cm) section leaves a 0.5 in (1.3 cm) gap between neighboring strands, so the flowers sit close together without rubbing or tangling.
Joining: Building the Strands
All joining uses the corded connector. Work it in cream from the header down, one strand at a time.
Top connector: Join cream with a sl st in the marked st of section 1. Ch 10, then sl st into any tip of the first motif in that strand (see the grid). Turn and work 14 sc over the ch-10. Sl st into the marked header st and fasten off.
Motif-to-motif connector: On the motif you just attached, count 3 tips from the joined tip to find the opposite tip, and join cream there. Ch 10, then sl st in any tip of the next motif. Turn and work 14 sc over the ch-10. Sl st into the starting tip and fasten off.
Rep the motif-to-motif connector until the strand has 12 motifs. Each strand has 1 top connector + 11 motif-to-motif connectors = 12 connectors. With 8 strands, that makes 96 connectors per panel.
Stitch-to-stitch logic: Every connector joins one tip to another tip, or one header sc to one tip. Nothing is added to the motifs, so each motif keeps its own counts. Always join through opposite tips so each flower hangs upright, with one point up and one point down.
Tension advice: Keep the ch-10 relaxed but even. A tight chain pinches the tips and shortens the strand, and a loose chain lets the motifs twist. Pack the 14 sc firmly along the chain so the connector stays straight.
Size checkpoint: After the top connector and the first 3 motifs of strand 1, hang the header from a rod and measure. Below the header you should have 3 connectors x 1.5 in (3.8 cm) + 3 motifs x 5 in (12.7 cm) = 19.5 in (49.5 cm). The full strand is 12 x 1.5 in (3.8 cm) + 12 x 5 in (12.7 cm), which is 18 in (45.7 cm) + 60 in (152.4 cm) = 78 in (198.1 cm). Add the 2 in (5.1 cm) header for a total of 80 in (203.2 cm).
Final Blocking
- Lay each finished strand flat on blocking mats. Work in sections if your mats are short.
- Mist the strand with water until it is damp but not soaked.
- Pin each motif to 5 in (12.7 cm) tip to tip, with one pin in each ch-3 tip.
- Ease each ch-5 arch into a smooth curve around the petal it frames.
- Straighten each connector so it runs in a straight line from tip to tip.
- Pin the header flat to 44 in (111.8 cm) wide, with the strands centered on their markers.
- Let everything dry completely, then unpin and hang.
- After 2 days of hanging, measure the length again. Cotton may relax by up to 1 in (2.5 cm).
Final Quality-Control Checklist
- Every motif measures 5 in (12.7 cm) tip to tip.
- Every motif has 6 petals in alternating colors and 6 ch-3 tips.
- Motif A and Motif B alternate down each strand and across each row, matching the grid.
- Each strand has exactly 12 motifs and 12 connectors.
- All connectors join opposite tips, so every flower hangs point-up.
- The header has 176 sts, and strands hang from sts 11, 33, 55, 77, 99, 121, 143, and 165.
- The panel measures 44 in (111.8 cm) x 80 in (203.2 cm).
- All ends are woven in and trimmed.
- The rod slides easily through the open pocket ends.
Troubleshooting
The motif cups. The Round 3 bridges are too short. Work ch 7 instead of ch 6.
The motif ruffles. The bridges are too long. Work ch 5 instead of ch 6.
The arches pull the inner petals inward. Your ch-5 arches are too tight. Work them more loosely, or go up a hook size for Round 4 only.
The strands are different lengths. Your connectors aren’t consistent. Count the chains every time and compare each connector with a finished one.
The flowers twist as they hang. You joined tips that aren’t opposite each other. Count 3 tips from the joined tip every time.
The header sags between strands. The header gauge is loose, or the rod is too thin. Redo the header on a smaller hook, or use a sturdier rod.
The curtain grew after hanging. The yarn has relaxed. Block again and dry the panel flat instead of on the rod.
Care
Hand wash in cool water with a mild detergent, then press out the water in a towel. Dry flat and reshape the motifs while they are still damp.
Final Notes
The measurement chain is short and easy to check. Each motif is 5 in (12.7 cm) across, and each connector is 1.5 in (3.8 cm). Twelve of each make a 78 in (198.1 cm) strand, and the 2 in (5.1 cm) header brings the panel to 80 in (203.2 cm). Across the width, 8 sections of 22 sts at 4 sts per inch give exactly 44 in (111.8 cm).
If your test motif hits 5 in (12.7 cm) and your header swatch hits 16 hdc in 4 in (10.2 cm), every other number will fall into place. Work steadily, one strand at a time, and soon you’ll have a window full of blush and cream flowers.
Happy crocheting!