

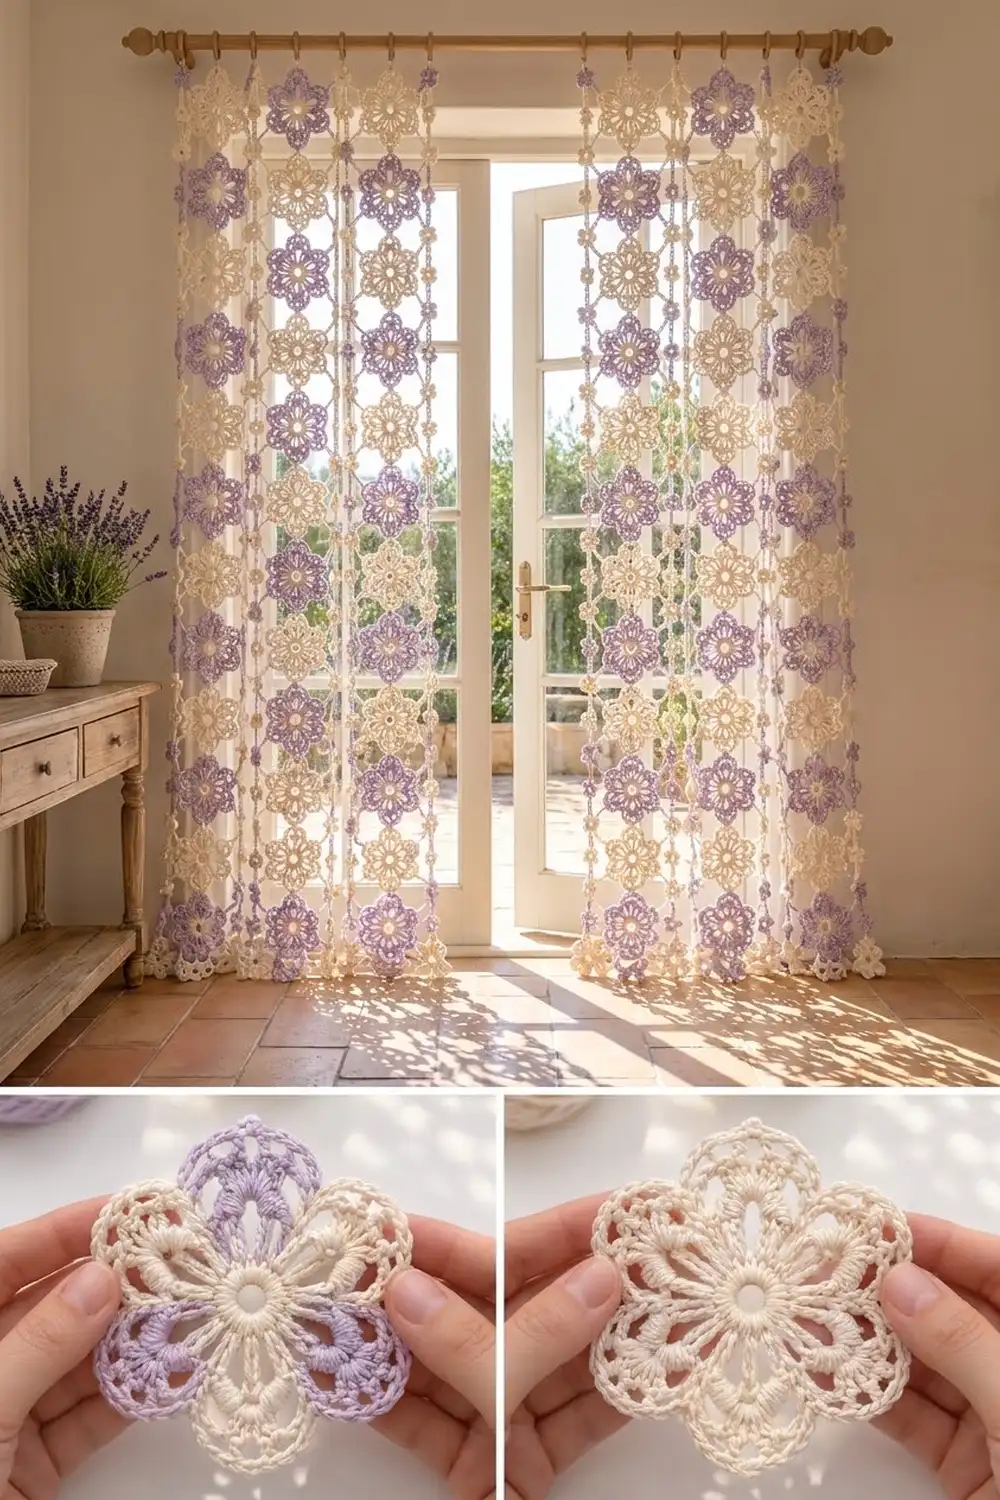
This curtain panel is made of soft six-petal flowers hanging in airy vertical strands. Each flower has a solid cream ring around an open center, lacy chain frames, and full fan-shaped petals with a delicate looped edge. Small cream mini-flowers link one motif to the next, so light pours through the gaps.
The palette is lavender and cream. Half the motifs are all cream, and half have a cream center with lavender petals. They alternate in a checkerboard across the panel, which gives the soft, sunlit, cottage look of a lavender field.
The pattern uses US crochet terms. One finished panel measures 40 in (101.6 cm) wide and about 81 in (205.7 cm) long from the top of the rod pocket to the lowest mini-flower. For a pair, make two panels.
Construction is simple and modular. You crochet each flower in four rounds. Then you link the flowers into strands with mini-flower connectors. Finally, you crochet a folded rod-pocket header and hang the strands from it.
Finished Size and Construction
- Finished panel size: 40 in (101.6 cm) wide x 81 in (205.7 cm) long
- Skill level: Intermediate
- Terminology: US crochet terms
- Yarn weight: DK (#3) cotton
- Hook: 3.5 mm (E-4)
- Number of pieces per panel: 96 flower motifs, 104 mini-flower connectors, 1 header
- Layout: 8 strands x 12 motifs, checkerboard colorway
- Motif size: 4.5 in (11.4 cm) tip to tip vertically, about 4 in (10.2 cm) side to side
- Strand length before header: 79.5 in (201.9 cm)
- Header (border) depth: 1.5 in (3.8 cm) folded, 3 in (7.6 cm) flat
Materials
Use a smooth mercerized or combed cotton in DK weight. Cotton holds the petal shapes, blocks crisply, and doesn’t stretch much as it hangs. Avoid splitty or fuzzy yarns, because the chain loops need clear definition.
Yarn is based on 50 g balls of about 112 m (122 yd) each:
- Cream (Color A): 550 g, about 1,232 m (1,347 yd), 11 balls
- Lavender (Color B): 200 g, about 448 m (490 yd), 4 balls
These quantities are for one panel and include a margin of roughly 10–20%. Double them for a pair.
Tools:
– 3.5 mm (E-4) crochet hook
– Tapestry needle
– Scissors
– Stitch markers
– Measuring tape
– Blocking mats and rustproof pins
– Spray bottle
Abbreviations (US Terms)
- ch – chain
- sl st – slip stitch
- sc – single crochet
- hdc – half double crochet
- dc – double crochet
- tr – treble crochet
- sk – skip
- sp – space
- st(s) – stitch(es)
- RS – right side
Special stitch – Mini-Flower: Ch 5, sl st in 5th ch from hook to form a ring. Then work [ch 2, 2 dc in ring, ch 2, sl st in ring] 5 times. This makes 5 small petals about 1 in (2.5 cm) across.
Gauge and Checkpoints
Gauge matters most for the motif, because 96 small differences add up over the length of the panel. Make one test motif, block it, and measure it before you go on.
Motif checkpoints (blocked):
– After Rnd 1: ring is 1.5 in (3.8 cm) across
– After Rnd 2: 2.5 in (6.4 cm) across the loop tips
– After Rnd 3: 4 in (10.2 cm) tip to tip
– After Rnd 4: 4.5 in (11.4 cm) tip to tip
Connector checkpoint: One connector, laid flat, measures 2 in (5.1 cm), with the flower 1 in (2.5 cm) and each ch-4 stem 0.5 in (1.3 cm).
Header gauge: 20 sc and 24 rows = 4 in (10.2 cm), which is 5 sc and 6 rows per 1 in (2.5 cm).
If your motif is too big, go down half a hook size or work your tr stitches more snugly. If it’s too small, go up half a hook size. A difference of 0.25 in (0.6 cm) per motif changes the length of each strand by 3 in (7.6 cm), so fix it now.
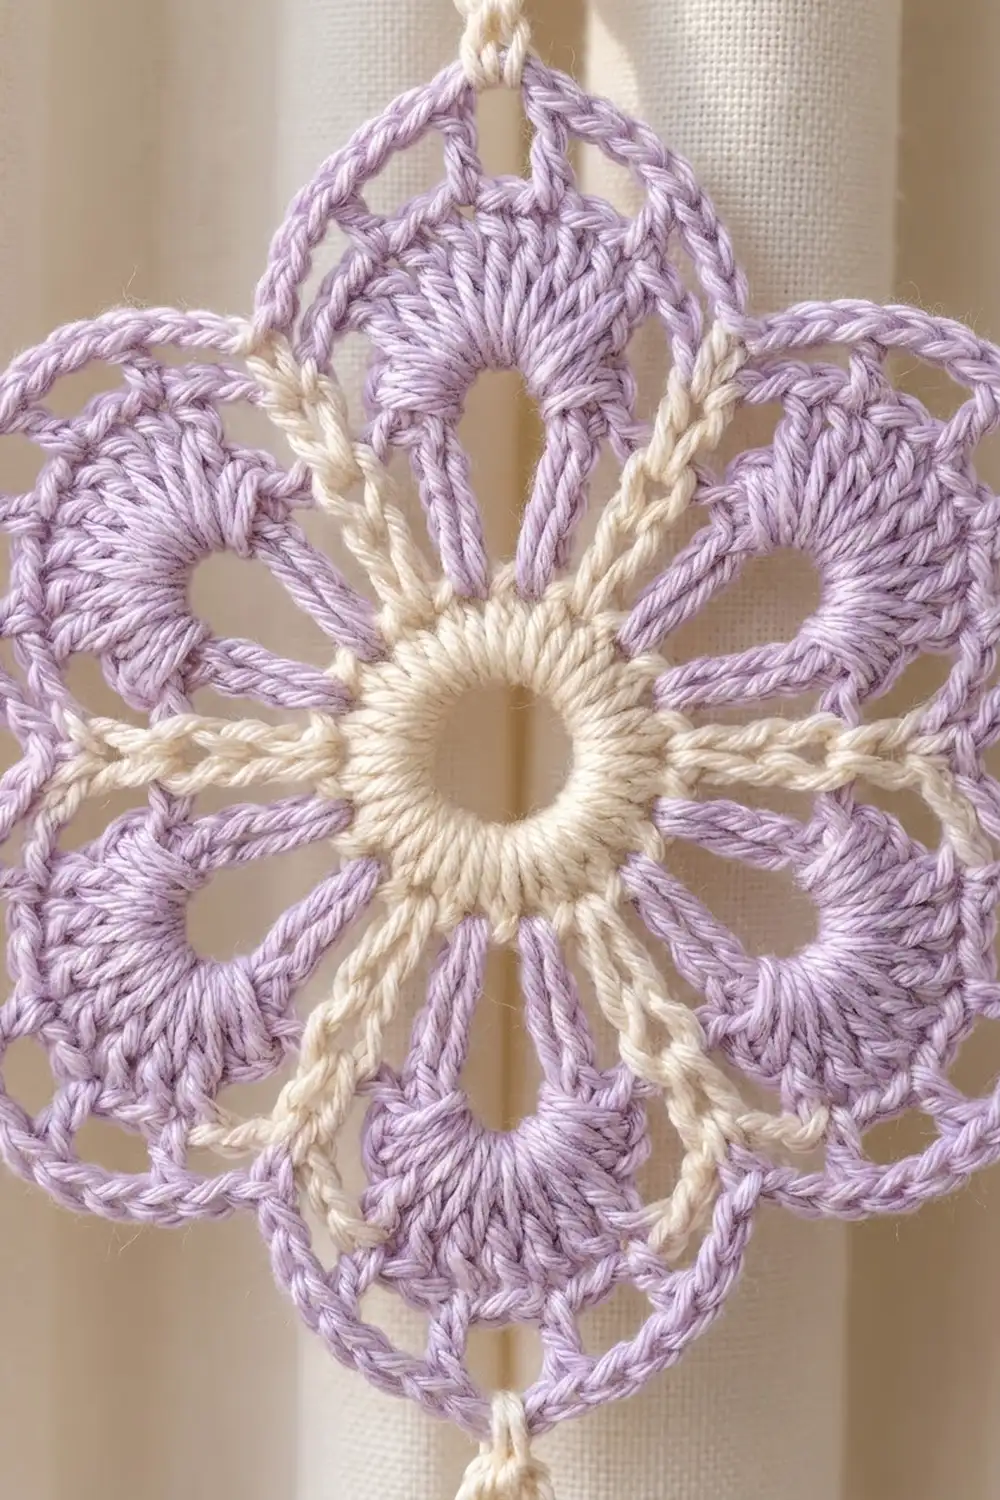
Flower Motif
Make two colorways:
– Motif A: all four rounds in cream
– Motif B: Rnds 1–2 in cream, Rnds 3–4 in lavender
Rnd 1 (cream)
Ch 6, sl st to the first ch to form a ring. Ch 3 (counts as dc), then work 23 dc in the ring. Sl st to the top of the ch-3.
(24 dc)
This makes the solid cream ring around the open center hole.
Rnd 2 (cream)
Ch 1. Sc in the same st, ch 7, sk 3 sts. Sc in next st, ch 7, sk 3 sts. Repeat from * 4 more times. Sl st to the first sc.
(6 sc, 6 ch-7 loops)
Check: each repeat uses 4 sts, and 6 x 4 = 24. These loops are the radiating petal frames.
For Motif B, fasten off cream here. Join lavender in any ch-7 loop and work Rnds 3–4 in lavender.
Rnd 3 – Petals
Sl st into the next ch-7 loop if you are continuing in cream. In each ch-7 loop, work (sc, hdc, 2 dc, 5 tr, 2 dc, hdc, sc), then sl st in the next sc of Rnd 2. Repeat around.
(13 sts per petal x 6 petals = 78 petal sts, plus 6 sl sts)
The graduated stitches make a rounded fan, and the 5 tr form its fullest part.
Rnd 4 – Lacy Petal Edge
This is a trim round worked into the 13 sts of each petal. Skip the sl sts between petals.
For each petal:
1. Sc in the first 4 sts.
2. [Ch 3, sc in next st] 2 times.
3. Ch 3, then work (sc, ch 5, sc) in the 7th st, which is the center tr. This is the tip loop.
4. [Ch 3, sc in next st] 3 times.
5. Sc in the last 3 sts.
Go straight on to the first sc of the next petal. At the end of the round, sl st to the first sc and fasten off.
Count per petal: 13 sc (1 per existing st) + 1 extra sc (at the tip) = 14 sc, plus 6 ch-3 loops and 1 ch-5 tip loop.
Round total: 78 + 6 = 84 sc, 36 ch-3 loops, 6 ch-5 tip loops.
The edge is symmetrical. There are 4 plain sc and 3 loops on each side of the tip.
Weave in all ends securely, because these motifs will hang with no backing.
Orientation: Hang each motif with one tip loop pointing straight up and the opposite tip loop pointing straight down. These two loops are the join points.
Make All Pieces
For one panel, make:
– Motif A (all cream): 48
– Motif B (cream center, lavender petals): 48
– Connectors: 104 (13 per strand)
Each strand uses 11 between-motif connectors, 1 top hanger, and 1 bottom drop. Connectors are worked in place during joining.
Layout grid (strands 1–8 left to right, row 1 at the top):
Row  1: A B A B A B A B
Row  2: B A B A B A B A
Row  3: A B A B A B A B
Row  4: B A B A B A B A
Row  5: A B A B A B A B
Row  6: B A B A B A B A
Row  7: A B A B A B A B
Row  8: B A B A B A B A
Row  9: A B A B A B A B
Row 10: B A B A B A B A
Row 11: A B A B A B A B
Row 12: B A B A B A B A
Every strand alternates colorways down its length. Odd-numbered strands start with A, and even-numbered strands start with B.
Joining
Between-Motif Connectors
Lay out one strand of motifs in order with their tips aligned vertically.
- With cream, join with a sl st in the bottom ch-5 tip loop of the upper motif.
- Ch 4.
- Work one Mini-Flower.
- Ch 4.
- Sl st in the top ch-5 tip loop of the motif below.
- Fasten off.
Repeat to link all 12 motifs: 11 connectors per strand.
Logic: Each connector joins only tip loop to tip loop, with no extra stitches added to the motifs. The motif counts stay at 84 sc and 42 loops each.
Tension: Keep the ch-4 stems at the same tension as your test connector. Tight stems pull the strand short. Loose stems sag and twist.
Bottom Drop
Join cream in the bottom tip loop of motif 12, ch 4, and work one Mini-Flower. Fasten off and weave in the tail through the ring.
Top Hanger
Join cream in the top tip loop of motif 1, ch 4, work one Mini-Flower, ch 4, and leave the loop live on a stitch marker. You will attach it to the header later.
Strand Size Checkpoint
- Motif + connector repeat: 6.5 in (16.5 cm)
- 12 motifs + 11 connectors: 76 in (193.0 cm)
- With hanger (2 in, 5.1 cm) and drop (1.5 in, 3.8 cm): 79.5 in (201.9 cm)
Measure each strand hanging freely and compare all 8 strands before you make the header.
Border: Rod-Pocket Header
The header is the panel’s only border. It holds all 8 strands at even spacing.
Border gauge: 5 sc and 6 rows per 1 in (2.5 cm).
Spacing: Each strand gets a 25-st section of header, which is 5 in (12.7 cm). The strand hangs from the 13th (center) stitch of its section, with 12 sts on each side.
Rows 1–18
- Row 1: With cream, ch 201. Sc in the 2nd ch from the hook and in each ch across. (200 sc)
- Rows 2–18: Ch 1, turn, sc in each st across. (200 sc per row)
The flat header now measures 40 in (101.6 cm) x 3 in (7.6 cm). Don’t fasten off.
Row 19 – Fold and Join
Fold the header in half lengthwise so Row 18 lies behind the foundation chain. With RS facing, ch 1. Sc through each Row 18 st and the matching free loop of the foundation chain together.
(200 sc)
This closes the rod pocket. The pocket is 1.5 in (3.8 cm) deep and fits a rod up to 1 in (2.5 cm) in diameter.
Edges
- Top edge: the fold, no stitches
- Bottom edge: Row 19, 200 sc
- Each short side: 9 row ends per layer, left unworked so the rod can slide through
Attaching Strands
Place markers in Row 19 sts 13, 38, 63, 88, 113, 138, 163, and 188.
Transfer each strand’s live top-hanger loop to the hook. Pull it through the marked stitch from front to back, ch 1 to secure, and fasten off. Attach the strands left to right in layout order.
Why the Math Works
- 8 strands x 25 sts per section = 200 sc.
- At 5 sc per in, 200 sc = 40 in (101.6 cm).
- Strand centers are 25 sts apart, or 5 in (12.7 cm).
- Each motif is about 4 in (10.2 cm) wide, which leaves about a 1 in (2.5 cm) gap between strands.
- The end strands sit 12 sts, or 2.4 in (6.1 cm), in from each edge. That is half a section minus half a stitch, so both edges match.
Final Blocking
- Block each motif before joining. Pin it to 4.5 in (11.4 cm) tip to tip, pinning each ch-5 tip loop and the center ch-3 loop of each petal edge.
- Spray until damp and let dry fully.
- After assembly, hang the panel on its rod.
- Mist each strand lightly from top to bottom.
- Straighten each motif by hand so the tips point straight up and down, and open each Mini-Flower.
- Gently tug the bottom drops so each strand hangs straight. Let it dry while hanging.
- Steam-block the header flat with a pressing cloth if it ripples.
Final Quality-Control Checklist
- Every motif has 6 petals, 84 sc in Rnd 4, and 6 ch-5 tip loops.
- All motifs measure 4.5 in (11.4 cm) tip to tip.
- The checkerboard matches the layout grid.
- Each strand has 12 motifs and 13 Mini-Flowers.
- All strands are 79.5 in (201.9 cm) long, within 0.5 in (1.3 cm) of each other.
- The header has 200 sc in Row 19 and measures 40 in (101.6 cm) wide.
- Strands sit at sts 13, 38, 63, 88, 113, 138, 163, and 188.
- The rod pocket sides are open.
- All ends are woven in and trimmed.
Troubleshooting
Petals cup or ruffle: Your tr stitches are too loose or too tight compared with the ch-7 loop. Re-work Rnd 2 with ch 6 (to stop ruffling) or ch 8 (to stop cupping), and keep the count at 13 sts per petal.
Strands are different lengths: Compare connector stems. Re-work any connector that is more than 0.25 in (0.6 cm) off.
Strands twist: Make sure every connector joins the exact center tip loops. Block while hanging.
Header ripples: Your header gauge is loose. Re-work it with a smaller hook so it measures 40 in (101.6 cm).
Header pulls the strands together: Your header is too tight. Go up a hook size.
Center hole closes up: Crowd the 24 dc snugly but don’t tighten the ch-6 ring.
Care
Hand wash in cool water with mild soap, press out the water in a towel, and dry it flat or hanging, reshaping each flower. Don’t tumble dry. Long strands can tangle and stretch.
Final Notes
Everything follows from one measurement chain. A 4.5 in (11.4 cm) motif plus a 2 in (5.1 cm) connector makes a 6.5 in (16.5 cm) repeat. Twelve motifs and eleven connectors give 76 in (193.0 cm). The hanger and drop bring each strand to 79.5 in (201.9 cm), and the 1.5 in (3.8 cm) header makes 81 in (205.7 cm) overall. Across the width, 8 sections x 25 sts = 200 sc = 40 in (101.6 cm).
To lengthen or shorten the panel, add or remove motif-and-connector pairs in steps of 6.5 in (16.5 cm). To change the width, add or remove 25-st sections and strands.
For the mixed look shown in the close-ups, work Rnds 3–4 one petal at a time, alternating lavender and cream petals around each motif.
Happy crocheting!