

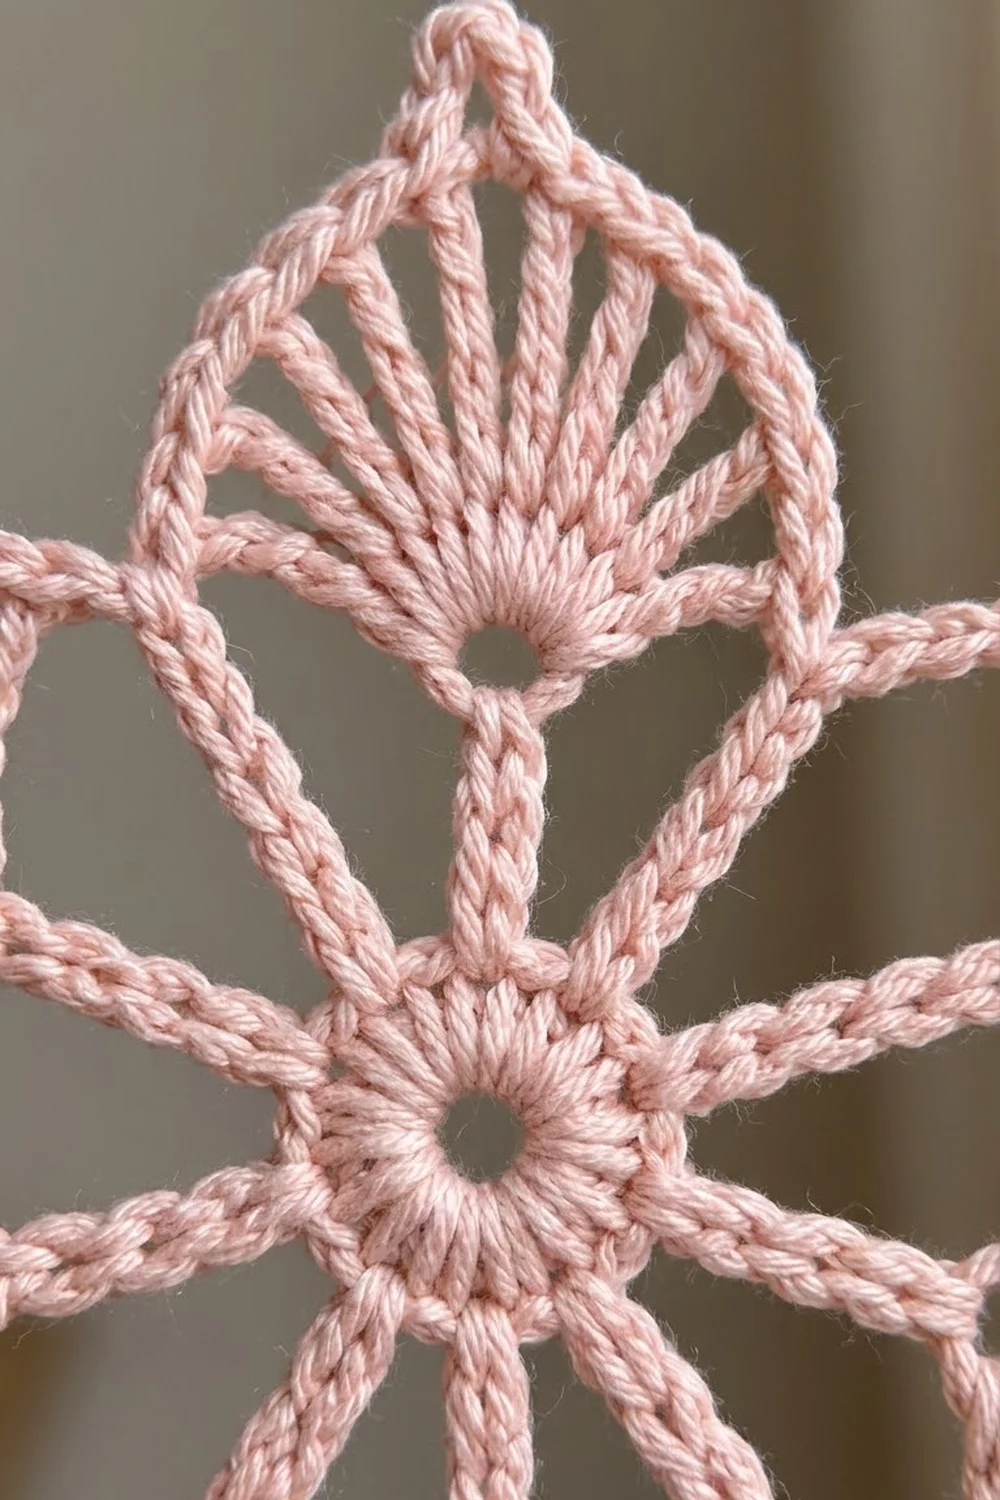
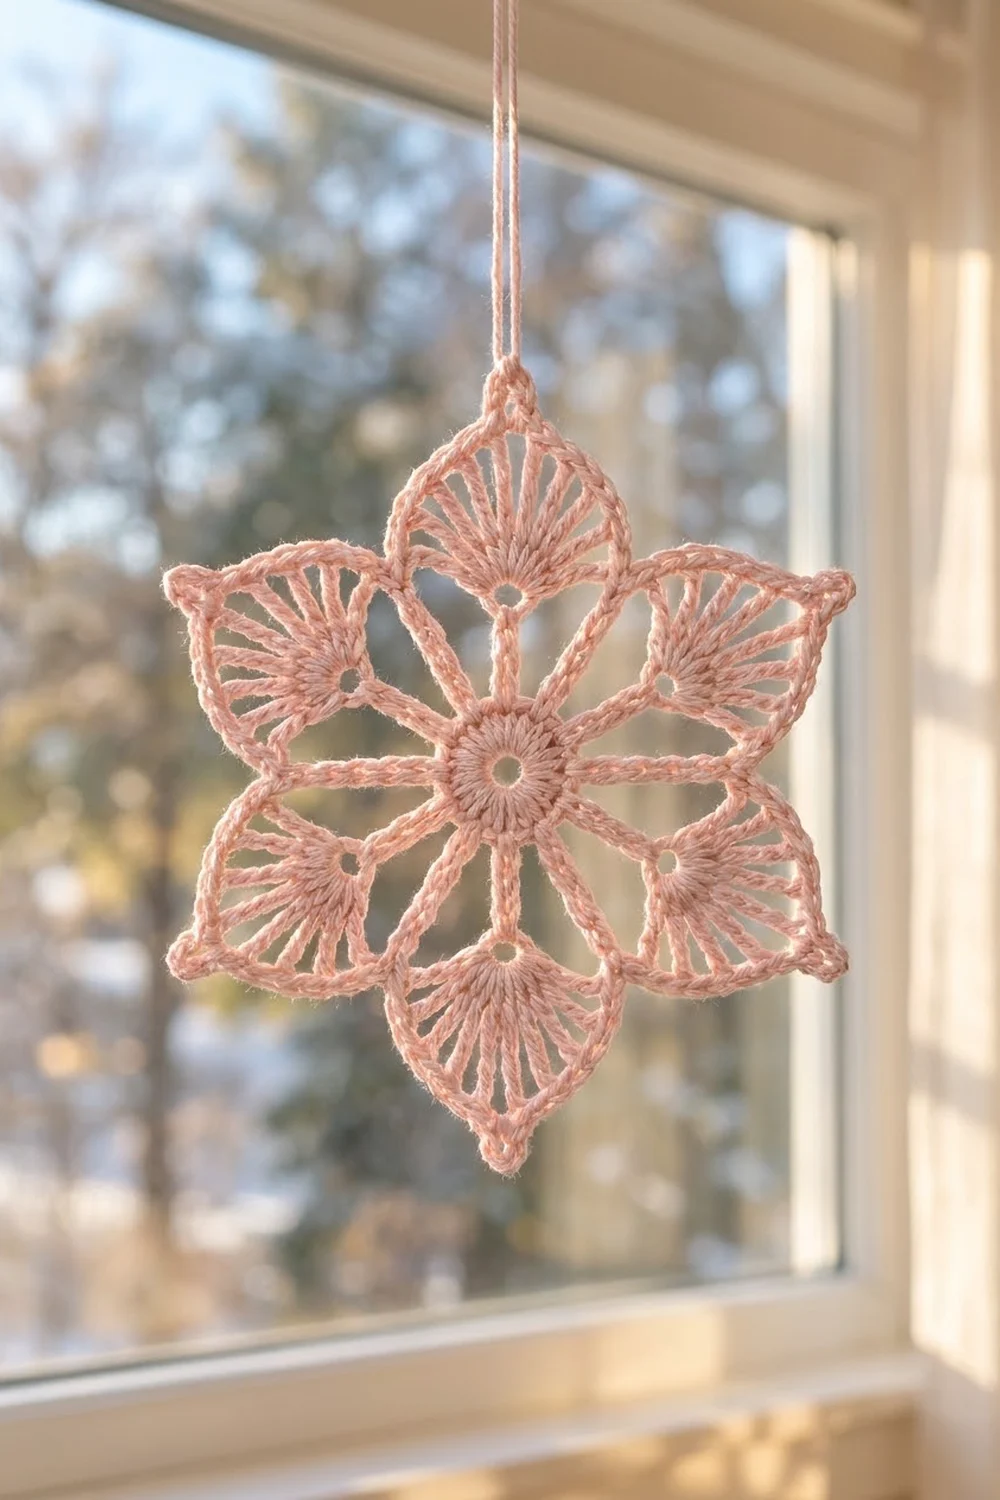
This six-pointed lace star is a quick, delicate motif with a vintage feel. Each of its six petals is a small fan of long treble spokes that spreads out from a tiny eyelet. A smooth single-crochet trim then pulls each petal into a crisp point. Light shines through the open spokes, so the motif looks lovely hanging in a window or on a branch.
The sample is worked in one soft blush-pink cotton, and a single color keeps the lace looking clean. Any pale pastel or classic white would work just as well. The style is light and romantic, somewhere between a snowflake and a flower.
This pattern uses US crochet terms throughout. The finished motif measures about 4.5 in (11.4 cm) from point to point and about 3 in (7.6 cm) from valley to valley.
Construction is simple. You work one center round, then a round that makes the stems, eyelets, and fans in one pass. Next comes a chain-outline round, and a final single-crochet border shapes the points. The motif is one piece with only two ends to weave in.
Finished Size and Construction
- Finished size: 4.5 in (11.4 cm) point to point; 3 in (7.6 cm) valley to valley
- Skill level: Easy-Intermediate
- Terminology: US crochet terms
- Yarn weight: Sport weight (#2), cotton or cotton blend
- Hook: 3.0 mm (US C/2 or D/3)
- Number of pieces: 1 single motif
- Layout: Six petals spaced evenly around one center ring
- Piece size: 4.5 in (11.4 cm) point to point
- Size before border: 4 in (10.2 cm) point to point after Round 3
- Border depth: 0.25 in (0.6 cm) added on all sides by Round 4
Materials
Yarn: Use a smooth, mercerized or combed sport-weight cotton. The spokes need clear stitch definition, and cotton holds its shape well after blocking. Avoid fuzzy or very stretchy fibers, because they blur the lace and the points will droop.
- Blush pink: about 10 g (approx. 20 m) per motif, based on a yarn with roughly 100 m per 50 g
These amounts include a safety margin of about 25% for your gauge swatch and for weaving in ends. If you plan to make several separate ornaments, multiply by the number of motifs.
Tools:
- 3.0 mm crochet hook
- Tapestry needle
- Scissors
- Stitch marker
- Blocking mat or folded towel and rustproof pins
- Spray bottle with water (and light spray starch, optional)
- Ruler or tape measure
Abbreviations (US Terms)
- ch – chain
- sl st – slip stitch
- sc – single crochet
- dc – double crochet
- tr – treble crochet
- st(s) – stitch(es)
- sp – space
- rep – repeat
- MR – magic ring
Special stitch – Eyelet: Ch 6, then sl st in the 4th ch from the hook. This makes a small ch-4 ring at the end of a 2-chain stem.
Treble crochet (tr): Yarn over twice, insert the hook, yarn over and pull up a loop (4 loops on the hook). Then [yarn over and pull through 2 loops] 3 times.
Gauge and Checkpoints
Gauge is not critical for an ornament, but it decides the final size and how sharp the points look. Make one test motif first and measure it at each stage:
- After Round 1: the center ring measures 0.75 in (1.9 cm) across.
- After Round 2: the motif measures 3.5 in (8.9 cm) across the tops of opposite fans.
- After Round 3: the motif measures 4 in (10.2 cm) point to point.
- After Round 4: the motif measures 4.5 in (11.4 cm) point to point, blocked.
Too big: go down to a 2.75 mm hook, or tighten the chains in Round 2.
Too small: go up to a 3.25 mm hook. The tr spokes should look long and open, not crowded.
Measure lightly flattened, before you block. Blocking usually adds no more than 0.25 in (0.6 cm).
Pattern
Round 1 – Center Ring
Make a MR.
Ch 3 (counts as the first dc), then work 17 dc into the ring. Pull the ring snug, leaving a small open hole about 0.25 in (0.6 cm) wide. Join with a sl st to the top of the beginning ch-3.
Stitch count: 18 dc.
Checkpoint: the ring lies flat and measures 0.75 in (1.9 cm) across.
Round 2 – Stems, Eyelets, and Fans
This round makes all six petal frames. Each repeat covers 3 dc of Round 1.
Ch 1, sc in the same st as the join. Place a marker in this sc.
*Make the eyelet: ch 6, sl st in the 4th ch from the hook. You now have a ch-4 ring on a 2-chain stem.
Work the fan into the eyelet ring: ch 4 (counts as the first tr), [ch 1, tr into the ring] 10 times. Turn the fan as you work so it opens outward, away from the center.
Ch 2 for the return stem. Skip the next 2 dc of Round 1 and sc in the next dc.*
Rep from * to * 5 more times. On the last repeat, skip the last 2 dc and join with a sl st to the marked first sc instead of working a new sc.
Stitch count: 6 sc on the center; 6 fans of 11 tr each (66 tr total) with 10 ch-1 sps per fan (60 ch-1 sps total); 6 eyelets.
Math check: 6 repeats × 3 dc each = 18 dc, which uses every stitch of Round 1 exactly once.
Checkpoint: about 3.5 in (8.9 cm) across opposite fans. Each fan should spread into a half-circle. If the fans cup upward, your chains are too tight.
Round 3 – Chain Outline
This round links the fans and starts each point. In each fan, tr 1 is the beginning ch-4, and tr 6 is the center spoke.
Ch 1, sc in the same sc as the join (this is a valley sc).
*Ch 3, sc in the top of tr 1, [ch 2, sc in the next tr] 4 times (tr 2–5), ch 2, (sc, ch 4, sc) all in tr 6 for the tip, [ch 2, sc in the next tr] 5 times (tr 7–11), ch 3, sc in the next center sc.*
Rep from * to * 5 more times. On the last repeat, replace the final sc with a sl st into the first sc.
Stitch count per petal: 12 sc (1 in tr 1 + 4 in tr 2–5 + 2 in tr 6 + 5 in tr 7–11), 10 ch-2 sps, 2 ch-3 sps, 1 ch-4 tip.
Round total: 78 sc (72 petal sc + 6 valley sc), 60 ch-2 sps, 12 ch-3 sps, 6 ch-4 tips.
Checkpoint: about 4 in (10.2 cm) point to point. This is your size before the border.
Border
Border Gauge
The border is one round of solid sc. It adds 0.25 in (0.6 cm) all around and turns each petal edge into a smooth, firm curve. Work it at the same tension as Round 3, or slightly looser.
Round 4 – Shaped SC Border
Sl st into the first ch-3 sp. Ch 1.
*3 sc in the ch-3 sp, sc in the next sc (above tr 1), [2 sc in the next ch-2 sp, sc in the next sc] 5 times. The 5th sc lands in the first tip sc.
Work (2 sc, ch 3, 2 sc) in the ch-4 tip.
Sc in the next sc (the second tip sc), [2 sc in the next ch-2 sp, sc in the next sc] 5 times (ending above tr 11), 3 sc in the next ch-3 sp, skip the valley sc.*
Rep from * to * 5 more times. Join with a sl st to the first sc. Fasten off, leaving a 12 in (30.5 cm) tail if you want a hanging loop.
Count per petal side: 3 + 1 + (5 × 3) + 2 = 21 sc on each side of the point.
Count per petal: 21 + 21 = 42 sc, plus 1 ch-3 tip.
Round total: 252 sc (6 × 42) and 6 ch-3 tips.
Why the Math Works
- Each ch-2 space gets 2 sc, and each sc of Round 3 gets 1 sc. That stays flat along a gentle curve.
- The 3 sc in each ch-3 space fill the longer chain next to the valley without puckering.
- Skipping the valley sc pulls the edge inward between petals, which makes the notched V.
- The (2 sc, ch 3, 2 sc) tip adds height and a sharp point at the outer edge.
- Each side of a point is the same 21 sc, so all six points stay symmetrical.
Checkpoint: 4.5 in (11.4 cm) point to point and 3 in (7.6 cm) valley to valley.
Optional Hanging Loop
Use the final tail. Sl st or sew up to the nearest ch-3 tip. Then fold the tail into a 6 in (15.2 cm) loop, or a longer 8 in (20.3 cm) loop for window hanging. Tie it securely and weave the end back through the border.
Final Blocking
- Weave in the starting tail through the back of Round 1. Weave in the ending tail along the border before you block.
- Mist the motif lightly with water until it is evenly damp, not dripping. Use light spray starch if you want a crisp ornament.
- Lay it face up on a blocking mat. Pin the center so the hole stays open and round.
- Pin each ch-3 tip outward so the points measure 4.5 in (11.4 cm) apart on opposite sides.
- Pin each valley V inward so valleys measure 3 in (7.6 cm) apart on opposite sides.
- Gently spread every fan so the 11 tr spokes are evenly spaced. Pin the middle of each petal curve if needed.
- Let it dry completely, which usually takes 2–4 hours. Unpin and check the size again.
Final Quality-Control Checklist
- Round 1 has exactly 18 dc, and the center hole is small and neat.
- All 6 eyelets are the same size and the same distance from the center.
- Each fan has 11 tr and opens into an even half-circle.
- Round 3 has 12 sc per petal and 78 sc in total.
- Round 4 has 21 sc on each side of every point (42 per petal, 252 total).
- All 6 points are sharp and the same height.
- All valley Vs are the same depth.
- The motif lies flat with no ruffling or cupping.
- The finished size is 4.5 in (11.4 cm) point to point.
- The ends are hidden and secure, and the hanging loop is tied tightly.
Troubleshooting
Fans curl upward or cup: The Round 2 chains are too tight. Work the ch-1 spaces a little looser or go up a hook size.
Border ruffles: Your tension in Round 4 is too loose, or you added extra sc. Recount 21 sc per side.
Border pulls and puckers: Your tension is too tight. Go up 0.25 mm for Round 4 only.
Points look rounded: Pin the ch-3 tips firmly while blocking and use light starch.
Petals are uneven: Check that each stem is exactly ch 6 with the sl st in the 4th ch, and that you skip exactly 2 dc each time.
Center hole won’t close: Weave the MR tail around the base of the stitches once more and pull it snug before you secure it.
Valleys are shallow: Make sure you skipped the valley sc in Round 4.
Care
Hand wash in cool water with mild soap, press out the water in a towel, and reshape it flat to dry. Re-starch as needed to keep the points crisp.
Final Notes
The measurement chain is short and easy to follow. The 18-dc center ring measures 0.75 in (1.9 cm). Six 11-tr fans bring the motif to 3.5 in (8.9 cm). The chain outline brings it to 4 in (10.2 cm). The 252-sc border finishes the star at 4.5 in (11.4 cm) point to point and 3 in (7.6 cm) valley to valley. If each checkpoint matches, the finished motif will too.
Make one as a window ornament or gift tag, or stitch a few more as separate hanging stars.
Happy crocheting!