

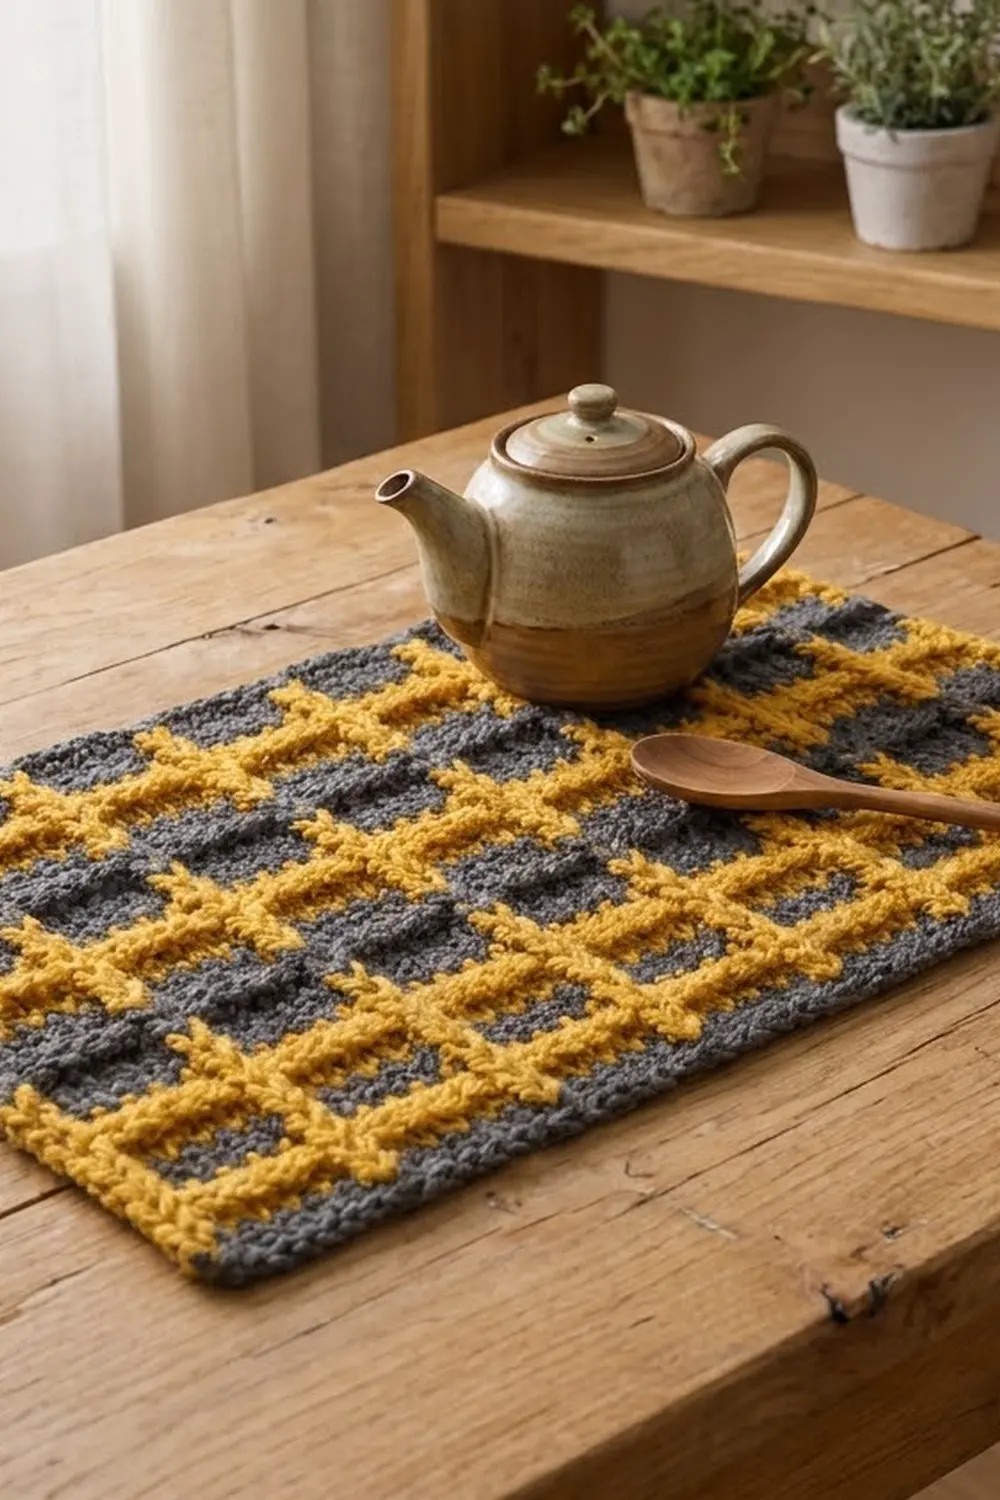
The Bumblebee Grid Panel is a bold, graphic rectangle in mustard yellow and charcoal gray. Horizontal stripes and raised vertical lines cross each other to make a plaid grid, and the fabric has a knit-like texture even though it is fully crocheted.
The texture comes from the half double crochet worked in the third loop, often called the camel stitch. It makes neat V-shaped stitches with a slim horizontal ridge under each row. Once the panel is finished, you add six mustard surface slip stitch lines from bottom to top. They look like braided chains laid over the stripes.
The finished panel measures 8 in x 12 in (20.3 cm x 30.5 cm) after blocking. You can use it as a placemat, a wall hanging or a textured mat, or keep it as a sample of the technique. This pattern uses US crochet terms throughout.
Construction is simple. You work one piece flat in rows, changing color for each stripe band. Next you add the vertical lines with surface slip stitches, and then you finish with two rounds of single crochet edging in charcoal.
Finished Size and Construction
- Finished size: 8 in x 12 in (20.3 cm x 30.5 cm)
- Skill level: Easy to intermediate
- Terminology: US crochet terms
- Yarn weight: Worsted (#4)
- Hook: 5.0 mm (H-8)
- Number of pieces: 1
- Layout: Single rectangle, portrait orientation
- Piece size before border: 7 in x 11 in (17.8 cm x 27.9 cm)
- Border depth: 0.5 in (1.3 cm) on each side, 2 rounds
Materials
Yarn: Use a smooth worsted-weight yarn with good stitch definition. Wool blends and acrylic both work well. Avoid fuzzy or highly textured yarns, because they hide the V-stitches and blur the surface lines.
- Color A, Charcoal Gray: 45 g / 90 m (98 yd)
- Color B, Mustard Yellow: 35 g / 70 m (77 yd)
These amounts include a margin of about 15–20% for your gauge swatch, weaving in ends and small differences in tension.
Tools:
– 5.0 mm (H-8) crochet hook
– Tapestry needle
– Scissors
– Stitch markers (at least 6)
– Measuring tape or ruler
– Rust-proof pins and a blocking mat
– Spray bottle with clean water
Abbreviations (US Terms)
- ch – chain
- sc – single crochet
- hdc – half double crochet
- sl st – slip stitch
- st(s) – stitch(es)
- RS / WS – right side / wrong side
- hdc3L – half double crochet in the third loop
Special stitch – hdc3L (camel stitch): Look at the top of the stitch. Below the front loop, on the side facing you, there is a horizontal bar. Yarn over and insert your hook under that bar only. Yarn over and pull up a loop (3 loops on hook). Yarn over and pull through all 3 loops. This pushes the regular top loops away from you and gives the knit-like V texture.
Special technique – surface slip stitch: Hold the yarn at the back (WS) of the panel. Insert the hook from front to back through the fabric, then yarn over and pull a loop through to the front. To make each new stitch, move up one row, insert the hook again, yarn over, and pull the loop through the fabric and through the loop on your hook.
Gauge and Checkpoints
Gauge: 16 sts x 12 rows = 4 in (10.2 cm) in hdc3L.
Test first: Before you start the panel, make a small swatch. Ch 22, hdc in the 3rd ch from the hook and in each ch across (20 hdc). Work 13 more rows of hdc3L. Measure 4 in (10.2 cm) across the center of the swatch, away from the edges.
Measurement checkpoints:
– After Row 1: width 7 in (17.8 cm) for 28 sts.
– After Row 18: height 6 in (15.2 cm).
– After Row 33: body 7 in x 11 in (17.8 cm x 27.9 cm).
– After Border Round 1: 7.5 in x 11.5 in (19.1 cm x 29.2 cm).
– After Border Round 2: 8 in x 12 in (20.3 cm x 30.5 cm).
If your piece is too big: Change to a hook 0.5 mm smaller and work the swatch again.
If your piece is too small: Change to a hook 0.5 mm larger.
Getting the height right matters more than the width, because the band proportions depend on it. If you have more than 12 rows per 4 in (10.2 cm), your yarn-overs are probably too tight. Make each loop a little taller as you pull it up.

Panel Body
Every row starts with ch 1. This ch 1 does not count as a stitch. Change color on the last yarn over of the final stitch of the previous row, and leave 6 in (15.2 cm) tails. The edging covers the tails, so you can cut both colors at each change.
Foundation (Color A): Ch 30.
Row 1 (Color A): Hdc in the 3rd ch from the hook and in each ch across. Turn. (28 sts)
Row 2 (Color A): Ch 1, hdc3L in each st across. Turn. (28 sts)
Row 3 (Color A): Ch 1, hdc3L in each st across. On the last st, change to Color B. Turn. (28 sts)
Charcoal Band 1 is complete. From here on, every row is ch 1, then hdc3L in each st across (28 sts). Only the color changes.
Rows 4–5 (Color B): Mustard Band 1. Change to A at the end of Row 5. (28 sts)
Rows 6–8 (Color A): Charcoal Band 2. Change to B at the end of Row 8.
Rows 9–10 (Color B): Mustard Band 2. Change to A.
Rows 11–13 (Color A): Charcoal Band 3. Change to B.
Rows 14–15 (Color B): Mustard Band 3. Change to A.
Rows 16–18 (Color A): Charcoal Band 4. Change to B.
Checkpoint: Width is 7 in (17.8 cm) and height is 6 in (15.2 cm).
Rows 19–20 (Color B): Mustard Band 4. Change to A.
Rows 21–23 (Color A): Charcoal Band 5. Change to B.
Rows 24–25 (Color B): Mustard Band 5. Change to A.
Rows 26–28 (Color A): Charcoal Band 6. Change to B.
Rows 29–30 (Color B): Mustard Band 6. Change to A.
Rows 31–33 (Color A): Charcoal Band 7. Do not fasten off. Keep the Color A loop on a stitch marker for the border.
Body totals: 33 rows, 28 sts per row. There are 7 charcoal bands of 3 rows each (21 rows) and 6 mustard bands of 2 rows each (12 rows), and 21 + 12 = 33 rows. At 3 rows per inch, 33 rows = 11 in (27.9 cm).
Checkpoint: Body is 7 in x 11 in (17.8 cm x 27.9 cm). Weave in all color-change tails on the WS now, before you add the surface lines.
Vertical Surface Lines
The six mustard lines go into the gaps between stitch columns. The 28 sts are split into seven groups of 4, so there are 4 sts outside the outermost line on each side. This keeps the grid even.
Mark the line positions: Hold the panel RS up with Row 1 at the bottom. Count the stitches of Row 1 from the right edge and place a marker in each of these gaps:
– between sts 4 and 5
– between sts 8 and 9
– between sts 12 and 13
– between sts 16 and 17
– between sts 20 and 21
– between sts 24 and 25
That gives 6 markers.
Line 1: Make a slip knot in Color B and hold it at the back. Insert the hook from front to back in the first marked gap, at the bottom of Row 1. Pull the loop through to the front. Work 1 surface sl st into the same gap in each row going up, through to Row 33. (33 surface sl sts) Pull the loop through to the back and fasten off.
Lines 2–6: Work each one the same way in its marked gap. (33 surface sl sts per line, 198 in total)
Tension tip: Each surface slip stitch spans one hdc row, about 0.33 in (0.8 cm). Pull the loop up to that full height. If the loops are short, the panel will pull in from top to bottom. Lay the panel flat after each line to check: the lines should look straight and slightly raised, and there should be no ripples next to them.
Weave the Color B tails into the back of the same column of stitches so they do not show through the charcoal bands.
Border
Border gauge: 16 sc = 4 in (10.2 cm), and 2 rounds of sc = 0.5 in (1.3 cm).
How corners are counted: In this border, each corner group is counted separately. The side counts below are the stitches between the corner groups, and the round total adds them together.
Round 1 (Color A): Pick up the loop you left at the end of Row 33. RS is facing, and you are at the top-left corner.
- Top edge: Ch 1, rotate, and work across the top. Work 3 sc in the first st (corner), 1 sc in each of the next 26 sts, then 3 sc in the last st (corner).
- Left side: Work 44 sc evenly into the row ends, using the repeat (1 sc, 1 sc, 2 sc) across each set of 3 row ends. 33 row ends ÷ 3 = 11 repeats, and 11 x 4 = 44 sc.
- Bottom edge: Work into the unused foundation ch loops: 3 sc in the first ch (corner), 1 sc in each of the next 26 ch, then 3 sc in the last ch (corner).
- Right side: Work 44 sc into the row ends in the same way. Join with a sl st to the first sc.
Round 1 count: 26 (top) + 44 (side) + 26 (bottom) + 44 (side) + 12 (4 corners x 3) = 152 sts
Round 2 (Color A): Ch 1, sc in each st around. In the center sc of each corner group, work 3 sc. Join with a sl st to the first sc and fasten off.
Round 2 count: 28 (top) + 46 (side) + 28 (bottom) + 46 (side) + 12 (4 corners x 3) = 160 sts
Why the math works: Each top and bottom edge has 28 stitches plus 2 corner sc in Round 1, so 30 sts at 4 sts per inch = 7.5 in (19.1 cm). Each side has 44 sc plus 2 corner sc, so 46 sts = 11.5 in (28.2 cm) by stitch count. The row height of Round 1 adds the rest, and the measured side comes to about 11.5 in (29.2 cm). In Round 2, each side gains 2 sts from the corner increases only. That gives 32 sts = 8 in (20.3 cm) across, and the sides grow by another 0.5 in (1.3 cm) in total. The (1, 1, 2) repeat along the sides matches the hdc row height, 3 rows per inch, to the sc gauge of 4 sts per inch. This keeps the long edges from flaring or pulling in.
Checkpoint: The panel is 8 in x 12 in (20.3 cm x 30.5 cm) before blocking, give or take 0.25 in (0.6 cm).
Final Blocking
- Weave in all remaining ends along the WS of the matching color.
- Lay the panel RS up on a blocking mat.
- Pin the four corners first to a rectangle of 8 in x 12 in (20.3 cm x 30.5 cm).
- Pin along each edge about every 1 in (2.5 cm). Check that the stripe bands run straight across and the surface lines run straight up and down.
- Mist the panel evenly with water until it is damp, not soaked.
- Gently pat the surface lines flat so they lie evenly. Do not press the texture flat.
- Let the panel dry completely, which usually takes 12–24 hours, before you remove the pins.
Final Quality-Control Checklist
- [ ] Body has 28 sts per row and 33 rows
- [ ] There are 7 charcoal bands of 3 rows and 6 mustard bands of 2 rows
- [ ] Top and bottom bands are both charcoal
- [ ] There are 6 vertical mustard lines with 4 sts outside the outer line on each side
- [ ] Each surface line has 33 surface sl sts and runs straight
- [ ] Border Round 1 has 152 sts and Round 2 has 160 sts
- [ ] Corners are square and lie flat
- [ ] Finished size is 8 in x 12 in (20.3 cm x 30.5 cm)
- [ ] All ends are woven in securely on the WS
Troubleshooting
Panel is getting narrower or wider: You have skipped or added a stitch at the row ends. Count 28 sts at the end of every row, and remember the ch 1 does not count.
Texture looks like plain hdc: You are working into the top loops instead of the third loop. Check that the hook goes under the horizontal bar below the front loop.
Panel puckers along the vertical lines: Your surface slip stitches are too tight. Pull out that line and work it again with taller loops, or use a hook 0.5 mm larger for the surface lines only.
Vertical lines wobble: You drifted into a different gap partway up. Keep a marker in the gap and move it up every few rows as you go.
Long edges ripple: You have too many sc in Round 1. Count exactly 44 per side.
Long edges pull in: You have too few sc. Check the (1, 1, 2) repeat.
Corners curl: Make sure Round 2 increases only in the center sc of each corner group.
Color jogs show at the edges: Change color on the last yarn over of the final stitch of the row, not at the start of the next row.
Care
Hand wash in cool water with a mild detergent, gently press out the water, and dry flat in shape. If the yarn is machine washable, use a gentle cycle in a laundry bag and reshape it while damp.
Final Notes
This panel follows one measurement chain from start to finish. A gauge of 16 sts and 12 rows per 4 in (10.2 cm) gives a 7 in x 11 in (17.8 cm x 27.9 cm) body of 28 sts and 33 rows. Six surface lines sit in the gaps after every 4th stitch. Border Round 1 has 152 sts and brings the panel to 7.5 in x 11.5 in (19.1 cm x 29.2 cm). Border Round 2 has 160 sts and finishes it at 8 in x 12 in (20.3 cm x 30.5 cm). If you check your size at each stage, the stripes, the grid and the edging will all line up.
Happy crocheting!