

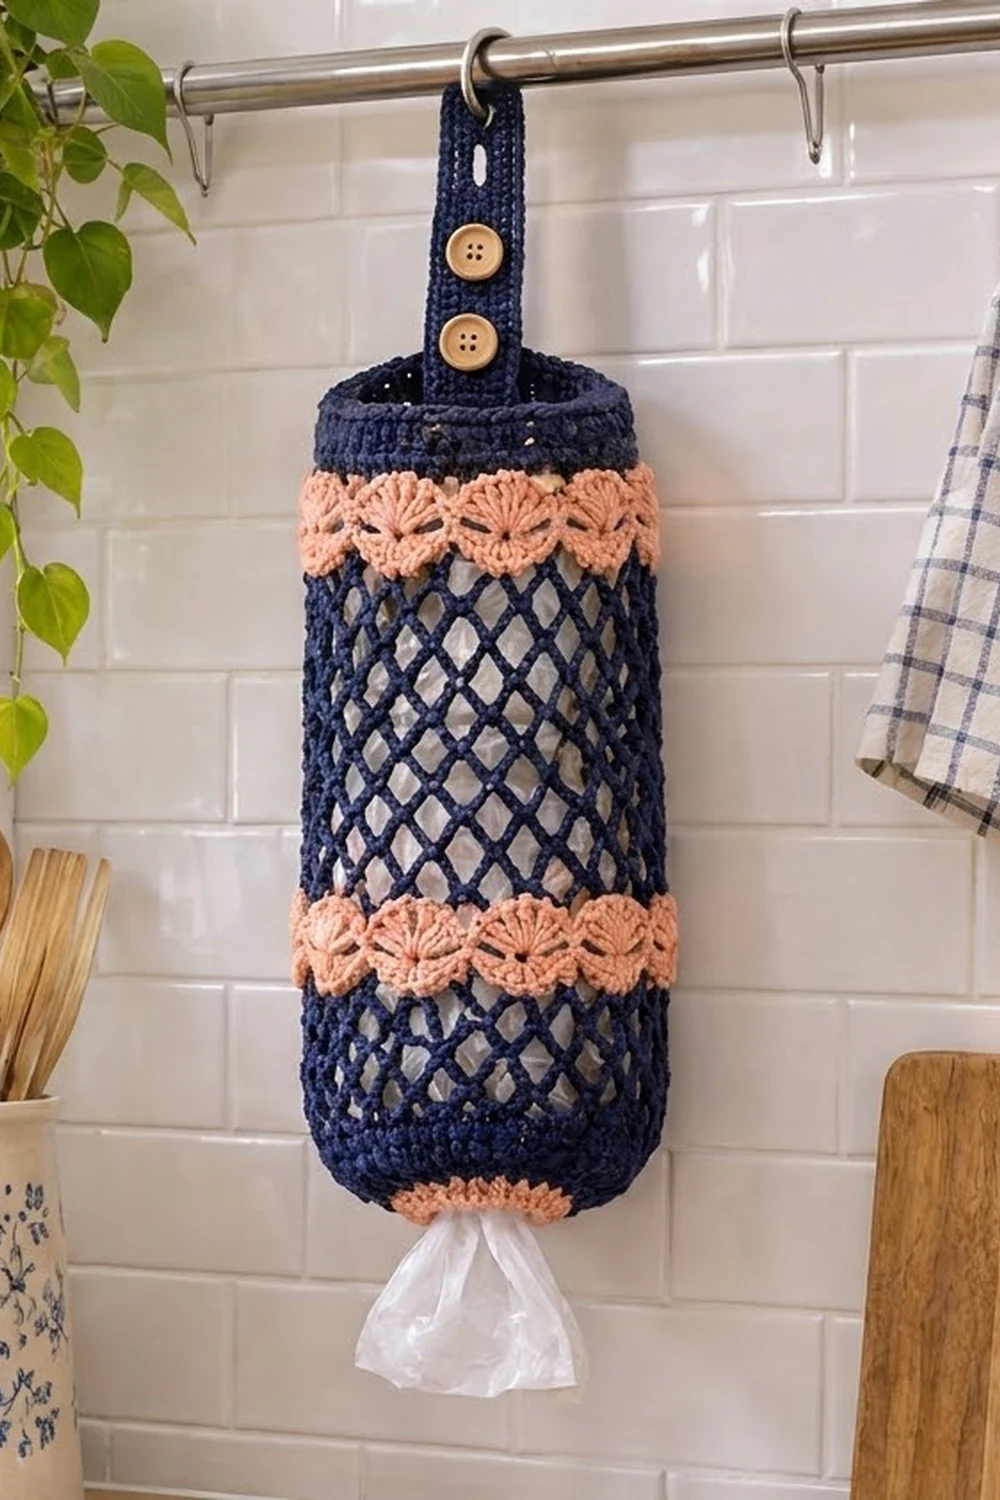
The Harbor Lace Bag Dispenser is a hanging plastic bag holder that keeps your grocery bags in one tidy place. You push bags in at the top and pull them out one at a time through a small ribbed opening at the bottom. The open mesh body lets you see at a glance how many bags are left.
The design uses deep navy cotton with peach accents. Two peach shell bands break up the mesh, and a peach ring finishes the dispensing hole. A solid navy strap with two wooden buttons loops over a towel rail, cabinet bar, or hook, then buttons back onto itself.
This pattern uses US crochet terms. Laid flat, the finished dispenser is about 9 in (22.9 cm) wide and about 16.5 in (41.9 cm) long. The circumference is 18 in (45.7 cm).
You work the body top-down in joined rounds: a solid top band, a shell band, mesh, a second shell band, more mesh, then a decreased bottom and the ribbed ring. The strap is worked separately in rows and sewn inside the back of the rim.
Finished Size and Construction
- Finished size: 9 in (22.9 cm) wide flat × about 16.5 in (41.9 cm) long, body only
- Circumference: 18 in (45.7 cm)
- Skill level: Easy intermediate
- Terminology: US crochet terms
- Yarn weight: Worsted (#4) cotton
- Hook: 5.0 mm (H-8)
- Number of pieces: 2 (1 body tube + 1 strap)
- Layout: Single vertical tube, with the strap centered on the back rim
- Body size before ring: 72 stitches around, about 15.5 in (39.4 cm) long
- Ring (border) depth: about 1 in (2.5 cm), with an 8 in (20.3 cm) circumference
- Strap: 1.75 in (4.4 cm) wide × 10 in (25.4 cm) long
Materials
Use a smooth worsted-weight cotton or cotton blend. Cotton holds its shape when the dispenser is full, and the mesh won’t stretch out over time the way soft acrylic can.
- Color A – Navy: 150 g (about 255 m)
- Color B – Peach: 40 g (about 68 m)
Both quantities include a margin for your gauge swatch and small tension differences.
Tools:
– 5.0 mm (H-8) crochet hook
– 2 wooden buttons, 0.875 in (2.2 cm) across
– Tapestry needle
– Sewing needle and navy thread for the buttons
– 4 stitch markers
– Measuring tape
– Scissors
– Rust-proof pins and a rolled towel for blocking
Abbreviations (US Terms)
- ch – chain
- sl st – slip stitch
- sc – single crochet
- dc – double crochet
- sc2tog – single crochet 2 together
- sk – skip
- sp(s) – space(s)
- st(s) – stitch(es)
- rnd(s) – round(s)
- FPdc – front post double crochet: yarn over, insert the hook from front to back to front around the post of the stitch, and complete a dc
- BPdc – back post double crochet: yarn over, insert the hook from back to front to back around the post, and complete a dc
Special stitch – Shell: 5 dc in the same stitch.
Round notes: Join every round with a sl st to the first stitch. The ch 1 at the start of a round never counts as a stitch. Chains in Rnds 10 and 28 do count as stitches.
Gauge and Checkpoints
Solid gauge: 16 sc × 18 rnds = 4 in (10.2 cm) square.
Mesh gauge: 1 net round is about 0.5 in (1.3 cm) tall, so 4 net rounds = 2 in (5.1 cm).
Before you commit to the whole tube, work the top band (Rnds 1–7) as your test piece. Then check it:
- After Rnd 7: The circumference should be 18 in (45.7 cm), and the band should lie flat at 9 in (22.9 cm) wide. It should be about 1.5 in (3.8 cm) tall.
- After Rnd 11: The total length should be about 3 in (7.6 cm).
- After Rnd 24: The total length should be about 9.5 in (24.1 cm).
- After Rnd 35: The total length should be about 14 in (35.6 cm).
- After Rnd 42: The total length should be about 15.5 in (39.4 cm), with an opening of 8 in (20.3 cm) around.
If your band is too big (more than 0.5 in / 1.3 cm over 18 in), go down to a 4.5 mm hook and restart. If it’s too small, go up to a 5.5 mm hook. Don’t change the stitch count, because 72 is the number that both the shell and mesh repeats depend on.

Body
Top Band
With Navy, ch 72. Join with a sl st to the first ch, taking care not to twist the chain.
Rnd 1: Ch 1, sc in each ch around. (72 sts)
Rnds 2–7: Ch 1, sc in each st around. (72 sts)
Check your gauge now. The top band should be 1.5 in (3.8 cm) tall and 18 in (45.7 cm) around.
Shell Band 1
Rnd 8: Join Peach in any st. Ch 1, sc in each st around. (72 sts)
Rnd 9: Ch 1, sc in first st, sk 2, shell in next st, sk 2, sc in next st. Repeat from * 10 more times, then sk 2, shell in next st, sk 2. Join to the first sc. (12 shells + 12 sc = 72 sts)
Each 6-stitch repeat uses exactly 6 stitches from Rnd 8. That’s why the shells sit flat without ruffling or pulling in. Because you’re working top-down, each fan opens downward, which gives the scalloped peach edge. Fasten off Peach.
Rnd 10: Join Navy in the center (3rd) dc of any shell. Ch 1, sc in the same dc, ch 2, dc in next sc, ch 2, sc in center dc of next shell. Repeat from * 10 more times, then ch 2, dc in last sc, ch 2. Join to the first sc. (12 sc + 12 dc + 48 ch = 72 sts)
The dc reaches into the valley between shells and evens out the band.
Rnd 11: Ch 1, sc in sc, 2 sc in ch-2 sp, sc in dc, 2 sc in ch-2 sp. Repeat from * around. (6 per repeat × 12 = 72 sts)
Checkpoint: the total length is about 3 in (7.6 cm).
Mesh Section 1
Rnd 12 (setup): Ch 1, sc in first st, ch 5, sk 3, sc in next st. Repeat from * 16 more times, then ch 2, sk 3, dc in the first sc. (18 ch-5 sps)
The ch 2 plus dc counts as the 18th ch-5 space and leaves your hook in the middle of that loop, ready for the next round.
Rnds 13–24 (net): Ch 1, sc around the post of the dc just made, ch 5, sc in next ch-5 sp. Repeat from * 16 more times, then ch 2, dc in the first sc. (18 ch-5 sps)
That’s 13 mesh rounds in total. They should measure about 6.5 in (16.5 cm) unstretched, and the total length should be about 9.5 in (24.1 cm).
Rnd 25 (conversion): Ch 1, 4 sc in each ch-5 sp around. (4 sc × 18 sps = 72 sts)
This is a conversion round: 18 spaces at 4 stitches each brings you back to exactly 72 stitches.
Shell Band 2
Rnds 26–29: Repeat Rnds 8–11 with the same colors. (72 sts)
Checkpoint: the total length is about 11 in (27.9 cm).
Mesh Section 2
Rnd 30 (setup): Repeat Rnd 12. (18 ch-5 sps)
Rnds 31–35 (net): Repeat Rnd 13 five times. (18 ch-5 sps)
That’s 6 mesh rounds, about 3 in (7.6 cm). The total length should be about 14 in (35.6 cm).
Solid Bottom
Rnd 36 (conversion): Ch 1, 4 sc in each ch-5 sp around. (4 sc × 18 sps = 72 sts)
Rnd 37: Ch 1, sc in each st around. (72 sts)
Rnd 38: Ch 1, sc in next 7 sts, sc2tog. Repeat from * around. (64 sts)
Rnd 39: Ch 1, sc in next 6 sts, sc2tog. Repeat from * around. (56 sts)
Rnd 40: Ch 1, sc in next 5 sts, sc2tog. Repeat from * around. (48 sts)
Rnd 41: Ch 1, sc in next 4 sts, sc2tog. Repeat from * around. (40 sts)
Rnd 42: Ch 1, sc in next 3 sts, sc2tog. Repeat from * around. (32 sts)
Losing 8 stitches per round curves the bottom inward into a rounded base. Checkpoint: the opening measures 8 in (20.3 cm) around, about 4 in (10.2 cm) flat, and the total length is about 15.5 in (39.4 cm). Fasten off Navy.
Strap
With Navy, ch 8.
Row 1: Sc in 2nd ch from hook and in each ch across. Turn. (7 sts)
Rows 2–29: Ch 1, sc in each st across. Turn. (7 sts)
Row 30 (buttonhole): Ch 1, sc in next 2 sts, ch 3, sk 3, sc in next 2 sts. Turn. (4 sc + 3 ch)
Row 31: Ch 1, sc in next 2 sts, 3 sc in ch-3 sp, sc in next 2 sts. Turn. (7 sts)
Rows 32–35: Ch 1, sc in each st across. Turn. (7 sts)
Rows 36–37: Repeat Rows 30–31.
Rows 38–41: Ch 1, sc in each st across. Turn. (7 sts)
Rows 42–43: Repeat Rows 30–31.
Rows 44–45: Ch 1, sc in each st across. Turn. (7 sts)
Fasten off and leave a 16 in (40.6 cm) tail. The strap is 45 rows long, which at 18 rows per 4 in comes to 10 in (25.4 cm). It’s 1.75 in (4.4 cm) wide. Each buttonhole is about 0.75 in (1.9 cm) wide, a snug fit for a 0.875 in (2.2 cm) button.
Attach the Strap and Buttons
- Lay the body flat with the beginning-of-round joins at the center back.
- Place Rows 1–7 of the strap inside the back rim, centered on the joins, so they cover the 1.5 in (3.8 cm) top band. Row 1 should line up with Rnd 7.
- Use the tail to whipstitch all four sides of that overlap. Go through the inner loops only so the stitches don’t show on the outside.
- Sew one button to the outside face of the strap at Row 12 and another at Row 20, centered across the width.
That leaves 8.5 in (21.6 cm) of strap free above the rim. To hang the dispenser, loop the strap over the rail, bring the tip down the front, and fasten one of the three buttonholes over a button. The three buttonholes let you adjust the drop for thick or thin rails.
Border: Dispensing Ring and Top Rim
Border gauge: The ring uses the same 16 sts = 4 in (10.2 cm) gauge, so 32 sts = 8 in (20.3 cm) around.
Rnd 43: Join Peach in any st of Rnd 42. Ch 1, sc in each st around. (32 sts)
Rnd 44: Ch 2 (does not count), FPdc around next st, BPdc around next st. Repeat from * around. (16 pairs = 32 sts)
Rnd 45: Ch 1, sc in each st around, keeping your tension firm. (32 sts)
Fasten off. The ring is about 1 in (2.5 cm) deep.
Why the math works: 32 is even, so the FPdc/BPdc rib closes cleanly as 16 pairs with no half-pair at the join. The ring has the same count as Rnd 42, so it neither flares nor pinches the opening. The ribbing also grips the bags lightly, so only one comes out at a time.
Top rim: Join Navy in the free loop of the foundation chain at the center back. Ch 1, sc in each free loop around. (72 sts) This round matches Rnd 1 stitch for stitch, so the rim stays at exactly 18 in (45.7 cm) and won’t stretch out from repeated bag stuffing. Fasten off.
Final Blocking
- Weave in all ends, running each one through solid stitches rather than the mesh.
- Soak the dispenser in cool water for 10 minutes, then press the water out gently. Don’t wring it.
- Roll up a bath towel until it’s about 18 in (45.7 cm) around, and slide it inside the tube.
- Smooth the shell bands so each fan is evenly spaced: 6 fans across the front and 6 across the back.
- Pull the mesh gently lengthwise so the diamonds open evenly. The body should measure about 16.5 in (41.9 cm) long.
- Pin the strap flat at 1.75 in (4.4 cm) wide.
- Let everything dry completely before removing the towel.
Final Quality-Control Checklist
- The body has 72 stitches at every solid round and 18 loops in every mesh round.
- Each shell band has 12 even fans that open downward.
- The width laid flat is 9 in (22.9 cm).
- The total length is about 16.5 in (41.9 cm).
- The opening measures 8 in (20.3 cm) around and has an unbroken rib.
- The strap is sewn securely along all four edges and doesn’t twist.
- Both buttons pass through every buttonhole snugly.
- No ends are visible on the outside.
Troubleshooting
The shell band ruffles. You probably skipped only 1 stitch, or your shell has more than 5 dc. Recount: there should be 6 base stitches per repeat.
The shell band pulls in. Your dc tension is too tight. Go up 0.5 mm for Rnds 9–10 only.
The mesh drifts in a spiral. That’s normal with ch 2/dc joins. Block on the towel to straighten the columns.
You have the wrong number of mesh loops. Recount Rnd 11 or Rnd 29 before the setup round. It must be exactly 72.
Bags fall out on their own. Rework Rnd 45 with firmer tension, or add one more round of sc to make the ring tighter.
The strap sags. Use a buttonhole closer to the tip, or move the buttons 2 rows higher.
Care
Hand wash in cool water and lay flat or hang over a rolled towel to dry. Don’t tumble dry, because cotton mesh can shrink unevenly.
Final Notes
Every measurement in this pattern goes back to one number: 72 stitches at 16 sc per 4 in (10.2 cm), which gives an 18 in (45.7 cm) circumference and a 9 in (22.9 cm) flat width. That count divides evenly into 12 shell repeats and 18 mesh loops. Each conversion round brings you back to 72, and the bottom drops in 8-stitch steps to the 32-stitch, 8 in (20.3 cm) ribbed ring. The strap is 1.75 in (4.4 cm) wide and 10 in (25.4 cm) long. If you check the numbers at each checkpoint, the dispenser will come out at 16.5 in (41.9 cm), ready to fill and hang.
Happy crocheting!