

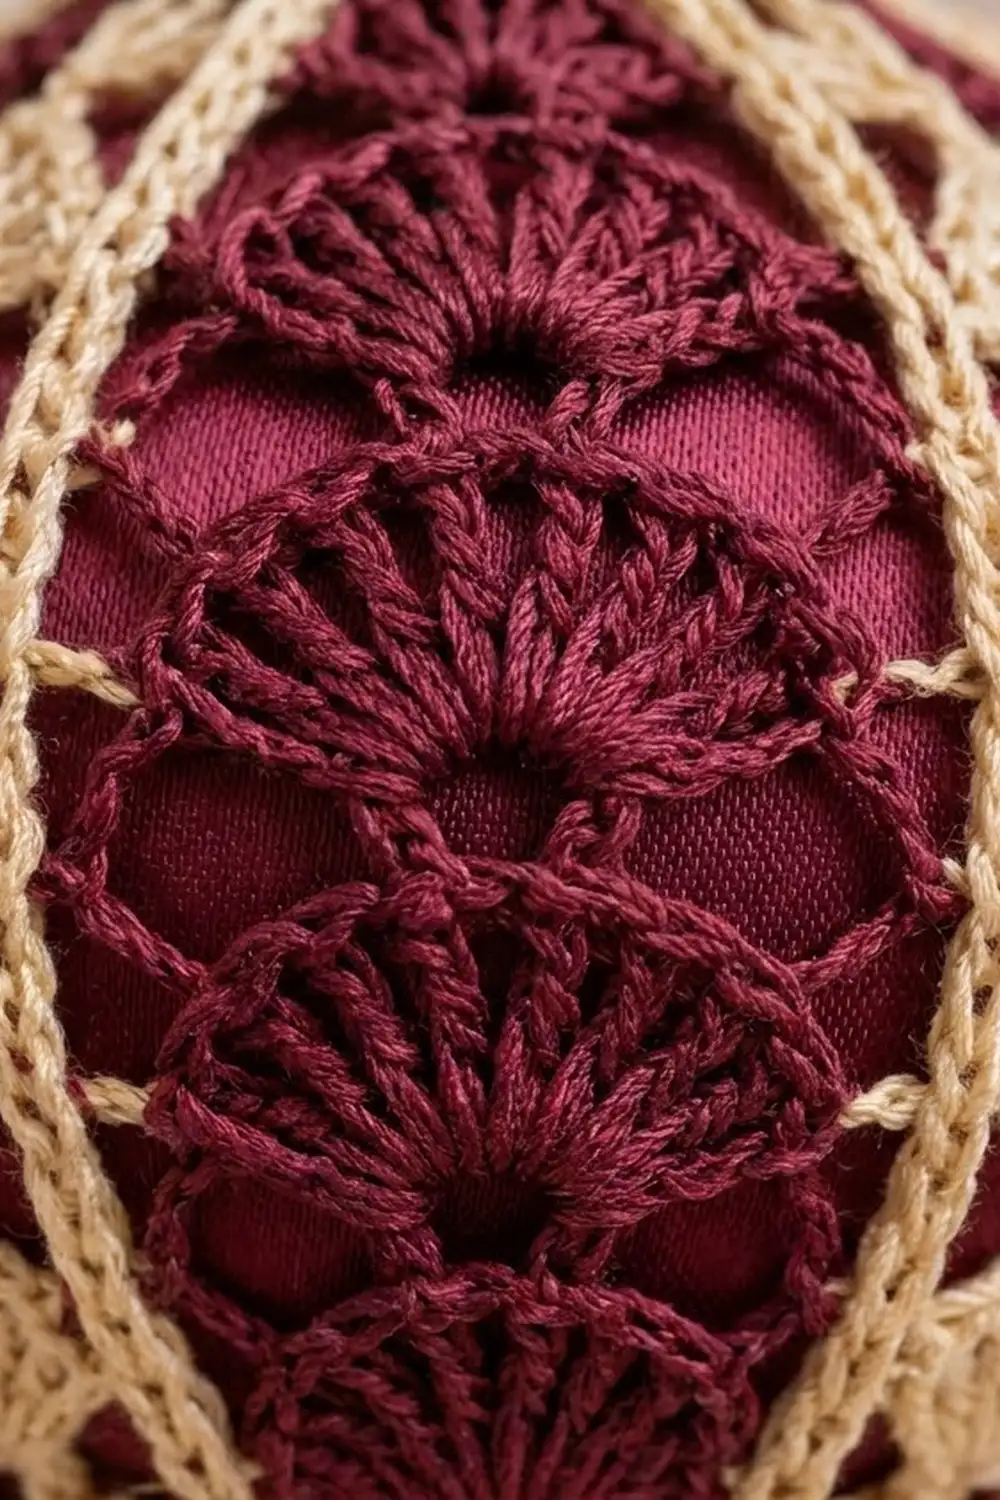
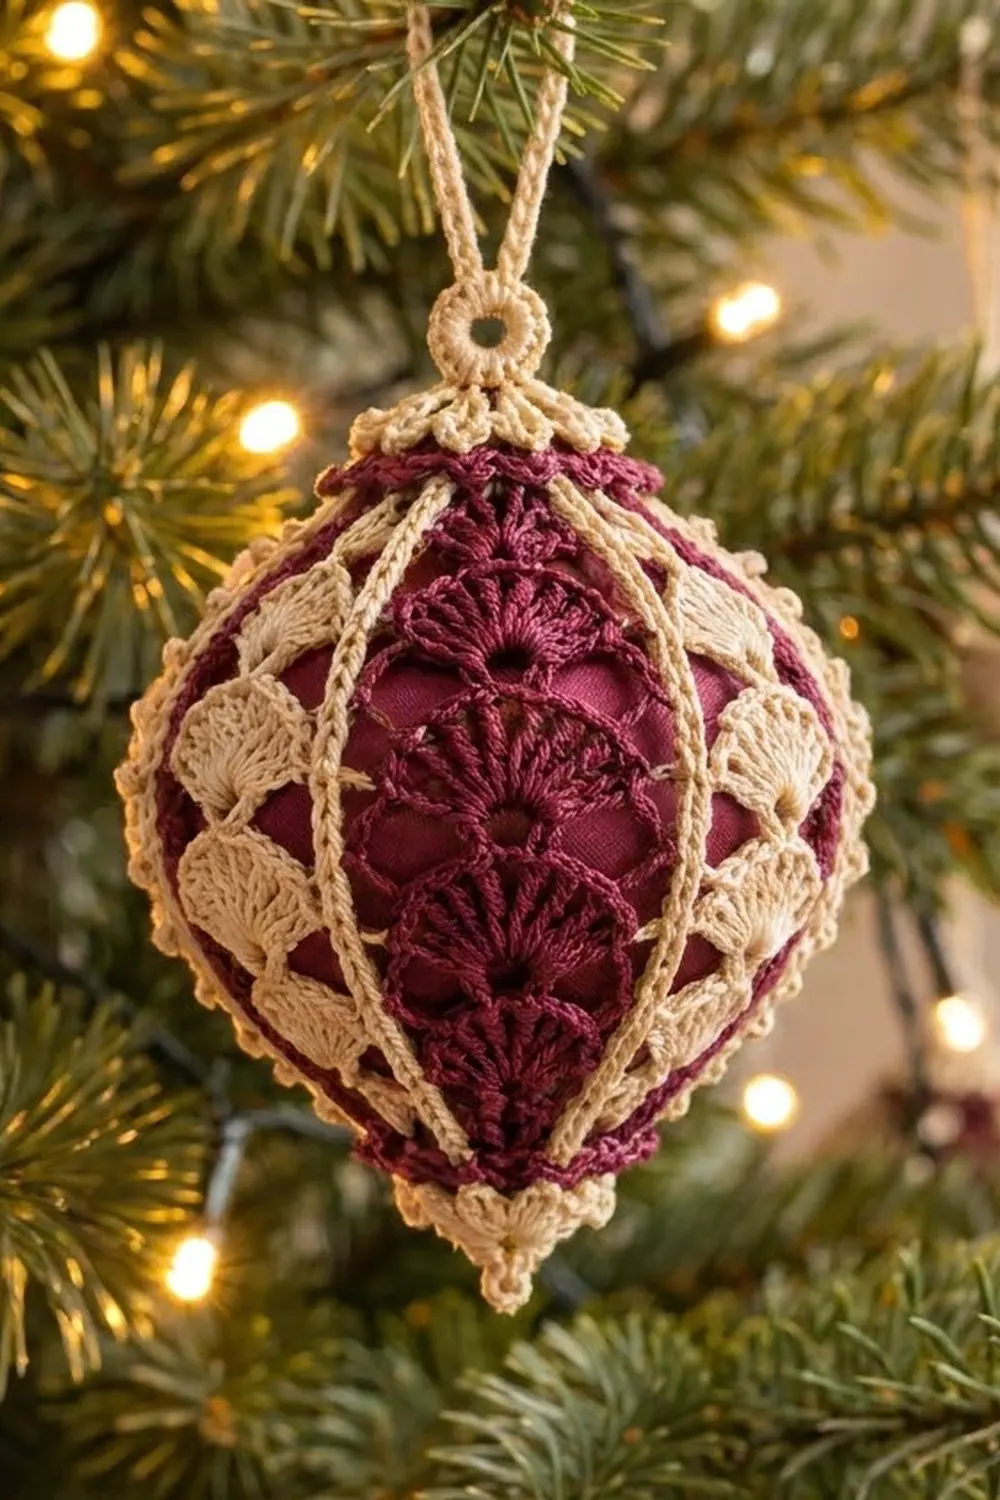
The Burgundy Fan Lace Ornament is a lacy holiday bauble made from six pointed-oval panels. Each panel has a burgundy column of stacked fans framed in cream lace. You join the panels around a burgundy satin ball, so the color shows through every open space.
The palette has two colors: deep burgundy and soft cream. Burgundy is used for the fans, the mesh outline and the neck bands. Cream is used for the raised seam spines, the little shells and picots, the petal caps, the ring and the hanging loop. The style is classic and a little Victorian, like an heirloom ornament.
The pattern uses US crochet terms. The finished ornament measures about 3 in (7.6 cm) wide and 4 in (10.2 cm) tall, not counting the 2 in (5.1 cm) hanging loop.
The construction is easy to follow. You crochet six flat panels in rows and rounds, block them and seam them into a ring around the ball. Then you crochet the top and bottom finishing rounds directly into the panel points.
Finished Size and Construction
- Finished size: 3 in (7.6 cm) wide x 4 in (10.2 cm) tall, plus 2 in (5.1 cm) loop
- Skill level: Intermediate
- Terminology: US crochet terms
- Yarn weight: Super Fine (#1) mercerized cotton, fingering weight, or size 3 crochet thread
- Hook: 2.25 mm (US B-1)
- Number of pieces: 6 identical panels
- Layout: 6 panels in a ring, with side seams running top to bottom
- Piece size (blocked): 3.75 in (9.5 cm) long x 1.5 in (3.8 cm) wide
- Size before border: joined body on the ball, 3 in (7.6 cm) wide x 3.25 in (8.3 cm) tall
- Border depth: about 3/8 in (1.0 cm) at the top and 3/8 in (1.0 cm) at the bottom
Materials
Choose a smooth, mercerized cotton. It gives crisp fans, holds picots well and takes starch nicely. Avoid fuzzy or very soft yarns, because the lace will lose definition.
- Color A, burgundy: 15 g, about 51 m
- Color B, cream: 15 g, about 51 m
- One burgundy satin-covered foam ball, 2.75 in (7.0 cm) in diameter (or a plastic ball ornament with the cap removed, wrapped in burgundy fabric)
- 2.25 mm (US B-1) hook
- Tapestry needle
- 4 stitch markers
- Blocking mat, rustproof pins and spray starch
- Scissors
The quantities include a margin of about 20 percent for swatching and weaving in ends.
Abbreviations (US Terms)
- ch: chain
- sl st: slip stitch
- sc: single crochet
- dc: double crochet
- sc2tog: single crochet 2 together
- sk: skip
- sp(s): space(s)
- tch: turning chain
- BLO / FLO: back loop only / front loop only
- RS / WS: right side / wrong side
Special stitches
- Picot: ch 3, sl st in the top of the sc just made.
- Shell: 5 dc in the same stitch.
- Petal: sl st in next st, 5 dc in next st, sl st in next st (uses 3 stitches).
Gauge and Checkpoints
Gauge is 8 sc = 1 in (2.5 cm) with Color B and the 2.25 mm hook. Matching the panel checkpoints below matters more than exact gauge, because the panels must fit the ball.
Make one full panel and block it before you start the other five.
Panel checkpoints:
- After Row 3: the fan is about 0.75 in (1.9 cm) wide.
- After Row 9: the strip is 3 in (7.6 cm) long and 1 in (2.5 cm) wide at its widest point.
- After Rnd 1: 3.25 in (8.3 cm) long x 1.25 in (3.2 cm) wide.
- After Rnd 3, blocked: 3.75 in (9.5 cm) long x 1.5 in (3.8 cm) wide.
Six panels at 1.5 in (3.8 cm) each give a circumference of 9 in (22.9 cm). That wraps the 2.75 in (7.0 cm) ball with a gentle, open fit.
If your panel is too big, go down a hook size or work your dc more tightly. If it is too small, go up a hook size. A difference of 0.25 in (0.6 cm) in panel width changes the circumference by 1.5 in (3.8 cm), so measure carefully.
Panel (Make 6)
Fan Column (Color A)
You work the column in rows from the bottom tip up, alternating fan rows and spacer rows. Each fan goes into the center sc of the spacer row below it.
Row 1 (RS): With A, ch 4, sl st in first ch to form a ring. Ch 3 (counts as dc), 6 dc in ring. Turn. [7 dc]
Row 2 (spacer): Ch 5 (counts as dc + ch 2), sk next 2 dc, sc in next dc (center), ch 2, sk next 2 dc, dc in top of tch. Turn. [3 sts, 2 ch-2 sps]
Row 3 (fan): Ch 3 (counts as dc), sk ch-2 sp, 9 dc in center sc, sk ch-2 sp, dc in 3rd ch of tch. Turn. [11 dc]
Row 4 (spacer): Ch 5 (counts as dc + ch 2), sk next 4 dc, sc in next dc (center), ch 2, sk next 4 dc, dc in top of tch. Turn. [3 sts, 2 ch-2 sps]
Row 5 (fan, largest): Ch 3, sk ch-2 sp, 13 dc in center sc, sk ch-2 sp, dc in 3rd ch of tch. Turn. [15 dc]
Row 6 (spacer): Ch 5, sk next 6 dc, sc in next dc (center), ch 2, sk next 6 dc, dc in top of tch. Turn. [3 sts, 2 ch-2 sps]
Row 7 (fan): Ch 3, sk ch-2 sp, 9 dc in center sc, sk ch-2 sp, dc in 3rd ch of tch. Turn. [11 dc]
Row 8 (spacer): Work as Row 4. Turn. [3 sts, 2 ch-2 sps]
Row 9 (fan): Ch 3, sk ch-2 sp, 5 dc in center sc, sk ch-2 sp, dc in 3rd ch of tch. [7 dc] Fasten off.
You now have five fans of 7, 11, 15, 11 and 7 dc. This sequence of sizes creates the pointed-oval silhouette.
Mesh Outline (Color A)
Rnd 1: With RS facing, join A in the center (4th) dc of Row 9. Ch 1, (sc, ch 4, sc) in same dc for the top point. Ch 3, sk 2 dc, sc in last dc of Row 9. (Ch 3, sc in end of next row) 8 times, ending at Row 1. Ch 3, (sc, ch 4, sc) in foundation ring for the bottom point. Ch 3, sc in end of Row 1. (Ch 3, sc in end of next row) 8 times, ending at the top of the Row 9 tch. Ch 3, sl st in first sc. Fasten off.
Count: 22 sc, 20 ch-3 sps (10 per side), 2 ch-4 point sps.
Cream Spine and Shell Edge (Color B)
Rnd 2: Join B in the top ch-4 sp. Ch 1, (2 sc, ch 3, 2 sc) in same sp. Work 3 sc in each of the next 10 ch-3 sps [30 sc]. (2 sc, ch 3, 2 sc) in bottom ch-4 sp. Work 3 sc in each of the next 10 ch-3 sps [30 sc]. Sl st in first sc.
Count: 68 sc and 2 ch-3 point sps. Each side has 34 sc from point sp to point sp (2 + 30 + 2). Place a marker in each point sp.
Rnd 3: Sl st in next sc and into the top ch-3 sp. Ch 1, (sc, ch 3, sc) in point sp.
Side: Sc in next 4 sc, picot, sc in next 4 sc. [Sk 2 sc, shell in next sc, sk 2 sc, sc in next sc] 3 times. Sc in next 4 sc, picot, sc in next 4 sc.
(Sc, ch 3, sc) in bottom point sp. Repeat Side once. Sl st in first sc. Fasten off.
Count per side: 8 + 18 + 8 = 34 sts (19 sc and 15 dc), plus 2 picots. Each point has 2 sc and a ch-3 sp. Round total: 72 sts, 2 point sps, 4 picots.
The three shells sit at the widest part of each side. When you join the panels, the shells meet back to back and form the paired cream fans along each seam.
Block the Panels
Pin each panel to 3.75 in (9.5 cm) x 1.5 in (3.8 cm), pinning both points and each picot. Spray with starch and let it dry fully.
Make All Pieces
Make 6 panels in total. Each panel uses about 2 g of Color A and 2 g of Color B. The remaining yarn goes into the joining and the top and bottom finishing.
Layout (seen from above, as a ring):
P1 | P2 | P3 | P4 | P5 | P6 | (back to P1)
All panels face the same way, with top points up and bottom points down.
Joining
Method: Whipstitch with Color B and a tapestry needle, through the back loops only of the Rnd 3 stitches.
Stitch-to-stitch logic: Place two panels RS up and side by side, with the top points level. Each side has 34 sts. Match them 1 to 1, from the sc next to the top point sp down to the sc next to the bottom point sp. Each side is built symmetrically (8 sts, 3 shells, 8 sts), so shell meets shell and picot meets picot. Skip the picot chains so they pop to the front.
Join P1 to P2, then P2 to P3, and continue until P5 is joined to P6. That makes 5 seams.
Slide the ball inside the open tube. Join P6 to P1 with the 6th seam.
Tension: Pull each stitch snug but not tight. The seam should lie flat and show as a cream ridge between the burgundy columns. If it puckers, loosen it.
Size checkpoint: The joined body should measure about 3 in (7.6 cm) wide and 3.25 in (8.3 cm) tall on the ball. The six top points and six bottom points sit near the poles, with small gaps between them.
Border: Top and Bottom Finishing
You work the top and bottom finishing directly into the panel point sps. Border gauge is 8 sc = 1 in (2.5 cm), the same as the panel edges.
Each panel point gets exactly 3 sc, so each starting round is 6 panels x 3 sc = 18 sc. No stitches are added at the seams.
Top
Rnd 1: Join A in any top point ch-3 sp. Ch 1, 3 sc in each of the 6 top point sps. Sl st in first sc. [18 sc, 3 per panel]
The points draw together into a neck as you work.
Rnd 2: Ch 1, sc in BLO of each sc around. Sl st in first sc. Fasten off. [18 sc]
Rnd 3: Join B. Ch 1, working in BLO, sc2tog 9 times. Sl st in first st. [9 sts]
Rnd 4: Ch 1, sc2tog 4 times, sc in last st. Sl st in first st. [5 sts]
Ring: Ch 6, sl st in first ch of the ch-6 to form a ring. Work 12 sc in the ring. Sl st in first sc.
Hanging loop: Sl st in next 6 sc to reach the top of the ring. Ch 40, sl st in same sc. Fasten off.
Top petals: Join B in any free FLO of Rnd 2. Work 6 petals around, using all 18 front loops (6 x 3 = 18). Fasten off. Let the petals fold down over the burgundy band.
Bottom
Rnd 1: Join A in any bottom point ch-3 sp. Ch 1, 3 sc in each of the 6 bottom point sps. Sl st in first sc. [18 sc, 3 per panel]
Rnd 2: Ch 1, sc in BLO of each sc around. Sl st in first sc. Fasten off. [18 sc]
Rnd 3: Join B. Ch 1, working in BLO, sc2tog 9 times. Sl st in first st. [9 sts]
Rnd 4: Ch 1, sc2tog 4 times, sc in last st. Sl st in first st. [5 sts]
Drop: Ch 4, sl st in 4th ch from hook. Fasten off, leaving a tail. Thread the tail through the 5 sts and pull closed.
Bottom petals: Work 6 petals into the 18 free FLO of Rnd 2, as for the top.
Why the Math Works
Each panel has 34 sts per side, so the seams match 1 to 1 with no extra stitches. Each panel has one point sp at each end, and 3 sc per point gives 18 sts. Eighteen sts make exactly 9 sc2tog, and the 18 front loops divide evenly into 6 petals, one centered over each panel.
Final Blocking
- Lightly mist the whole ornament with water.
- Smooth each fan column with your fingertips so the dc rays stand straight.
- Push the cream shells outward so each pair opens like a fan.
- Fold the petals down evenly and pinch each one into a rounded scallop.
- Pull the picots and the bottom drop into points.
- Spray lightly with starch.
- Hang the ornament by its loop and let it dry for at least 12 hours.
Final Quality-Control Checklist
- Each panel has five fans: 7, 11, 15, 11 and 7 dc.
- Each panel side has 34 sts in Rnd 3.
- All six seams lie flat, with shells meeting back to back.
- Top and bottom Rnd 1 each have 18 sc.
- There are six petals at the top and six at the bottom, one per panel.
- The ring and loop are centered and secure.
- The ornament measures about 3 in (7.6 cm) x 4 in (10.2 cm).
- All ends are woven in and hidden.
Troubleshooting
Fans curl or cup. Your dc are too tight. Loosen your yarn-overs or go up half a hook size.
Panel is too wide for the ball. Check Rnd 2. It should have exactly 3 sc per ch-3 sp, because extra sc stretch the edge.
Seams pucker. Your whipstitch is too tight. Unpick it and sew again with gentler tension.
Top points won’t close. Pull the Rnd 1 sts snug. The sc2tog in Rnd 3 will finish the closing.
Ball rattles inside. Your panels are too big. Use a 3 in (7.6 cm) ball instead, or remake the panels with a smaller hook.
Petals stand straight up. Starch them again and let them dry folded down.
Care
Spot clean only, with a damp cloth. Store the ornament in tissue so the petals and picots keep their shape.
Final Notes
Every step builds on the one before. The fan column reaches 3 in (7.6 cm). The mesh and edge bring each panel to 3.75 in (9.5 cm) x 1.5 in (3.8 cm). Six panels give 9 in (22.9 cm) around, which wraps the 2.75 in (7.0 cm) ball. The joined body is 3.25 in (8.3 cm) tall, and the 3/8 in (1.0 cm) finishing at the top and bottom brings the ornament to 4 in (10.2 cm), plus its 2 in (5.1 cm) loop.
Check each measurement as you go, and the ornament will come together neatly.
Happy crocheting!