

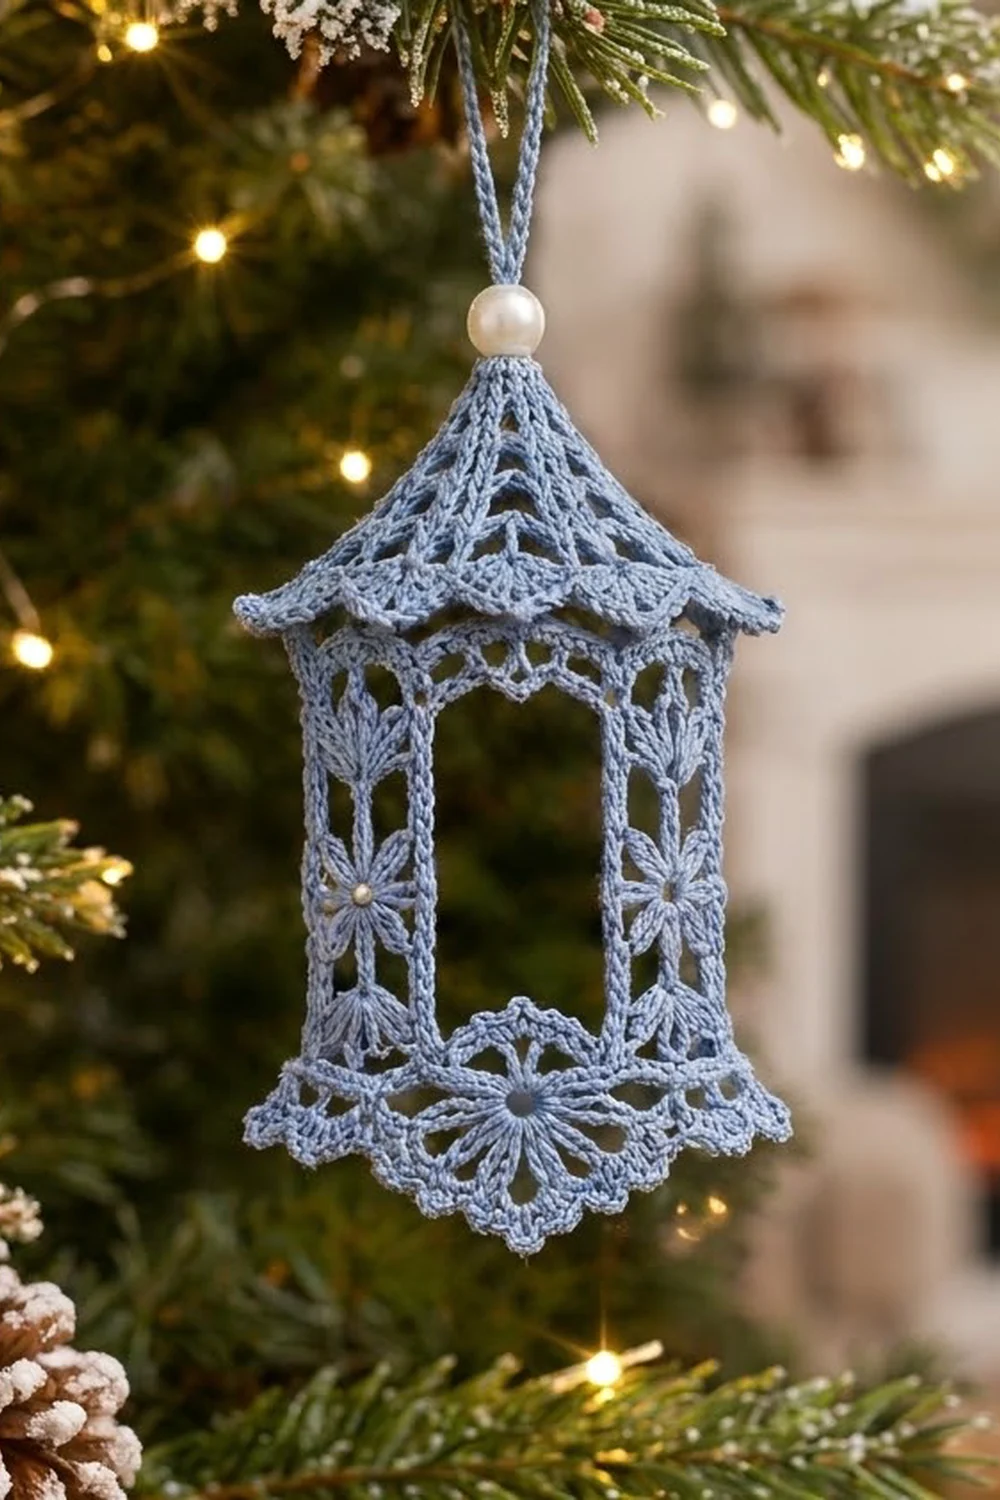
The Frosted Pavilion Lantern is a small, airy thread-crochet ornament shaped like an old-fashioned garden lantern. A pointed lace roof with a scalloped eave sits on a round body. The body has four open windows, slender flower columns, and a flared fan-shell skirt.
The sample uses one soft dusty-blue cotton thread, which looks frosty against green branches and warm lights. A white pearl bead caps the roof, and tiny seed pearls sit in the column flowers.
This pattern uses US crochet terms. The finished lantern measures:
– 4.1 in (10.4 cm) tall from the skirt edge to the roof tip
– 5.4 in (13.7 cm) tall including the hanging loop
– 2.75 in (7.0 cm) wide across the roof eave
You make three pieces:
– a roof, worked from the top down in the round
– a body, worked from the bottom up, with the columns worked in short rows
– a flower medallion for the base
Then you join the pieces, add the skirt as a border, and starch and shape the lantern.
Finished Size and Construction
- Finished height: 4.1 in (10.4 cm) without the loop; 5.4 in (13.7 cm) with the loop
- Width at the eave: 2.75 in (7.0 cm)
- Width at the skirt: 2.4 in (6.1 cm)
- Skill level: Intermediate (thread crochet, rows worked inside a round, sewing 3D parts)
- Terminology: US
- Yarn weight: Size 10 cotton crochet thread (lace weight, category 0)
- Hook: 1.75 mm (US steel 6)
- Number of pieces: 3 (roof, body, base)
- Layout: stacked vertically, with the roof on top, the body in the middle, and the base inside the bottom
- Body size: 6 in (15.2 cm) around, 1.9 in (4.8 cm) across
- Body height before the border: 2.4 in (6.1 cm)
- Border (skirt) depth: 0.7 in (1.8 cm)
Materials
Use a mercerized size 10 cotton thread. It holds starch well and shows stitches crisply. Fuzzy or acrylic threads won’t hold the roof and skirt shapes.
- Dusty blue, size 10 cotton thread: 12 g, about 66 m (72 yd)
- 1 white 8 mm pearl bead, with a hole large enough for doubled thread
- 4 white 2–3 mm seed pearls
- 1.75 mm steel hook
- Fine tapestry needle and a beading needle
- Stitch marker
- Fabric stiffener or heavy spray starch
- A cylinder about 1.9 in (4.8 cm) across (a spice jar or rolled card tube) and a small cone form (rolled card wrapped in plastic)
- Rust-proof pins
The quantities include a margin of about 15 percent for gauge differences, swatching, and sewing tails.
Abbreviations (US Terms)
- ch – chain
- sl st – slip stitch
- sc – single crochet
- hdc – half double crochet
- dc – double crochet
- sk – skip
- sp – space
- st(s) – stitch(es)
- rnd – round
Special stitches
- 3-dc cluster: *Yarn over, insert the hook in the stitch, and pull up a loop. Yarn over and pull through 2 loops. Repeat from * 2 more times in the same stitch (4 loops on the hook). Yarn over and pull through all 4 loops. Counts as 1 st.
- Picot: Ch 3, then sl st in the top of the stitch you just made.
Gauge and Checkpoints
Gauge: 20 dc and 9 dc rows = 2 in (5.1 cm) square. That means 10 dc = 1 in (2.5 cm), and one dc row is about 0.22 in (0.6 cm) tall.
Make the base first as your test piece. It’s small and shows quickly whether your tension matches.
Checkpoints:
- Base after Rnd 3: 1.9 in (4.8 cm) across, lying flat.
- Body after Rnd 1: 6 in (15.2 cm) around, or 3 in (7.6 cm) across when flattened.
- Columns after Row 7: 1.6 in (4.1 cm) tall.
- Body after Rnd 4: 2.4 in (6.1 cm) tall.
- Roof after Rnd 4: about 1.8 in (4.6 cm) across and starting to cup.
- Roof after Rnd 6: the edge measures 6 in (15.2 cm) around, matching the body.
If your pieces are too big, change to a 1.5 mm hook. If they’re too small, change to a 2 mm hook. Change hooks before you start the body, because the roof and base must match the body’s 60-stitch circumference.

Base (Flower Medallion)
Ch 10 and sl st to the first ch to form a ring.
Rnd 1: Ch 3 (counts as dc), 19 dc in the ring, sl st to the top of the ch-3. (20 dc)
Rnd 2: Ch 1, sc in the same st, ch 5, sk 1, sc in the next st; repeat from * 8 more times, ch 5, sk 1, sl st to the first sc. (10 sc and 10 ch-5 loops; 60 sts)*
Rnd 3: Sl st into the first ch-5 loop, (sc, hdc, 5 dc, hdc, sc) in the loop; repeat from * in each loop around, sl st to the first sc. (10 petals of 9 sts each; 90 sts)*
Fasten off, leaving a 12 in (30.5 cm) tail for sewing. Check that the base measures 1.9 in (4.8 cm) across.
Body
The body starts at the bottom. Leave the foundation chain free, because you’ll work the skirt into it later.
Ch 60 and sl st to the first ch to form a ring, without twisting the chain. Place a marker in the joining st.
Rnd 1: Ch 3 (counts as dc), dc in each ch around, sl st to the top of the ch-3. (60 dc)
Treat the 60 sts as 4 sides of 15 sts. On each side, the first 7 sts form a column and the next 8 sts form a window sill.
Columns (work 4 times)
Each column is worked in rows over 7 sts of Rnd 1. Count from the joining st:
| Column | Sts of Rnd 1 |
|---|---|
| 1 | 1–7 |
| 2 | 16–22 |
| 3 | 31–37 |
| 4 | 46–52 |
Row 1 (mesh row): Join the thread in the first st of the column, ch 3 (counts as dc), dc in the next st, ch 1, sk 1, dc in the next st, ch 1, sk 1, dc in the last 2 sts, turn. (7 sts)
Row 2 (flower row): Ch 3, dc in the next dc, ch 1, 3-dc cluster in the center dc, ch 1, dc in the last 2 sts, turn. (7 sts)
Rows 3–7: Repeat Rows 1 and 2 twice more, then work Row 1 once. (7 rows of 7 sts each)
The three clusters stack up the center of each column with mesh between them, making the flower spray. Fasten off Columns 1–3. Don’t fasten off Column 4: its Row 7 ends at the edge beside the last window, ready for the next round.
Each window is 8 sts wide (0.8 in / 2.0 cm) and 1.6 in (4.1 cm) tall.
Upper Band
Rnd 2: With Column 4 still active, ch 8 and sl st to the top of the first st of Column 1, Row 7. Ch 3 (counts as dc) and dc in the next 6 sts. Ch 8, dc in the 7 sts of the next column; repeat from * once more. Ch 8, dc in the 7 sts of Column 4, sl st to the top of the ch-3. (4 × (7 dc + 8 ch) = 60 sts)*
Rnd 3: Ch 3, dc in each dc and each ch around, sl st to the top of the ch-3. (60 dc)
Rnd 4 (scallops): Ch 1, sc in the first st, sk 2, 5 dc in the next st, sk 2, sc in the next st; repeat from * 8 more times, sk 2, 5 dc in the next st, sk 2, sl st to the first sc. (10 scallops; 10 sc + 50 dc = 60 sts)*
Fasten off. The body should measure 2.4 in (6.1 cm) tall. Sew one seed pearl to the center cluster (Row 4) of each column.
Roof
Rnd 1: Ch 4 and sl st to form a ring. Ch 3 (counts as dc), 11 dc in the ring, sl st to the top of the ch-3. (12 dc)
Rnd 2: Ch 4 (counts as dc + ch 1), dc in the next dc, ch 1; repeat from * 10 more times, sl st to the 3rd ch of the ch-4. (12 dc + 12 ch = 24 sts)*
Rnd 3: Ch 5 (counts as dc + ch 2), dc in the next dc, ch 2; repeat from * around, sl st to the 3rd ch. (12 dc + 24 ch = 36 sts)*
Rnd 4: Ch 6 (counts as dc + ch 3), dc in the next dc, ch 3; repeat from * around, sl st to the 3rd ch. (12 dc + 36 ch = 48 sts)*
Rnd 5: Ch 7 (counts as dc + ch 4), dc in the next dc, ch 4; repeat from * around, sl st to the 3rd ch. (12 dc + 48 ch = 60 sts)*
The 12 dc stacked in each round form the roof ribs.
Rnd 6 (conversion round): Ch 3 (counts as dc), 4 dc in the ch-4 sp, dc in the next dc, 4 dc in the next ch-4 sp; repeat from * around, sl st to the top of the ch-3. (12 dc worked one per rib + 48 dc added in the spaces = 60 dc)*
Rnd 7 (eave): Ch 1, sc in the first st (a rib), sk 1, 3 dc in the next st, ch 1, 3 dc in the next st, sk 1, sc in the next rib st; repeat from * around, leaving out the last sc, and sl st to the first sc. (12 scallops; 12 sc + 72 dc + 12 ch = 96 sts)*
Rnd 8 (picot edge): Sl st in the first sc, sc in the next 3 dc, (sc, ch 3, sc) in the ch-1 sp, sc in the next 3 dc, sl st in the next sc; repeat from * around. (96 sc, 12 picots, 12 sl sts)*
Fasten off, leaving a 12 in (30.5 cm) tail.
Hanging Loop
Join the thread at the top of Rnd 1 and slide the 8 mm pearl onto the working thread. Ch 30 and sl st back into the top of Rnd 1. Slide the pearl down so it sits on the roof tip, then sew through the pearl twice to lock it in place. The loop rises about 1.25 in (3.2 cm) above the pearl.
Make All Pieces
All three pieces use dusty blue:
- Roof: 1 (about 4 g)
- Body: 1 (about 5 g)
- Base: 1 (about 1.5 g)
Stacking layout, top to bottom:
[ loop + pearl ]
[ ROOF ]                    Rnds 1-8, eave over body
[ BODY Rnd 4 ]              scallops tucked inside roof
[ BODY Rnds 1-3 + columns ] 4 windows
[ BASE ]                    inside bottom edge
[ SKIRT border ]            worked last
Joining
Whipstitch the pieces together with the long tails and a tapestry needle.
Roof to body: Place the roof over the body so roof Rnd 6 sits level with body Rnd 3. The roof has 12 ribs, one every 5 sts, and each side of the body has 15 sts. That puts exactly 3 ribs on each side, so line up one rib with the center st of each column. Sew each roof Rnd 6 dc to one body Rnd 3 dc, stitch to stitch. (60 to 60) The scallops of body Rnd 4 stand inside the roof and support it.
Base to body: Hold the base inside the bottom of the body, right side down. Tack the center (3rd) dc of each petal to the lower edge of body Rnd 1 at every 6th st. (10 petals × 6 sts = 60 sts) Keep the foundation chain loops free.
Tension: Pull each stitch snug but not tight. After joining, the roof edge and body should both still measure 6 in (15.2 cm) around. If a seam puckers, loosen it and sew it again.
Border (Skirt)
Work the skirt into the free loops of the body’s foundation chain, so it points downward.
Border gauge: the same as the body, 10 dc = 1 in (2.5 cm).
Starting count: 4 sides × 15 sts = 60 sts. Each side’s 15 sts already include its column and sill. A round piece has no corners, so there are no corner stitches to add.
Rnd S1 (flare): Join in the foundation ch below the marker. Ch 3 (counts as dc), dc in the next 3 ch, 2 dc in the next ch, dc in the next 4 ch, 2 dc in the next ch; repeat from * around, sl st to the top of the ch-3. (Per side: 15 worked one per stitch + 3 added = 18; total 60 + 12 = 72 dc)*
Rnd S2 (fans): Ch 1, sc in the first st, sk 2, 7 dc in the next st, sk 2, sc in the next st; repeat from * around, leaving out the last sc, and sl st to the first sc. (Per side: 3 fans; total 12 fans; 12 sc + 84 dc = 96 sts)*
Rnd S3 (picot): Sc in the next 3 dc, (sc, picot) in the next dc, sc in the next 3 dc, sl st in the next sc; repeat from * around. (Per side: 21 sc, 3 picots, 3 sl sts; total 84 sc, 12 picots, 12 sl sts)*
Fasten off and weave in the ends.
Why the math works: 72 divided by 6 is exactly 12 fan repeats, so there’s no partial repeat at the join. The 12 skirt fans echo the 12 roof scallops, giving the top and bottom the same rhythm. The skirt adds 0.7 in (1.8 cm), bringing the body to 3.1 in (7.9 cm).
Final Blocking
- Soak the lantern in diluted fabric stiffener (or starch) until it’s saturated.
- Squeeze out the excess and blot the lantern in a towel. Clear any film from the windows with a toothpick.
- Slide the body over the 1.9 in (4.8 cm) cylinder wrapped in plastic.
- Set the roof on the plastic-wrapped cone so its tip rises 1.2 in (3.0 cm) above the join.
- Pull each eave scallop and skirt fan outward, and pin the picots evenly.
- Square the windows so each column stands straight.
- Let it dry completely, for at least 24 hours, then remove the forms.
- Measure: 4.1 in (10.4 cm) tall and 2.75 in (7.0 cm) across the eave.
Final Quality-Control Checklist
- The base has 10 even petals and lies flat at 1.9 in (4.8 cm).
- The body has 60 sts in each of Rnds 1, 2, 3, and 4.
- All 4 columns have 7 rows and 3 clusters.
- The windows are all the same size: 0.8 in (2.0 cm) wide and 1.6 in (4.1 cm) tall.
- The roof ribs line up with the column centers.
- The roof eave has 12 scallops and the skirt has 12 fans.
- The pearl and seed pearls are secure.
- No tails show, and there’s no starch film in the openings.
Troubleshooting
- Body too wide or too narrow: Check Rnd 1 against 6 in (15.2 cm). Change your hook and start again.
- Columns lean: Your turning ch-3 may be loose. Tighten it, or block the columns straighter.
- Window tops sag: Chain the ch-8s in Rnd 2 tightly and starch generously.
- Roof stays flat: Check that you used ch 1, 2, 3, and 4 in Rnds 2–5, not bigger spaces.
- Roof won’t fit the body: Recount Rnd 6. It must have 60 dc.
- Skirt ruffles: Check that Rnd S1 has 72 sts, not more.
- Base shows below the skirt: Tack the petals higher on Rnd 1.
Care
Dust the lantern gently with a soft brush. If it goes soft, rinse it in cool water, starch it again, and reshape it over the forms.
Final Notes
The measurements build on each other:
– A gauge of 10 dc = 1 in (2.5 cm) gives a 60-stitch body that’s 6 in (15.2 cm) around.
– The 7-row columns make windows 1.6 in (4.1 cm) tall, and the body reaches 2.4 in (6.1 cm).
– The roof’s 60-stitch Rnd 6 matches the body exactly.
– The 72-stitch flare and 12 fans add a 0.7 in (1.8 cm) skirt, for a finished lantern 4.1 in (10.4 cm) tall.
Make one for the tree, or a whole row of them in different blues. Happy crocheting!