

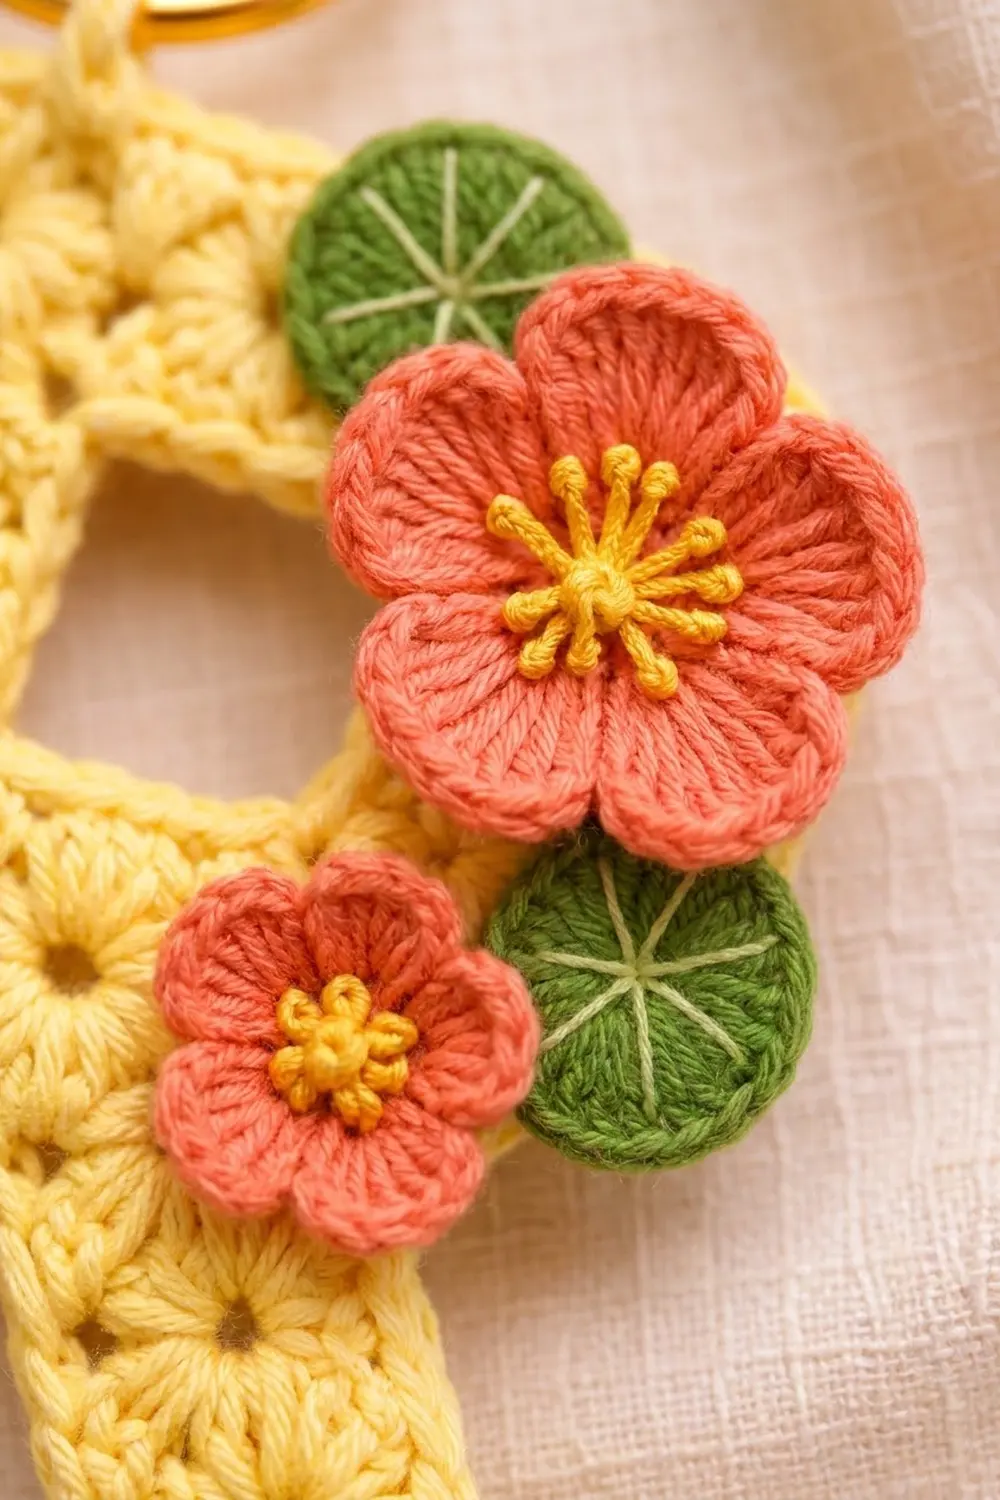
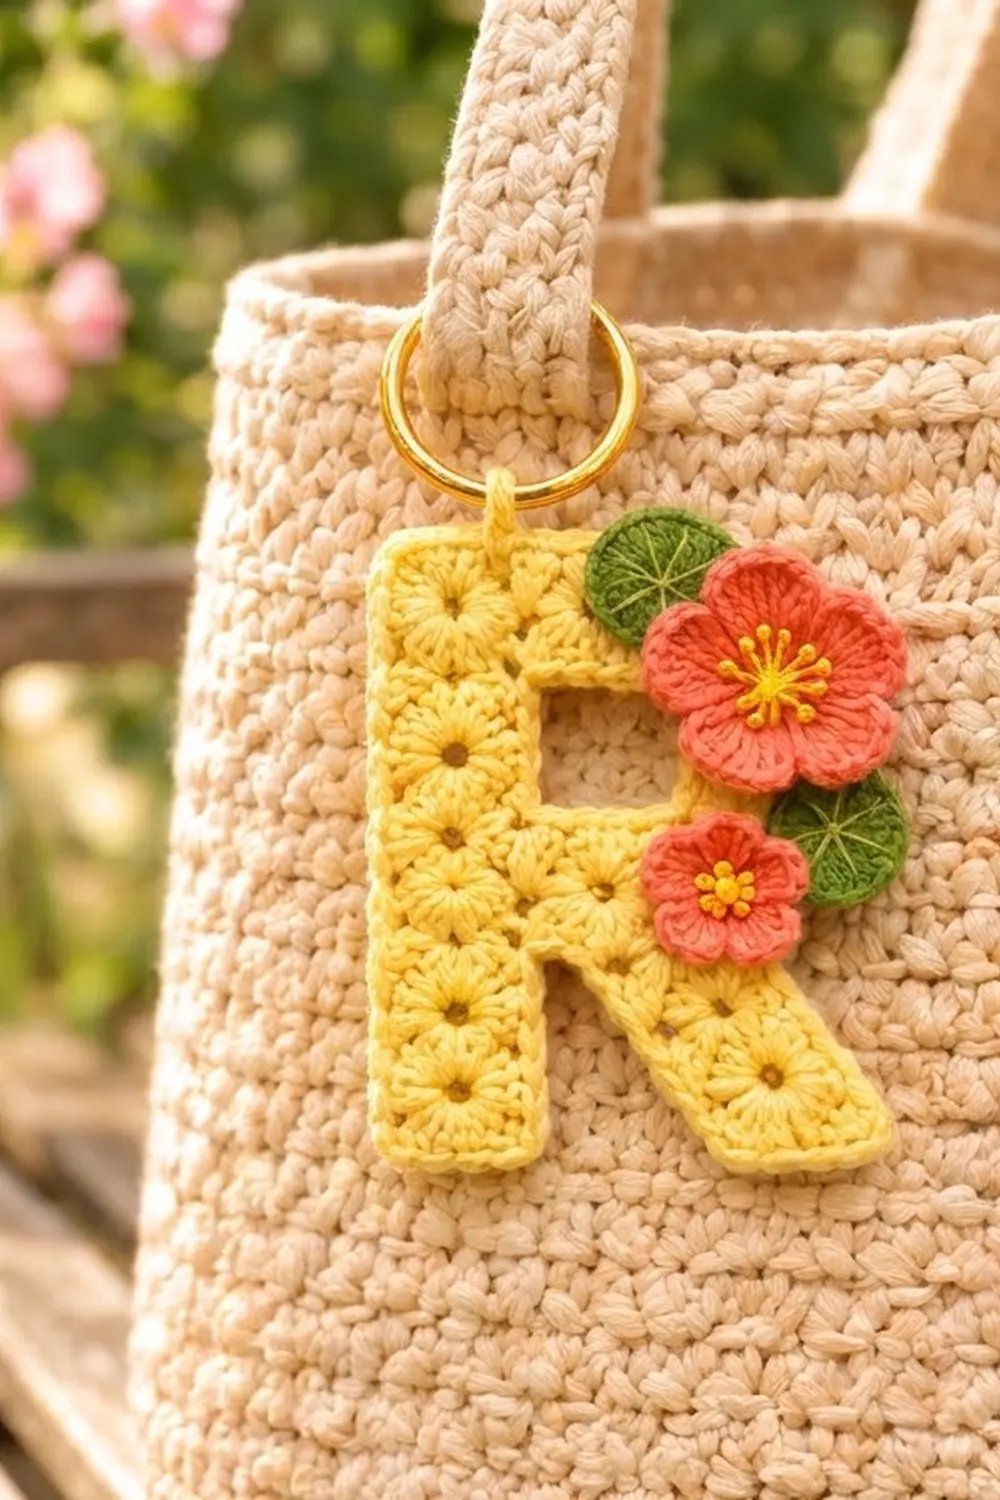
This little letter R is a bag charm you can finish in an evening. The butter-yellow fabric is covered in tiny eyelets, and each eyelet sits between two plump clusters, so the surface reads like a field of small sunbursts. A coral flower cluster with moss-green leaf discs sits on the upper bowl and makes it feel like spring.
The palette is soft and warm: pale yellow, coral, moss green, golden-yellow stamens and a gold split ring. The style is cottage-garden and personal. Make it as a gift, a monogram for a tote or a zipper pull for a pencil case.
The pattern uses US crochet terms. The finished letter measures 3 in (7.6 cm) wide by 3.75 in (9.5 cm) tall, not counting the tab and ring.
You’ll work the letter flat in rows from the bottom up. First you make the stem base and the stepped diagonal leg as two small sections. One row joins them, then the bowl splits around the counter and closes again under a chain bridge. A single round of single crochet edges the whole outline. Finally you add a hanging tab and sew on four small appliqués.
Finished Size and Construction
- Finished size: 3 in (7.6 cm) wide x 3.75 in (9.5 cm) tall
- Skill level: Intermediate
- Terminology: US crochet terms
- Yarn weight: Fingering (#1 super fine) cotton
- Hook: 2.5 mm
- Number of pieces: 1 letter, plus 4 small appliqués sewn on (2 flowers, 2 leaf discs)
- Layout: One single letter charm. Nothing is joined into a larger project.
- Letter size before border: 2.75 in (7.0 cm) wide at the base x 3.5 in (8.9 cm) tall
- Border depth: 0.125 in (0.3 cm) on every edge, one round of sc
Materials
Use a smooth, tightly plied mercerized or combed cotton in fingering weight. Cotton holds the cluster texture crisply and stands up to life on a bag handle. Avoid fuzzy or very splitty yarns, because the eyelets will blur.
- Pale butter yellow (letter, tab): 12 g / about 40 m
- Coral (both flowers): 4 g / about 14 m
- Moss green (leaf discs): 3 g / about 10 m
- Golden yellow (stamens): 1 g / about 3 m
- Light yellow-green (disc lines): 1 g / about 3 m
These quantities include a margin of roughly 20% for the gauge swatch and tails.
Tools:
- 2.5 mm crochet hook
- Tapestry needle
- 1.25 in (3.2 cm) gold split ring or key ring
- Stitch markers
- Blocking mat and rust-proof pins
- Spray bottle
- Small sharp scissors
Abbreviations (US Terms)
- ch – chain
- sl st – slip stitch
- sc – single crochet
- sc2tog – single crochet 2 together
- hdc – half double crochet
- dc – double crochet
- sk – skip
- st(s) – stitch(es)
- sp – space
- RS / WS – right side / wrong side
Special stitches:
- Cluster (cl): [Yarn over, insert hook in the stitch, pull up a loop, yarn over, pull through 2 loops] 3 times in the same stitch, then yarn over and pull through all 4 loops on the hook.
- Sunburst unit (unit): Worked over 4 sts: cl in the next st, ch 1, sk the next st, cl in the next st, sc in the next st. One unit uses 4 sts and gives 4 sts. The ch-1 makes the eyelet, and the clusters on either side of it make the sunburst.
Construction note: RS rows are always cluster rows and WS rows are always sc rows, so the eyelets line up into a neat grid.
Gauge and Checkpoints
Gauge: 8 sts and 4 rows = 1 in (2.5 cm) in sunburst pattern. One unit (4 sts x 2 rows) is a 0.5 in (1.3 cm) square.
Test swatch:
- Ch 18.
- Row 1 (RS): Cl in the 3rd ch from the hook, ch 1, sk the next ch, cl in the next ch, sc in the next ch, then work 3 more units in the chs. You have 16 sts.
- Row 2 (WS): Ch 1, turn, sc in each st and ch-1 sp across. You have 16 sts.
- Row 3 (RS): Ch 2 (does not count as a st), turn, work 4 units. You have 16 sts.
- Rows 4–8: Repeat Rows 2 and 3 twice more, then repeat Row 2 once.
The swatch should measure 2 in (5.1 cm) square.
Checkpoints:
- Stem section after Row 6: 1 in (2.5 cm) wide x 1.5 in (3.8 cm) tall
- Leg section after Row 6: 1 in (2.5 cm) wide x 1.5 in (3.8 cm) tall
- After Row 8: 2 in (5.1 cm) wide x 2 in (5.1 cm) tall
- After Row 14: 2.75 in (7.0 cm) wide at the base x 3.5 in (8.9 cm) tall
- After the border: 3 in (7.6 cm) x 3.75 in (9.5 cm)
If your piece is too big: Go down to a 2.25 mm hook. If only the height is off, make the clusters shorter by pulling each loop up less.
If your piece is too small: Go up to a 2.75 mm hook.
Pattern: Letter R
The x-positions below run from 1 (the letter’s left edge) to 22 (the leg’s tip) and are only there to help you visualize where each section sits.
Section 1 – Stem Base (x = 1–8)
Ch 10.
- Row 1 (RS): Cl in the 3rd ch from the hook, ch 1, sk the next ch, cl in the next ch, sc in the next ch, then work 1 unit in the next 4 chs. (8 sts, 2 units)
- Row 2 (WS): Ch 1, turn, sc in each st and ch-1 sp across. (8 sts)
- Row 3 (RS): Ch 2 (does not count), turn, work 2 units. (8 sts)
- Rows 4–6: Repeat Rows 2, 3 and 2. (8 sts)
Fasten off. The stem section measures 1 in (2.5 cm) x 1.5 in (3.8 cm).
Section 2 – Diagonal Leg (x = 9–22)
The leg moves 2 sts to the left on every WS row: you add 2 sts at the start of the row and leave 2 sts unworked at the end. This creates the diagonal.
Ch 10.
- Row 1 (RS): Work as Stem Row 1. (8 sts, at x = 15–22)
- Row 2 (WS): Ch 3, turn, sc in the 2nd ch from the hook and in the next ch (2 new sts), sc in the next 6 sts, then leave the last 2 sts unworked. (8 sts, at x = 13–20)
- Row 3 (RS): Ch 2, turn, work 2 units. (8 sts)
- Row 4 (WS): Repeat Row 2. (8 sts, at x = 11–18)
- Row 5 (RS): Repeat Row 3. (8 sts)
- Row 6 (WS): Repeat Row 2. (8 sts, at x = 9–16)
Do not fasten off. The leg should form a stepped strip leaning to the left, 1 in (2.5 cm) wide.
Section 3 – Joining Row and Middle Bar
Lay the stem to the left of the leg with the RS facing you. The stem’s last row should sit directly beside the leg’s last row.
- Row 7 (RS): Ch 2, turn, work 2 units across the leg (x = 16 to 9), then continue straight into the stem and work 2 units across it (x = 8 to 1). (16 sts, 4 units)
- Row 8 (WS): Ch 1, turn, sc in each st and ch-1 sp across. (16 sts)
Checkpoint: the piece is now 2 in (5.1 cm) across the joined row. A V-shaped gap separates the stem and the leg below it.
Section 4 – Bowl Around the Counter
Right column (x = 13–16):
- Row 9 (RS): Ch 2, turn, work 1 unit. (4 sts) Leave the remaining 12 sts unworked.
- Row 10 (WS): Ch 1, turn, sc in each st and sp. (4 sts)
- Row 11 (RS): Ch 2, turn, work 1 unit. (4 sts)
Fasten off.
Stem column (x = 1–8): With the RS facing, skip 4 sts of Row 8 after the right column (x = 12–9). These skipped stitches become the floor of the counter.
- Row 9 (RS): Join yarn with a sl st in the next st (x = 8), ch 2, cl in the same st, ch 1, sk the next st, cl in the next st, sc in the next st, then work 1 unit. (8 sts)
- Row 10 (WS): Ch 1, turn, sc in each st and sp across. (8 sts)
- Row 11 (RS): Ch 2, turn, work 2 units. (8 sts)
- Row 12 (WS, bridge): Ch 1, turn, sc in each st and sp across the stem column, ch 4 loosely, then sc in each st and sp across Row 11 of the right column. That is 8 sc + 4 ch + 4 sc = 16 sts.
The chain bridge closes the top of the counter. The counter is a rectangle 0.5 in (1.3 cm) wide by about 0.75 in (1.9 cm) tall.
Section 5 – Top Bar
- Row 13 (RS): Ch 2, turn, work 4 units. The middle unit goes into the 4 bridge chains. (16 sts)
- Row 14 (WS): Ch 1, turn, sc in each st and sp across. (16 sts)
Do not fasten off.
Checkpoint: the letter measures 2.75 in (7.0 cm) wide at the base and 3.5 in (8.9 cm) tall.
Border
Border gauge: 4 sc per 0.5 in (1.3 cm), which matches the body gauge of 8 sts per inch. Along the edges, work:
- 1 sc in each st along the top and bottom edges
- 3 sc in the end of each cluster row
- 1 sc in the end of each sc row
- 1 sc in each exposed step stitch or chain on the diagonal
Corners: Work 3 sc in the stitch at each of 5 square corners: top left, the two stem base corners and the two leg base corners. Each of those adds 2 sts. The top-right corner gets only 1 sc. That pulls it in slightly and gives the bowl its rounded shoulder.
Rnd 1 (RS): Ch 1, turn so the RS faces you, and work around in this order:
| Segment | Instructions | Count |
|---|---|---|
| Top edge | 1 sc in x = 16 (top-right corner), sc in each of the next 14 sts, 3 sc in x = 1 | 18 |
| Left side, Rows 14–1 | 7 row pairs x 4 sc | 28 |
| Stem base | 3 sc in the first ch, sc in the next 6 chs, 3 sc in the last ch | 12 |
| Stem right side, Rows 1–5 | 3 + 1 + 3 + 1 + 3 sc | 11 |
| Crotch | sc2tog over the Row 6 stem end and the Row 6 leg end | 1 |
| Leg left side, going down | 2 sc in the bottoms of the Row 6 chains, 3 + 1 sc in the ends of Rows 5 and 4, 2 sc in the bottoms of the Row 4 chains, 3 + 1 sc in the ends of Rows 3 and 2, 2 sc in the bottoms of the Row 2 chains, 3 sc in the end of Row 1 | 17 |
| Leg base | 3 sc in the first ch, sc in the next 6 chs, 3 sc in the last ch | 12 |
| Leg right side, going up | 3 sc in the end of Row 1, 2 sc in the step, 1 + 3 sc in the ends of Rows 2 and 3, 2 sc in the step, 1 + 3 sc in the ends of Rows 4 and 5, 2 sc in the step, 1 sc in the end of Row 6 | 18 |
| Right side, Rows 7–14 | 4 row pairs x 4 sc | 16 |
Join with a sl st to the first sc. Total: 133 sc.
Why the math works: The edge stitches add up to 124. The 5 corners add 2 each (+10), and the sc2tog takes away 1 (−1), so 124 + 10 − 1 = 133. Every row pair gets exactly 4 border sc, which is the same as 4 body sts per 0.5 in (1.3 cm). The edges therefore neither ruffle nor pull in. Working the steps one sc per stitch, with no extra corner stitches, smooths the staircase into a clean diagonal.
Counter edging: Join yellow in the counter. Work 4 sc along the floor (Row 8 sts), 7 sc up one side (3 + 1 + 3 in the row ends), 4 sc under the chain bridge and 7 sc down the other side. That is 22 sc. Don’t add stitches at the corners, because the corners of a hole curve inward and extra stitches would make them bulge. Join and fasten off.
Hanging tab: With the RS facing, join yellow in the 4th sc from the top-left corner along the top edge.
- Row 1: Ch 1, sc in the same st and in the next 2 sts. (3 sts)
- Rows 2–8: Ch 1, turn, sc in each st across. (3 sts)
The tab is 0.375 in (1.0 cm) wide x 1 in (2.5 cm) long. Leave a 6 in (15.2 cm) tail and fasten off. Thread the tab through the split ring, fold it to the back and whipstitch Row 8 to the base of Row 1.
Appliqués and Assembly
Large coral flower (make 1): Make a magic ring.
- Rnd 1: Ch 1, 10 sc in the ring, join. (10 sts)
- Rnd 2: *(Hdc, 3 dc, hdc) in the next st, sl st in the next st; repeat from * 4 more times. (5 petals, 30 sts)
The flower measures 1.25 in (3.2 cm) across.
Small coral flower (make 1): Make a magic ring.
- Rnd 1: Ch 1, 10 sc in the ring, join. (10 sts)
- Rnd 2: *(Hdc, dc, hdc) in the next st, sl st in the next st; repeat from * 4 more times. (5 petals, 20 sts)
The flower measures 0.875 in (2.2 cm) across.
Stamens: With golden yellow, sew 6–8 straight stitches radiating from each flower’s center, about 0.25 in (0.6 cm) long. Finish each one with a French knot at its tip.
Leaf discs (make 2): Use moss green and make a magic ring.
- Rnd 1: Ch 1, 6 sc in the ring. (6 sts)
- Rnd 2: 2 sc in each st. (12 sts)
- Rnd 3: *Sc in the next st, 2 sc in the next st; repeat from * 5 more times. (18 sts)
Join and fasten off. Each disc measures 0.75 in (1.9 cm) across. With light yellow-green, sew 6 straight stitches from the center to the edge, like the spokes of a wheel.
Placement (see the photo for reference):
- Tuck one disc under the upper-left petals of the large flower.
- Center the large flower on the top-right shoulder of the bowl, letting about 0.25 in (0.6 cm) of the petals extend past the border.
- Place the second disc at the right edge, level with the counter’s floor.
- Set the small flower below-left of the second disc, so it overlaps the middle bar and the top of the leg.
- Pin everything, then sew around each piece from the back. Keep your stitches in the back loops so nothing shows through the eyelets.
Final Blocking
- Mist the letter and the tab until they are damp, not soaked.
- Pin the letter face up on the mat to 3 in (7.6 cm) x 3.75 in (9.5 cm). Put pins at the 5 square corners.
- Push a pin through the counter to keep it a crisp rectangle.
- Gently straighten the diagonal leg so its outer edge is a straight line.
- Shape the flower petals with your fingertips. Don’t pin through the appliqués.
- Leave it to dry completely, about 6–8 hours.
Final Quality-Control Checklist
- [ ] The letter measures 3 in (7.6 cm) x 3.75 in (9.5 cm).
- [ ] The eyelets form straight vertical columns on the stem and the bowl.
- [ ] The border has 133 sc and lies flat with no ripples.
- [ ] The counter is open and square, with a 22-sc edging.
- [ ] The top-right corner is gently rounded and the other corners are crisp.
- [ ] The tab is sewn securely and the ring turns freely.
- [ ] The appliqués are stitched all the way around with no loose petals.
- [ ] All tails are woven in through the sc rows, not across the eyelets.
Troubleshooting
- The eyelets don’t line up: Always start the cluster rows with ch 2, which does not count, and work the first cluster in the first st.
- The leg twists: The ch-3 step on Rows 2, 4 and 6 is too tight. Rework it with looser chains.
- There’s a gap at the crotch: Close it with the sc2tog in the border, or add a single stitch on the back with the tail.
- The border ruffles: You’ve worked 4 sc into a cluster row end. Use 3.
- The border cups: Check that the 5 corners have 3 sc each.
- The petals are floppy: Go down a hook size for the flowers only.
Care
Hand wash in cool water with mild soap, press the water out in a towel and dry flat. Don’t put it in the dryer, because the clusters can felt and lose definition.
Final Notes
The whole design depends on one measurement: a 4-st, 2-row unit that is 0.5 in (1.3 cm) square.
- The stem and leg sections are each 2 units wide and 1.5 in (3.8 cm) tall.
- The joined body grows to 2 in (5.1 cm) across the middle bar, 2.75 in (7.0 cm) at the leg tip and 3.5 in (8.9 cm) tall.
- The 133-sc border, at 4 sc per 0.5 in (1.3 cm), brings the letter to 3 in (7.6 cm) x 3.75 in (9.5 cm).
If your swatch matches, every checkpoint after it will too. Once you’re comfortable with this letter, try the same unit for other initials.
Happy crocheting!