

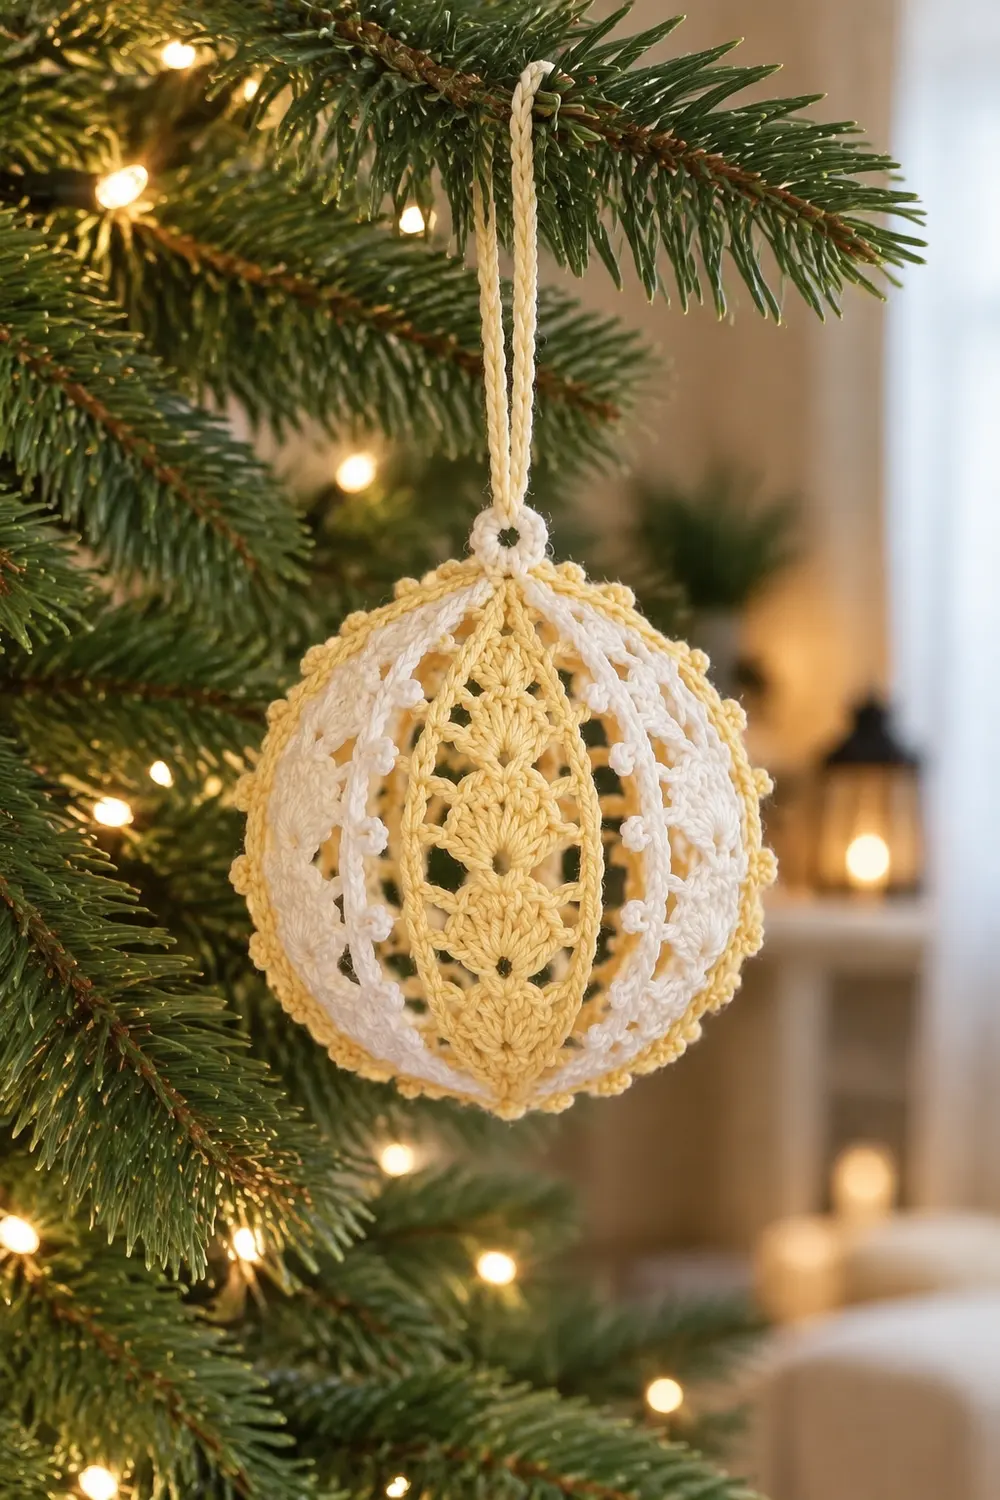
The Buttercream Lace Ornament is a hollow, egg-shaped Christmas bauble in an airy shell-and-fan lace. It hangs from a cream twisted cord and catches tree lights through its open diamonds.
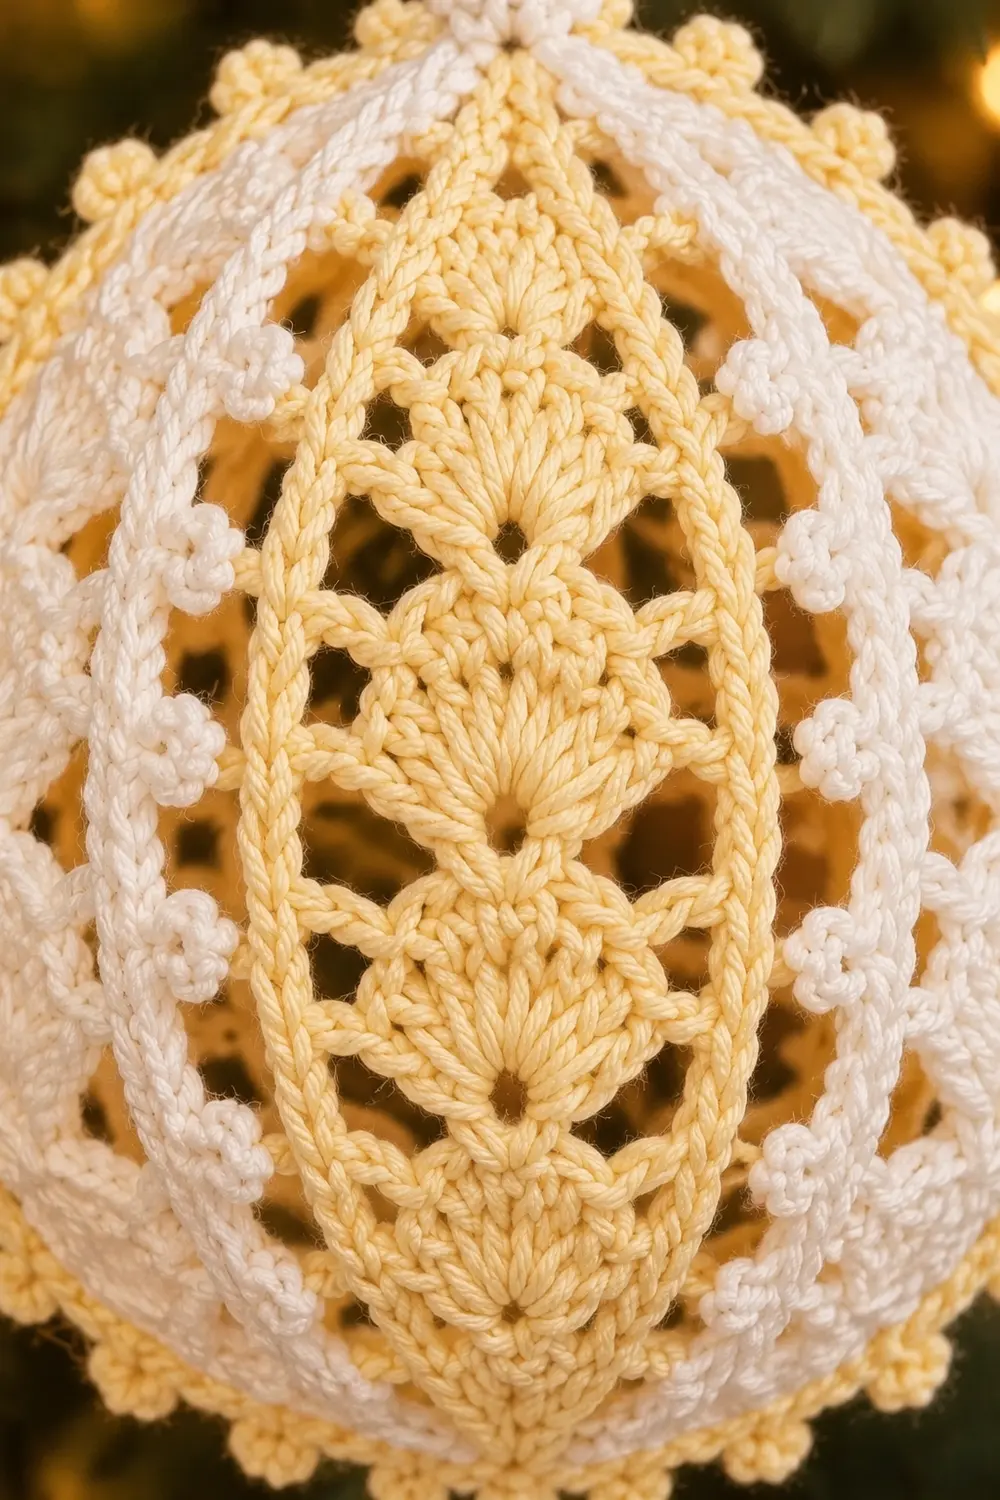
Two colors alternate in vertical stripes: butter yellow and cream. A butter-yellow panel runs down the center, cream lace panels sit on either side, and the stripes continue all the way around. A cream picot trim forms a delicate scalloped outline over the surface.
The pattern uses US crochet terms. The finished ornament is about 3.5 in (8.9 cm) tall and 3 in (7.6 cm) wide, not counting the hanging loop.
The ornament is a single piece worked flat, side to side. Every row runs pole to pole. Ten narrow vertical panels, called gores, are worked one after another and alternate colors. The flat piece gets cream picot ridges, then it is seamed into a tube and closed at both poles. Stiffening over a balloon gives the final hollow egg shape.
Finished Size and Construction
- Finished size: 3.5 in (8.9 cm) tall x 3 in (7.6 cm) wide, about 9.5 in (24.1 cm) around the middle
- Skill level: Intermediate
- Terminology: US
- Yarn weight: Sport (#2) mercerized cotton
- Hook: 2.75 mm (C-2)
- Number of pieces: 1
- Layout: 10 vertical gores alternating Yellow / Cream, starting with Yellow
- Piece size (flat, before border): 9.5 in (24.1 cm) wide at the center x 5.2 in (13.2 cm) pole to pole
- Border: 10 cream picot ridges, one per gore boundary, each 5.2 in (13.2 cm) long; picots stand about 0.15 in (0.4 cm) proud
Materials
Use a smooth mercerized sport-weight cotton for this project. It gives crisp stitch definition and stiffens well. Quantities below assume about 150 m per 50 g, which is 3 m per gram.
- Butter Yellow (Y): 7 g / 20 m
- Cream (C): 14 g / 40 m
Cream uses more yarn because it also covers the picot ridges, the pole rounds, and the hanging cord. Both quantities include a margin of roughly 40% for tails and swatching.
Tools:
– 2.75 mm (C-2) crochet hook
– Tapestry needle
– Scissors
– Locking stitch marker
– Small round balloon
– Fabric stiffener, or a strong starch solution
– Small bowl and towel for stiffening
– Ruler or tape measure
Abbreviations (US Terms)
- ch – chain
- sl st – slip stitch
- sc – single crochet
- hdc – half double crochet
- dc – double crochet
- tr – treble crochet
- sc2tog – single crochet 2 together
- sk – skip
- sp – space
- st(s) – stitch(es)
- rep – repeat
- Y / C – Yellow / Cream
Special stitches:
– Shell: 5 sts of the stated height worked into the same stitch. For example, a “dc shell” is 5 dc in the same st.
– Picot: ch 3, sl st in the 3rd ch from hook.
– Surface sl st: Hold the yarn behind the fabric. Insert the hook from front to back through the center of the stated stitch, pull up a loop, and draw it through the loop on the hook.
Gauge and Checkpoints
Gauge: 6 sc = 1 in (2.5 cm), and 13 sc rows = 2 in (5.1 cm).
Your first gore doubles as the gauge test. Work Gore 1 and measure it before continuing.
Checkpoints:
– After Row 1 (31 sc): 5.2 in (13.2 cm) long
– After Gore 1: about 0.95 in (2.4 cm) wide at the center, narrowing to about 0.3 in (0.8 cm) at each end
– After Gore 5: about 4.75 in (12.1 cm) wide at the center
– After Gore 10: about 9.5 in (24.1 cm) wide at the center
– After blocking: 3.5 in (8.9 cm) tall x 3 in (7.6 cm) wide
If Row 1 is longer than 5.4 in (13.7 cm), go down to a 2.5 mm hook. If it is shorter than 5 in (12.7 cm), go up to a 3 mm hook.
If only the gore width is off, adjust the height of your tall stitches. Pull up longer loops if gores are too narrow; snug them down if gores are too wide.
Gore Pattern
Each gore is 3 rows: a solid sc row, a shell row, and an open mesh row. Turn at the end of every row.
The shells are graded so each gore is wide at the middle and narrow at the ends:
– Shells 1 and 5 use hdc.
– Shells 2 and 4 use dc.
– Shell 3 uses tr.
This grading is what shapes the egg. Because the shell sequence is symmetrical, rows worked in either direction match.
Gore 1 (Y)
Foundation: With Y, ch 32.
Row 1: Sc in 2nd ch from hook and in each ch across. Turn. (31 sc)
Mark the side facing you as the outside.
Row 2 (shell row): Ch 1, sc in first sc. Sk 2 sc, hdc shell in next sc, sk 2 sc, sc in next sc. Sk 2 sc, dc shell in next sc, sk 2 sc, sc in next sc. Sk 2 sc, tr shell in next sc, sk 2 sc, sc in next sc. Sk 2 sc, dc shell in next sc, sk 2 sc, sc in next sc. Sk 2 sc, hdc shell in next sc, sk 2 sc, sc in last sc. Turn. (5 shells, 25 shell sts + 6 sc = 31 sts)
Row 3 (mesh row): Ch 1, sc in first sc. Then, for each shell: ch X, sk 2 sts, sc in center (3rd) st of shell, ch X, sk 2 sts, sc in next sc. Work this sequence 5 times.
Use X = 1 over hdc shells, X = 2 over dc shells, and X = 3 over the tr shell. (11 sc + 10 ch-sps)
Change to C on the final yarn-over of the last sc. Cut Y, leaving a 6 in (15.2 cm) tail.
Gores 2–10
Row 1: Ch 1, sc in first sc. 2 sc in next ch-sp, sc in next sc; rep from * 9 more times. Turn. (31 sc)*
This row converts the mesh back to a solid line. Each of the 11 mesh sc gets 1 sc, and each of the 10 ch-sps gets 2 sc: 11 + (10 x 2) = 31. The count stays at 31 regardless of chain length, so every gore boundary is exactly 5.2 in (13.2 cm) long.
Rows 2–3: Work as Gore 1.
Colors:
– Even-numbered gores (2, 4, 6, 8, 10) are C.
– Odd-numbered gores (3, 5, 7, 9) are Y.
– Change color on the last sc of each Row 3, leaving 6 in (15.2 cm) tails.
After Gore 10, fasten off C, leaving a 20 in (50.8 cm) tail for seaming. You now have 10 gores, 30 rows total, alternating Y and C.
Weave in all color-change tails along the sc rows, except the seaming tail.
Picot Ridges (Border)
The picot ridges are worked while the piece is still flat, which is far easier than working on a closed ball. There is one ridge on Row 1 of each gore, so 10 ridges in total. Each ridge runs pole to pole.
Gores 1 and 6 sit directly opposite each other on the finished ball, and so do Gores 2 and 7, and so on. That means each opposite pair of ridges meets at the poles and forms one continuous picot circle around the full circumference. The 10 ridges make 5 picot circles.
Border gauge: Work 1 surface sl st per Row 1 sc. This matches the body gauge of 6 sts = 1 in (2.5 cm), so each ridge is 5.2 in (13.2 cm) long and lies flat without pulling.
Each Ridge (worked 10 times, with C, outside facing)
Join C with a surface sl st in the first sc of Row 1.
Surface sl st in next sc (2 sts). Picot, surface sl st in next 3 sc; rep from * 8 more times (29 sts). Picot, surface sl st in last 2 sc. Fasten off. (31 sl sts, 10 picots)*
Why the math works: 2 + (9 x 3) + 2 = 31. This exactly matches the 31 sc in Row 1. The picots sit at the same positions on every ridge, 2 sts in from each end and every 3 sts (0.5 in / 1.3 cm) between. Opposite ridges therefore mirror each other through the poles.
Total for the border: 10 ridges x 10 picots = 100 picots.
Seam
Fold the piece so the last row of Gore 10 (the mesh row) lies against the foundation chain of Gore 1. Keep the outside facing out, then flip so you are working on the inside.
Use the C tail to work sl sts through both layers:
– 1 sl st through each mesh sc and the matching foundation ch.
– 2 sl sts through each ch-sp and the next 2 foundation chs.
This gives 11 + (10 x 2) = 31 sl sts, matching the 31 foundation chains one for one. You now have a lace tube that is open at both poles.
Top Ring
Join C at either pole end.
Rnd 1: Ch 1. Work 1 sc into the Row 2 end of each gore, skipping the Row 1 and Row 3 ends. Join with sl st. (10 sc)
Skipping those row ends draws the 30 row ends together evenly.
Rnd 2: Ch 1, sc in each sc around, join. (10 sc)
Fasten off and weave in the end. This forms the small cream ring at the top, about 0.5 in (1.3 cm) across.
Bottom Pole
Rnd 1: Work as Top Ring Rnd 1. (10 sc)
Rnd 2: Ch 1, sc2tog 5 times, join. (5 sc)
Fasten off, leaving an 8 in (20.3 cm) tail. Do not cinch yet; the balloon neck passes through this opening during blocking.
Hanging Cord
Cut 40 in (101.6 cm) of C and fold it in half. Twist the doubled strand until it kinks, then fold it again and let it twist back on itself. You should have a cord about 9 in (22.9 cm) long.
Thread the cord through the top ring and knot the ends together. The finished loop hangs about 4 in (10.2 cm) above the ornament.
Final Blocking
- Slide the deflated balloon in through the bottom opening.
- Inflate it inside the ornament until the lace measures 3 in (7.6 cm) wide and 3.5 in (8.9 cm) tall. Tie off the balloon, leaving the neck poking out the bottom.
- Brush stiffener over the whole surface, or dip the ornament briefly and blot it on a towel.
- Nudge each gore so the Row 1 lines run straight from pole to pole.
- Center the tr shells on the widest point and lift every picot upright.
- Hang the ornament by the balloon neck and let it dry completely, usually 12–24 hours.
- Pop the balloon and draw it out through the bottom opening.
- Thread the bottom tail through the front loops of the 5 sc, cinch closed, knot, and hide the tail inside.
Final Quality-Control Checklist
- [ ] Every Row 1 has 31 sc, and every Row 2 has 5 shells in the order hdc, dc, tr, dc, hdc
- [ ] There are 10 gores, alternating Y and C
- [ ] There are 10 picot ridges, each with 31 sl sts and 10 picots
- [ ] Opposite ridges line up through both poles
- [ ] The seam has 31 sl sts and is on the inside
- [ ] The top ring is 10 sc, and the bottom is cinched from 5 sc
- [ ] The ornament measures 3.5 in (8.9 cm) x 3 in (7.6 cm)
- [ ] The ornament is fully dry and holds its shape when squeezed lightly
Troubleshooting
Gores ruffle at the center. Your tr shells are too tall. Shorten the yarn-over loops, or try a slightly smaller hook for Row 2 only.
Ornament is too narrow at the middle. The shells are too short. Pull up taller loops on the dc and tr shells.
Poles pucker or show gaps. Make sure Rnd 1 at each pole works only into Row 2 ends. Pull the ring rounds snug.
Seam looks bulky. Work the seam on the inside, and keep the sl sts at the same tension as your sc.
Picots flop over. Re-stiffen the picots with a little extra stiffener, then pinch each one upright while it dries.
Stripes spiral around the ball. The Row 1 lines were not straightened during blocking. Re-wet the ornament, realign the lines, and let it dry again.
Balloon sticks to the lace. Let the stiffener dry fully before popping the balloon. Ease the balloon out slowly.
Care
Dust gently with a soft brush. If the ornament loses its shape, re-wet it with stiffener over a balloon and let it dry again. Store it in a small box so it isn’t crushed.
Optional: For a matching set, make extra ornaments in other color pairs using the same instructions.
Final Notes
The measurement chain is simple:
– 31 sc at 6 sc per in gives a 5.2 in (13.2 cm) meridian.
– 10 gores of about 0.95 in (2.4 cm) give 9.5 in (24.1 cm) around the middle.
– 31-stitch picot ridges match every Row 1 exactly.
– Blocking over a balloon sets the shape at 3.5 in (8.9 cm) tall x 3 in (7.6 cm) wide.
Check Row 1 and Gore 1 against the gauge, and the rest of the ornament will fall into place. Hang it near the lights and enjoy how the lace glows.
Happy crocheting!