

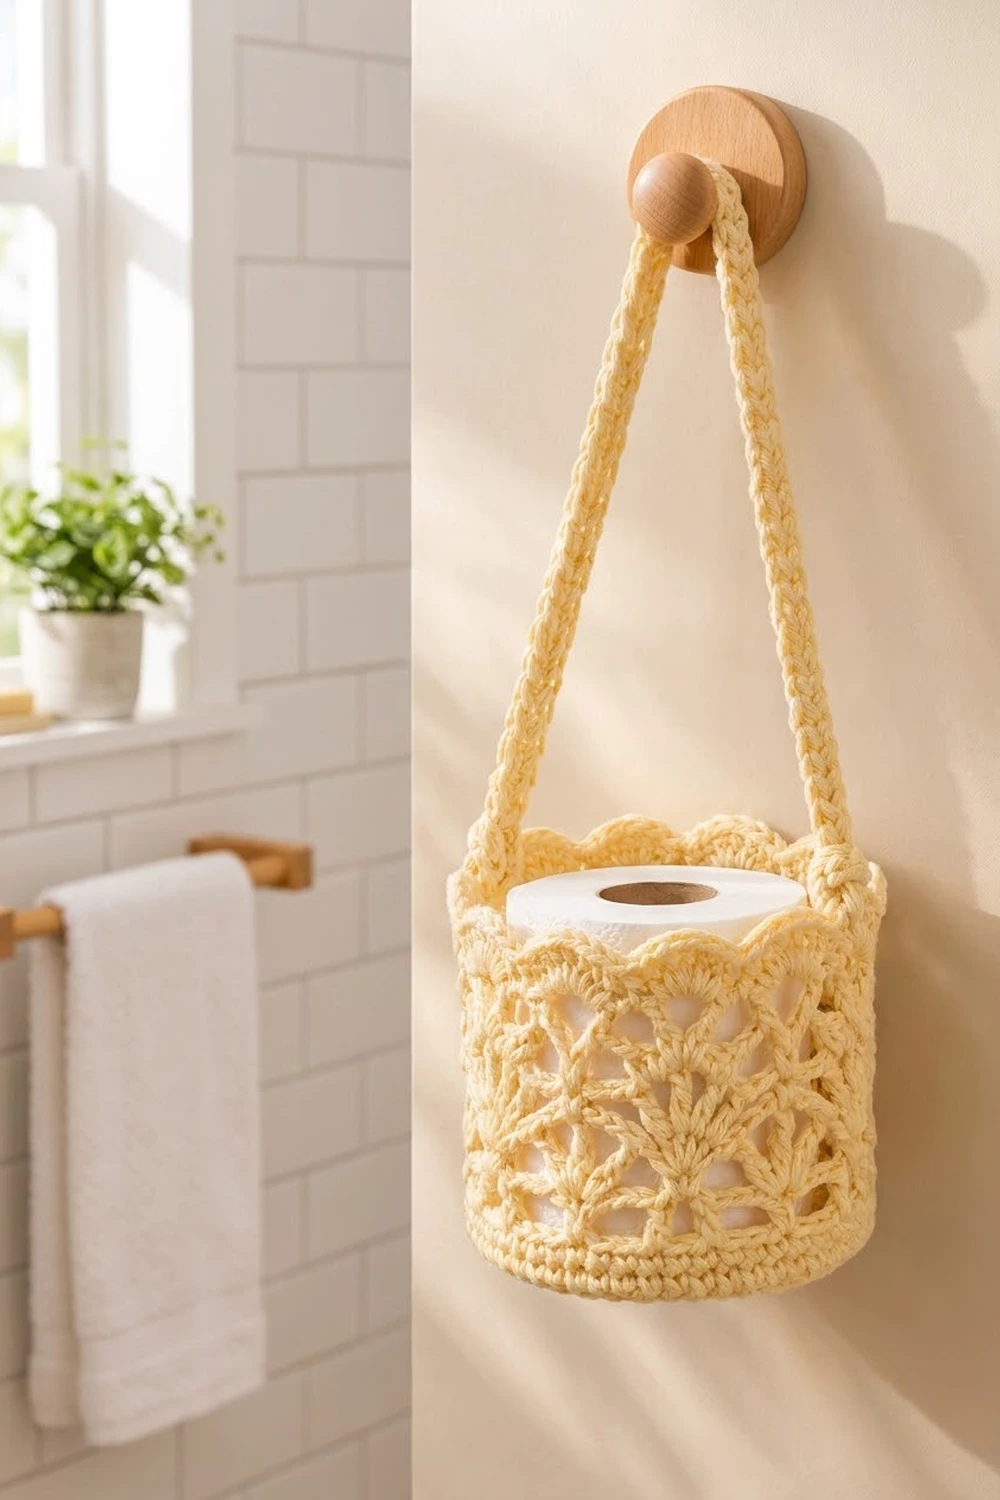
This hanging basket keeps a spare roll close by and looks pretty doing it. It has a solid round base, a lacy round wall and two cord straps, and it hangs from a wall peg or hook. A standard toilet paper roll drops in from the top.
The whole piece uses one soft butter-cream cotton, so the stitch texture carries the design. Openwork fans rise from a solid band at the bottom. Above them are a diamond lattice, a row of shells, a second lattice and a gently scalloped rim.
This pattern uses US crochet terms. The finished basket is about 5.75 in (14.6 cm) across and 4.75 in (12.1 cm) tall. Each strap is about 11 in (27.9 cm) long, including its hanging loop.
Construction is simple. First you crochet a flat circle for the base. Then you work the wall as a separate tube in joined rounds and finish it with a scalloped rim. A single crochet round joins the wall to the base, and the two straps are sewn on last.
Finished Size and Construction
- Finished size: 5.75 in (14.6 cm) diameter x 4.75 in (12.1 cm) tall
- Skill level: Easy-Intermediate
- Terminology: US crochet terms
- Yarn weight: Worsted (#4), cotton or cotton blend
- Hook: 4.0 mm (G-6)
- Number of pieces: 4 (1 base, 1 wall, 2 straps)
- Layout: The wall stands on the base; the straps attach inside the rim on opposite sides
- Base size: 5.75 in (14.6 cm) diameter, 72 stitches around
- Wall size before rim: 18 in (45.7 cm) around x 3.75 in (9.5 cm) tall
- Border depth: Rim band and scallops 0.75 in (1.9 cm), plus 0.25 in (0.6 cm) for the joining round at the bottom
Materials
Choose a smooth, firm worsted cotton. Cotton holds its shape, shows lace clearly and copes well with bathroom humidity. Avoid fluffy or very stretchy yarns, which blur the fans and let the basket sag.
- Butter Cream (only color): 100 g, about 180 m (197 yd)
- Base: about 25 g, 45 m
- Wall and rim: about 45 g, 80 m
- Straps: about 10 g, 18 m
- Joining round and margin: about 20 g, 37 m
Tools:
- 4.0 mm (G-6) crochet hook
- Tapestry needle
- Stitch markers (at least 4)
- Scissors
- Tape measure
- Rust-proof pins, and a round container about 5.75 in (14.6 cm) wide for blocking
These quantities include a margin of about 20 percent to cover a test piece and differences in tension.
Abbreviations (US Terms)
- ch – chain
- sl st – slip stitch
- sc – single crochet
- dc – double crochet
- inc – 2 sc in the same stitch
- MR – magic ring
- sk – skip
- sp(s) – space(s)
- st(s) – stitch(es)
- RS – right side
- fsc – foundation single crochet. Ch 2, insert hook in 2nd ch from hook, yo and pull up a loop, yo and draw through 1 loop (this makes the “chain”), yo and draw through 2 loops. For each following fsc, insert hook into the “chain” of the previous stitch and repeat.
Special stitches:
- V-st: (dc, ch 2, dc) in the same stitch.
- Fan: 7 dc in the same ch-2 space.
- Shell: 5 dc in the same ch-5 loop.
- Scallop: 5 dc in the same stitch.
Gauge and Checkpoints
Gauge: 16 sc and 16 rows = 4 in (10.2 cm) in sc. One dc round is about 0.5 in (1.3 cm) tall.
Make the base first and use it as your test piece. If the base comes out the right size, the wall will fit it, because both have 72 stitches around.
Checkpoints:
- Base after Rnd 6 (36 sts): about 2.75 in (7.0 cm) across
- Base after Rnd 12 (72 sts): 5.75 in (14.6 cm) across
- Wall after Rnd 3: 0.75 in (1.9 cm) tall and 18 in (45.7 cm) around
- Wall after Rnd 5: 1.75 in (4.4 cm) tall
- Wall after Rnd 9: 3.75 in (9.5 cm) tall
- Wall after Rnd 10: 4 in (10.2 cm) tall
- Wall after Rnd 11: 4.5 in (11.4 cm) tall
- Finished basket after joining: 4.75 in (12.1 cm) tall
Too big? Go down to a 3.75 mm (F-5) hook. Too small? Go up to a 4.5 mm (7) hook. If the base ripples, go up a hook size. If it cups, go down one.
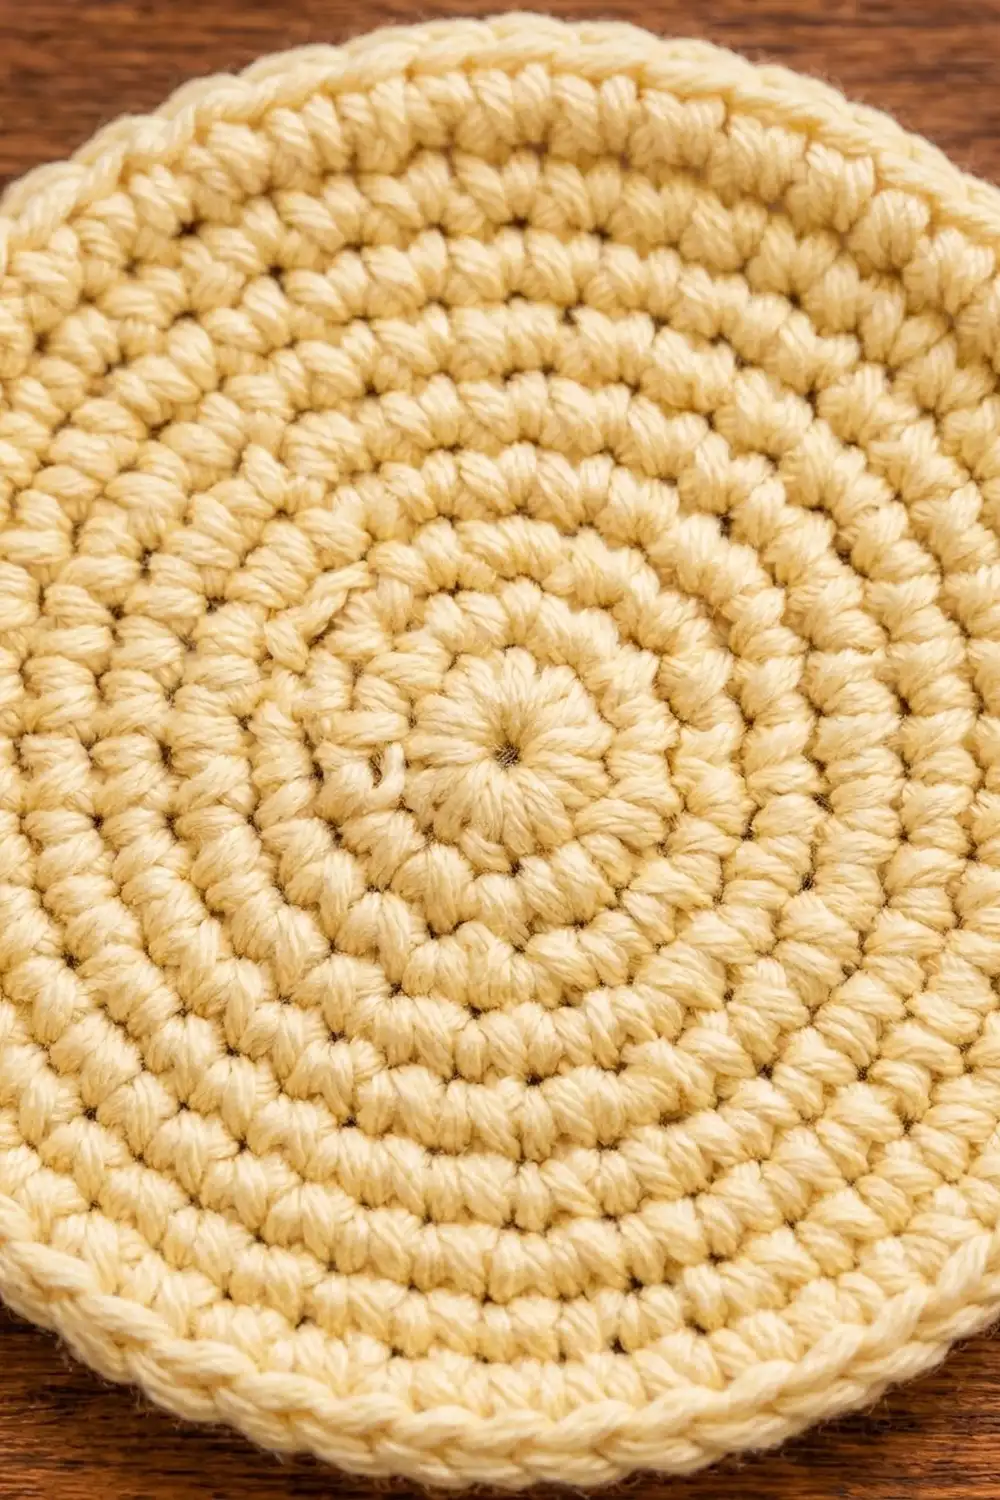
Base
Work in joined rounds with the RS facing. The ch 1 at the start of each round does not count as a stitch. Join each round with a sl st to the first sc.
Rnd 1: In MR, work 6 sc. Join. (6 sts)
Rnd 2: Inc in each st around. Join. (12 sts)
Rnd 3: *Sc in next st, inc; rep from * 5 more times. Join. (18 sts)
Rnd 4: *Sc in next 2 sts, inc; rep from * 5 more times. Join. (24 sts)
Rnd 5: *Sc in next 3 sts, inc; rep from * 5 more times. Join. (30 sts)
Rnd 6: *Sc in next 4 sts, inc; rep from * 5 more times. Join. (36 sts)
Rnd 7: *Sc in next 5 sts, inc; rep from * 5 more times. Join. (42 sts)
Rnd 8: *Sc in next 6 sts, inc; rep from * 5 more times. Join. (48 sts)
Rnd 9: *Sc in next 7 sts, inc; rep from * 5 more times. Join. (54 sts)
Rnd 10: *Sc in next 8 sts, inc; rep from * 5 more times. Join. (60 sts)
Rnd 11: *Sc in next 9 sts, inc; rep from * 5 more times. Join. (66 sts)
Rnd 12: *Sc in next 10 sts, inc; rep from * 5 more times. Join. (72 sts)
To keep the circle round instead of hexagonal, shift the increases on even rounds. For example, on Rnd 8: sc in next 3 sts, inc, *sc in next 6 sts, inc; rep from * 4 more times, sc in last 3 sts. The count stays the same.
Fasten off and weave in the center tail. Keep the outer tail short; the joining round will hide it.
Wall
The wall is worked in the round from the bottom up. The lace repeat is 12 stitches, worked 6 times around.
Rnd 1: Fsc 72. Join to the first fsc with a sl st, taking care not to twist. (72 sts)
Rnd 2: Ch 1, sc in each st around. Join. (72 sts)
Rnd 3: Ch 1, sc in each st around. Join. (72 sts)
Check: the wall should be 0.75 in (1.9 cm) tall and 18 in (45.7 cm) around.
Rnd 4 (V round): Ch 1, sc in first st, ch 4, sk 5 sts, V-st in next st, ch 4, sk 5 sts*, sc in next st; rep from * 4 more times, then from * to ** once. Join to first sc. (6 sc, 6 V-sts, 12 ch-4 sps)
Each repeat uses 1 + 5 + 1 + 5 = 12 stitches, so 6 repeats use all 72.
Rnd 5 (fan round): Ch 1, sc in first sc, ch 2, fan in ch-2 sp of next V-st, ch 2*, sc in next sc; rep from * 4 more times, then from * to ** once. Join. (6 sc, 6 fans = 42 dc, 12 ch-2 sps)
Leave the ch-4 spaces from Rnd 4 open under the new chains. They make the airy openings beneath each fan.
Rnd 6 (lattice): Ch 1, sc in first sc, ch 5, sc in 4th (center) dc of next fan, ch 5*, sc in next sc; rep from * 4 more times, then from * to ** once. Join. (12 sc, 12 ch-5 loops)
Rnd 7 (lattice): Sl st in next 3 ch, ch 1, sc in same loop, *ch 5, sc in next loop; rep from * 9 more times, ch 2, dc in first sc. (12 sc, 12 ch-5 loops; the ch-2 plus dc counts as the 12th loop)
The joining dc leaves your hook in the center of the last loop, ready for the next round.
Rnd 8 (shell round): Ch 1, sc around the post of the joining dc, shell in next loop*, sc in next loop; rep from * 4 more times, then from * to ** once. Join. (6 sc, 6 shells = 30 dc)
Rnd 9 (lattice): Ch 1, sc in first sc, ch 5, sc in 3rd (center) dc of next shell, ch 5*, sc in next sc; rep from * 4 more times, then from * to ** once. Join. (12 sc, 12 ch-5 loops)
Check: the wall should be about 3.75 in (9.5 cm) tall. Do not fasten off. Go straight on to Rnds 10 and 11 in the Border section, then come back to join the wall to the base.
Make All Pieces
All pieces use Butter Cream.
- Base: 1 (about 25 g)
- Wall: 1 (about 45 g, including the rim)
- Straps: 2 (about 5 g each)
Straps (make 2): Ch 8, then sl st in the first ch to form the hanging loop. Ch 42. Sc in the back bump of the 2nd ch from the hook and in each ch across, ending next to the loop. Sl st into the loop. Fasten off. Join yarn to the other end of the strap and fasten off again, leaving a 10 in (25.4 cm) tail there for sewing. (41 sc)
Each strap measures 10.25 in (26.0 cm) along the sc section, plus about 0.75 in (1.9 cm) for the loop, for 11 in (27.9 cm) in total. Working into the back bumps gives the strap a neat, braided look along both edges.
Layout:
[ Strap A ]          [ Strap B ]
     [    Wall (tube)    ]
     [   Base (circle)   ]
Joining
Method: Single crochet join, worked stitch to stitch.
Turn the wall so its foundation edge is at the bottom and set it on the base, wrong sides together, with the RS of both pieces facing out. The wall has 72 foundation stitches and the base has 72 stitches in Rnd 12. On both pieces, place markers at stitches 1, 19, 37 and 55, then line the markers up.
Join yarn through both layers at any marker. Ch 1, then work 1 sc through each wall stitch and its matching base stitch all the way around. Join to the first sc. (72 sts)
Because the counts match exactly, no easing or extra stitches are needed. The markers hold each quarter at 18 stitches, so the wall cannot twist.
Tension: Work the joining round at your normal gauge. If it is too tight, the base cups upward; if it is too loose, the bottom edge flares.
Size checkpoint: The joined basket should stand upright on a flat base 5.75 in (14.6 cm) across.
Straps: Mark two opposite points on the rim band: stitch 1 and stitch 37 of Rnd 10. Lay the tail end of one strap against the inside of the wall at each point, overlapping 0.75 in (1.9 cm) down across Rnds 9 and 10. Whipstitch all around the overlap with the tail. Keep both straps untwisted, with the loops at the top.
Border
The border is the scalloped rim. It is worked into Rnd 9 of the wall before joining.
Border gauge: 4 sc per 1 in (2.5 cm). Each scallop uses 6 stitches, so it spans 1.5 in (3.8 cm).
Rnd 10 (rim band, conversion round): Ch 1, *sc in next sc, 5 sc in next ch-5 loop; rep from * 11 more times. Join. (12 sc worked 1 per existing sc + 60 sc worked 5 per loop = 72 sts)
Count per half (front or back): 36 sts.
Rnd 11 (scallop trim round): Ch 1, sc in first st, sk 2 sts, scallop in next st, sk 2 sts*, sc in next st; rep from * 10 more times, then from * to ** once. Join to first sc. Fasten off. (12 sc worked 1 per anchor stitch + 60 dc worked 5 per scallop stitch = 72 sts; 12 scallops)
Count per half: 6 sc and 6 scallops, using 36 stitches of Rnd 10.
Why the math works: Each lattice loop takes 5 sc, and each loop plus its sc anchor makes 6 stitches. Twelve loops give 12 x 6 = 72 stitches, the same count as the foundation and the base. Each scallop also uses 6 stitches, so 72 / 6 = 12 scallops fit with nothing left over. The straps attach at stitches 1 and 37, exactly 36 stitches apart, so they sit directly opposite each other.
Final Blocking
- Weave in all ends on the inside of the wall, following the solid sc rounds where you can.
- Spray the basket evenly with water until it is damp but not soaked.
- Slide it over a round container about 5.75 in (14.6 cm) wide, or stuff it with a rolled towel to the same width.
- Ease each fan open and center it between its neighbors.
- Pin the tip of each scallop so the rim is even.
- Press the base flat against a towel.
- Straighten each strap and pin it flat to dry.
- Let everything dry completely before you remove the pins.
Final Quality-Control Checklist
- The base is flat and 5.75 in (14.6 cm) across
- The wall is 18 in (45.7 cm) around and not twisted
- There are 6 evenly spaced fans of 7 dc each
- Rnds 6, 7 and 9 each have 12 lattice loops
- Rnd 8 has 6 shells
- The rim band has 72 sc and the rim has 12 even scallops
- The joining round has 72 sc and no gaps
- Both straps are 11 in (27.9 cm) long and attached directly opposite each other
- The basket stands 4.75 in (12.1 cm) tall
- All ends are secure and hidden
Troubleshooting
Base ripples: Your increases are stacking or your hook is too small. Stagger the increases and go up a hook size.
Base cups: Your stitches are too loose for the increase rate. Go down a hook size.
Wall is wider than the base: Your dc rounds are loose. Rework Rnds 4–9 with a smaller hook. The foundation must still have 72 sts.
Fans lean to one side: A V-st landed in the wrong stitch. Recount Rnd 4; there should be 5 skipped stitches on each side of every V-st.
Lattice loops sag: Work the ch-5 loops more firmly, or change them to ch 4 on Rnds 6, 7 and 9. Keep working 5 sc per loop on Rnd 10.
Scallops don’t fit evenly: Rnd 10 does not have 72 sts. Count it and fix it before working the rim.
Basket tilts when hung: The straps are different lengths or not opposite each other. Check that they are attached at stitches 1 and 37.
Care
Hand wash in cool water with mild soap. Press the water out in a towel, reshape the basket over a round form and let it dry; do not tumble dry.
Final Notes
Every measurement in this basket depends on the one before it. The base grows by 6 stitches a round to 72 stitches and 5.75 in (14.6 cm) across. The wall starts with the same 72 stitches, 18 in (45.7 cm) around. The lace repeats 6 times over a 12-stitch repeat and returns to 72 stitches on the rim band. Twelve 6-stitch scallops finish the top, and the joining round matches the wall to the base 72 to 72. Two 11 in (27.9 cm) straps set 36 stitches apart keep the basket level on its peg.
Check your gauge on the base and count at every checkpoint, and the pieces will fit together without any adjusting.
Happy crocheting!