

This curtain panel turns a window into a small garden. Square daisy motifs in butter yellow and cream sit inside an open sage-green lattice, and small green leaves rest where the squares meet. Light comes through the chain openings, so the panel softens the window without blocking it.
Each flower has a raised golden-yellow center and 12 pointed petals. The yellow and cream daisies alternate in a checkerboard, which looks calm and even from across the room. The style is cottage-vintage, and the construction repeats the same steps, so it is easy to follow.
This pattern uses US crochet terms. One finished panel measures 31.5 in x 91.5 in (80.0 cm x 232.4 cm) after the border, with 3 in (7.6 cm) chain tabs above it. The photo shows a matching pair, so the materials list covers two panels.
Each panel uses 75 square motifs, 5 across and 15 down. You’ll crochet each flower in rounds, add a green frame with corner leaves, and join the motifs with a flat slip-stitch seam. Then you’ll add a three-round border and six chain-loop tabs.
Finished Size and Construction
- Finished panel size: 31.5 in x 91.5 in (80.0 cm x 232.4 cm), plus 3 in (7.6 cm) tabs
- Skill level: Intermediate
- Terminology: US crochet terms
- Yarn weight: DK (#3) cotton
- Hook: 4.5 mm (US 7)
- Number of pieces: 75 motifs per panel, 150 for the pair
- Layout: 5 motifs wide x 15 motifs tall, yellow/cream checkerboard
- Motif size: 6 in (15.2 cm) square
- Size before border: 30 in x 90 in (76.2 cm x 228.6 cm)
- Border depth: 0.75 in (1.9 cm) per side
Materials
Use a smooth combed or mercerized DK cotton of about 125 m per 50 g. Cotton holds the petal shape, hangs well, and stands up to sunlight. The amounts below are for the pair. Halve them for one panel.
- Color A, Golden Yellow (centers): 110 g / 275 m
- Color B, Butter Yellow (petals): 270 g / 675 m
- Color C, Cream (petals): 270 g / 675 m
- Color D, Sage Green (frames, leaves, joining, border, tabs): 650 g / 1,625 m
Tools:
- 4.5 mm (US 7) crochet hook
- Tapestry needle
- Stitch markers
- Tape measure
- Blocking mats and rust-proof pins
All quantities include a margin of about 15 percent to allow for differences in gauge, your test motif, and weaving in ends.
Abbreviations (US Terms)
- ch: chain
- sl st: slip stitch
- sc: single crochet
- hdc: half double crochet
- dc: double crochet
- sp(s): space(s)
- sk: skip
- st(s): stitch(es)
- rep: repeat
- RS: right side
Special stitch, Leaf: Ch 7, sl st in 2nd ch from hook, sc in next ch, hdc in next ch, dc in next ch, hdc in next ch, sc in last ch. That gives you 6 sts along 6 chains, and you end back at the base of the leaf.
Gauge and Checkpoints
Gauge: 16 sc = 4 in (10.2 cm). The most important gauge is the finished motif: 6 in (15.2 cm) square after Round 6, measured edge to edge through the middle.
Make and lightly block one full motif before you make the rest. Check these sizes:
- After Round 2: center 1.25 in (3.2 cm) across
- After Round 4: flower 4.25 in (10.8 cm) tip to tip
- After Round 5: frame 5.5 in (14.0 cm) side to side
- After Round 6: motif 6 in (15.2 cm) square
If your motif is bigger, switch to a 4 mm hook. If it is smaller, switch to a 5 mm hook. Small errors add up: a motif just 0.25 in (0.6 cm) too long makes the panel 3.75 in (9.5 cm) too long.
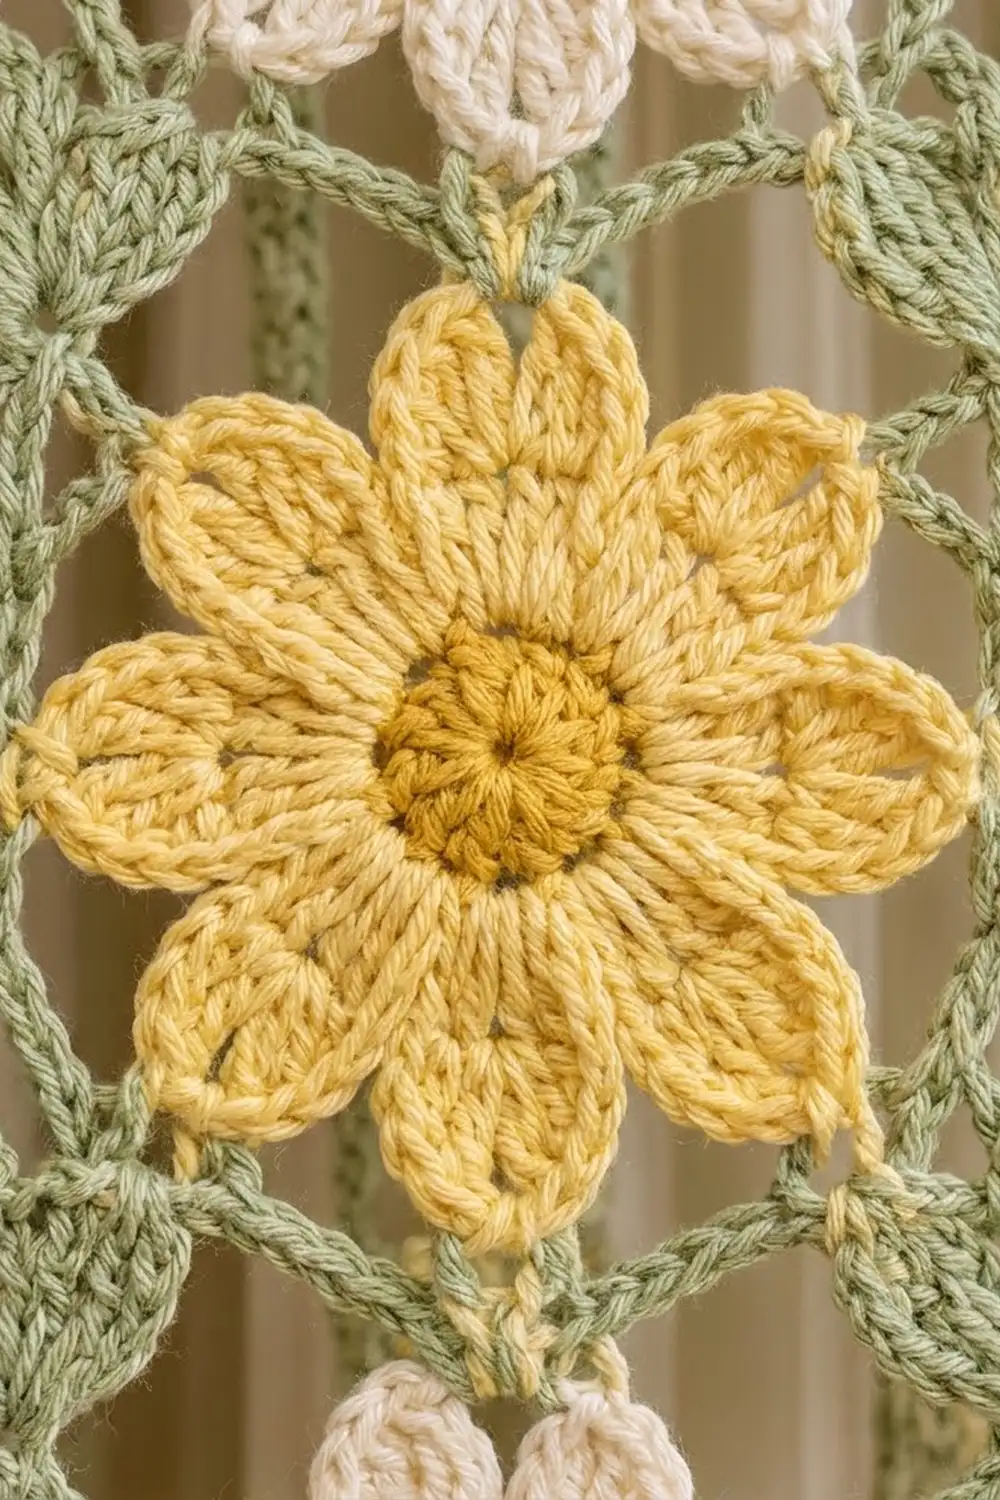
Daisy Motif
All motifs use Color A for the center and Color D for the frame. Use Color B or C for the petals.
Round 1 (A): Magic ring. Ch 1, 12 sc in ring. Sl st to first sc. Pull ring closed. (12 sc)
Round 2 (A): Ch 1, 2 sc in each st around. Sl st to first sc. Fasten off. (24 sc)
The center should be a firm, slightly domed disc.
Round 3 (B or C): Join petal color in any st. Ch 1, sc in same st, ch 6, sk 1 st, sc in next st, ch 6, sk 1 st; rep from * 10 more times. Sl st to first sc. (12 sc, 12 ch-6 sps)*
Round 4 (same petal color): Sl st in first ch-6 sp. Ch 1, in same sp work (sc, hdc, 3 dc, ch 2, 3 dc, hdc, sc). In next ch-6 sp work (sc, hdc, 3 dc, ch 2, 3 dc, hdc, sc); rep from * 10 more times. Sl st to first sc. Fasten off. (12 petals: 120 sts, 12 ch-2 tips)*
Each petal has 10 sts plus a ch-2 tip, so 12 x 10 = 120 sts. The ch-6 loop runs up the middle of each petal like a vein, and the ch-2 forms the pointed tip.
Round 5 (D): Pick any petal tip as a corner tip. Every third tip after it is also a corner, so you have 4 corner tips and 8 side tips.
Join D with sc in a corner ch-2 tip. Leaf, ch 5, sc in same tip. [Ch 6, sc in next tip] twice, ch 6, (sc, Leaf, ch 5, sc) in next tip; rep from * 2 more times. [Ch 6, sc in next tip] twice, ch 6, sl st to first sc. (16 sc, 4 Leaves, 4 corner ch-5 sps, 12 ch-6 sps)*
There are now 3 ch-6 sps on each side between corners, and the round has turned the flower into a square.
Round 6 (D): Keeping the Leaf to the front, sl st in next st, then sl st into the corner ch-5 sp. Ch 1, (3 sc, ch 2, 3 sc) in same sp. 6 sc in each of next 3 ch-6 sps, (3 sc, ch 2, 3 sc) in next corner ch-5 sp; rep from * 2 more times. 6 sc in each of next 3 ch-6 sps. Sl st to first sc. Fasten off. (96 sc, 4 corner ch-2 sps)*
Stitches per side: 3 + 6 + 6 + 6 + 3 = 24 sc, counted between the corner ch-2 sps. The corner ch-2 sps are not part of the 24. All joining and border math uses this count.
Leaves: Fold each Leaf inward on the RS so it lies diagonally from the corner toward the flower. Tack the tip down with one stitch in D. After joining, four leaves meet at every lattice junction.
Weave in the ends on each motif as you finish it.
Make All Pieces
Per panel, make 38 motifs with Color B (yellow) petals and 37 with Color C (cream) petals, for 75 in total. For the pair, make 76 yellow and 74 cream, 150 in all.
Layout per panel (Y = yellow, C = cream). Row 1 is the top:
Y C Y C Y
C Y C Y C
Y C Y C Y
C Y C Y C
Y C Y C Y
C Y C Y C
Y C Y C Y
C Y C Y C
Y C Y C Y
C Y C Y C
Y C Y C Y
C Y C Y C
Y C Y C Y
C Y C Y C
Y C Y C Y
The 8 odd rows have 3 yellow each (24), and the 7 even rows have 2 each (14), for 38 yellow. Cream: 8 x 2 + 7 x 3 = 37.
Joining
Method: A flat slip-stitch seam in D, worked from the RS.
Lay two motifs side by side, RS up, with their edges touching. Sl st through both corner ch-2 sps together. Then sl st through the inner loop of each matching pair of sts, one from each motif, for all 24 sts. Finish with a sl st through the opposite pair of corner sps.
The seam matches stitch for stitch: st 1 joins st 1 and st 24 joins st 24. Every side has exactly 24 sc, so nothing needs easing in.
Order: First join each row of 5 motifs, following the grid. Then join the 15 rows with long seams. At each junction, sl st through all the corner sps that meet there.
Tension: Keep your slip stitches as loose as the sc they join. If your seams are tight, the panel will narrow and pucker. If needed, use a 5 mm hook for joining only.
Checkpoint: The joined panel should measure 30 in x 90 in (76.2 cm x 228.6 cm).
Border
Border gauge matches the motif edge: 4 sc per 1 in (2.5 cm), or 24 sc per 6 in (15.2 cm) motif side. Work in D with the RS facing.
Round 1: Join in any panel corner ch-2 sp. Ch 1, (sc, ch 2, sc) in same sp. Work 1 sc in each of the 24 sts of every motif edge. At seams, work no stitch and go straight on to the next motif’s first st. Work (sc, ch 2, sc) in each panel corner sp. Sl st to first sc.
- Short sides: 1 + (5 x 24) + 1 = 122 sc
- Long sides: 1 + (15 x 24) + 1 = 362 sc
- Total: 968 sc, 4 corner ch-2 sps
Each side count includes that side’s 2 corner sc.
Round 2: Sl st into corner sp. Ch 1, (sc, ch 3, sc) in same sp. *Sk next st, ch 3, sc in next st; rep from * along the side. The last sc lands in the side’s corner sc. Work (sc, ch 3, sc) in each corner sp and repeat on all sides. Sl st to first sc.
- Short sides: 122 / 2 = 61 ch-3 sps
- Long sides: 362 / 2 = 181 ch-3 sps
- Total: 492 sc, 484 side ch-3 sps, 4 corner ch-3 sps
Round 3: Sl st into corner sp. Ch 1, (2 sc, ch 2, 2 sc) in each corner ch-3 sp and 2 sc in each side ch-3 sp. Sl st to first sc. Fasten off.
- Short sides: 61 x 2 = 122 sc between corner groups
- Long sides: 181 x 2 = 362 sc between corner groups
- Total: 968 + 16 corner sc = 984 sc, 4 corner ch-2 sps
Why the math works: Round 1 keeps the same 4 sc per inch as the motif edges. Both 122 and 362 are even, so the skip-1 mesh in Round 2 fits with no partial repeat. In Round 3, each ch-3 sp covered 2 sts, so working 2 sc into it brings each side back to the Round 1 count and the edge lies flat.
Tabs: On the 122 top-edge sts of Round 3, place markers in sts 2, 26, 50, 73, 97, and 121. These put a tab at each end and at each of the 4 seams, spaced the same from both ends.
For each tab, join D with a sl st in the st before the marker. Ch 30, sl st in same st. Sl st in the marked st, ch 30, sl st in same st. Sl st in next st, ch 30, sl st in same st. Fasten off. (3 chain loops per tab, 6 tabs)
Each 30-ch loop is about 6 in (15.2 cm) long, so it folds over the rod into a 3 in (7.6 cm) tab.
Final Blocking
- Weave in all remaining ends.
- Soak the panel in cool water for 15 minutes. Press out the water gently, without wringing.
- Roll the panel in towels to remove extra moisture.
- Lay it RS up on blocking mats.
- Pin the corners to 31.5 in x 91.5 in (80.0 cm x 232.4 cm).
- Pin at each seam, every 6 in (15.2 cm), keeping the edges straight.
- Open the petals and smooth the leaves into place with your fingers.
- Lay the tabs straight, without pins.
- Let it dry completely, then repeat for the second panel.
Final Quality-Control Checklist
- 75 motifs per panel, each 6 in (15.2 cm) square
- 12 petals and 4 tacked leaves on every motif
- Checkerboard matches the grid, with yellow at all four corners
- Seams lie flat, with no puckering
- Border Round 1 has 122 sc per short side and 362 sc per long side
- Panel measures 31.5 in x 91.5 in (80.0 cm x 232.4 cm)
- 6 tabs, each with 3 chain loops
- All ends secured
Troubleshooting
Petals cup: Your Round 3 chains are too tight. Loosen the ch-6 loops.
Frame ruffles: The ch-6 sps are too long for your tension. Try ch-5 and check the size again.
Motif isn’t square: Count the tips. There should be exactly 2 side tips between corners in Round 5.
Seams pucker: Use a larger hook for joining and keep the slip stitches relaxed.
Border waves: Make sure you worked no stitch at the seams and exactly 1 sc per edge stitch.
Panel lengthens when hung: Cotton relaxes under its own weight. Block it again and let it dry flat.
Care
Hand wash in cool water with a mild detergent, then reshape and dry flat. Never hang the panel while it’s wet.

Final Notes
Every measurement builds on the last. Each motif is 6 in (15.2 cm) with 24 sc per side. Five motifs across give 30 in (76.2 cm), and fifteen down give 90 in (228.6 cm). The 0.75 in (1.9 cm) border brings the panel to 31.5 in x 91.5 in (80.0 cm x 232.4 cm), with 3 in (7.6 cm) tabs above. Get your first motif right and the rest of the curtain follows.
Happy crocheting!