

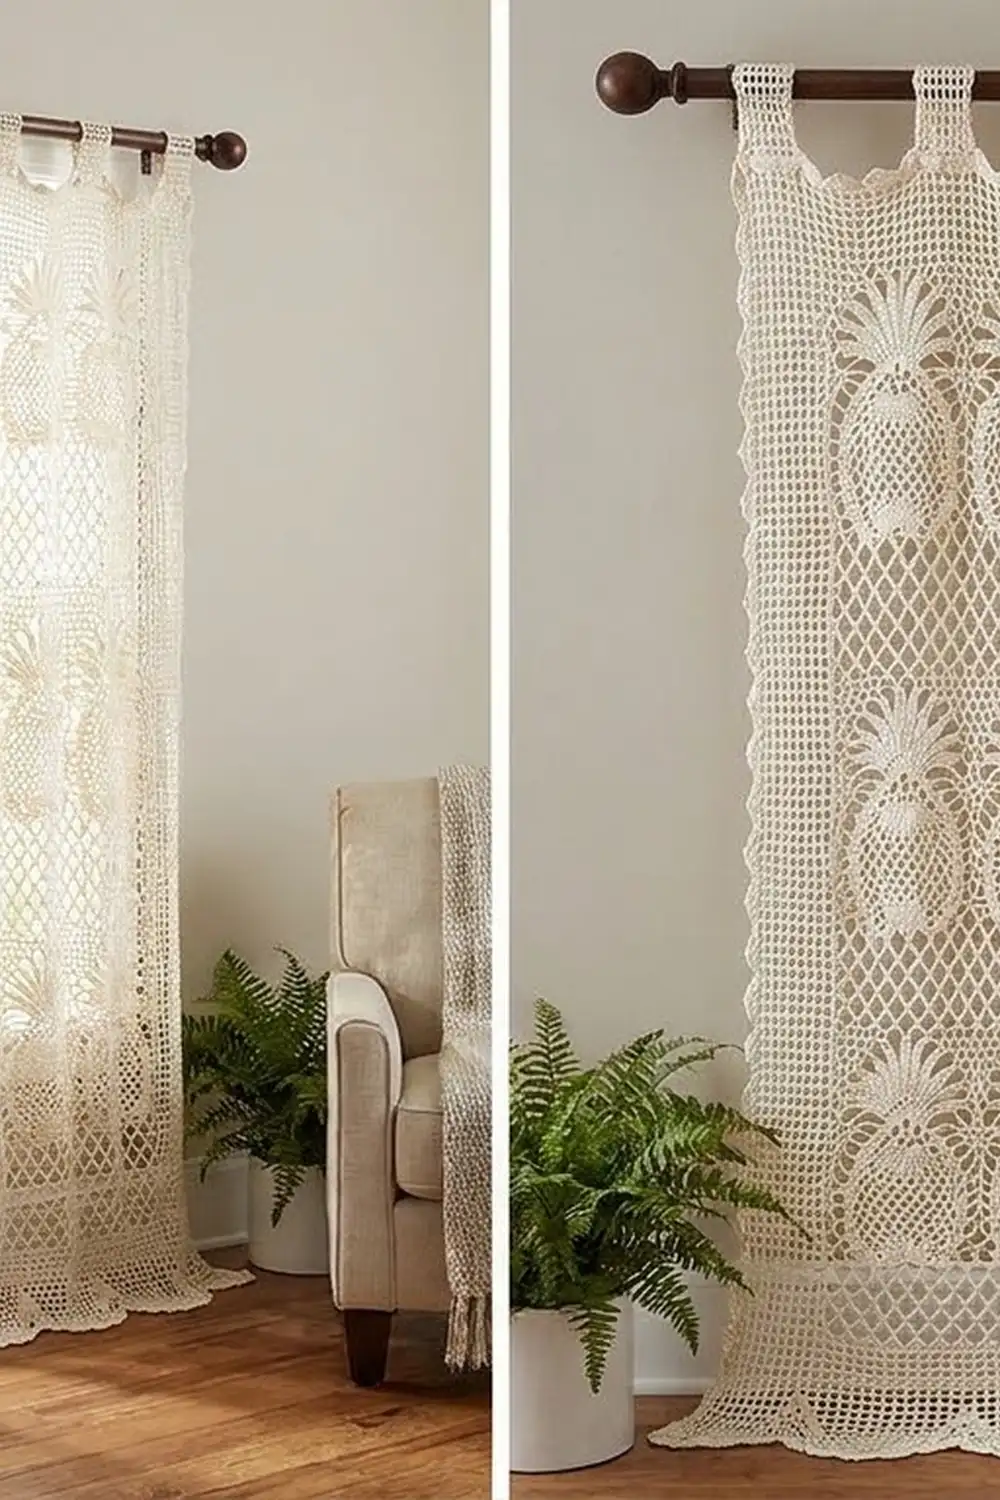
This curtain panel is classic pineapple lace in one soft ivory color. Columns of pineapples run the full length of the panel. Each one has a fanned crown on top and a diamond lattice that narrows to a point below it. Light comes through the open mesh, and the plain cotton gives it a quiet vintage look.
The panel is built from 21 identical rectangular blocks, joined 3 across and 7 down. A two-round border finishes the edges with small scallops, and five tabs at the top slide straight onto a curtain rod. The photo shows two panels hung as a pair. This pattern makes one panel, so make a second one for a pair.
All terms are US crochet terms. The finished panel measures about 25 x 85 in (63.5 x 215.9 cm) without the tabs. The tabs add about 2 in (5.1 cm) above the rod.
Each block is worked flat in rows with a filet mesh frame around a pineapple, then gets one round of single crochet edging. Blocks are slip-stitched together stitch to stitch. The border is worked last, and the tabs are worked off the border.
Finished Size and Construction
- Finished size: 25 x 85 in (63.5 x 215.9 cm), excluding tabs
- Skill level: Intermediate
- Terminology: US
- Yarn weight: Size 3 cotton crochet thread (super fine, #1)
- Hook: 2.25 mm (US B-1)
- Number of pieces: 21 blocks, plus 5 tabs worked directly onto the border
- Layout: 3 blocks across x 7 blocks down
- Block size: 8 x 12 in (20.3 x 30.5 cm)
- Size before border: 24 x 84 in (61.0 x 213.4 cm)
- Border depth: about 0.5 in (1.3 cm) on every side
Materials
Use a mercerized cotton thread for this panel. It holds its shape after blocking, takes repeated washing, and doesn’t fade much in sunlight. Avoid acrylic blends, which won’t hold a crisp block.
- Ivory/ecru: 900 g (about 2,700 m) per panel, or 1,800 g (about 5,400 m) for a pair
These quantities include a margin of roughly 12% for your swatch, joins and tension differences.
Tools:
– 2.25 mm (US B-1) crochet hook
– Tapestry needle
– Locking stitch markers
– Rust-proof pins and a large blocking surface
– Spray bottle
– Measuring tape
Abbreviations (US Terms)
- ch – chain
- sc – single crochet
- dc – double crochet
- sl st – slip stitch
- sk – skip
- sp(s) – space(s)
- st(s) – stitch(es)
- tch – turning chain
- RS / WS – right side / wrong side
Special stitches:
– Shell: (2 dc, ch 2, 2 dc) in the same st or sp. This counts as 6 sts.
– Shell in shell: work a shell into the ch-2 sp of the shell below.
– L (left mesh edge, 8 sts): ch 4 (counts as dc and ch 1), (dc in next dc, ch 1) 3 times.
– R (right mesh edge, 8 sts): (ch 1, dc in next dc) 3 times, ch 1, dc in 3rd ch of tch.
Chains count as stitches in all counts below.
Gauge and Checkpoints
Mesh gauge: 24 sts and 8 rows = 4 in (10.2 cm) in (ch 1, dc) mesh.
Make one full block as your swatch, then wash and block it before you start the rest.
- After Row 2: about 7.75 in (19.7 cm) wide.
- After Row 23: about 11.5 in (29.2 cm) tall.
- After edging, once blocked: 8 x 12 in (20.3 x 30.5 cm).
If the blocked block is more than 0.5 in (1.3 cm) too big in either direction, go down a hook size. If it is that much too small, go up a hook size. Over 7 blocks, a 0.5 in error grows to 3.5 in (8.9 cm) on the length, so don’t skip this step.
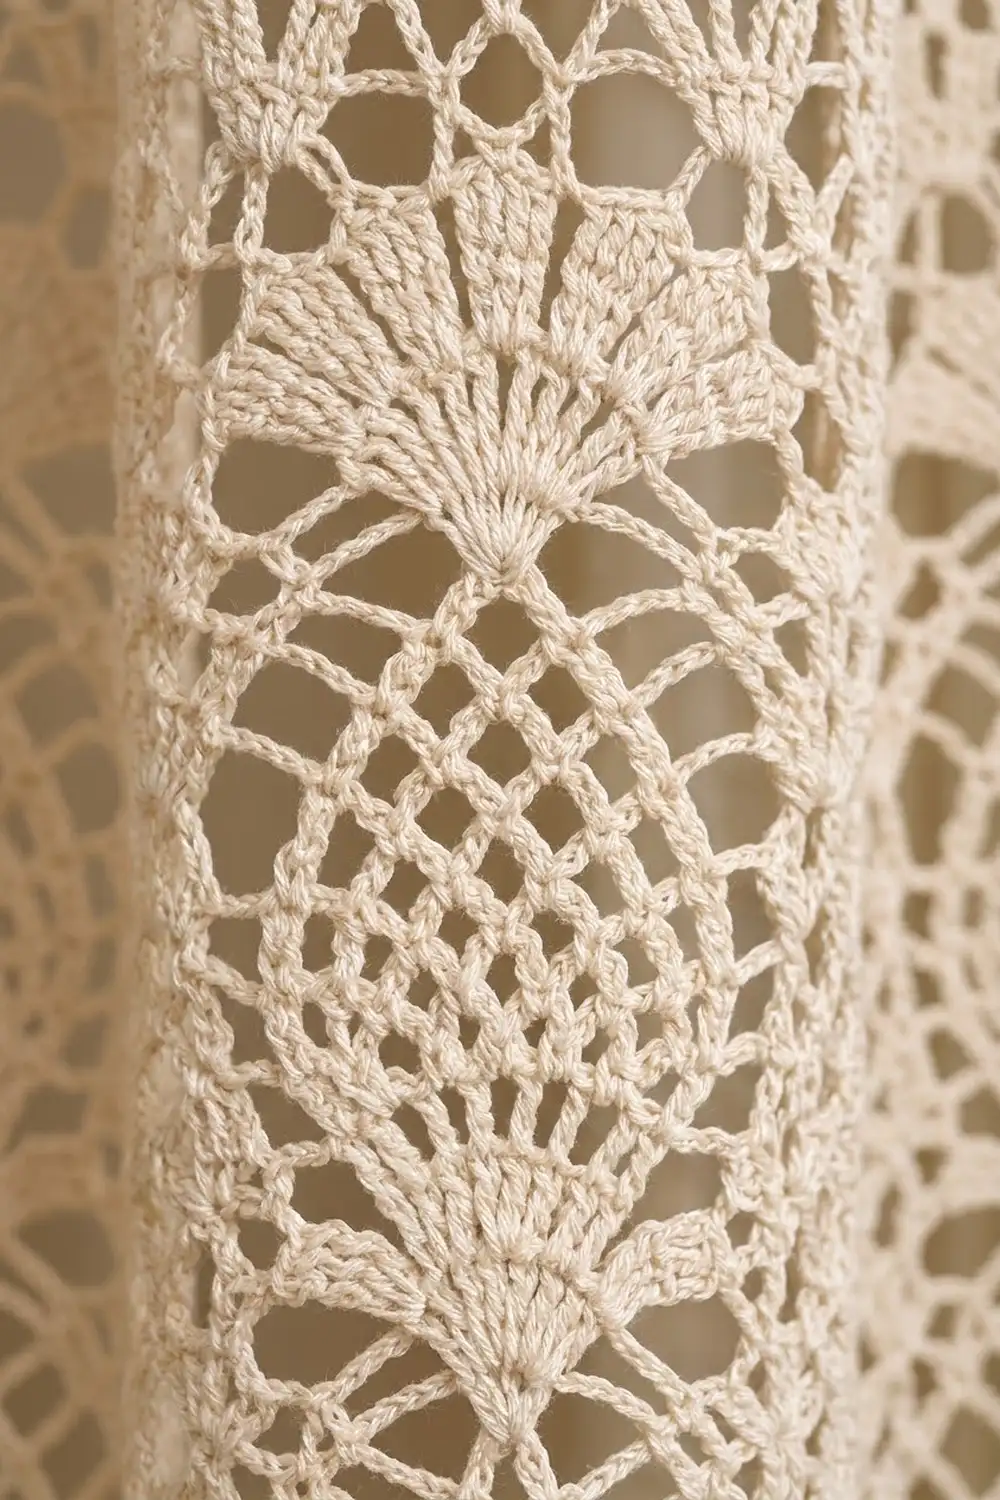
Pineapple Block (make 21)
Each row has three parts: L (8 sts), a center section, and R (8 sts). The center section always starts and ends with an edge dc worked into the edge dc below. Because the pattern is symmetrical, every row reads the same in both directions.
Foundation: Ch 50.
Row 1 (mesh): Dc in 6th ch from hook, *ch 1, sk 1 ch, dc in next ch; repeat from * across. Turn. (24 dc, 23 ch-1 sps = 47 sts)
Row 2 (mesh): Ch 4 (counts as dc and ch 1), dc in next dc, *ch 1, dc in next dc; repeat from * across, working the last dc in the 4th ch of the beginning ch. Turn. (47 sts)
Number the 29 center sts of Row 2, between the 9th and 39th sts, as positions 1–29. In those positions, the odd numbers are ch-1 sps and the even numbers are dc.
Row 3 (fan base): L, dc in next dc (edge dc), ch 1, sk positions 1–3, shell in position 4, ch 3, sk positions 5–14, 11 dc in position 15, ch 3, sk positions 16–25, shell in position 26, ch 1, sk positions 27–29, dc in next dc (edge dc), R. Turn. (49 sts; center section 31 sts)
Row 4 (fan): L, edge dc, shell in shell, ch 2, dc in first fan dc, (ch 1, dc in next dc) 10 times, ch 2, shell in shell, edge dc, R. Turn. (55 sts; 10 ch-1 sps in the fan)
Row 5 (lattice set-up): L, edge dc, shell in shell, ch 3, sc in first ch-1 sp of fan, (ch 4, sc in next ch-1 sp) 9 times, ch 3, shell in shell, edge dc, R. Turn. (82 sts; 9 ch-4 loops)
Rows 6–14 (lattice): L, edge dc, shell in shell, ch 4, sc in first ch-4 loop of the pineapple, (ch 4, sc in next loop) across to the last pineapple loop, ch 4, shell in shell, edge dc, R. Turn. The ch-4 at each side is skipped on the next row, so each row has one loop fewer than the row below.
Row totals:
– Row 6: 79 sts (8 loops)
– Row 7: 74 sts (7 loops)
– Row 8: 69 sts (6 loops)
– Row 9: 64 sts (5 loops)
– Row 10: 59 sts (4 loops)
– Row 11: 54 sts (3 loops)
– Row 12: 49 sts (2 loops)
– Row 13: 44 sts (1 loop)
– Row 14: 39 sts (single sc at the point)
Row 15: L, edge dc, shell in shell, ch 5, sc in point sc, ch 5, shell in shell, edge dc, R. Turn. (41 sts; 2 ch-5 sps)
Row 16: L, edge dc, shell in shell, (ch 5, sc in next ch-5 sp) twice, ch 5, shell in shell, edge dc, R. Turn. (47 sts; 3 ch-5 sps)
Row 17: As Row 16, working (ch 5, sc in next ch-5 sp) 3 times. (53 sts; 4 ch-5 sps)
Row 18: As Row 16, working the repeat 4 times. (59 sts; 5 ch-5 sps)
Row 19: As Row 16, working the repeat 5 times. (65 sts; 6 ch-5 sps)
Row 20 (conversion to mesh): L, edge dc, ch 1, dc in ch-2 sp of shell, ch 1, *(dc, ch 1) twice in next ch-5 sp; repeat from * 5 more times, dc in ch-2 sp of next shell, ch 1, edge dc, R. Turn. (47 sts; the center 29 sts are 14 dc and 15 ch-1 sps, the same layout as the mesh)
Rows 21–23 (mesh): Repeat Row 2. Do not fasten off. (47 sts each row)
Block edging round: Ch 1. Work along the top of Row 23 with 3 sc in the first st, 1 sc in each of the next 45 sts and 3 sc in the last st. Down the side, work 3 sc in each of the 23 row ends (69 sc). Along the foundation, work 3 sc at the corner, 1 sc in each of the next 45 dc bases and ch-1 sps, and 3 sc at the far corner. Up the second side, work 69 sc. Join with sl st to the first sc and fasten off.
Count for the round: 232 sts worked 1 per st or 3 per row end, plus 8 corner extras, = 240 sts.
Per side, including both corner center sts:
– Top and bottom: 49 sts
– Each side: 73 sts
Check: 2 x 49 + 2 x 73 − 4 shared corners = 240.
Make All Pieces
Make 21 blocks in ivory. Weave in ends as you go, and block each one to 8 x 12 in (20.3 x 30.5 cm).
Turn every block so the foundation edge is at the top. This puts each fan crown above its pineapple and points the lattice downward, as in the photo.
Col:   A    B    C
Row1  [P]  [P]  [P]
Row2  [P]  [P]  [P]
Row3  [P]  [P]  [P]
Row4  [P]  [P]  [P]
Row5  [P]  [P]  [P]
Row6  [P]  [P]  [P]
Row7  [P]  [P]  [P]
P = pineapple block, foundation edge up
Joining
Method: Hold two blocks with RS together. Working through the outer loops of both edging rounds, sl st in each matching pair of sts, corner center to corner center.
Stitch logic: Horizontal seams join 49 sts to 49 sts. Vertical seams join 73 sts per block. Every st lines up with exactly one partner, so the seams don’t need any extra or skipped sts.
- Join 7 blocks top to bottom into a column, using 6 seams of 49 sts each. Make 3 columns.
- Join the columns side by side with 2 long seams of 7 x 73 = 511 sts each.
Tension: Keep the sl sts as loose as your edging sts. If the seams pull, use a 2.5 mm hook for joining only. Lay the work flat every two blocks and check that it isn’t puckering.
Size checkpoint: The joined panel should measure 24 x 84 in (61.0 x 213.4 cm).
Border
Border gauge: Same as the edging, about 6 sc = 1 in (2.5 cm).
Panel edge counts:
– Top and bottom: 3 blocks x 49 = 147 sts
– Each side: 7 blocks x 73 = 511 sts
These counts already include the corner sts at each seam. Nothing is added at the joins.
Round 1: Join the thread at the top right corner. Ch 1, then work 1 sc in each st all around, with 3 sc in each of the 4 outer corner sts. Join with sl st.
Count: 1,312 sts worked 1 per st, plus 8 corner extras, = 1,320 sts.
Per side, including the new corner centers:
– Top and bottom: 149 sts
– Each side: 513 sts
Round 2 (scallops): Ch 1, sc in the corner center st, *sk 1, 5 dc in next st, sk 1, sc in next st; repeat from * all around. End with sk 1 and join with sl st to the first sc.
Scallops per side:
– Top and bottom: 37 each
– Each side: 128 each
Total: 330 scallops and 330 sc, = 1,980 sts. Fasten off.
Why the math works: Each scallop uses 4 sts of Round 1. Since 149 = 4 x 37 + 1 and 513 = 4 x 128 + 1, a sc lands exactly on every corner center. The whole round uses 330 x 4 = 1,320 sts.
Tabs (make 5): Along the top edge, count the scallops from the right corner. Tabs go on scallops 1, 10, 19, 28 and 37, about 6 in (15.2 cm) apart.
- With RS facing, join the thread in the first dc of the scallop. Row 1: Ch 1, sc in each of the 5 dc. Turn. (5 sc)
- Next rows: Ch 1, sc in each sc. Turn. (5 sc) Repeat until the tab measures 5 in (12.7 cm).
- Fasten off, leaving a long tail. Fold the tab to the WS and sew its last row to the back of Round 1, directly behind its own scallop.
Each tab fits a rod up to 1.25 in (3.2 cm) across.
Final Blocking
- Soak the panel in cool water for 20 minutes, then press out the water. Don’t wring it.
- Roll it in towels to remove excess moisture.
- Lay it flat in sections, pinning to 25 x 85 in (63.5 x 215.9 cm).
- Pin each fan crown into an even arc and open the lattice loops into diamonds.
- Pin the tip of every bottom scallop and every side scallop.
- Let it dry completely, at least 24 hours, before unpinning.
- Steam the tabs flat while they are still slightly damp.
Final Quality-Control Checklist
- [ ] Blocked panel is 25 x 85 in (63.5 x 215.9 cm)
- [ ] All 21 blocks have the foundation edge up and the fans on top
- [ ] Seams lie flat without ridges or puckers
- [ ] Border Round 1 is 1,320 sts, with 149 sts on the top and bottom and 513 sts on each side
- [ ] Round 2 has 37 scallops on the top and bottom and 128 on each side
- [ ] Five tabs are evenly spaced and sewn securely
- [ ] All ends are woven in through solid sts
Troubleshooting
- Fan cups or ruffles: Your tension is too tight on Row 3. Chain more loosely before and after the 11-dc group.
- Lattice runs out of loops early: Check that you work into every pineapple loop and skip only the side ch-4.
- Row 20 isn’t 47 sts: Make sure each of the 6 ch-5 sps gets two (dc, ch 1).
- Columns of blocks are different lengths: Re-block the blocks so they all match before joining.
- Border waves on the sides: Round 1 is too tight. Go up 0.25 mm for the border.
- Tabs twist: Sew each tab directly behind the center of its own scallop.
Care
Hand wash in cool water with a mild detergent and dry flat, re-pinning if needed. Keep the panel out of the dryer, which will shrink the cotton and distort the lace.
Final Notes
The measurement chain is short and checkable. Each block is 8 x 12 in (20.3 x 30.5 cm), with 49 and 73 sts per side. Seven blocks give a length of 84 in (213.4 cm), and three give a width of 24 in (61.0 cm). The 0.5 in (1.3 cm) border brings the panel to 25 x 85 in (63.5 x 215.9 cm). Get your first block right and the rest of the panel follows.
Happy crocheting!