

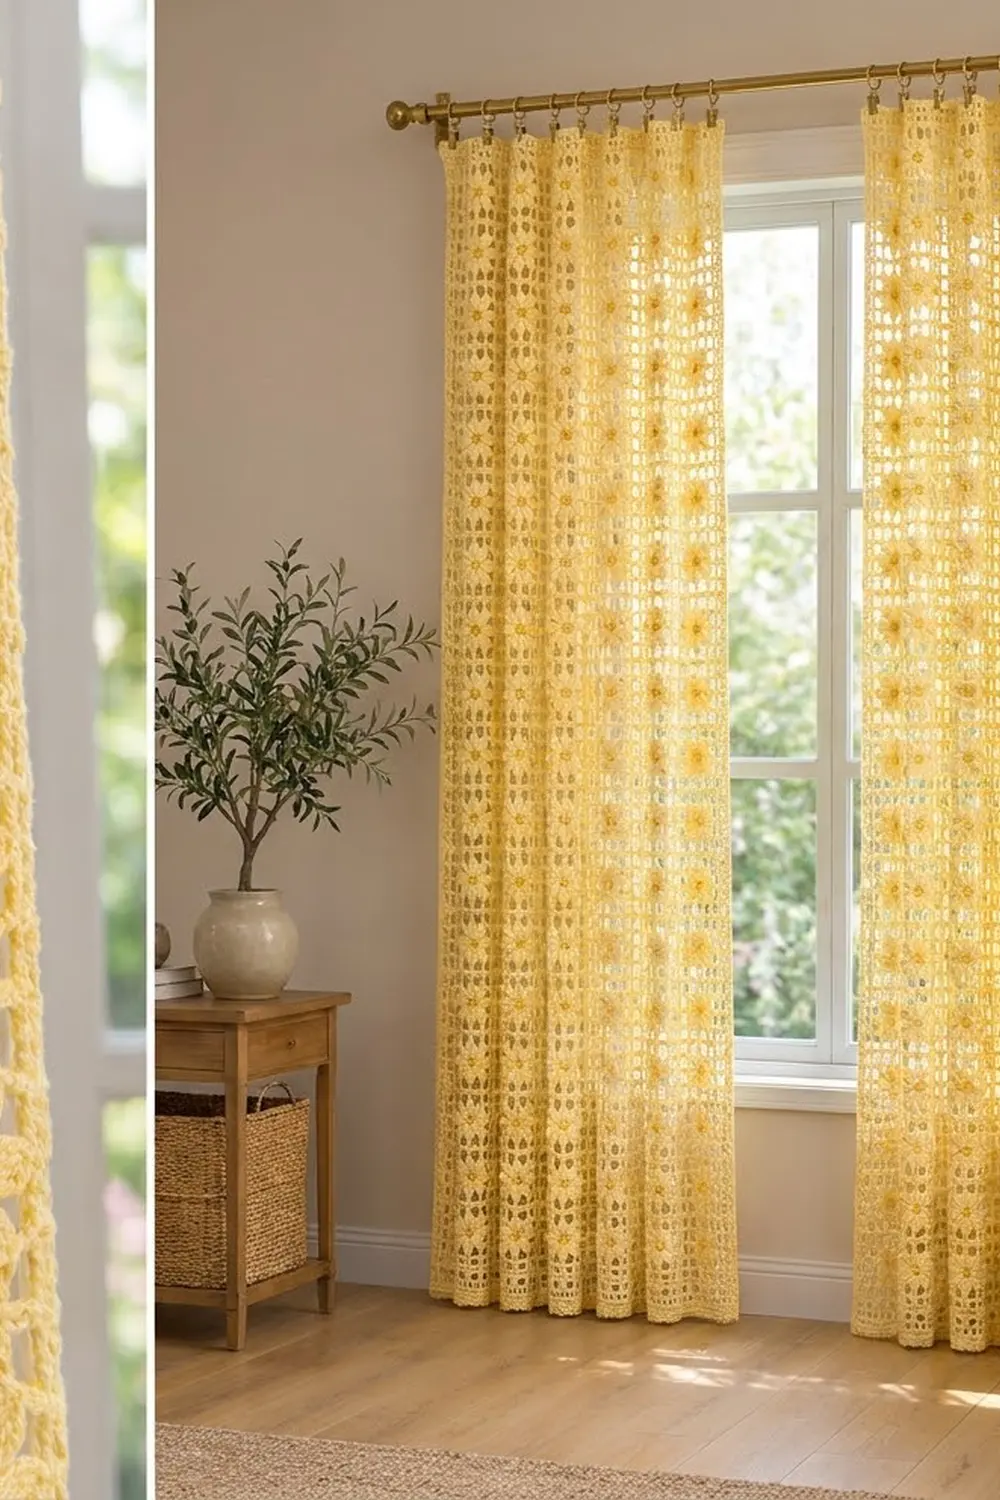
These curtains bring soft daylight into a room. Each panel is an airy grid of open mesh, and every square has a raised eight-petal flower in the middle. From across the room the panels look like a light filet lace. Up close, the flowers stand out because the petals are worked in solid stitches against the open background.
The palette is calm and sunny. Everything is pale butter yellow except the flower centers, which use a slightly deeper golden yellow. The style is cottage-meets-modern, and it suits a bedroom, a living room, or a sunny kitchen window.
The pattern uses US crochet terms. Each finished panel measures 32 x 86 in (81.3 x 218.4 cm), and the pattern makes two panels.
Construction is simple and repetitive. You crochet 6 in (15.2 cm) square flower motifs in the round, join them flat with slip stitches into a grid 5 motifs wide by 14 motifs tall, and finish each panel with a three-round border that gives the clip rings a firm edge.
Finished Size and Construction
- Finished panel size: 32 x 86 in (81.3 x 218.4 cm)
- Skill level: Intermediate
- Terminology: US
- Yarn weight: DK (light / 3), cotton or cotton blend
- Hook: 4.0 mm (G-6)
- Number of pieces: 70 motifs per panel, 140 motifs for the pair
- Layout: 5 motifs wide x 14 motifs tall per panel
- Motif size: 6 x 6 in (15.2 x 15.2 cm)
- Size before border: 30 x 84 in (76.2 x 213.4 cm)
- Border depth: 1 in (2.5 cm) on every side
Materials
Yarn: Use a smooth DK cotton or cotton blend at about 115 m per 50 g. Cotton holds its shape in a hanging panel, keeps the mesh crisp, and doesn’t fuzz in sunlight. Avoid very stretchy acrylic, because a long, heavy curtain made from it will grow in length over time.
- Color A, pale butter yellow (petals, mesh, joining, border): 1,400 g / about 3,220 m
- Color B, golden yellow (flower centers): 100 g / about 230 m
Both quantities include a safety margin of about 10–15%.
Tools:
– 4.0 mm (G-6) crochet hook
– 4.5 mm (7) hook for joining (optional)
– Tapestry needle
– Stitch markers
– Scissors
– Measuring tape
– Blocking mats and rust-proof pins, or a clean floor and towels
– Spray bottle
– 24 curtain clip rings (12 per panel)
Abbreviations (US Terms)
- ch: chain
- sl st: slip stitch
- sc: single crochet
- hdc: half double crochet
- dc: double crochet
- tr: treble crochet
- sp: space
- st(s): stitch(es)
- RS / WS: right side / wrong side
- BLO: back loop only
Special stitch – Petal: work (hdc, dc, tr, dc, hdc) all into the same stitch. This makes a solid, rounded petal with a gentle point at the tr.
Gauge and Checkpoints
Make one complete motif before you start production, and block it lightly.
Motif gauge: Rounds 1–7 = 6 x 6 in (15.2 x 15.2 cm), with 29 sts per side (including both corner stitches).
Measure at each checkpoint:
- After Round 1: center circle is 1.5 in (3.8 cm) across
- After Round 2: flower is 3.25 in (8.3 cm) across, tip to tip
- After Round 4: square is 4 in (10.2 cm)
- After Round 5: square is 4.75 in (12.1 cm)
- After Round 6: square is 5.5 in (14.0 cm)
- After Round 7: square is 6 in (15.2 cm)
If your motif is larger than 6.25 in (15.9 cm), go down 0.5 mm in hook size. If it’s smaller than 5.75 in (14.6 cm), go up 0.5 mm.
Small errors add up quickly. A motif that is only 0.25 in (0.6 cm) too big makes the panel 1.25 in (3.2 cm) too wide and 3.5 in (8.9 cm) too long.
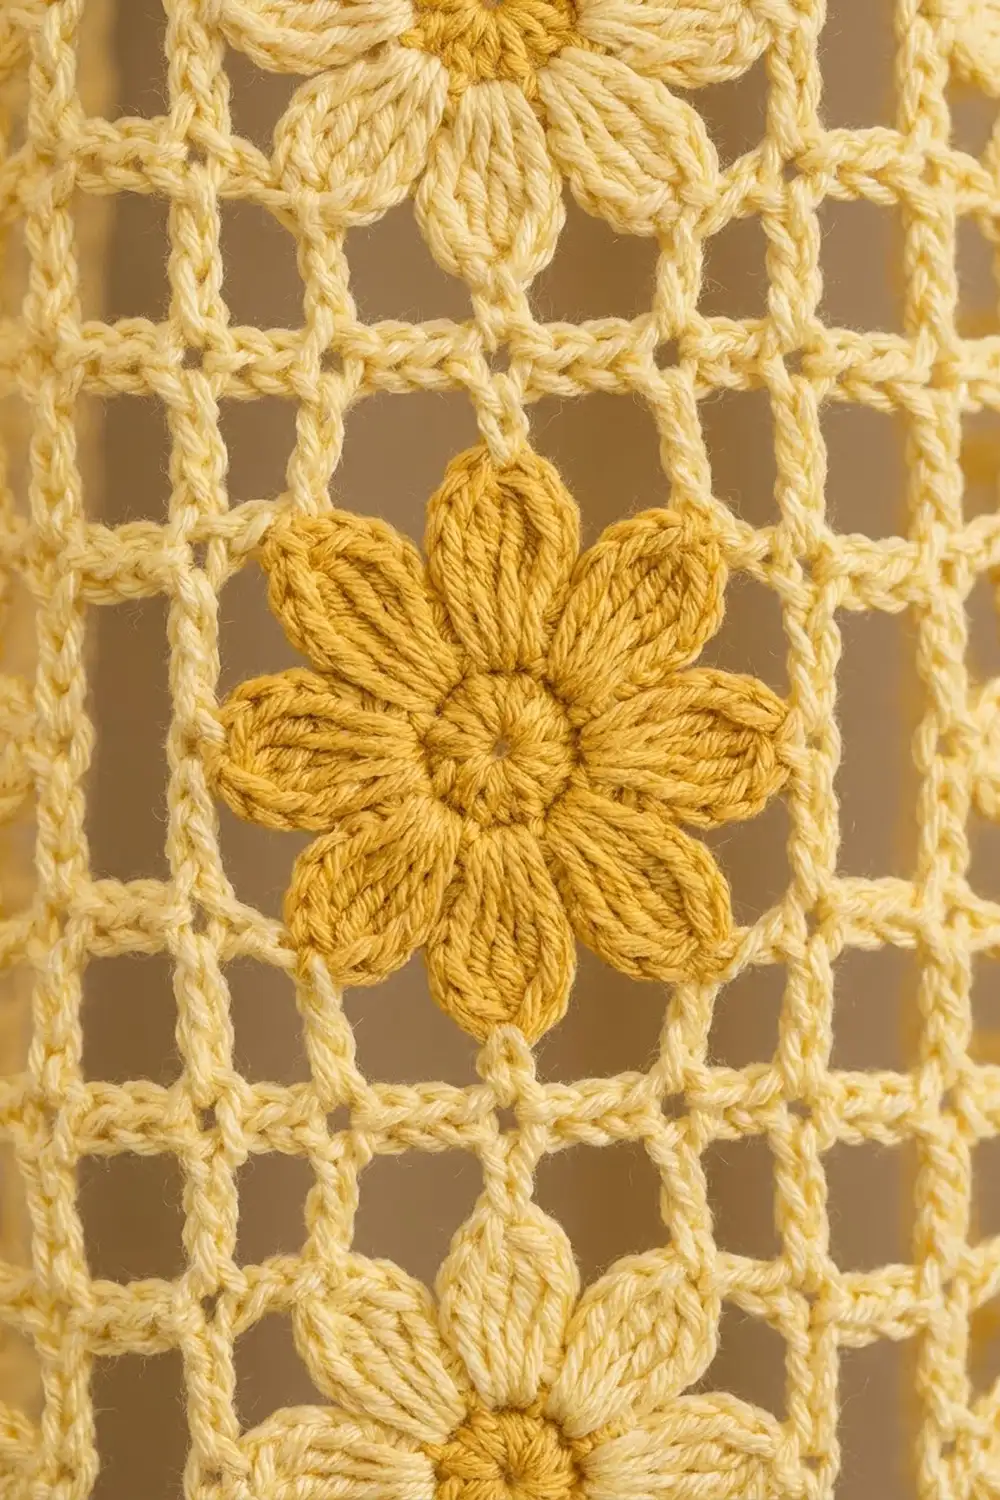
Flower Mesh Motif
Make 140 (70 per panel).
Round 1 (Color B): Make a magic ring. Ch 3 (counts as first dc), then work 15 dc in the ring. Sl st to the top of the ch-3, pull the ring closed, and fasten off. (16 dc)
Round 2 (Color A): Join A with a sl st in any dc; this counts as the first sl st. Work a Petal in the next dc. Sl st in the next dc, Petal in the next dc. Repeat from * 6 more times, then sl st in the joining sl st. (8 petals: 40 petal sts + 8 sl sts = 48 sts)
Each petal sits on one center stitch, with a sl st between petals. The petals stay solid and slightly cupped, so they stand above the mesh.
Round 3: Sl st in the next hdc and the next dc so you reach the tr at the tip of the first petal. Ch 1, then sc in that tr. Ch 5, sc in the tr of the next petal. Repeat from * 6 more times, ch 5, and sl st to the first sc. (8 sc + 8 ch-5 sps = 48 sts)
The chains connect the petal tips and frame the flower.
Round 4 (squaring and first mesh): The sc you just joined to is the first corner.
- Ch 6 (counts as dc + ch 3), then dc in the same sc.
- Ch 2, dc in the next ch-5 sp, ch 2, dc in the next sc (side middle), ch 2, dc in the next ch-5 sp, ch 2.
- (Dc, ch 3, dc) in the next sc (corner), ch 2, dc in the next ch-5 sp, ch 2, dc in the next sc, ch 2, dc in the next ch-5 sp, ch 2. Repeat from * 2 more times.
- Sl st in the 3rd ch of the beginning ch-6.
(Per side: 5 dc and 4 ch-2 sps. Total: 20 dc, 16 ch-2 sps, 4 corner ch-3 sps.)
Four petal tips become the corners, so four petals point diagonally into the corners, as in the photo.
Round 5: Sl st into the corner ch-3 sp. Ch 6 (counts as dc + ch 3), then dc in the same sp. [Ch 2, dc in the next dc] 5 times, ch 2, then (dc, ch 3, dc) in the next corner sp. Repeat from * around, omitting the last corner, and sl st in the 3rd ch of the ch-6.
(Per side: 7 dc and 6 ch-2 sps. Total: 28 dc, 24 ch-2 sps.)
Round 6: Repeat Round 5, but work the bracketed section 7 times per side.
(Per side: 9 dc and 8 ch-2 sps. Total: 36 dc, 32 ch-2 sps.)
This is a growth round. Each side gains 2 mesh boxes, one at each corner.
Round 7 (sc edge, conversion round): Sl st into the corner ch-3 sp. Ch 1, then work 3 sc in the same sp. Sc in the next dc, [2 sc in the next ch-2 sp, sc in the next dc] 8 times, then 3 sc in the next corner sp. Repeat from * around, omitting the last corner group, and sl st to the first sc. Fasten off and weave in the ends.
(Per side between corner groups: 9 sc worked 1-per-dc + 16 sc in the ch-2 sps = 25 sc. Corners: 3 sc each. Total: 100 + 12 = 112 sc.)
The middle sc of each 3-sc group is the corner stitch. Counting both corner stitches, each side has 29 sts (1 + 1 + 25 + 1 + 1).
Make All Pieces
- Color B: 140 centers (70 per panel)
- Color A: 140 complete motifs (Rounds 2–7)
Layout for each panel (F = flower motif), 5 across and 14 down:
Row 1  (top):    F F F F F
Rows 2–13:       F F F F F  (12 identical rows)
Row 14 (bottom): F F F F F
Every motif is identical, so you don’t need to plan placement. Just keep all of the motifs RS up.
Joining
Method: Flat slip-stitch seam. Use the 4.5 mm hook if your slip stitches tend to be tight.
- Place two motifs RS together, with their edges and corners lined up.
- Starting in a corner stitch, sl st through the back loops of both motifs (the outer loops). Work 1 sl st in each st across, ending in the opposite corner stitch.
- Each side has 29 sts, so every seam is exactly 29 sl sts, stitch to stitch.
Order:
1. Join 5 motifs into a horizontal strip for each of the 14 rows.
2. Join the strips to each other with long seams. Each long seam is 5 x 29 = 145 sl sts.
3. At each four-way intersection, work 1 sl st through all four corner stitches. This keeps the grid lines straight.
Tension: Your slip stitches should be as wide as the sc they join. If a seam puckers, rip it back and work it more loosely. A tight seam on a curtain this long can pull the panel up by several inches.
Size checkpoint: Lay the joined panel flat. It should measure 30 x 84 in (76.2 x 213.4 cm).
Border
Border gauge: The border sc must match the motif edge gauge of 29 sts per 6 in (15.2 cm), or about 4.8 sts per in (1.9 sts per cm). Work 1 border st into every edge stitch so the border can’t ruffle or draw in.
Starting counts:
– Top and bottom: 5 motifs x 29 sts = 145 sts
– Sides: 14 motifs x 29 sts = 406 sts
These counts include each motif’s own corner stitches. No stitches are added at the seams.
Round 1 (sc, conversion round): With RS facing, join A in any stitch. Sc in each st around, and work 3 sc in each of the 4 outer panel corner stitches. Sl st to the first sc.
- Top/bottom: 145 worked 1-per-st + 2 extra = 147 sts
- Sides: 406 + 2 = 408 sts
- Total: 1,106 sts
Round 2 (sc): Ch 1. Sc in each st, working 3 sc in each corner st (the middle sc of the previous corner group). Sl st to the first sc.
- Top/bottom: 147 + 2 = 149 sts
- Sides: 408 + 2 = 410 sts
- Total: 1,114 sts
Round 3 (dc band): Ch 3 (counts as dc). Dc in each st, working 3 dc in each corner st. Sl st to the top of the ch-3, then fasten off.
- Top/bottom: 149 + 2 = 151 sts
- Sides: 410 + 2 = 412 sts
- Total: 1,122 sts
Why the math works: Each round works 1 stitch into every stitch, which keeps the border at the same gauge as the motif edges. The only increases are 2 per corner per round, and they turn the corners without cupping. The two sc rounds add about 0.25 in (0.6 cm) each, and the dc round adds about 0.5 in (1.3 cm). That gives 1 in (2.5 cm) per side:
- Width: 30 + 2 = 32 in (81.3 cm)
- Length: 84 + 2 = 86 in (218.4 cm)
Repeat the border on the second panel.
Final Blocking
- Weave in any remaining ends along the seam lines, where they won’t show through the mesh.
- Lay the panel flat on mats or towels, RS up.
- Pin the four corners first to 32 x 86 in (81.3 x 218.4 cm).
- Pin along every edge at about every 6 in (15.2 cm), lining up the pins with the motif seams.
- Straighten the grid lines with your fingers so the mesh boxes are square.
- Lift each flower gently so the petals sit raised.
- Spray the panel evenly until it is damp, not soaked.
- Let it dry completely, usually 24–48 hours, before unpinning.
- Clip on 12 rings across the top border of each panel, about every 2.9 in (7.4 cm), with the end rings at the corners.
Final Quality-Control Checklist
- [ ] Every motif has 112 sts in Round 7 and 29 sts per side.
- [ ] All 140 flowers have 8 petals, and 4 of them point into the corners.
- [ ] Every seam is 29 sl sts per motif, worked stitch to stitch.
- [ ] Grid lines run straight from the top of the panel to the bottom.
- [ ] Border counts are 151 sts top and bottom and 412 sts on each side after Round 3.
- [ ] Each blocked panel measures 32 x 86 in (81.3 x 218.4 cm).
- [ ] Both panels match in length to within 0.5 in (1.3 cm).
- [ ] All ends are secured.
Troubleshooting
The petals flare or ruffle. Your tension is loose in Round 2. Tighten the sl sts between the petals, or use a hook 0.5 mm smaller for that round only.
The square cups in the middle. The ch-5 loops in Round 3 are too short for your tension. Try ch 6 instead, and keep the counts in Round 4 unchanged.
The motif edges wave. Check that Round 7 has 2 sc (not 3) in each ch-2 space.
The seams pucker. Your slip stitches are too tight. Switch to the 4.5 mm hook for joining.
The border ruffles. You’ve added stitches somewhere. Count each side against the numbers given for that round.
The panels differ in length. Re-block the shorter panel and stretch it gently to match, or remove the border and check the seam tension.
The panel grows after hanging. This is common with heavy cotton. Re-block the panel and let it dry flat before you hang it again.
Care
Hand wash or machine wash on a cold, delicate cycle in a mesh laundry bag. Reshape the panels and dry them flat, out of direct sun. Don’t hang them up wet.
Final Notes
Every measurement in this pattern builds on the one before it:
- One motif is 6 in (15.2 cm) square, with 29 sts per side.
- Five motifs give 145 sts and 30 in (76.2 cm) of width.
- Fourteen motifs give 406 sts and 84 in (213.4 cm) of length.
- Three border rounds add 1 in (2.5 cm) on every side, for a finished panel of 32 x 86 in (81.3 x 218.4 cm).
If your first motif matches the gauge, the rest of the chain will follow.
Happy crocheting!