
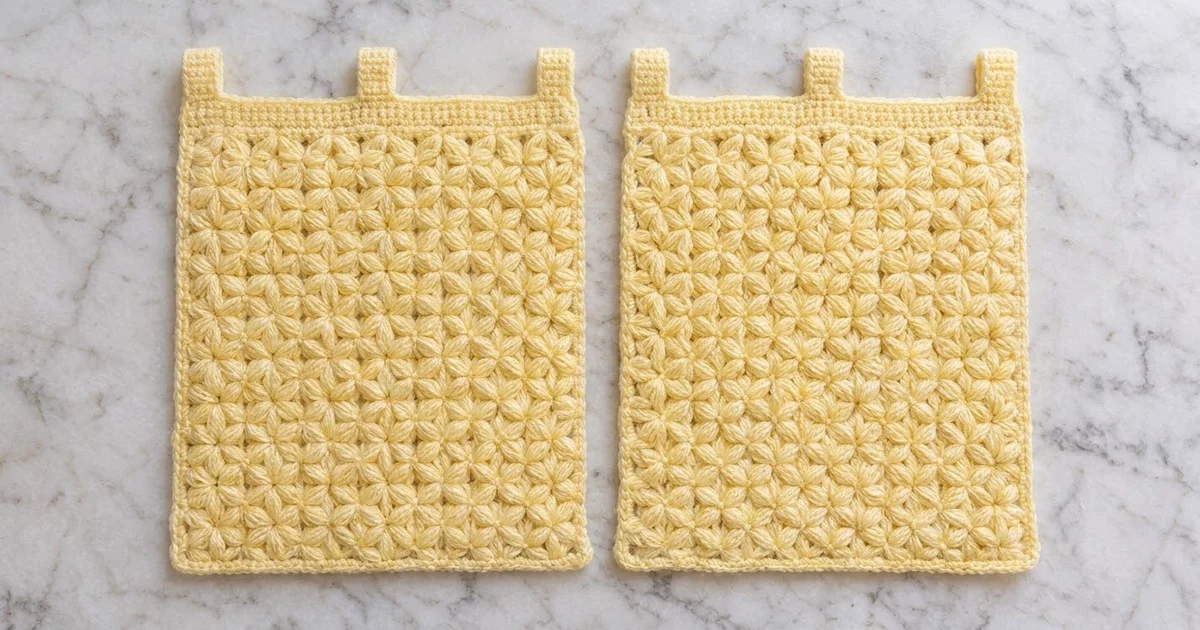
These butter-yellow café curtains bring soft texture to a kitchen or breakfast nook. Each panel is covered in plump star clusters. The long petal loops gather around tiny centers, so the fabric looks like a field of packed six-petal flowers. When sunlight comes through, the petals glow and the small eyes let a little light through.
The set is two separate, identical panels in a single color. Each has a solid band across the top, a slim single-crochet edging on the sides and bottom, and three tab loops that slide straight onto a café rod. You don’t need rings or clips. The style is cottage-classic: one color, lots of texture, and a clean outline.
This pattern uses US crochet terms. Each finished panel measures 16.5 in (41.9 cm) wide by 24 in (61.0 cm) tall, or 25.5 in (64.8 cm) including the tabs. The two panels together span 33 in (83.8 cm) of rod.
Each panel is worked flat from the bottom up. You start with a single-crochet foundation row, then alternate a Petal Star row with a quick single-crochet return row. Then you add four rows of half double crochet for the top band, work three tabs up from the band, and fold them to the back. A single-crochet edging round finishes the sides and bottom.
Finished Size and Construction
- Finished panel size: 16.5 in × 24 in (41.9 cm × 61.0 cm), plus 1.5 in (3.8 cm) tabs
- Skill level: Intermediate (the star clusters need even tension)
- Terminology: US crochet terms
- Yarn weight: Worsted (#4)
- Hook: 6.0 mm (US J-10) for the body, band, and tabs; 5.0 mm (US H-8) for the edging
- Number of pieces: 2 identical panels, not joined to each other
- Layout: Panels hang side by side on one rod
- Panel size before edging: 16 in × 23.75 in (40.6 cm × 60.3 cm)
- Edging depth: 0.25 in (0.6 cm) on the sides and bottom
Materials
Yarn: Use a smooth worsted-weight yarn with good stitch definition, such as cotton-acrylic or soft acrylic. Fuzzy or splitty yarns blur the petals. Choose something that holds up to washing, since kitchen curtains collect steam and dust.
- Butter Yellow: 800 g, about 1,600 m (1,750 yd) total, based on 100 g / 200 m (219 yd) skeins. That’s about 400 g (800 m / 875 yd) per panel.
Star clusters use a lot of yarn. These quantities already include a margin of roughly 10% for your swatch and tension differences.
Tools:
– 6.0 mm (US J-10) crochet hook
– 5.0 mm (US H-8) crochet hook
– Tapestry needle
– 4 stitch markers
– Measuring tape
– Blocking mats and rust-proof pins
– Spray bottle
Abbreviations (US Terms)
- ch – chain
- sc – single crochet
- hdc – half double crochet
- sl st – slip stitch
- st(s) – stitch(es)
- RS / WS – right side / wrong side
- pl – petal loop (see below)
Petal loop (pl): Yarn over, insert the hook in the indicated place, yarn over, and pull up a loop to about 0.5 in (1.3 cm) tall. This adds 2 loops to the hook.
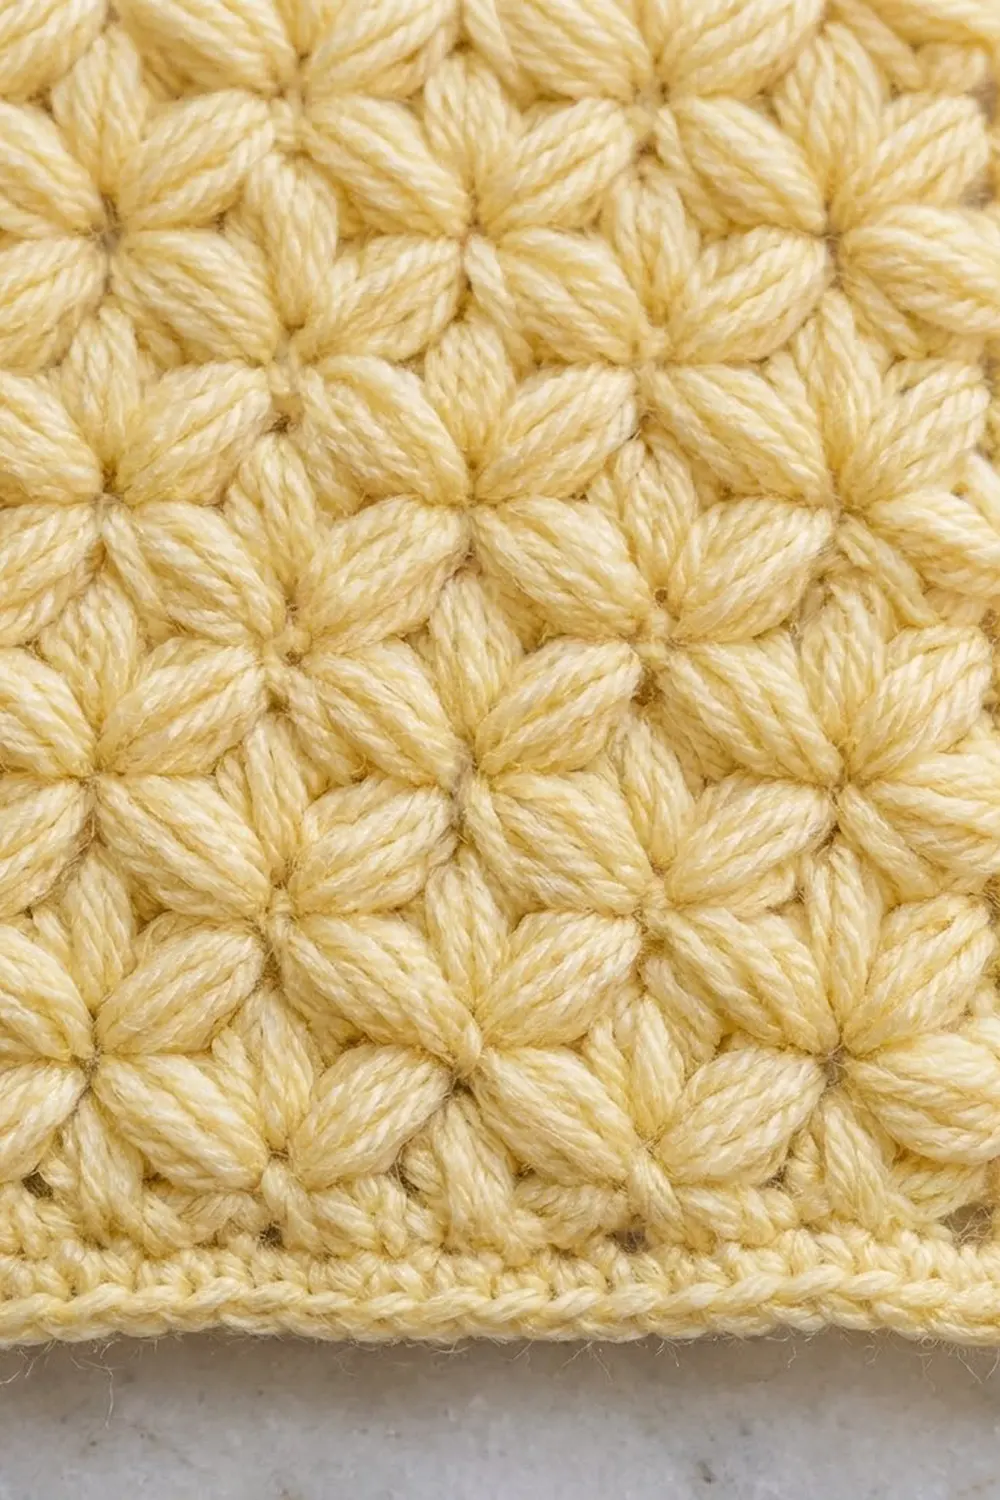
Petal Star (star): Work 5 petal loops as directed. You now have 11 loops on the hook. Yarn over and pull through all 11 loops, then ch 1 firmly to close. This ch-1 is the eye.
The first star in a row works its first two petal loops into the turning chain. Every later star works petal loops into these places, in order: the eye of the previous star; the back strand of the last petal of the previous star; the same st that held the last petal loop of the previous star; and each of the next 2 sts.
So each star after the first uses 2 new base stitches. That shared-stitch overlap is what packs the petals into flower shapes.
Gauge and Checkpoints
Body gauge: In the Petal Star pattern with a 6.0 mm hook, 10 sts = 4 in (10.2 cm), and 8 rows (4 star rows + 4 sc rows) = 4 in (10.2 cm). One full pattern repeat (one star row plus one sc row) is 1 in (2.5 cm) tall.
Edging gauge: In sc with a 5.0 mm hook, 13 sc = 4 in (10.2 cm).
Test swatch: Ch 21. Work Row 1 as written below to get 20 sc. Then repeat Rows 2–3 four times, which gives 9 stars per star row. The swatch should measure 8 in (20.3 cm) wide and about 4.25 in (10.8 cm) tall.
Checkpoints for each panel:
– After Row 1: 16 in (40.6 cm) wide
– After Row 21 (10 star rows): about 10.25 in (26.0 cm) tall
– After Row 45 (22 star rows): about 22.25 in (56.5 cm) tall
– After the top band: about 23.75 in (60.3 cm) tall
– After the edging: 16.5 in × 24 in (41.9 cm × 61.0 cm)
If your swatch is too big, go down half a hook size. Also check that your petal loops aren’t taller than 0.5 in (1.3 cm), because tall loops add both width and height. If it’s too small, go up half a hook size and let the petal loops reach their full height. Don’t change the stitch count. All the edging math depends on 40 sts across.
Panel Pattern (Make 2)
Use the 6.0 mm hook.
Foundation: Ch 41.
Row 1 (WS): Sc in the 2nd ch from the hook and in each ch across. Turn. (40 sc)
This row works for 19 stars, because 2 × 19 stars + 2 = 40 sts.
Row 2 (RS, star row): Ch 3.
- First star: pl in the 2nd ch from the hook, pl in the 3rd ch from the hook, then pl in each of the first 3 sc. Close the star with ch 1.
- Next stars: Work a star: pl in the eye of the previous star, pl in the back strand of the last petal, pl in the same sc as the last pl of the previous star, then pl in each of the next 2 sc. Close with ch 1. Repeat from * 17 more times.
- End: Hdc in the last sc. Turn.
You’ll have 19 stars, 19 eyes, and 1 hdc. The first star uses sc 1–3. Each of the other 18 stars uses 2 new sc, so the last star ends in sc 39 and the hdc goes into sc 40.
Row 3 (WS): Ch 1. Sc in the first hdc, 2 sc in each eye across, then sc in the 3rd ch of the turning ch-3. Turn. (1 + 38 + 1 = 40 sc)
The short sc row sinks between the puffy star rows. On the RS, the petals cover it almost completely.
Rows 4–45: Repeat Rows 2–3 twenty-one more times. You now have 22 star rows, and the last row is a WS sc row of 40 sc. The panel should measure about 22.25 in (56.5 cm) from the foundation.
Top Band
Row 46 (RS): Ch 2 (counts as the first hdc). Hdc in each st across. Turn. (40 hdc)
Rows 47–49: Repeat Row 46. You’ll have 40 hdc in each row.
The band is about 1.5 in (3.8 cm) deep. It should be as wide as the body, 16 in (40.6 cm). If it pulls in, rework it with a 6.5 mm hook so the top edge stays straight.
Tabs
Divide the 40 band sts into: 6 tab sts, 11 gap sts, 6 tab sts, 11 gap sts, 6 tab sts. That’s 6 + 11 + 6 + 11 + 6 = 40. Place markers to show the edges of the center tab.
Tab 1 (right tab): With the RS facing, don’t turn after Row 49. Ch 1 and turn.
- Row 1: Sc in each of the first 6 sts. Turn. (6 sc)
- Rows 2–12: Ch 1, sc in each sc across. Turn. (6 sc)
Fasten off and leave a 12 in (30.5 cm) tail. The tab strip is about 2.25 in × 3.5 in (5.7 cm × 8.9 cm).
Tab 2 (center tab): Skip the next 11 band sts. Join the yarn in the next st and work Rows 1–12 over 6 sts as for Tab 1. Fasten off with a 12 in (30.5 cm) tail.
Tab 3 (left tab): Skip the next 11 band sts. Join the yarn in the next st and work Rows 1–12 over the last 6 sts. Fasten off with a 12 in (30.5 cm) tail.
Fold and sew: Fold each tab toward the WS so that about 1.5 in (3.8 cm) stands above the band. The last row of each tab should lie flat on the back of the band, roughly level with Row 47. Whipstitch the last row in place with the tail, working only through the back loops of the band so nothing shows on the RS. Each loop fits a rod up to 0.75 in (1.9 cm) across.
Make Both Panels
Work two identical panels in Butter Yellow, using about 400 g (800 m / 875 yd) for each. The panels are not joined. They hang side by side and can be pulled apart, as shown in the window photo.
Layout on the rod (T = tab):
 T     T     T        T     T     T
[ PANEL 1      ]    [ PANEL 2      ]
[ 16.5 x 24 in ]    [ 16.5 x 24 in ]
Measure both panels after the band. They should match within 0.25 in (0.6 cm) in both width and height before you start the edging.
Edging
Use the 5.0 mm hook. The edging runs down one side, across the bottom, and up the other side. The top band between the tabs is left plain.
Edging gauge: 13 sc = 4 in (10.2 cm), or about 3.25 sc per inch.
Edging Row (RS): With the RS facing, join the yarn at the top left corner of the band and ch 1. Work the edges in this order:
- Left side: 2 sc in the end of each hdc band row (8 sc), 2 sc in the end of each star row (44 sc), 1 sc in the end of each sc return row (22 sc), and 1 sc in the end of Row 1 (1 sc). (8 + 44 + 22 + 1 = 75 sc)
- Bottom-left corner: 3 sc in the first foundation ch.
- Bottom: Sc in each of the next 38 foundation chs.
- Bottom-right corner: 3 sc in the last foundation ch.
- Right side: Work up the right side to match the left side. (75 sc)
Fasten off.
Counts:
– Left side: 75
– Bottom: 40 foundation sts worked 1 per stitch, plus 2 extra sc at each corner (40 + 4 = 44)
– Right side: 75
– Total: 75 + 44 + 75 = 194 sc
Why the math works: The sides are 23.75 in (60.3 cm) tall, and 75 sc ÷ 23.75 in is about 3.2 sc per inch. That’s just under the 3.25 sc per inch edging gauge. The edge lies flat and is very slightly firm, which keeps the long sides from rippling as the curtain hangs.
Star rows are tall, so they get 2 sc each. The short sc rows get 1 each. The bottom takes one sc in each of the 40 foundation sts, so it keeps the panel’s true 16 in (40.6 cm) width, and the 3-sc corners let it turn cleanly.
The edging adds 0.25 in (0.6 cm) on each side and along the bottom. That brings the panel to 16.5 in × 24 in (41.9 cm × 61.0 cm).
Final Blocking
- Weave in all the ends along the WS edging or inside the sc return rows, never across the petals.
- Lay one panel RS up on the blocking mats.
- Pin the corners first, at 16.5 in (41.9 cm) wide and 24 in (61.0 cm) tall.
- Pin the sides about every 2 in (5.1 cm), keeping the edges straight.
- Spritz the panel until it’s damp but not soaked. Gently pat the star clusters so the petals sit evenly around each eye. Don’t press them flat.
- Pin each tab loop flat and square so it stands 1.5 in (3.8 cm) above the band.
- Let the panel dry completely, then repeat with the second panel.
- Lay the dry panels side by side and compare them. Re-block either one if they differ by more than 0.25 in (0.6 cm).
Final Quality-Control Checklist
- Every star row has 19 stars and every sc row has 40 sc.
- Each panel has 22 star rows and 4 hdc band rows.
- The band is as wide as the body, 16 in (40.6 cm) before edging.
- The three tabs sit at the right edge, the center, and the left edge, with 11 sts between tabs.
- Each tab is folded to the WS, sewn invisibly, and stands 1.5 in (3.8 cm) tall.
- The edging has 75 sc on each side and 44 sc across the bottom, with neat 3-sc corners.
- Each panel measures 16.5 in × 24 in (41.9 cm × 61.0 cm), plus tabs.
- The two panels match in size and in petal height.
- No ends show on the RS.
Troubleshooting
Stars look flat or thin. Your petal loops are too short. Pull each loop up to a full 0.5 in (1.3 cm) and keep the loops even before you close the star.
It’s hard to pull through 11 loops. Use a hook with a pointed, tapered head. Yarn over firmly, and rock the hook slightly as you draw through.
The panel is getting wider. You may be putting more than 2 sc in an eye, or working the last sc into the wrong place. Count 40 sc after every return row.
The panel is getting narrower. You may be skipping the shared stitch, which is the third petal loop of each star. Every star except the first must reuse the last st of the star before it.
The band pulls in. Rework the band with a hook one size larger.
The side edging ruffles. Use 1 sc per star row on the worst sections, but keep the totals equal on both sides.
The tabs twist. Re-sew them so the tab’s last row lies straight across the band, then block again.
Care
Hand wash or machine wash cool on a gentle cycle in a mesh bag. Reshape while damp and dry flat. Don’t hang the curtains wet, because the weight of the star stitch will stretch them lengthwise.

Final Notes
The whole curtain rests on one measurement chain. It starts with 40 sts at 10 sts per 4 in (10.2 cm), which gives a 16 in (40.6 cm) body. Each repeat of one star row and one sc row adds 1 in (2.5 cm). Twenty-two repeats plus the foundation reach 22.25 in (56.5 cm). The 4-row band brings the panel to 23.75 in (60.3 cm), and the 194-stitch edging finishes it at 16.5 in × 24 in (41.9 cm × 61.0 cm). The three 6-stitch tabs, spaced 11 stitches apart, stand 1.5 in (3.8 cm) tall and hang the pair from your rod.
Check your swatch, count your stitches, and your panels will match.
Happy crocheting!