

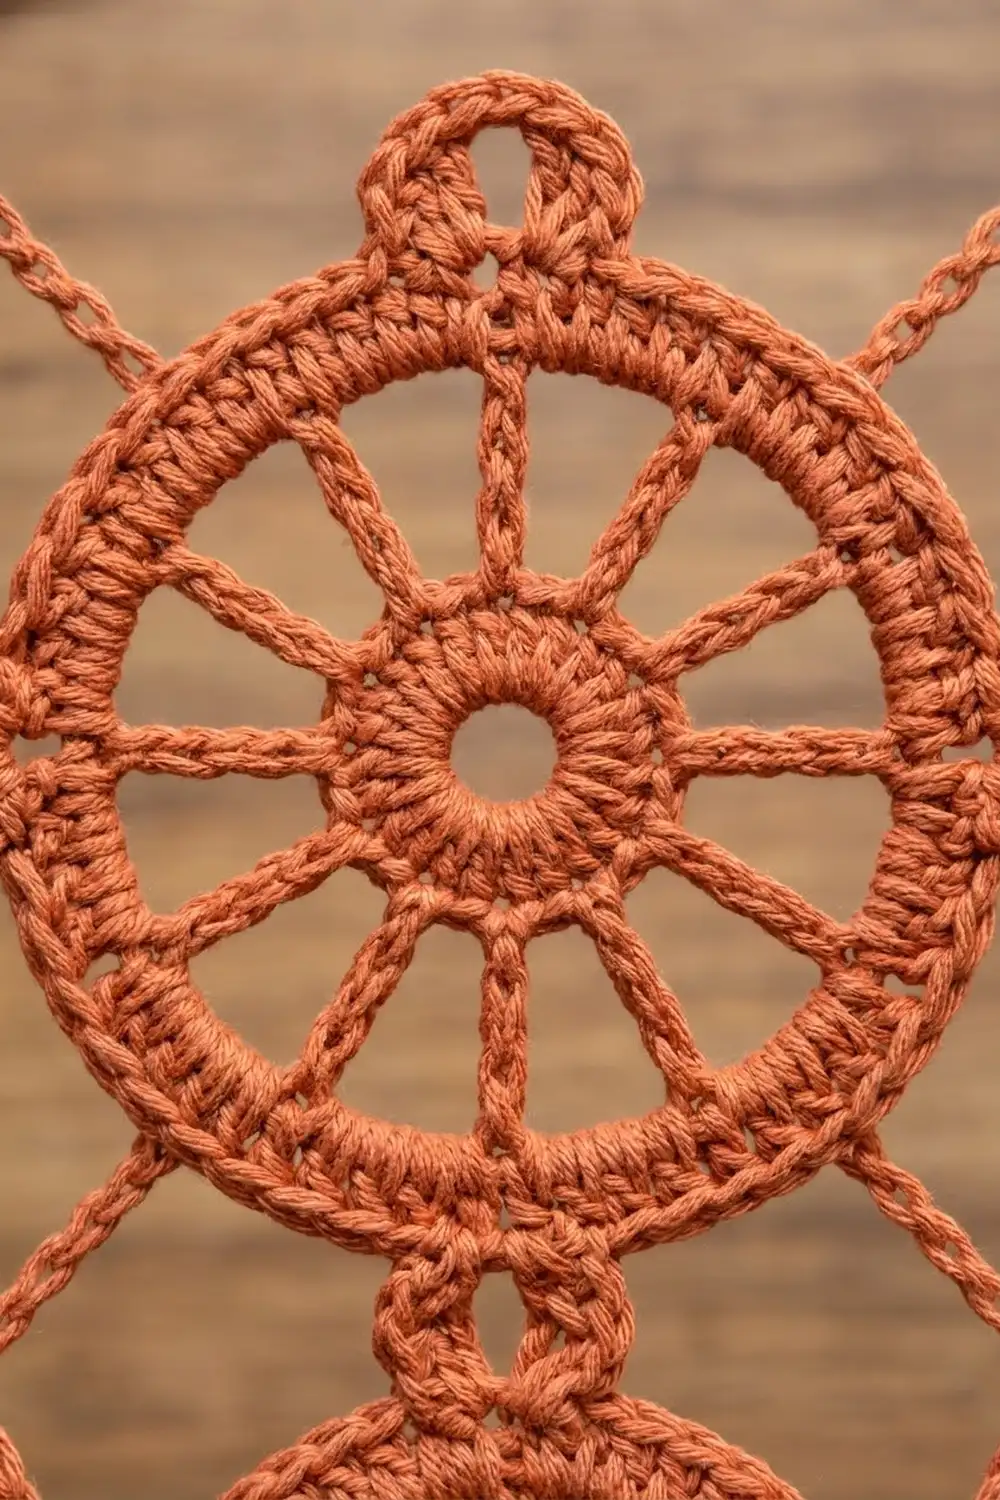
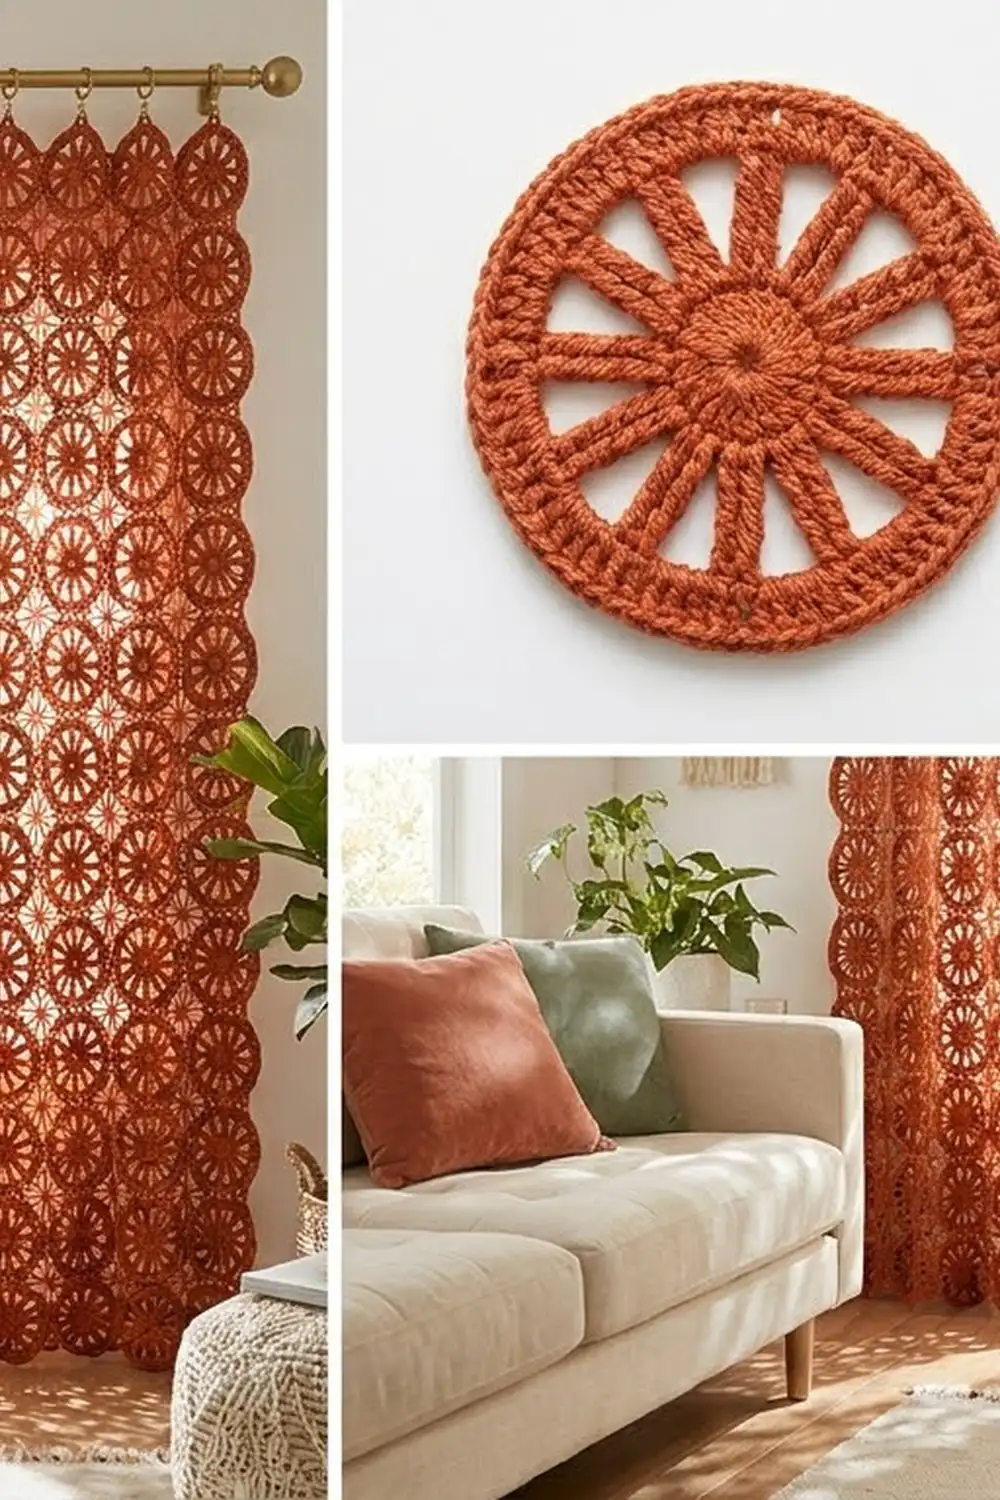
This curtain panel is made from round “sunwheel” motifs. Each wheel has an open center, a solid hub, twelve long spokes, and a firm rim. The wheels are joined only at four small loops, so the circles keep their shape and the gaps between them let light through. When the curtain hangs in a sunny window, the wheels cast patterned shadows on the floor.
The sample uses one warm terracotta cotton. A single color shows off the spoke pattern best, and the rust tone suits boho, earthy, and mid-century rooms. The pattern uses US crochet terms throughout.
One finished panel measures about 34 in wide x 72 in long (86.4 cm x 182.9 cm). It is 7 motifs across and 15 motifs down. The photo shows a pair, so make two identical panels.
Each motif takes six rounds. The first motif is made in full. Every motif after it is joined to its neighbors in the last round (join-as-you-go), so you don’t sew any seams. A two-round chain-and-single-crochet band then goes around the panel and straightens the edges for hanging.
Finished Size and Construction
- Finished panel size: 34 in x 72 in (86.4 cm x 182.9 cm)
- Skill level: Intermediate
- Terminology: US crochet terms
- Yarn weight: DK (light worsted, #3) cotton
- Hook: 3.5 mm (E-4)
- Number of pieces: 105 motifs per panel, 210 for a pair
- Layout: 7 motifs wide x 15 motifs tall
- Motif size: 4.5 in (11.4 cm) across the rim, 5 in (12.7 cm) from loop tip to loop tip
- Motif pitch (center to center once joined): 4.75 in (12.1 cm)
- Size before border: 33.5 in x 71.5 in (85.1 cm x 181.6 cm)
- Border depth: about 0.25 in (0.6 cm) per side
Materials
Yarn: Use a smooth mercerized or combed cotton in DK weight. Cotton holds the spokes crisp, doesn’t stretch much on a long drop, and washes well. Avoid acrylic: a long panel made from it can grow in length as it hangs.
- Terracotta: 1,100 g / about 2,310 m for a pair (22 balls of 50 g / 105 m). That is 550 g / about 1,155 m per panel.
Each motif uses about 4.5 g. The border uses about 20 g per panel. The quantities above include a margin of roughly 10% for gauge swatches and differences in tension.
Tools:
– 3.5 mm (E-4) crochet hook
– Tapestry needle
– 4 locking stitch markers
– Measuring tape and a ruler
– Rustproof pins and foam blocking mats (or a clean carpet covered with a towel)
– Spray bottle
– 9 curtain clip rings per panel, for hanging
Abbreviations (US Terms)
- ch: chain
- sl st: slip stitch
- sc: single crochet
- dc: double crochet
- dtr: double treble crochet
- sp: space
- st(s): stitch(es)
- rnd: round
- JAYG: join-as-you-go
Double treble (dtr): Yarn over 3 times, then insert the hook into the stitch and pull up a loop (5 loops on hook). Yarn over and pull through 2 loops. Repeat from * 3 more times until 1 loop remains.
Joining loop: Work ch 2, take the hook out of the working loop, and insert it from front to back into the neighbor’s ch-4 loop. Pick up the dropped loop and pull it through (this is the sl st join), then ch 2. The two loops interlock, so neither motif twists.
Gauge and Checkpoints
Make one complete motif before you start anything else, then wet-block it and let it dry flat. All the panel math depends on this motif.
- After Rnd 2: hub measures 1.5 in (3.8 cm) across.
- After Rnd 3: spoke tips measure 3.2 in (8.1 cm) across.
- After Rnd 4: 3.6 in (9.1 cm) across.
- After Rnd 5: 4.2 in (10.7 cm) across.
- After Rnd 6: rim measures 4.5 in (11.4 cm), and loop tip to loop tip measures 5 in (12.7 cm).
If the motif is too big: go down to a 3.25 mm hook, or tighten your dtr by pulling each loop snug before the next yarn over.
If the motif is too small: go up to a 3.75 mm hook. Your motifs can differ by up to 1/8 in (0.3 cm), but that difference multiplies across 15 rows, so fix it now.
If the motif cups: your spokes are short. Lengthen each dtr slightly.
If the motif ruffles: your Rnd 5 is loose. Try a smaller hook for Rnds 5-6 only.
Motif Pattern
Rnd 1: Ch 5 and sl st to the first ch to form a ring. Ch 1, work 12 sc in the ring, then sl st to the first sc. (12 sc)
Rnd 2: Ch 3 (counts as dc), dc in the same st, then 2 dc in each st around. Sl st to the top of the ch-3. (24 dc) This round makes the solid hub around the open center.
Rnd 3 (spokes): Ch 5 (counts as dtr), ch 3. Skip next st, dtr in next st, ch 3. Repeat from * 10 more times. Sl st to the top of the ch-5. (12 dtr and 12 ch-3 sps) Each dtr is one spoke, and the ch-3 spaces make the open gaps between spokes.
Rnd 4 (rim base): Sl st into the first ch-3 sp. Ch 1, 3 sc in the same sp. Sc in next dtr, 3 sc in next ch-3 sp. Repeat from * 10 more times, sc in the last dtr, then sl st to the first sc. (48 sc: 36 in spaces + 12 on spokes)
Rnd 5 (rim): Ch 3 (counts as dc), dc in next 2 sts, 2 dc in next st. Dc in next 3 sts, 2 dc in next st. Repeat from * 10 more times, then sl st to the top of the ch-3. (60 dc) This round adds 12 stitches, one increase for each spoke.
Rnd 6 (edge and loops): Ch 1. Sc in next 14 sts, then work (sc, ch 4, sc) in next st. Repeat from * 3 more times. Sl st to the first sc and fasten off. (64 sc + 4 ch-4 loops) That is 60 sts worked one per stitch, plus 4 extra sc added at the loop points.
The four loops land exactly one quarter of the way around from each other. They become the top, right, bottom, and left joining points. Weave in the tails along the back of the rim.
Make All Pieces
Each panel needs 105 motifs in Terracotta, so a pair needs 210. Make Motif 1 in full. Make every other motif the same way through Rnd 5, then join it in Rnd 6 as described below.
The layout for one panel has 15 rows of 7 motifs. In the grid, O is a motif and each dash or bar is a joined loop pair:
Row 1:   O-O-O-O-O-O-O
         | | | | | | |
Row 2:   O-O-O-O-O-O-O
         | | | | | | |
Row 3:   O-O-O-O-O-O-O
  ...    (repeat)
Row 15:  O-O-O-O-O-O-O
Each panel has 6 x 15 = 90 side-to-side joins and 7 x 14 = 98 top-to-bottom joins.
Joining
Method: JAYG in Rnd 6. Work from left to right along Row 1, then start each new row at the left.
Stitch-to-stitch logic: In Rnd 6, work the sc runs exactly as written. Each time you reach a loop point that faces a finished motif, work (sc, joining loop, sc) instead of (sc, ch 4, sc). The joining loop still totals 4 chains, so the 64-sc count doesn’t change. No stitches are added at the seams.
- A Row 1 motif (after the first) joins its left loop to the right loop of the motif before it.
- In Rows 2-15, the first motif joins its top loop to the bottom loop of the motif above it.
- Every other motif in Rows 2-15 joins its left loop and its top loop.
Tension: Keep the joining chains the same size as a free ch-4 loop. Tight joins pull the circles together and pucker the panel. Loose joins let the panel sag lengthwise.
Size checkpoints:
– After Row 1, the strip measures 33.5 in (85.1 cm) from outer loop to outer loop. That is 5 in + 6 x 4.75 in.
– After 4 rows, the height measures 19.25 in (48.9 cm).
– After 15 rows, the height measures 71.5 in (181.6 cm). That is 5 in + 14 x 4.75 in.
Border
Border gauge: 21 sts = 4.75 in (12.1 cm), or about 4.4 sts per inch. One border repeat matches one motif pitch.
Rnd 1 (chain bridges): With the right side facing, join yarn in the top loop of the top-left motif.
- Top edge: Ch 1, 3 sc in that loop. Ch 18, 3 sc in the top loop of the next motif. Repeat from * 5 more times. Ch 8, ch 1 (corner, mark it), ch 8.
- Right edge: 3 sc in the right loop of the top-right motif. Ch 18, 3 sc in the right loop of the next motif down. Repeat from * 13 more times. Ch 8, ch 1 (corner, mark it), ch 8.
- Bottom edge: Work it like the top edge, using bottom loops.
- Left edge: Work it like the right edge, using left loops. Ch 8, ch 1 (corner, mark it), ch 8, then sl st to the first sc.
Rnd 1 counts between corner chains:
– Top and bottom: 8 + 3 + (6 x 21) + 8 = 145 sts each
– Left and right: 8 + 3 + (14 x 21) + 8 = 313 sts each
– Total: 145 + 145 + 313 + 313 + 4 corner ch = 920 sts
Rnd 2: Ch 1. Work 1 sc in each st and ch along every side, and 3 sc in each marked corner ch. Sl st to the first sc and fasten off. That is 920 sts worked one per stitch, plus 8 extra corner sc, for 928 sc. Counting each side including both 3-sc corner groups:
– Top and bottom: 3 + 145 + 3 = 151 sc each
– Left and right: 3 + 313 + 3 = 319 sc each
Why the math works: Each 21-stitch bridge repeat (3 sc + 18 ch) spans exactly one motif pitch of 4.75 in (12.1 cm). Each corner run (3 corner sc + 8 ch + half of the 3 loop sc) covers about 2.75 in (7.0 cm). That is the 2.5 in (6.4 cm) from the outer loop center to the corner, plus the border depth.
The top edge comes to 151 sts at about 4.4 per inch, which is about 34 in (86.4 cm). The side edge comes to 319 sts, about 72 in (182.9 cm). Both match the unbordered panel plus 0.25 in (0.6 cm) of border on each side, within about 1/4 in. Blocking evens out that small difference.
Final Blocking
- Soak the panel in cool water for 15 minutes, then press out the water. Don’t wring it.
- Roll the panel in towels to remove more water.
- Lay it flat on the mats and shape it to 34 in x 72 in (86.4 cm x 182.9 cm).
- Pin the four corners first, then pin each border edge straight every 4.75 in (12.1 cm), at each motif loop.
- Nudge each wheel round and line up its spokes. Open each center hole with a fingertip.
- Let it dry completely, which takes 24-48 hours, before unpinning.
- Repeat for the second panel. Measure the two panels side by side to check that they match.
Final Quality-Control Checklist
- Every motif has 12 spokes, 64 rim sc, and 4 loops.
- Every motif measures 4.5 in (11.4 cm) across the rim.
- Every joining loop is interlocked, with no gaps or twisted motifs.
- There are 15 straight rows of 7 motifs, with no row shifted by a loop.
- Border Rnd 2 has 151 sc on the top and bottom edges and 319 sc on each side.
- The panel measures 34 in x 72 in (86.4 cm x 182.9 cm).
- All ends are woven into the rims with no visible tails.
- Both panels match in length to within 1/2 in (1.3 cm).
Troubleshooting
- Spokes lean or twist: You worked a spoke into the wrong stitch. In Rnd 3, always skip exactly one hub stitch.
- Rnd 4 count is off: Check that you worked 3 sc in each space and 1 sc on each spoke top, not 2.
- Loops are not opposite each other: The 14-sc runs are off by one. Recount Rnd 6 before fastening off.
- Panel is longer than planned: Your joins are loose, or the cotton is stretching. Re-block it flat and don’t hang it while it’s wet.
- Border edge ripples: Your bridge chains are too loose. Work Rnd 1 with a hook one size smaller.
- Border edge pulls in: Your bridge chains are too tight. Go up one hook size for the chains only.
- Corners curl: Make sure you worked 3 sc into each corner ch in Rnd 2.
Care
Hand wash in cool water with mild soap, then dry flat and re-pin to size. Don’t tumble dry, and don’t hang the panel while it’s wet, because the weight of the water will stretch it.
Final Notes
Everything in this pattern follows from one measurement chain:
- One motif is 4.5 in (11.4 cm) across the rim and 5 in (12.7 cm) from loop tip to loop tip.
- Joined loop to loop, the motifs sit 4.75 in (12.1 cm) apart, center to center.
- Seven motifs across and fifteen down make 33.5 in x 71.5 in (85.1 cm x 181.6 cm).
- The 21-stitch border repeat matches that pitch, which brings the panel to 34 in x 72 in (86.4 cm x 182.9 cm).
Check the first motif carefully, keep your joins even, and the rest of the panel will measure out as planned. Happy crocheting!