

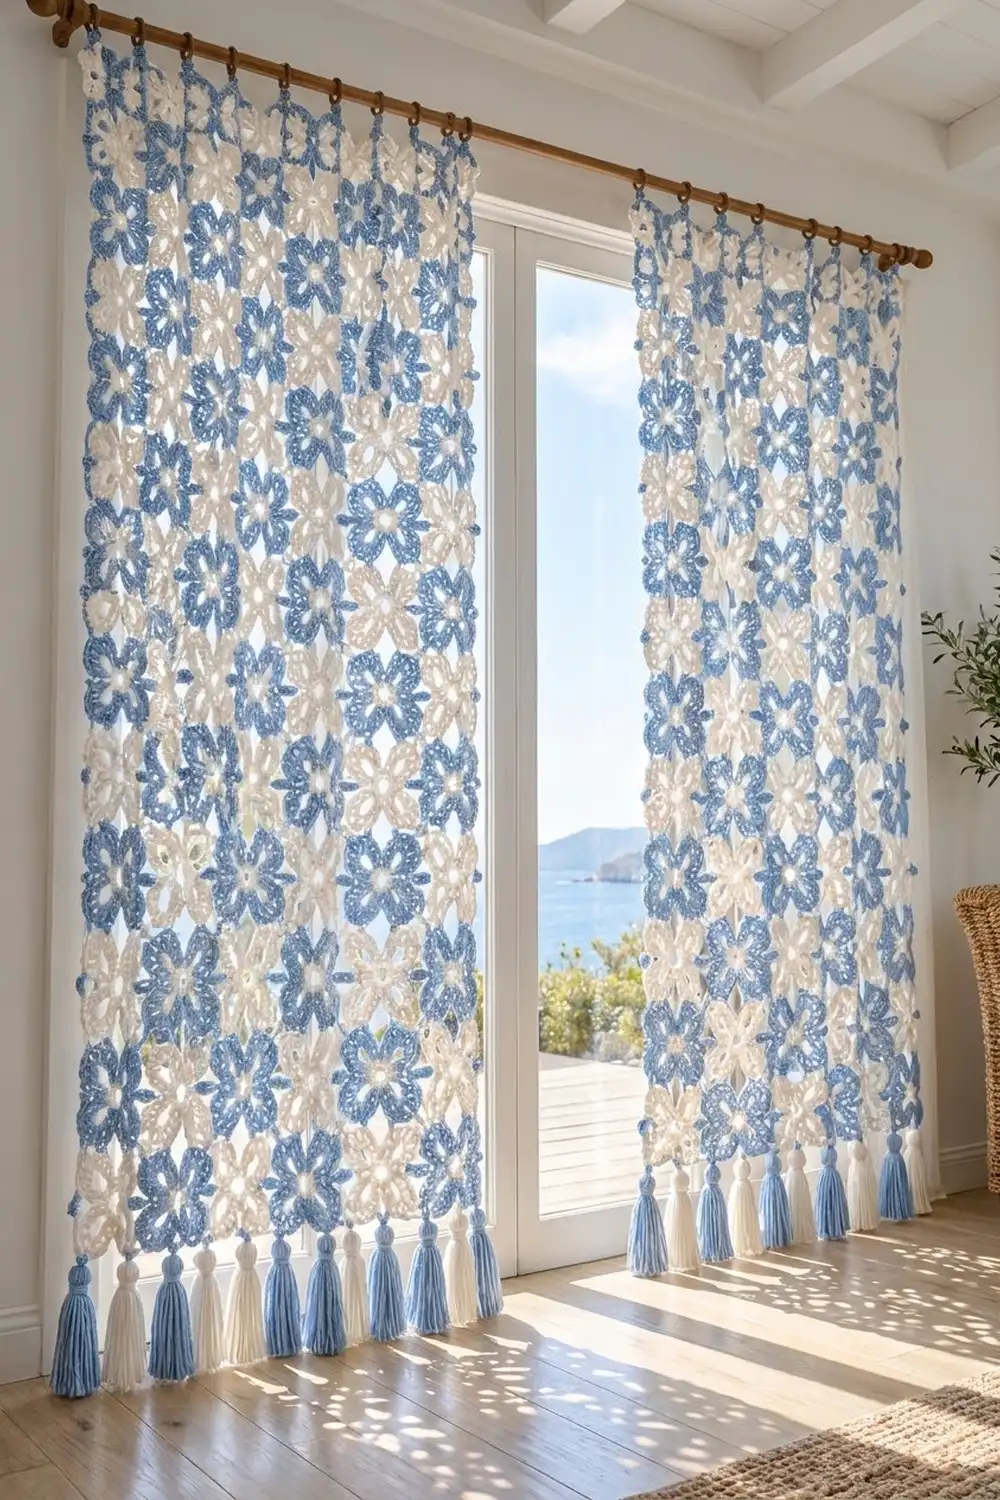
This curtain panel looks like summer on a whitewashed island. It’s built from rounded four-lobed motifs in two styles set in a checkerboard. One style has a white flower with four open oval petals and a cornflower-blue scalloped edge. The other is an all-white lacy motif made of chain loops. The light comes through the petals and the gaps between motifs, so the panel works as a sheer.
You only need two colors: a soft cornflower blue and a warm white. The bottom edge has chunky tassels that alternate blue and white, and the top has a solid white rod-pocket band. The look is relaxed and coastal, and the structure is very regular.
The pattern uses US crochet terms. One finished panel measures 36 in (91.4 cm) wide and 80 in (203.2 cm) long, from the top of the rod pocket to the bottom motif tips. With the tassels it’s about 86 in (218.4 cm) long. The photo shows a matching pair, so make two panels for a window like the one pictured.
Each motif is worked in the round. Motifs join to each other through small ch-2 tips at their four points as you go, so you never sew motifs together. When the motif grid is done, you work a sc band across the top and fold it into a rod pocket. The tassels go on last.
Finished Size and Construction
- Finished panel size: 36 in (91.4 cm) × 80 in (203.2 cm), plus 6 in (15.2 cm) of tassels
- Skill level: Intermediate
- Terminology: US crochet terms
- Yarn weight: Worsted weight (#4) cotton
- Hook: 4.5 mm (US 7)
- Number of pieces per panel: 78 motifs (39 Motif A, 39 Motif B) plus 6 tassels
- Layout: 6 motifs wide × 13 motifs tall, in a checkerboard
- Motif size: 6 in (15.2 cm), measured tip to tip
- Size before border: 36 in (91.4 cm) × 78 in (198.1 cm)
- Border depth: 2 in (5.1 cm) folded rod-pocket band along the top only. The sides stay as open motif edges, as in the photo.
Materials
Choose a smooth mercerized or combed cotton, or a cotton blend, at about 85 m per 50 g. Cotton holds stitch definition and doesn’t stretch much while it hangs. Avoid fuzzy or very stretchy yarns, because a long panel pulls on itself and those yarns will sag.
Per panel:
- White: 850 g, about 1,445 m (17 balls)
- Cornflower blue: 250 g, about 425 m (5 balls)
For a pair: 1,700 g of white and 500 g of blue.
These quantities include about a 15% margin for swatching, weaving in ends, and dye-lot safety. Buy all your yarn from one dye lot.
Tools:
- 4.5 mm (US 7) hook
- Tapestry needle
- Scissors
- Stitch markers
- Tape measure
- Cardboard cut 5.5 in (14.0 cm) tall, for tassels
- Blocking mats and rustproof pins
- Spray bottle
Abbreviations (US Terms)
- ch: chain
- sl st: slip stitch
- sc: single crochet
- hdc: half double crochet
- dc: double crochet
- sk: skip
- sp(s): space(s)
- st(s): stitch(es)
- MR: magic ring
- rep: repeat
Special technique: joining tip. When a tip that says “ch 2” touches a finished motif, work this instead: ch 1, sl st into the neighbor’s ch-2 tip sp, ch 1. This replaces the free ch-2 tip, so the stitch count doesn’t change.
Gauge and Checkpoints
Make and block one Motif A and one Motif B before you start the panel. Every measurement in this pattern depends on these two test motifs.
- Motif A after Round 1: 1.5 in (3.8 cm) across
- Motif A after Round 3: about 5 in (12.7 cm) across the white petals
- Motif A after Round 4: 6 in (15.2 cm) tip to tip
- Motif B after Round 3: 3.75 in (9.5 cm) across
- Motif B after Round 5: 6 in (15.2 cm) tip to tip
- Band gauge: 16 sc and 18 rows = 4 in (10.2 cm)
If a motif comes out too big, go down to a 4 mm hook. If it’s too small, go up to a 5 mm hook. Motifs A and B must match within 0.25 in (0.6 cm). If they don’t, adjust Motif B only: change the ch 8 in Round 4 to ch 7 to make it smaller, or to ch 9 to make it larger.
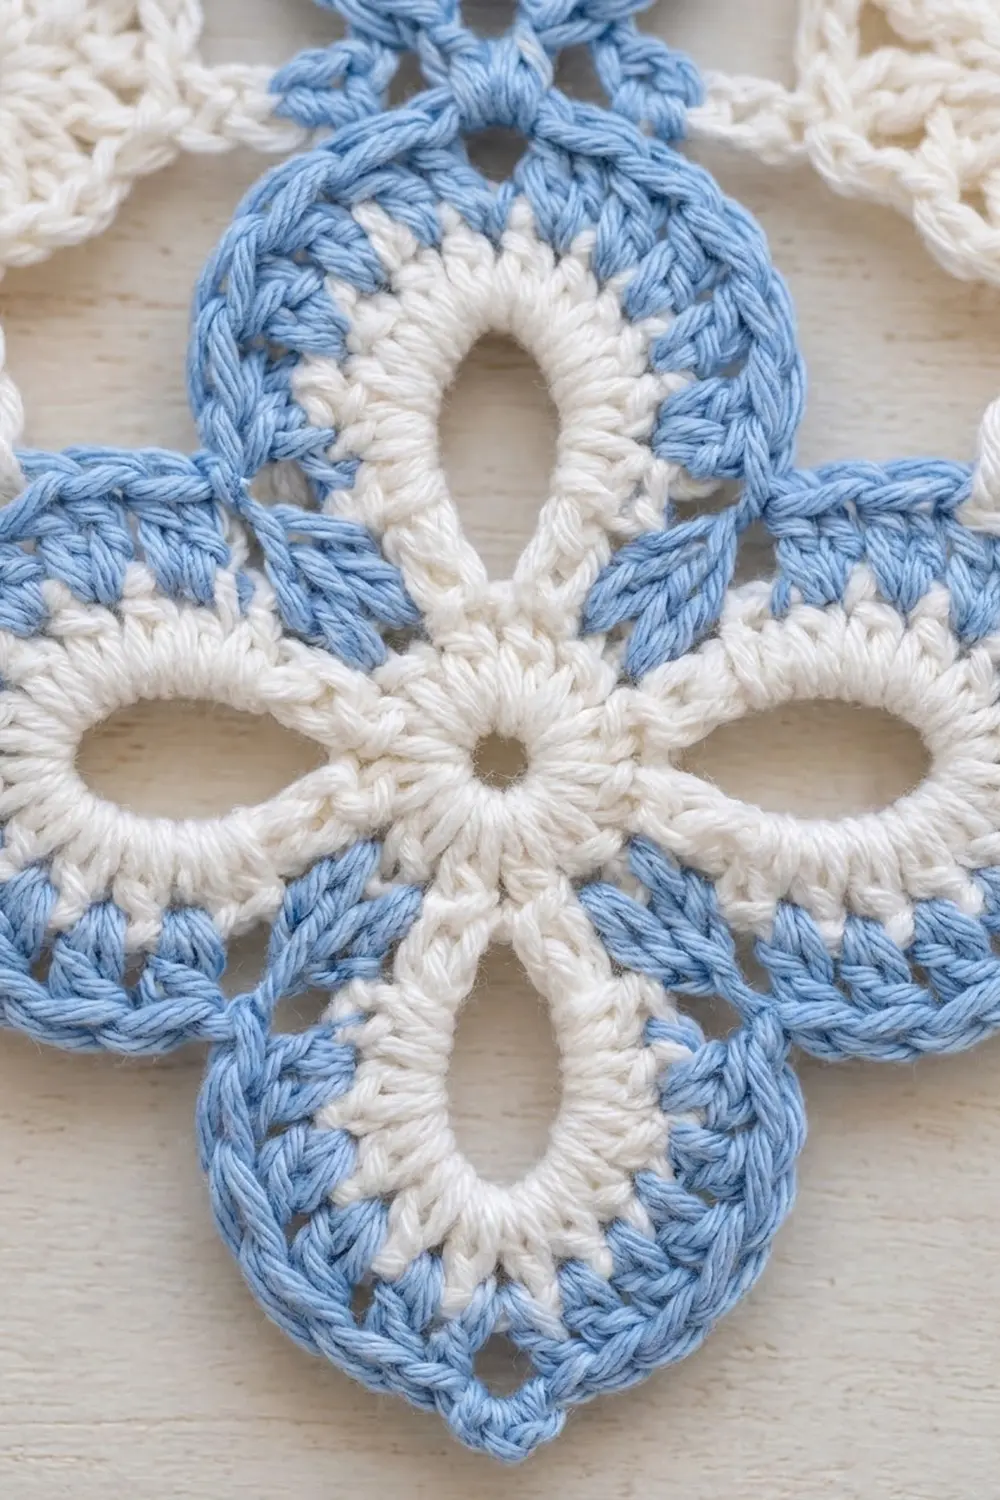
Motif A: Blue-Edged Quatrefoil (make 39)
Rounds 1 to 3 are white. Round 4 is blue.
Round 1 (white): Make a MR. Ch 3 (counts as dc), work 15 dc into the ring, then sl st to the top of the ch-3. Pull the ring tight. (16 dc)
Round 2: Ch 1, sc in the same st, ch 12, sk 3 dc. Sc in the next dc, ch 12, sk 3 dc. Rep from * to * 2 more times, then sl st to the first sc. (4 sc, 4 ch-12 loops)
Each loop arcs over 3 skipped dc. The gap under each arc becomes one open oval petal.
Round 3: Sl st into the first loop and ch 1. In the loop work (2 sc, 3 hdc, 10 dc, 3 hdc, 2 sc), then sc in the next sc. Rep from * to * around and sl st to the first sc. (4 petals of 20 sts + 4 sc = 84 sts)
Pack the stitches snugly over the chain to make the thick white petal outline. Fasten off.
Round 4 (blue): Join blue with a sl st in any sc between petals. This sc is the valley. Ch 1, then sc in the same st.
Now work across the first lobe:
- Sk the next sc, then sc in the next sc.
- Hdc in each of the next 3 hdc.
- [Dc in the next dc, 2 dc in the next dc] twice, then dc in the next dc.
- Ch 2. This is the tip.
- Dc in the next dc, [2 dc in the next dc, dc in the next dc] twice.
- Hdc in each of the next 3 hdc.
- Sc in the next sc, then sk the last sc of the petal.
Sc in the next valley sc, then rep the lobe instructions. Continue until you have 4 lobes. After the 4th lobe, don’t work the valley sc again; sl st to the first sc instead. (4 lobes of 23 sts = 92 sts + 4 ch-2 tips)
Each lobe takes 21 sts from Round 3: 1 valley sc, 2 sc, 6 hdc, 10 dc, and 2 skipped sc. It gives back 23 sts. The two skipped sc pull the valleys in, which shapes the quatrefoil. Fasten off.
Motif B: White Lace Quatrefoil (make 39)
All rounds are white.
Round 1: Make a MR. Ch 3 (counts as dc), work 15 dc into the ring, then sl st to the top of the ch-3. (16 dc)
Round 2: Ch 1, sc in the same st, ch 5, sk 1 dc. Sc in the next dc, ch 5, sk 1 dc. Rep from * to * 6 more times and sl st to the first sc. (8 sc, 8 ch-5 sps)
Round 3: Sl st into the first ch-5 sp and ch 1. In each sp work (sc, hdc, 3 dc, hdc, sc). Sl st to the first sc. (8 scallops of 7 sts = 56 sts)
Round 4: Sl st in the next hdc and the next 2 dc, which brings you to the middle dc of the scallop. Ch 1, sc in the same dc, ch 8. Sc in the middle dc of the next scallop, ch 8. Rep from * to * 6 more times and sl st to the first sc. (8 sc, 8 ch-8 loops)
Round 5: Sl st into the first loop and ch 1. In this loop work (5 sc, ch 2, 5 sc); this is a tip loop. In the next loop work 9 sc; this is a side loop. Rep from * to * 3 more times and sl st to the first sc. (4 × 10 sc + 4 × 9 sc = 76 sc + 4 ch-2 tips)
Tip loops alternate with side loops, so the 4 tips sit exactly opposite each other. Fasten off.
Make All Pieces
For one panel, make:
- 39 Motif A: about 11 m white and 8 m blue each
- 39 Motif B: about 15.5 m white each
Only the first motif is fully finished on its own. Every other motif joins in its final round.
Layout (A = blue-edged, B = white lace), viewed from the front:
- ROW 1 (top): A B A B A B
- ROW 2: B A B A B A
- ROW 3: A B A B A B
- ROW 4: B A B A B A
- ROW 5: A B A B A B
- ROW 6: B A B A B A
- ROW 7: A B A B A B
- ROW 8: B A B A B A
- ROW 9: A B A B A B
- ROW 10: B A B A B A
- ROW 11: A B A B A B
- ROW 12: B A B A B A
- ROW 13 (bottom): A B A B A B
Every row has 3 A and 3 B, so 13 rows give 39 of each.
Joining
Method: Join as you go, at the ch-2 tips only. Place each motif so its tips point up, down, left, and right.
Order: Work left to right across each row, then move down to the next row.
- Each Row 1 motif after the first joins its left tip to its neighbor’s right tip.
- In Rows 2 to 13, each motif joins its top tip to the bottom tip of the motif above it.
- It also joins its left tip to its left neighbor, unless it’s the first motif in the row.
Stitch-to-stitch logic: Each tip joins one-to-one with one neighbor tip, using the joining tip from the Abbreviations section. The rounded shoulders stay free, which forms the open diamonds between motifs. Every motif keeps its full count, 92 sts or 76 sc, so the grid stays square.
Tension: Keep the ch 1 on each side of the joining sl st the same height as a normal chain. If it’s tight, the tips pucker and the panel gets narrower. If it’s loose, the panel sags lengthwise.
Size checkpoint: After Row 1, the strip should measure 36 in (91.4 cm) from the outer tip of the first motif to the outer tip of the last. Each row should add 6 in (15.2 cm), so 13 rows come to 78 in (198.1 cm). Check this every 3 rows.
Border: Top Rod-Pocket Band and Tassels
Border gauge: 4 sc per inch, so the 36 in (91.4 cm) width needs 144 sts. That’s 24 sts for each of the 6 top motifs.
Row 1 (white): Make a slipknot and ch 10. Work 4 sc in the top tip of the first Row 1 motif. Ch 20, then 4 sc in the top tip of the next motif. Rep from * to * 4 more times. Ch 11 and turn. The last ch is the turning ch.
Count: 10 + (6 × 4) + (5 × 20) + 10 = 144 sts.
Why the math works: Each motif is 24 sts wide, with its tip in the middle. Each motif gets 10 ch, then 4 sc on its tip, then 10 ch. Where two motifs meet, their two 10-ch sections combine into one ch-20.
Row 2: Sc in the 2nd ch from the hook and in every st across. (144 sc) Ch 1 and turn.
Rows 3–19: Sc in each st across. (144 sc) Ch 1 and turn after every row except Row 19. Rows 2–19 are 18 rows, which makes the band 4 in (10.2 cm) tall. After Row 19, leave a 48 in (121.9 cm) tail.
Rod pocket: Fold the band toward the back so that Row 19 lies along Row 10. Whipstitch each of the 144 sts of Row 19 to the matching st of Row 10. This gives a 2 in (5.1 cm) band with a pocket that fits rods up to 1 in (2.5 cm) thick.
Tassels (make 3 blue, 3 white): Wrap yarn 30 times around the card. Tie the top with a 12 in (30.5 cm) strand and cut the bottom loops. Wrap a strand tightly 0.75 in (1.9 cm) below the top, then trim the tassel to 5 in (12.7 cm).
Attaching tassels: Join matching yarn at the bottom tip of each Row 13 motif: blue under A, white under B. Ch 4 to make a cord about 1 in (2.5 cm) long, then tie on the tassel.
Final Blocking
- Weave in all ends inside the stitches of the same color.
- Lay the panel flat in sections, starting at the top band.
- Spray each section until it’s damp. Don’t soak it, because wet cotton is heavy.
- Pin every motif tip on a 6 in (15.2 cm) grid, then pin each petal open.
- Check the width at every third row: it should be 36 in (91.4 cm).
- Let each section dry completely before you move to the next one.
- Comb the tassels straight and trim them to 5 in (12.7 cm).
Final Quality-Control Checklist
- 78 motifs are in a true checkerboard
- Every Motif A has 92 sts and 4 tips, and every Motif B has 76 sc and 4 tips
- All joins are at tips only, and the shoulders are free
- The panel is 36 in (91.4 cm) × 78 in (198.1 cm) before the band
- The band has 144 sc on every row and is 2 in (5.1 cm) deep after folding
- There are 6 tassels in alternating colors, each 5 in (12.7 cm) long
- No knots or ends show on the front
Troubleshooting
- Petals look narrow: Chain more loosely in Round 2.
- Motif A cups: Check that each loop in Round 3 has exactly 20 sts.
- Motif B is smaller than Motif A: Use ch 9 in Round 4.
- The panel narrows at the bottom: The joins got tighter as you went. Re-block and loosen the joining chains.
- The band ripples: Recount Row 1 for exactly 144 sts, or go down a hook size.
- The tassels splay: Tighten the neck wrap and steam them lightly.
Care
Hand wash in cool water, or machine wash in a mesh bag on a gentle cycle. Dry the panel flat, never hanging while it’s wet, so the weight of the water doesn’t stretch it.
Final Notes
The measurements follow one chain. A 1.5 in (3.8 cm) center grows into a 6 in (15.2 cm) motif. Six motifs across give 36 in (91.4 cm), and 13 rows give 78 in (198.1 cm). The 2 in (5.1 cm) folded band brings the panel to 80 in (203.2 cm), and the tassels finish it at about 86 in (218.4 cm). If your test motifs measure correctly, every later number will too. Make a second panel to complete the pair.
Happy crocheting!