

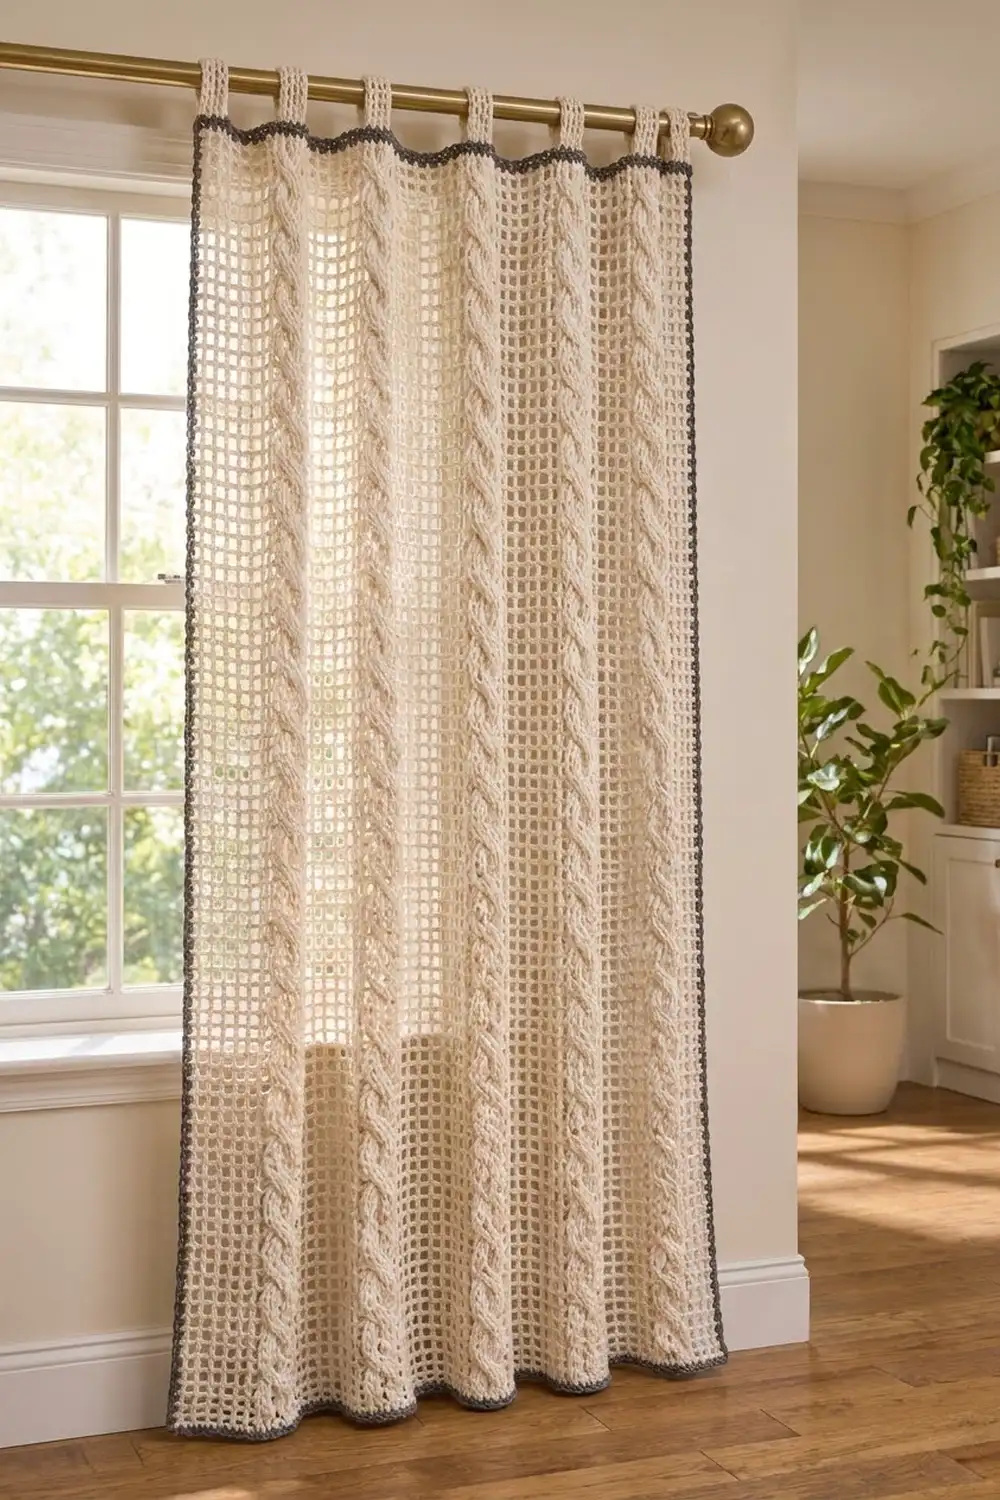
This curtain panel pairs an open filet mesh with six tall, braided cable columns that run its full length. The mesh lets daylight through, and the raised plaits give the curtain structure and a cozy, knit-like texture. A slim charcoal border frames the cream fabric, and cream tabs at the top slide straight onto a curtain rod.
The panel is worked in cream worsted-weight cotton with a charcoal border. The look is calm, natural, and a little Scandinavian. It works well in a study, bedroom, or any room where you want privacy without losing light.
The pattern uses US crochet terms. One finished panel measures 29.75 in (75.6 cm) wide by 81.5 in (207.0 cm) long, not counting the tabs. The photo shows two identical panels hung as a pair, but this pattern describes one panel. If you want a pair, make a second panel the same way.
Construction is simple. You work the panel in one piece, from the bottom up, in rows of dc mesh with post-stitch cables. Then you work three rounds of charcoal border all the way around. Finally, you work six cream tabs into the top edge, fold them to the back, and sew them down.
Finished Size and Construction
- Finished size: 29.75 in x 81.5 in (75.6 cm x 207.0 cm), not counting the tabs
- Skill level: Intermediate (post stitches, cable crosses, steady row counting)
- Terminology: US
- Yarn weight: Worsted (#4)
- Hook: 5.0 mm (H-8)
- Number of pieces: 1 panel with built-in tabs (make 2 for a pair)
- Layout: Single vertical panel, 6 cable columns separated by mesh
- Piece size: 29.75 in x 81.5 in (75.6 cm x 207.0 cm) after border
- Size before border: 28.25 in x 80 in (71.8 cm x 203.2 cm)
- Border depth: 0.75 in (1.9 cm) on each side
- Tabs: 6 tabs, each 1.5 in (3.8 cm) wide and 7 in (17.8 cm) long before folding
Materials
Choose a smooth worsted cotton or cotton blend. Cotton drapes well, shows the cables clearly, and stays straight on a rod. Pure acrylic tends to stretch and curl over a long length. The amounts below assume a yarn with about 190 m (208 yd) per 100 g.
Yarn (one panel):
– Cream (main color): 1,200 g, about 2,280 m (2,493 yd)
– Charcoal gray (border): 150 g, about 285 m (312 yd)
These amounts include a margin of roughly 10 to 15 percent for your gauge swatch and small tension differences. Buy all the cream yarn from one dye lot. For a pair of panels, double everything.
Tools:
– 5.0 mm (H-8) crochet hook
– Tapestry needle
– Stitch markers (at least 12)
– Measuring tape
– Rust-proof pins and a large blocking surface
– Spray bottle or steamer
– Scissors
Abbreviations (US Terms)
- ch – chain
- sk – skip
- sl st – slip stitch
- sc – single crochet
- dc – double crochet
- rsc – reverse single crochet (crab stitch)
- FPdc – front post double crochet
- BPdc – back post double crochet
- FPtr – front post treble crochet
- sp – space
- st(s) – stitch(es)
- RS / WS – right side / wrong side
- rep – repeat
Special stitches
Cross A (6 sts): Sk next 2 sts, FPtr around each of next 2 sts. Then, working behind the FPtr just made, FPtr around each of the 2 skipped sts. FPdc around each of next 2 sts.
Cross B (6 sts): FPdc around each of next 2 sts, sk next 2 sts, FPtr around each of next 2 sts. Then, working in front of the FPtr just made, FPtr around each of the 2 skipped sts.
Alternating Cross A and Cross B on every RS row creates the three-strand braid. Each post stitch replaces one stitch, so the count never changes.
Rsc: Working from left to right, insert hook into the next st to the right, pull up a loop, yarn over, and draw through both loops.
Gauge and Checkpoints
Gauge in pattern: 16 sts and 8 rows = 4 in (10.2 cm). One 17-st repeat (5 mesh squares, 1 cable, 1 dc) = 4.25 in (10.8 cm).
Border gauge: 16 sc = 4 in (10.2 cm) wide; 4 rounds = 1 in (2.5 cm) deep.
Test one piece first. Before starting the panel, make a swatch with one cable. Ch 30 and work Rows 1–7 below with one repeat instead of six, which gives 28 sts (1 + 17 + 10). Rep Rows 4–7 until you have 16 rows. Block it lightly. The swatch should measure 7 in (17.8 cm) wide by 8 in (20.3 cm) tall.
Checkpoints for the main panel:
– After Row 1: 113 sts, 28.25 in (71.8 cm) wide
– After Row 20: 10 in (25.4 cm) tall
– After Row 80: 40 in (101.6 cm) tall
– After Row 120: 60 in (152.4 cm) tall
– After Row 160: 80 in (203.2 cm) tall
Measure the fabric flat and relaxed, never stretched. If the width is more than 0.5 in (1.3 cm) off, start over.
If your fabric is too big, go down 0.5 mm in hook size. If it is too small, go up 0.5 mm. Don’t add or drop stitches to fix the width, because the cable spacing depends on the 17-st repeat. If only the length is off, add or remove whole 4-row repeats (each 4-row repeat is 2 in or 5.1 cm).

Main Panel
Work with cream. The turning ch-3 counts as a dc throughout. On Row 2, place a marker in the first stitch of each cable and move it up as you go. This makes the cable columns easy to track.
Foundation: Ch 115.
Row 1 (WS): Dc in 4th ch from hook (skipped chs count as first dc), dc in each remaining ch, turn. (113 sts)
Row 2 (RS): Ch 3, [ch 1, sk next st, dc in next st] 5 times, FPdc around each of next 6 sts, dc in next st; rep from * 5 more times, [ch 1, sk next st, dc in next st] 5 times, turn. (113 sts: 6 cables of 6 sts, 7 mesh sections of 5 squares)*
Stitch check: 1 starting dc + 6 repeats x 17 sts + 10 final mesh sts = 113.
Row 3 (WS): Ch 3, [ch 1, sk ch-1 sp, dc in next dc] 5 times, BPdc around each of next 6 sts, dc in next st; rep from * 5 more times, [ch 1, sk ch-1 sp, dc in next dc] 5 times, working last dc in top of turning ch, turn. (113 sts)*
Row 4 (RS): Ch 3, [ch 1, sk ch-1 sp, dc in next dc] 5 times, Cross A, dc in next st; rep from * 5 more times, [ch 1, sk ch-1 sp, dc in next dc] 5 times, turn. (113 sts)*
Row 5 (WS): Work as Row 3. (113 sts)
Row 6 (RS): Ch 3, [ch 1, sk ch-1 sp, dc in next dc] 5 times, Cross B, dc in next st; rep from * 5 more times, [ch 1, sk ch-1 sp, dc in next dc] 5 times, turn. (113 sts)*
Row 7 (WS): Work as Row 3. (113 sts)
Rows 8–159: Rep Rows 4–7 another 38 times. You have now worked Rows 4–7 a total of 39 times, ending with a WS row. (113 sts)
Row 160 (RS, top band): Ch 3, dc in each of next 10 sts (working into each dc and each ch-1 sp), FPdc around each of next 6 sts, dc in next st; rep from * 5 more times, dc in each of last 10 sts. (113 sts)*
This solid top row matches the solid Row 1 at the bottom. Together they give the border a firm edge and the tabs a firm base. Fasten off the cream and weave in the ends.
Check now: 28.25 in (71.8 cm) by 80 in (203.2 cm).
Border
Work with charcoal and RS facing. The border is worked in rounds around all four edges.
Why the math works: Each dc row is 0.5 in (1.3 cm) tall. Two sc per row end gives 4 sc per inch, which matches the border gauge of 16 sc per 4 in (10.2 cm). Across the top and bottom, the panel already has 4 sts per inch, so 1 sc per stitch also matches. The sides stay straight and the corners don’t ruffle.
Side counts include both corner stitches. The corner stitch is the center sc of each 3-sc group, and it counts toward both sides that share it.
Round 1: Join charcoal in the last st of Row 160. Ch 1, 3 sc in same st (corner), sc in each of next 111 sts, 3 sc in last st (corner). Along the side, work 2 sc in each row end down to the foundation chain (320 sc). Work 3 sc in the first foundation ch (corner), sc in each of next 111 chs, 3 sc in last ch (corner). Work 2 sc in each row end up the second side (320 sc). Sl st to first sc.
– Top and bottom: 115 sts per side (1 corner + 1 + 111 + 1 + 1 corner)
– Each long side: 324 sts per side (1 corner + 1 + 320 + 1 + 1 corner)
– Total: 874 sts (2 x 115 + 2 x 324 − 4 shared corners)
Round 2: Ch 1, sc in each st around, working 3 sc in each corner center st. Sl st to first sc.
– Top and bottom: 117 sts per side
– Each long side: 326 sts per side
– Total: 882 sts (2 x 117 + 2 x 326 − 4 shared corners)
Round 3 (trim): Ch 1, rsc in each st around, working left to right. Sl st to first rsc and fasten off.
– Total: 882 sts (882 worked 1 per existing st + 0 added)
The rsc round makes the twisted, rope-like outer edge. The border is now 0.75 in (1.9 cm) deep, and the panel measures 29.75 in (75.6 cm) by 81.5 in (207.0 cm).
Tabs
Make 6 tabs with cream. Each tab sits directly above a cable column.
Finding the tab positions: With RS facing, count along the top edge, counting a top corner center st as st 1. Rounds 1 and 2 each added one st before the panel’s first stitch, so each cable’s 6 stitches now sit at border sts 14–19, 31–36, 48–53, 65–70, 82–87, and 99–104. Place a marker in the first st of each group. That leaves 12 sts outside the first and last tabs (not counting the corner st) and 11 sts between tabs.
Tab Row 1 (RS): Join cream in first marked st, ch 1, sc in same st and in each of next 5 sts, turn. (6 sc)
Tab Rows 2–28: Ch 1, sc in each st across, turn. (6 sc)
Fasten off, leaving a 12 in (30.5 cm) tail. The tab is 1.5 in (3.8 cm) wide by 7 in (17.8 cm) long.
Fold each tab to the WS and line up its last row with the base of border Round 1. Sew the 6 sts down firmly with the tail, keeping the stitches on the back. The loop fits a rod up to 1.5 in (3.8 cm) across. Repeat for all 6 tabs.
Final Blocking
- Weave in all remaining ends along the mesh bars or the border, never across open squares.
- Lay the panel flat on towels or blocking mats, RS up. Work in sections if your space is small.
- Mist the panel evenly until it is damp, not soaked.
- Pin the width to 29.75 in (75.6 cm), placing pins every 6 in (15.2 cm) along the border.
- Pin the length to 81.5 in (207.0 cm). Use a measuring tape as a guide to ease the long sides straight.
- Square up the mesh with your fingers so each open square sits level.
- Gently lift the cables so they stand out. Don’t press them flat.
- Let the panel dry completely, then unpin it.
- Hang the panel for 24 hours, then measure again. Cotton can drop slightly under its own weight.
Final Quality-Control Checklist
- Every row has 113 sts and the edges are straight
- All 6 cables braid the same way, alternating Cross A and Cross B
- Mesh squares line up vertically from bottom to top
- Border Round 2 has 117 sts on the top and bottom and 326 on each long side
- Corners lie flat and square
- The rsc edge is even, with no gaps
- 6 tabs are centered over the 6 cables, each sewn securely on the WS
- Panel measures 29.75 in x 81.5 in (75.6 cm x 207.0 cm)
Troubleshooting
The cables look flat. You may have worked FPdc on a WS row. Use BPdc on WS rows so the posts stay on the RS.
The cable looks like a rope instead of a braid. Check that you are alternating Cross A and Cross B. Two of the same cross in a row makes a rope instead of a braid.
The panel narrows at the cables. Post stitches pull in. Keep the FPtr loose, pulling each loop up to the full row height.
The sides are wavy after the border. You worked more than 2 sc per row end. Frog Round 1 and recount for 320 sc per side.
The sides pull in. Your sc is tighter than your dc rows. Go up 0.5 mm in hook size for the border only.
The tabs are uneven. Count again from the corner and move the markers before sewing.
The panel is too long after hanging. Take out the border along the bottom edge, rip back the panel by 4 rows, then rework the border.
Care
Hand wash, or machine wash on a gentle, cool cycle inside a mesh bag. Reshape and lay flat to dry. Never tumble dry, because the dryer can shrink and distort the cotton.
Final Notes
This panel depends on one chain of measurements. A gauge of 16 sts and 8 rows to 4 in (10.2 cm) makes 113 sts measure 28.25 in (71.8 cm) wide. At 0.5 in (1.3 cm) each, 160 rows give 80 in (203.2 cm). Three border rounds add 0.75 in (1.9 cm) on every side, bringing the panel to 29.75 in x 81.5 in (75.6 cm x 207.0 cm). The six tabs finish it. Check each of these measurements as you go, and the finished panel will hang straight.
Happy crocheting!