

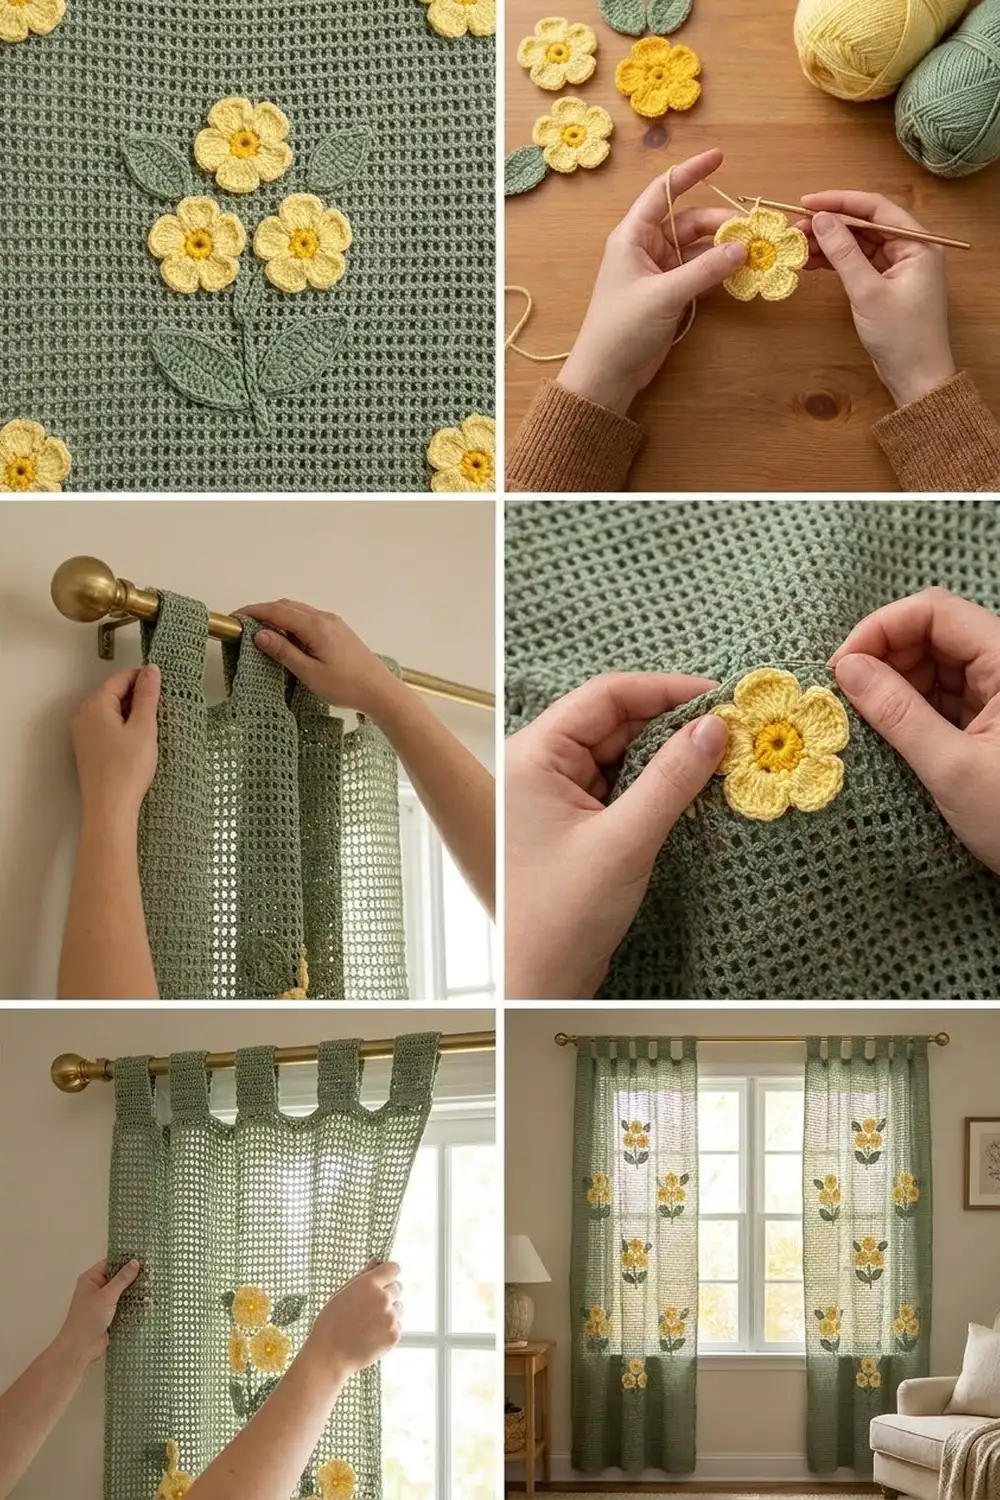
This curtain panel brings a cottage-garden look to a window. The background is an airy sage green filet mesh that lets light through. Climbing over it are five slender vines with paired leaves, and at the bottom each vine ends in a cluster of soft yellow primroses with golden centers.
The colors stay gentle: sage green mesh, deeper sage leaves, pale butter-yellow petals and golden centers. A row of lacy scallops finishes the hem, and simple folded tabs slide straight onto a curtain rod.
The pattern uses US crochet terms. One panel measures 40 in (101.6 cm) wide and 80 in (203.2 cm) long in the body before the edging. With the scallops and tabs it measures about 40.5 in (102.9 cm) wide and 84.5 in (214.6 cm) from the top of the tab loops to the tips of the scallops.
You’ll crochet the mesh panel in one piece from the bottom up. Then you’ll add the scalloped hem, the side edging and the tabs. Last, you’ll crochet the leaves and flowers separately, slip-stitch the stems onto the surface and sew everything in place. For the matching pair in the photo, make two panels.
Finished Size and Construction
- Finished size: 40.5 in × 84.5 in (102.9 cm × 214.6 cm), tabs and scallops included
- Skill level: Intermediate
- Terminology: US
- Yarn weight: DK (light #3) cotton
- Hook: 4.0 mm (US G-6)
- Number of pieces: 1 mesh panel, plus 170 leaves and 25 flowers (appliqués)
- Layout: 60 mesh squares wide × 120 rows tall; 5 vine columns 12 squares apart
- Piece size: body 40 in × 80 in (101.6 cm × 203.2 cm)
- Size before border: 40 in × 80 in (101.6 cm × 203.2 cm)
- Border depth: sides about 1/4 in (0.6 cm) each; scallops 1.5 in (3.8 cm) at the deepest point; tab loops 3 in (7.6 cm)
Materials
Use a smooth mercerized cotton or a cotton blend in DK weight, about 50 g / 120 m per ball. Cotton gives crisp mesh squares and hangs straight. Avoid fuzzy yarns, because they blur the filet holes.
Amounts are for one panel. Double them for a pair.
- Color A, sage green (mesh, hem, edging, tabs): 1,100 g / 2,640 m
- Color B, deeper sage green (leaves and stems): 300 g / 720 m
- Color C, pale butter yellow (petals): 100 g / 240 m
- Color D, golden yellow (centers): 25 g / 60 m
Tools: 4.0 mm (G-6) hook, tapestry needle, stitch markers, rustproof pins, measuring tape, blocking mats or a clean sheet on a carpet, and a spray bottle.
All quantities include a margin of about 10%.
Abbreviations (US Terms)
- ch – chain
- sl st – slip stitch
- sc – single crochet
- hdc – half double crochet
- dc – double crochet
- tr – treble crochet
- sp(s) – space(s)
- rev sc – reverse single crochet (crab stitch), worked left to right
- st(s) – stitch(es)
Mesh square: ch 2, skip 2 sts (or the ch-2 sp), dc in next dc. Each square is 3 sts wide.
Picot: ch 3, sl st in 3rd ch from hook.
Surface sl st: with the yarn held behind the mesh, insert the hook from front to back, pull up a loop and draw it through the loop on the hook.
Gauge and Checkpoints
Gauge: 6 mesh squares (18 sts) and 6 rows = 4 in (10.2 cm) in filet mesh. One row is about 2/3 in (1.7 cm) tall.
Border gauge: 18 sc = 4 in (10.2 cm). 20 rows of sc = 4 in (10.2 cm).
Test first: Ch 27. Work Row 1 below (25 dc), then 9 rows of mesh (8 squares). Block the swatch and measure 6 squares across the middle. Then make one leaf and one flower. The leaf should be 2 in (5.1 cm) long and the flower 2 in (5.1 cm) across.
Checkpoints:
– After Row 1: 40 in (101.6 cm) wide
– After Row 12: 8 in (20.3 cm) tall
– After Row 120: 80 in (203.2 cm) tall
Too big? Go down a hook size (3.75 mm). Too small? Go up a hook size (4.5 mm). Check the row height separately: if the rows are too tall, pull the first loop of each dc a little snugger.

Mesh Panel Body
Work with Color A. The turning ch-3 counts as a dc throughout.
Foundation: Ch 183.
Row 1: Dc in the 4th ch from the hook and in each ch across. Turn. (181 sts)
Row 2: Ch 3, ch 2, skip 2 sts, dc in next st 60 times. Turn. (60 squares: 61 dc + 120 ch = 181 sts)
Rows 3–119: Ch 3, ch 2, skip ch-2 sp, dc in next dc 60 times, working the last dc in the top of the turning ch. Turn. (60 squares, 181 sts each row)
Row 120 (conversion row): Ch 3, 2 dc in next ch-2 sp, dc in next dc 60 times. (61 dc worked into existing dc + 120 dc worked into spaces = 181 sts)
Fasten off. The panel measures 40 in × 80 in (101.6 cm × 203.2 cm). Rows 1 and 120 are solid, which keeps the hem and the top firm.
Scalloped Hem
With the right side facing, join Color A in the first ch at the bottom right corner. Work into the underside of the foundation chain (181 ch).
Hem Row 1: Ch 1, sc in first ch, ch 5, skip 2 ch, sc in next ch 60 times. Turn. (61 sc, 60 ch-5 loops)
Count the loops in groups of 6 (L1–L6). Each group becomes one scallop.
Hem Row 2: Ch 1, sc in L1, ch 4, dc in L2, ch 4, tr in L3, ch 4, tr in L4, ch 4, dc in L5, ch 4, sc in L6 10 times. Turn. (10 scallops, each with 6 sts and 5 ch-4 sps)
Because the stitches get taller toward the middle of each group, the scallop curves downward. The two sc next to each other between groups form the valleys.
Hem Row 3: Ch 1, sc in first sc, (3 sc, picot, 2 sc) in next ch-4 sp, [sc in next st, (3 sc, picot, 2 sc) in next sp] 4 times, sc in last sc 10 times. (31 sc and 5 picots per scallop; 310 sc and 50 picots total)
Fasten off. Each scallop is 4 in (10.2 cm) wide (6 squares) and 1.5 in (3.8 cm) deep in the center.
Side Borders
With the right side facing, join Color A at the top corner of one long edge.
Side Row 1: Ch 1, work 3 sc in each row-end down to the corner, ending at Row 1. (120 row-ends × 3 = 360 sc)
Side Row 2: Ch 1, do not turn, rev sc in each sc back up the side. (360 rev sc)
Fasten off. Repeat on the other long edge.
Why the math works: each row is 2/3 in (1.7 cm) tall, and 3 sc at 4.5 sc per inch also cover 2/3 in. So 360 sc = 80 in (203.2 cm), the same as the body, and the edge lies flat without ruffling or pulling in.
Tabs
The top row has 181 sts. Lay it out as: 3 sts, then 9 tabs of 7 sts with 14 sts between them, then 3 sts. (3 + 63 + 112 + 3 = 181)
Tab 1: With the right side facing, skip the first 3 sts of Row 120 and join Color A in the 4th st.
Row 1: Ch 1, sc in same st and in next 6 sts. Turn. (7 sc)
Rows 2–30: Ch 1, sc in each st across. Turn. (7 sc)
Fasten off, leaving a 12 in (30.5 cm) tail. Skip the next 14 sts of Row 120 and join in the next st for the next tab. Work 9 tabs in total.
Each tab is about 1.5 in (3.8 cm) wide and 6 in (15.2 cm) long. Fold each tab to the back and sew its last row along the back of Row 120. This makes a 3 in (7.6 cm) loop. The tabs sit 21 sts, or about 4.67 in (11.9 cm), apart center to center.
Leaves (make 170)
Work with Color B.
Ch 10.
Rnd 1: Sc in 2nd ch from hook, hdc in next ch, dc in next 4 ch, hdc in next ch, sc in next ch, (sc, ch 2, sc) in last ch for the pointed tip. Working along the other side of the foundation ch: sc in next ch, hdc in next ch, dc in next 4 ch, hdc in next ch, sc in last ch. Sl st to first sc. (18 sts + ch-2 tip)
Fasten off, leaving an 8 in (20.3 cm) tail. The foundation chain shows down the middle as the vein. Each leaf is 2 in (5.1 cm) long and 1 in (2.5 cm) wide.
Primrose Flowers (make 25)
Rnd 1 (Color D): Magic ring, ch 1, 10 sc in ring, sl st to first sc. Pull the ring closed. (10 sc) Fasten off.
Rnd 2 (Color C): Join with sl st in any sc, ch 3, skip next sc, sl st in next sc 5 times, working the last sl st into the joining st. (5 ch-3 loops)
Rnd 3: In next ch-3 loop work (sc, hdc, 2 dc, sl st, 2 dc, hdc, sc), sl st in next sl st 5 times. (5 petals of 9 sts each = 45 sts, plus 5 sl sts between petals)
Pull the sl st in the middle of each petal snug to make the small notch at the tip. Fasten off, leaving a 10 in (25.4 cm) tail. Each flower is 2 in (5.1 cm) across.
Stems and Appliqué Placement
Mark the 5 vine columns on the dc lines after squares 6, 18, 30, 42 and 54, counting from the right edge. The columns are 12 squares, or 8 in (20.3 cm), apart. That leaves 6 squares, or 4 in (10.2 cm), between each outer vine and the side edge.
Stems: With Color B, work surface sl sts up each marked dc line from Row 10 to Row 112. Work 3 sl sts per row, inserting the hook into the squares on alternate sides of the dc so the chain sits on top of the post.
Text layout for one vine (rows counted from the hem):
Row 112  leaf  |  leaf   <- top pair
 ...  pair every 6 rows ...
Row 22   leaf  |  leaf
Row 16   leaf  |  leaf   <- first pair
Row 11       [A]          on the stem
Row 8   [B]    |    [C]   2 squares each side
Row 4  [D]           [E]  3 squares each side
Leaves: Sew 17 pairs per vine (34 leaves) at Rows 16, 22, 28 and so on up to Row 112. Place each base against the stem with the tip angled up and out at about 45°.
Flowers: Sew 5 per vine in the positions shown above. The flowers sit flat side by side, just touching, with no petals stacked on top of each other.
Sew with the tails using small whipstitches through the mesh bars and dc posts, never through open air. Keep the stitches loose enough that the mesh stays square.
Final Blocking
- Weave in all remaining ends, following the dc posts.
- Soak the panel in cool water with a little wool wash for 15 minutes.
- Press out the water by rolling the panel in towels. Do not wring.
- Lay it flat and pin the body to 40 in × 80 in (101.6 cm × 203.2 cm).
- Pin the tip of each scallop down 1.5 in (3.8 cm) below Row 1, and open each picot.
- Straighten the stems and smooth the leaves and petals flat.
- Mist the tabs and let them dry flat.
- Leave the panel pinned until it is completely dry, which takes 24–48 hours.
Final Quality-Control Checklist
- 60 squares across and 120 rows tall
- Body 40 in × 80 in (101.6 cm × 203.2 cm)
- 10 even scallops with 50 open picots
- 360 sc along each side, lying flat
- 9 tabs, evenly spaced and the same length
- 5 straight stems, each with 17 leaf pairs and 5 flowers
- No appliqué stitches showing through on the right side
Troubleshooting
- Squares look like tall rectangles: your dc are too tall. Pull the first loop up less, or use a smaller hook for the dc only.
- Panel slants: you missed the last dc in the turning ch. Check that each row has 61 dc.
- Scallops are flat: the tr are too short. Wrap the yarn fully and keep the ch-4 loose.
- Side edges ruffle: work 2 sc in every third row-end instead of 3.
- Petals curl: block the flowers flat before sewing.
- Stem puckers: surface slip stitches too tight. Use a hook one size larger for the stems.
Care
Hand wash in cool water and dry flat. Avoid hanging the panel to dry while it’s wet, because the weight of the water stretches the mesh lengthwise.
Final Notes
The measurement chain is simple: 6 squares and 6 rows = 4 in (10.2 cm). That gives 60 squares = 40 in (101.6 cm) and 120 rows = 80 in (203.2 cm). The 10 scallops of 6 squares match the 60-square width, the 360 side sc match the 120 rows, and the 9 tabs fit exactly into 181 sts. Check your gauge early and the rest falls into place.
Happy crocheting!