

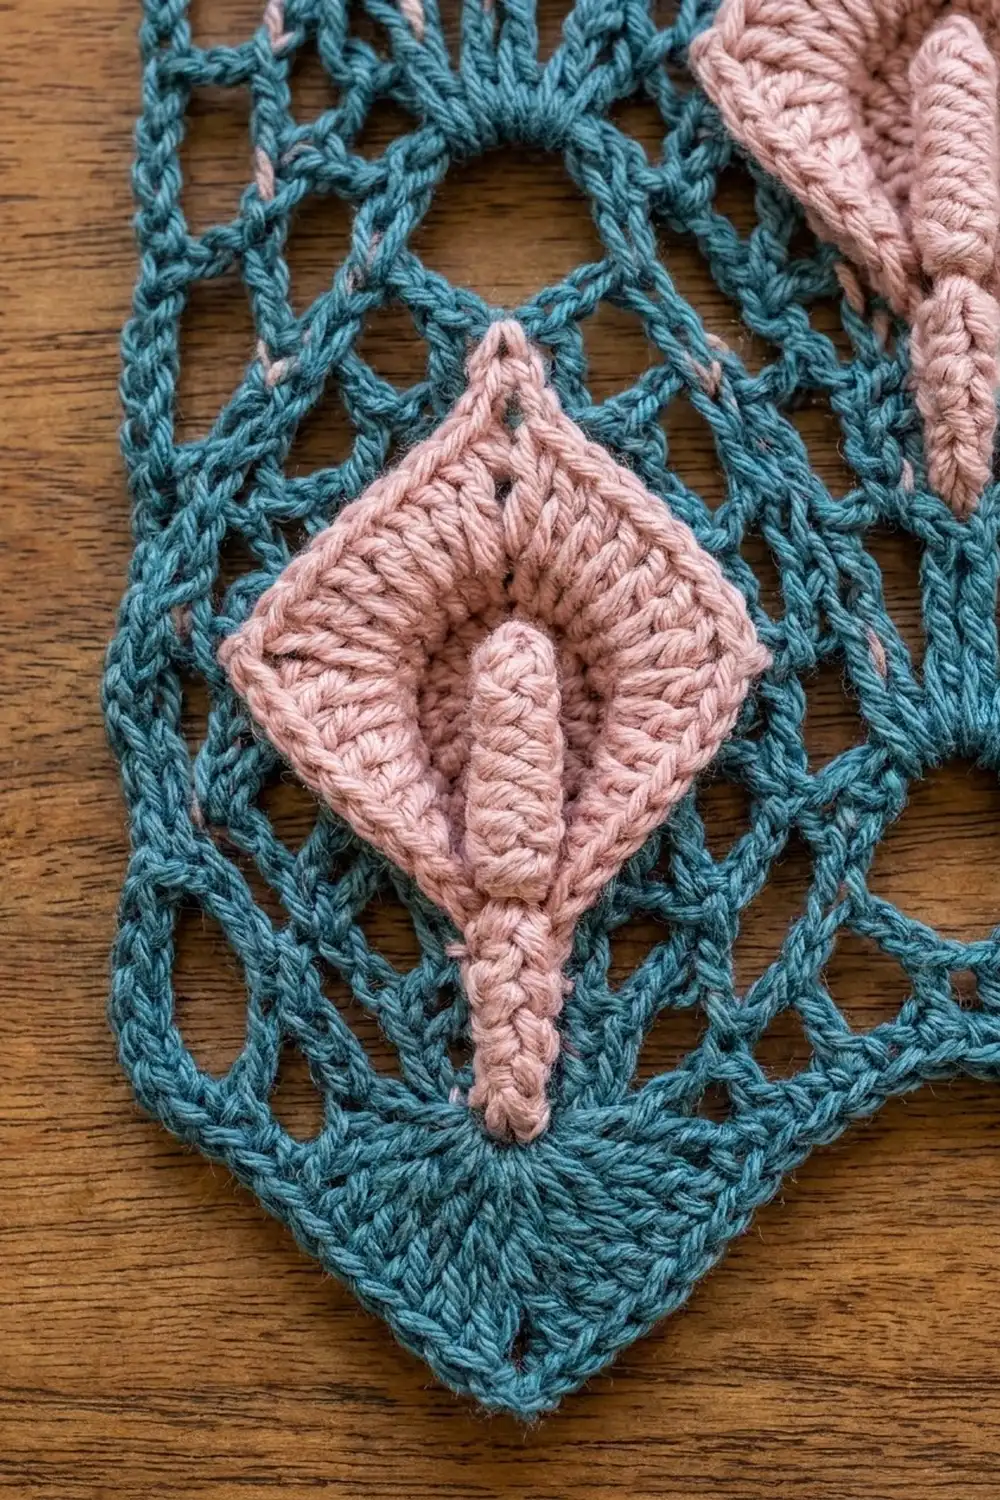
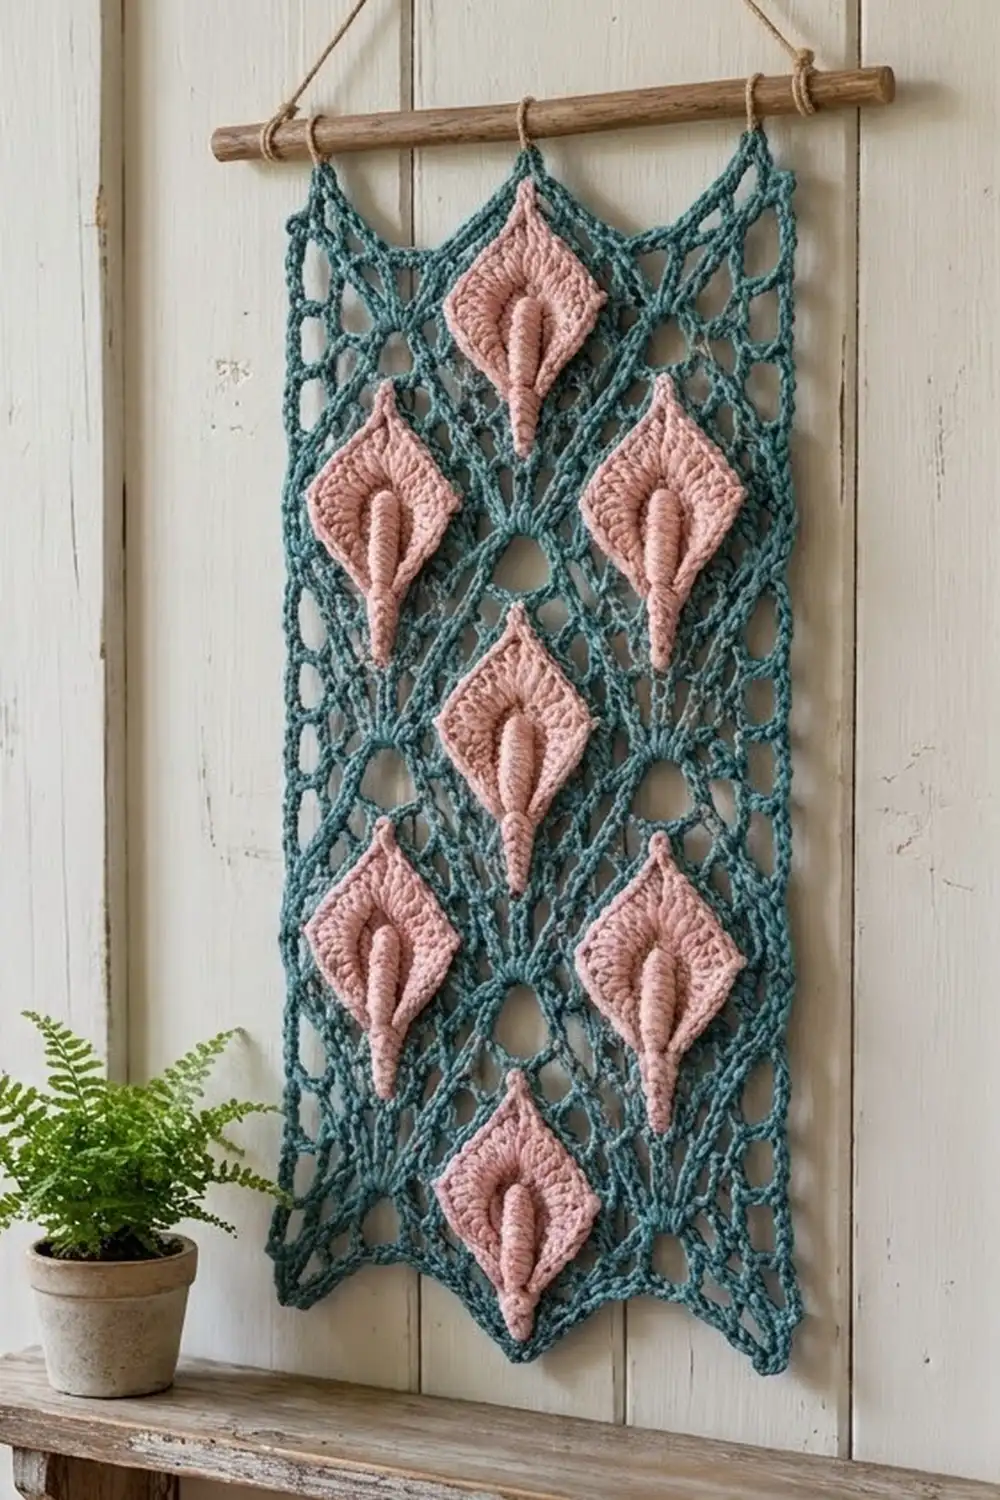
The Calla Bud Lattice Panel is a narrow lace panel made from teal chain arches and dc fans. Seven blush-pink diamonds sit on top of the lattice, and each one has a raised, rolled bud down its center that looks like a small calla lily.
The colors are a deep teal for the lattice and a soft blush pink for the diamonds and buds. The look is vintage and a little Art Deco. The pointed top and bottom edges echo the diamond shapes.
This pattern uses US crochet terms. The finished panel measures 9.25 in (23.5 cm) wide and 16.5 in (41.9 cm) long, measured from peak to peak. Measured from dip to dip, it is 15.5 in (39.4 cm) long.
Here is how it’s built. You crochet the teal lattice in rows from the bottom up. You make the pink diamonds and buds separately and sew them onto chosen fans. Then you add a two-round border that turns the short ends into points.
Finished Size and Construction
- Finished size: 9.25 x 16.5 in (23.5 x 41.9 cm) at the peaks
- Skill level: Intermediate
- Terminology: US
- Yarn weight: DK (light worsted / 3), cotton or cotton blend
- Hook: 4.0 mm (G-6)
- Number of pieces: 1 lace panel, plus 7 diamond appliqués and 7 buds sewn onto it to make one finished piece
- Layout: 3 staggered columns of diamonds, reading 1-2-1-2-1 from bottom to top
- Piece size: each diamond is 2 x 2.5 in (5.1 x 6.4 cm); each bud is 1.6 in (4.1 cm) long
- Size before border: 8.25 x 14.5 in (21.0 x 36.8 cm)
- Border depth: 0.5 in (1.3 cm) on the long sides; 1 in (2.5 cm) at the peaks and 0.5 in (1.3 cm) at the dips on the short ends
Materials
Choose a smooth, mercerized DK cotton. It shows the fans clearly and blocks crisply. A fuzzy yarn will blur the arches. The amounts below assume about 115 m per 50 g.
- Teal (lattice and border): 65 g, about 150 m
- Blush pink (diamonds and buds): 20 g, about 46 m
Tools:
- 4.0 mm (G-6) hook
- Tapestry needle
- Locking stitch markers
- Rust-proof pins
- Blocking mat
- Spray bottle
- Measuring tape
The quantities include a margin of about 15% for your gauge swatch and sewing tails.
Abbreviations (US Terms)
- ch – chain
- sl st – slip stitch
- sc – single crochet
- hdc – half double crochet
- dc – double crochet
- tr – treble crochet
- sc2tog – single crochet 2 together
- sc3tog – single crochet 3 together
- sk – skip
- sp(s) – space(s)
- st(s) – stitch(es)
- RS / WS – right side / wrong side
Special stitches:
- Fan: 7 dc in the same stitch.
- Half fan: 4 dc in the same stitch. At the start of a row, ch 3 counts as the first of these 4 dc.
- Standing sc: with a slip knot on the hook, insert the hook into the stitch and complete a sc as usual.
Gauge and Checkpoints
- Solid sc: 18 sc and 20 rows = 4 in (10.2 cm).
- Lace: one 4-row repeat (Rows 3–6) is 2.25 in (5.7 cm) tall, and 37 sts are 8.25 in (21.0 cm) wide.
Test one piece first. Make one pink diamond (Rows 1–10 plus its edging). It should measure 2 x 2.5 in (5.1 x 6.4 cm).
Then make a lattice swatch. Ch 26 and work Rows 1–6, changing the number of repeats:
- Row 2: work the repeat 8 times.
- Rows 3–4: work the repeat 3 times.
- Rows 5–6: work the repeat 4 times.
The swatch should measure about 5.5 in (14.0 cm) wide and 3 in (7.6 cm) tall.
Checkpoints for the panel:
- After Row 2: 0.75 in (1.9 cm) tall
- After Row 10: 5.25 in (13.3 cm) tall
- After Row 18: 9.75 in (24.8 cm) tall
- After Row 26: 14.25 in (36.2 cm) tall
- After Row 27: 14.5 in (36.8 cm) tall, 8.25 in (21.0 cm) wide
If your pieces are too big, go down 0.5 mm. If they’re too small, go up 0.5 mm. If only the fan rows are too tall, make your dc stitches a little shorter instead of changing hooks.
Lattice Panel
Use teal.
Foundation: Ch 38.
Row 1 (RS): Sc in the 2nd ch from the hook and in each ch across. Turn. (37 sc)
Row 2 (WS): Ch 1, sc in the first sc. Ch 5, sk 2 sc, sc in the next sc; repeat from * 12 times. Turn. (13 sc, 12 ch-5 sps)
Row 3 (RS, fan row A): Ch 3 (counts as dc), 3 dc in the first sc (half fan). Sk the ch-5 sp, sc in the next sc, sk the ch-5 sp, fan in the next sc; repeat from * 5 times. Sk the ch-5 sp, sc in the next sc, sk the ch-5 sp, 4 dc in the last sc (half fan). Turn. (5 fans, 2 half fans, 6 sc = 49 sts)
You skip the ch-5 loops on purpose. They fold behind the fans and form the open arches you see between them.
Row 4 (WS): Ch 1, sc in the first dc, ch 5, sc in the next sc. Ch 5, sc in the 4th (center) dc of the next fan, ch 5, sc in the next sc; repeat from * 5 times. Ch 5, sc in the top of the turning ch. Turn. (13 sc, 12 ch-5 sps)
Row 5 (RS, fan row B): Ch 1, sc in the first sc. Sk the ch-5 sp, fan in the next sc, sk the ch-5 sp, sc in the next sc; repeat from * 6 times. Turn. (6 fans, 7 sc = 49 sts)
The fans now sit between the fans of Row 3, which makes the diamond lattice.
Row 6 (WS): Ch 1, sc in the first sc. Ch 5, sc in the center dc of the next fan, ch 5, sc in the next sc; repeat from * 6 times. Turn. (13 sc, 12 ch-5 sps)
Rows 7–26: Repeat Rows 3–6 five more times, for 6 repeats in total. Row 26 ends with 13 sc and 12 ch-5 sps.
Row 27 (RS, closing row): Ch 1, sc in the first sc. 2 sc in the next ch-5 sp, sc in the next sc; repeat from * 12 times. (37 sc = 13 sc worked into sc + 24 sc worked into spaces)
Fasten off. The panel should measure 8.25 x 14.5 in (21.0 x 36.8 cm).
Fan numbering for placement: In every Row A (Rows 3, 7, 11, 15, 19 and 23), count the full fans from right to left as fans 1 to 5. Fan 3 is the center fan. Fans 1 and 5 sit 6 sts in from each edge.
Diamond Appliqués (make 7)
Use pink.
Row 1: Ch 2, 3 sc in the 2nd ch from the hook. Turn. (3)
Row 2: Ch 1, 2 sc in the first sc, sc in the next sc, 2 sc in the last sc. Turn. (5)
Row 3: Ch 1, 2 sc in the first sc, sc in the next 3, 2 sc in the last sc. Turn. (7)
Rows 4–5: Ch 1, sc in each st. Turn. (7)
Row 6: Ch 1, sc2tog, sc in the next 3, sc2tog. Turn. (5)
Row 7: Ch 1, sc in each st. Turn. (5)
Row 8: Ch 1, sc2tog, sc in the next st, sc2tog. Turn. (3)
Row 9: Ch 1, sc in each st. Turn. (3)
Row 10: Ch 1, sc3tog. (1)
Edging round: Ch 1, but don’t turn. Work 3 sc in the top of the sc3tog for the top point. Work 9 sc down the side, 1 in each row end from Row 9 to Row 1. Work 3 sc in the foundation ch for the bottom point. Work 9 sc up the other side. Join with a sl st to the first sc. (24 sc)
Fasten off, leaving a 12 in (30.5 cm) tail.
The quick increases and slow decreases make the flame shape: the diamond is widest in its lower third and has a long top point.
Buds (make 7)
Use pink. Ch 9. Working in the back bumps, sl st in the 2nd ch from the hook, sc in the next 2 ch, hdc in the next 2 ch, and dc in the last 3 ch. (8 sts)
Fold the strip in half lengthwise with the RS facing out. Whipstitch the long edges together to make a rounded tube that is fat at the dc end and narrow at the sl st end. Leave a tail for sewing.
Attaching the Appliqués
First lightly steam or wet-block the lattice to 8.25 x 14.5 in (21.0 x 36.8 cm) so the fans lie open.
- Sew a bud to the vertical center of each diamond. Put the fat end 0.3 in (0.8 cm) above the bottom point, and taper the bud toward the top point.
- Place each diamond so that its bottom point sits on the center dc of the fan listed below. The diamond will reach about 2.5 in (6.4 cm) upward:
- Row 3: fan 3
- Row 7: fans 1 and 5
- Row 11: fan 3
- Row 15: fans 1 and 5
- Row 19: fan 3
- Whipstitch around each edging round, catching the teal sc and fan tops underneath. Keep the stitches small so the edge lies flat without puckering.
That gives 7 diamonds in a 1-2-1-2-1 stagger.
Border
Border gauge: 4.5 sc per inch, the same as the panel.
Round 1: With teal, join with a standing sc in the first sc of Row 27 at the right edge. Work 2 more sc in the same st (corner). Sc in the next 35 sts, then 3 sc in the last st (corner). Work 63 sc evenly down the row ends: 1 each in Rows 27, 2 and 1, and 10 in each 4-row repeat (3 in each fan row, 2 in each net row). Work 3 sc in the first foundation st (corner), sc in the next 35, 3 sc in the last foundation st (corner), and 63 sc up the other side. Join with a sl st to the first sc. (208 sc)
Each corner group has 3 sc, and the middle one is the corner center. Counting only the stitches between corner centers, each short end has 37 sts (1 + 35 + 1) and each long side has 65 sts (1 + 63 + 1). That gives 2 x 37 + 2 x 65 + 4 = 208.
Round 2: Sl st into the next sc (the corner center). Ch 4 (counts as tr), ch 3, tr in the same st. This is the corner peak.
- Short end (37 sts):
- Tr in the next 2 sts, dc in the next 3, hdc in the next 2, sc in the next 4 (the dip), hdc in the next 2, dc in the next 3, and tr in the next 2. That’s 18 sts.
- Work (tr, ch 3, tr) in the next st for the center peak.
- Repeat the 18-st sequence.
- Corner: (tr, ch 3, tr) in the corner center.
- Long side: Sc in the next 65 sts.
Work the corner, short end, corner and long side sequence again around the rest of the panel, then join to the top of the beginning ch-4. (214 sts, 6 ch-3 sps)
The round breaks down as 38 sts on each short end, 65 sc on each long side and 2 tr at each of the 4 corners.
Why the math works: Row 27 has 37 sts, and it matches the 37-st foundation. Each short end splits into 18 + 1 + 18, so the center peak falls exactly on the middle stitch, st 19. The two dips mirror each other. On the long sides, 63 sc over 14 in (35.6 cm) of row ends, plus 1 sc into each corner group, gives about 4.5 sc per inch, so the edges don’t ruffle or pull in. On the long sides, each round adds 0.25 in (0.6 cm), for 0.5 in (1.3 cm) per side. The tr peaks add 0.75 in (1.9 cm) on top of Round 1.
Final Blocking
- Weave in all ends along stitches of the same color.
- Soak the panel in cool water for 10 minutes. Press the water out in a towel without wringing.
- Lay the panel RS up and pin the 4 corner peaks to a 9.25 x 16.5 in (23.5 x 41.9 cm) rectangle.
- Pin each center peak, then pin each dip 0.5 in (1.3 cm) in from the peak line.
- Open each fan and arch with your fingers. Make sure the diamonds lie flat and the buds stand up.
- Let it dry completely before you unpin it.
Final Quality-Control Checklist
- [ ] The panel measures 8.25 x 14.5 in (21.0 x 36.8 cm) before the border.
- [ ] Every fan row has 49 sts, and every net row has 13 sc and 12 ch-5 sps.
- [ ] Each diamond has 24 edging sc and measures 2 x 2.5 in (5.1 x 6.4 cm).
- [ ] There are 7 diamonds in a 1-2-1-2-1 stagger, and every bud is centered and vertical.
- [ ] Border Round 1 has 208 sc, and Round 2 has 214 sts plus 6 ch-3 sps.
- [ ] The finished panel is 9.25 x 16.5 in (23.5 x 41.9 cm).
Troubleshooting
- The fans cup or ruffle: Your dc stitches are too loose. Go down a hook size for the fan rows only.
- The arches look tight: Loosen your ch-5 stitches. Each loop should span 3 sts without pulling.
- The panel is narrower at the top: Check Row 27. It needs exactly 2 sc in each space.
- The diamonds look boxy: You probably skipped Rows 7 or 9. The long, slow taper needs those straight rows.
- The long edges wave: Take out Round 1 and work fewer sc into the fan rows.
- The bud flops over: Whipstitch it more tightly so the tube is firm, and tack it down at both ends.
Care
Hand wash in cool water with mild soap and dry flat. Reshape the peaks while the panel is damp.
Final Notes
Here is the full measurement chain. The 18-sc gauge gives a 37-st panel that is 8.25 in (21.0 cm) wide. Six 2.25 in (5.7 cm) repeats plus the edge rows make the panel 14.5 in (36.8 cm) tall. Seven 2 x 2.5 in (5.1 x 6.4 cm) diamonds sit on the fans. The two-round border then brings the panel to 9.25 x 16.5 in (23.5 x 41.9 cm). If every checkpoint matches along the way, the finished size will too.
Happy crocheting!