

This holder turns a drawer full of loose grocery bags into something you’ll want to hang where people can see it. It’s a soft cream tube with a hanging strap. Three dimensional calla lilies climb up the front on slim green stems, with long pointed leaves around them.
The colors are calm and natural: a cream body and cream lily petals, butter-yellow flower centers, and sage-green stems and leaves. It suits a farmhouse or cottage kitchen and works just as well in a laundry room or entryway.
The pattern uses US crochet terms. The finished holder is 5.5 in (14.0 cm) wide when flat and about 17 in (43.2 cm) tall. The strap loop rises about 4.5 in (11.4 cm) above the top edge.
The body is one tube of single crochet worked from the bottom up in joined rounds, with no increases and no base. You add a firm rolled edge at each opening, make and sew on a strap, then crochet the lilies, stems, and leaves and stitch them to the front.
Finished Size and Construction
- Finished size: 5.5 in (14.0 cm) wide flat × about 17 in (43.2 cm) tall, not counting the strap
- Skill level: Easy intermediate
- Terminology: US
- Yarn weight: Worsted (#4), cotton or cotton blend
- Hook: 5.0 mm (H-8)
- Number of pieces: 1 tube body, 1 strap, 3 spathes, 3 spadices, 3 stems, 3 leaves
- Layout: Single tube; appliqués grouped on the front face
- Tube circumference: 44 sts = 11 in (27.9 cm)
- Size before border: 5.5 in (14.0 cm) × 16 in (40.6 cm)
- Border depth: about 0.5 in (1.3 cm) at each opening
Materials
Pick a smooth cotton or cotton blend. It holds its shape, washes well, and makes the stitch definition you see on the body. Avoid fluffy acrylics, which blur the appliqué edges.
The quantities below are based on yarn of about 170 m per 100 g:
- Cream (A): 110 g / 187 m, for the body, strap, and spathes
- Sage green (B): 20 g / 34 m, for the stems and leaves
- Butter yellow (C): 5 g / 9 m, for the spadices
All quantities include a margin of about 15%.
Tools:
- 5.0 mm (H-8) crochet hook
- 4.0 mm (G-6) hook for the stems (optional, for neater slip stitches)
- Stitch marker
- Tapestry needle
- Sewing pins
- Scissors
- Tape measure
- Blocking mat and rust-proof pins
Abbreviations (US Terms)
- ch – chain
- sl st – slip stitch
- sc – single crochet
- hdc – half double crochet
- dc – double crochet
- tr – treble crochet
- rev sc – reverse single crochet (crab stitch)
- st(s) – stitch(es)
- Rnd – round
- RS – right side
Special stitch, reverse single crochet (rev sc): Work from left to right (right to left if you crochet left-handed). Insert the hook into the next stitch to the right, yarn over, pull up a loop, then yarn over and pull through both loops. This makes the rolled, corded edge on both openings.
Picot point: Ch 3, then sl st into the 3rd ch from the hook.
Gauge and Checkpoints
Gauge: 16 sc × 18 rnds = 4 in (10.2 cm), worked in joined rounds with color A.
Before you start the full tube, test your gauge with a sample. Ch 44, join into a ring, and work 18 rounds as written below. Flatten the sample without stretching it.
- Width checkpoint: The flat width should be 5.5 in (14.0 cm).
- Height checkpoint: 18 rounds should measure 4 in (10.2 cm).
If your sample is too big, go down one hook size. If it’s too small, go up one hook size. Gauge matters most for the width, because the bags need a snug opening to feed out cleanly. You can keep the sample as Rounds 1–18 if it matches.
Running checkpoints:
| Round | Height |
|---|---|
| 18 | 4 in (10.2 cm) |
| 36 | 8 in (20.3 cm) |
| 54 | 12 in (30.5 cm) |
| 72 | 16 in (40.6 cm) |
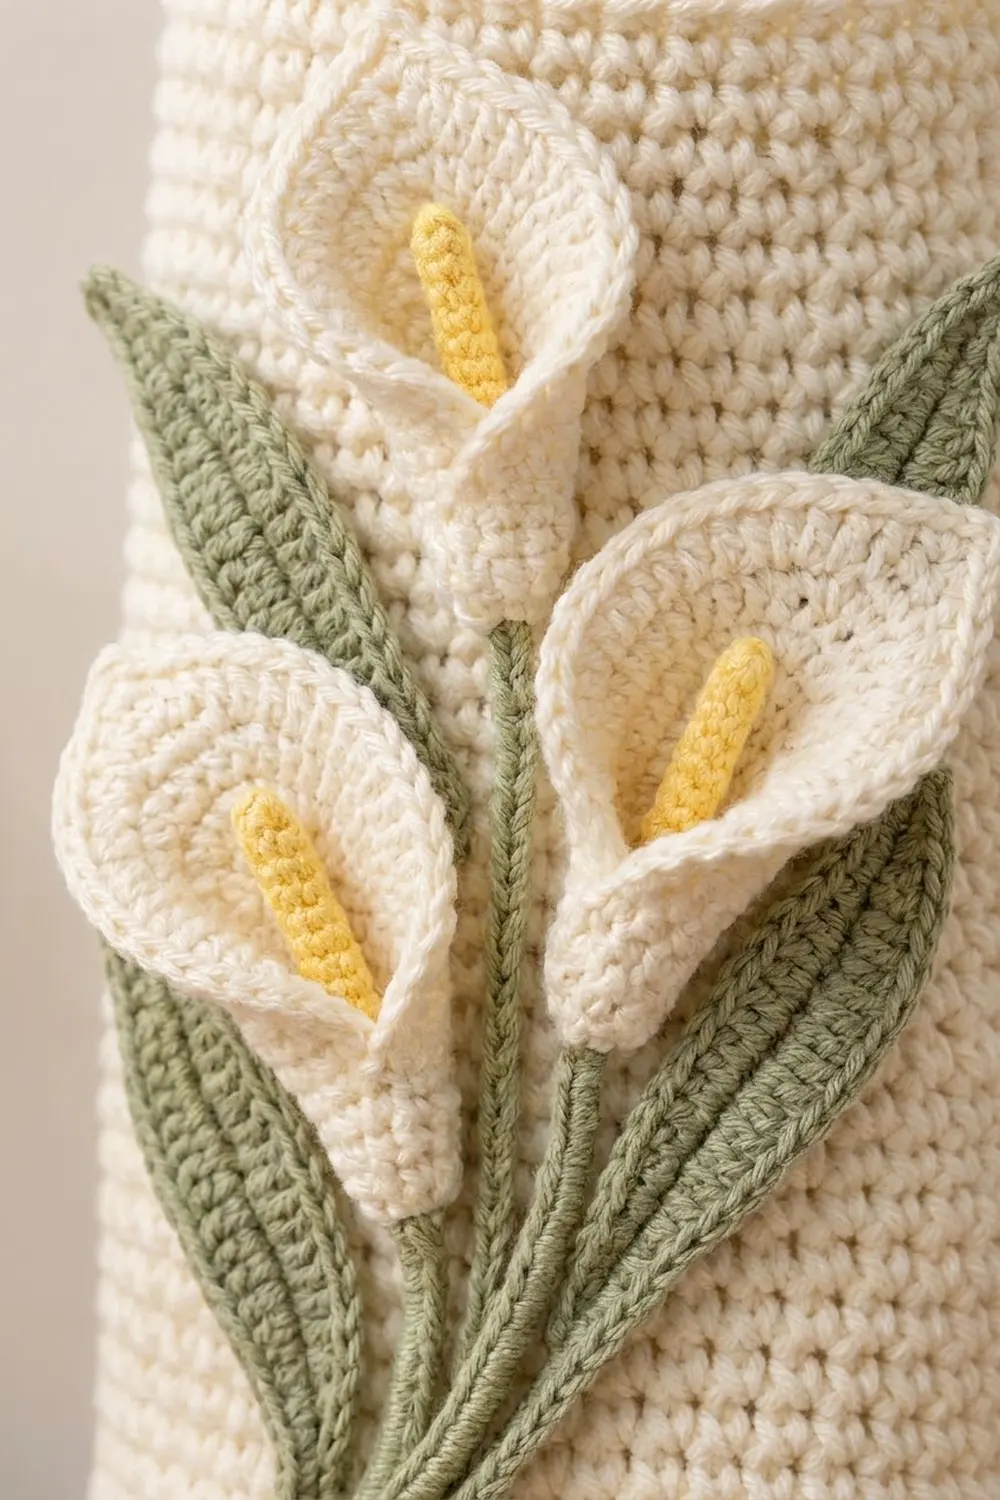
Tube Body
Use color A and the 5.0 mm hook. Every round starts with ch 1, which does not count as a stitch. Every round ends with a sl st into the first sc. The joins form a faint seam that becomes the center back.
Foundation: Ch 44. Check that the chain isn’t twisted, then sl st into the first ch to form a ring.
Rnd 1: Ch 1, sc in each ch around, sl st to first sc. (44 sc)
Place a marker in the first sc of Rnd 1 and move it up each round. This stitch marks the center back.
Rnds 2–72: Ch 1, sc in each st around, sl st to first sc. (44 sc each round)
Don’t increase or decrease anywhere. The tube should stay perfectly straight, measuring 5.5 in (14.0 cm) flat and 16 in (40.6 cm) tall after Rnd 72.
Don’t fasten off. Go straight on to the top border.
Top and Bottom Border
Border gauge: The border keeps the body’s count of 44 stitches per round. One plain sc round plus one rev sc round adds about 0.5 in (1.3 cm) at each opening.
Top border:
- Rnd 1: Ch 1, sc in each st around, sl st to first sc. (44 sc)
- Rnd 2: Ch 1, rev sc in each st around, sl st to first rev sc. (44 rev sc)
Fasten off and weave in the end.
Bottom border: Turn the tube upside down. Join A with a sl st in the unused loop of the foundation chain at the center back, where the marker column starts.
- Rnd 1: Ch 1, sc in each unused foundation loop around, sl st to first sc. (44 sc)
- Rnd 2: Ch 1, rev sc in each st around, sl st to first rev sc. (44 rev sc)
Fasten off and weave in the end.
Why the math works: The foundation chain has 44 loops and the last body round has 44 stitches. Working one stitch into each keeps both openings at exactly 11 in (27.9 cm) around, so they don’t flare or pucker. Rev sc is a little shorter and tighter than standard sc. That is what rolls the edge into the firm rim shown in the photo.
Height checkpoint: 16 in (40.6 cm) + 0.5 in (1.3 cm) + 0.5 in (1.3 cm) = about 17 in (43.2 cm).
Strap
Use color A and the 5.0 mm hook.
- Foundation: Ch 6.
- Row 1: Sc in 2nd ch from hook and in each ch across, turn. (5 sc)
- Rows 2–54: Ch 1, sc in each st across, turn. (5 sc each row)
The strap measures 1.25 in (3.2 cm) wide and 12 in (30.5 cm) long.
Edging: Don’t turn after the last row. Sl st evenly down one long edge, one sl st per row (54 sl sts). Fasten off. Join A at the opposite corner and repeat on the other long edge (54 sl sts). This makes the strap look firm and rounded and stops it from stretching.
Attaching: Flatten the tube so the marker column sits at the center back. The folds now fall at sts 11 and 33. On the inside of the tube, center one strap end over sts 9–13 so it overlaps 1 in (2.5 cm) down from the top rim. Center the other end over sts 31–35 the same way, with no twist in the strap.
Whipstitch each end on all four sides with A. Sew through the inner loops only, so no stitches show on the outside. The 10 in (25.4 cm) of strap left free forms a loop that stands about 4.5 in (11.4 cm) high.
Calla Lily Spathe (Make 3)
Use color A and the 5.0 mm hook. The spathe is worked flat as a teardrop and then wrapped into a cone.
- Foundation: Ch 2.
- Row 1: 3 sc in 2nd ch from hook, turn. (3 sc)
- Row 2: Ch 1, 2 sc in first st, sc in next st, 2 sc in last st, turn. (5 sc)
- Row 3: Ch 1, 2 sc in first st, sc in next 3 sts, 2 sc in last st, turn. (7 sc)
- Row 4: Ch 2 (does not count as a st), 2 hdc in first st, hdc in next 5 sts, 2 hdc in last st, turn. (9 hdc)
- Row 5: Ch 2 (does not count), 2 dc in first st, dc in next 7 sts, 2 dc in last st, turn. (11 dc)
- Row 6: Ch 2 (does not count), dc in each st across, turn. (11 dc)
- Row 7 (tip shaping): Ch 1, sc in next 2 sts, hdc in next 2 sts, dc in next st, 2 tr in next st (the center st, st 6), dc in next st, hdc in next 2 sts, sc in last 2 sts. (12 sts)
Rnd 8 (edging): Don’t turn.
- Ch 1. Work 9 sc evenly down the side edge, one per sc or hdc row and 2 per dc row (rows 7, 6, 5, 4, 3, 2, 1 give 1 + 2 + 2 + 1 + 1 + 1 + 1).
- Work 3 sc into the base point.
- Work 9 sc up the other side edge in the same way.
- Sc in the first 6 sts of Row 7, then make a picot point.
- Sc in the last 6 sts of Row 7.
- Sl st to the first edging sc.
(33 sc + 1 picot point) Fasten off and leave a 12 in (30.5 cm) tail.
The flat spathe measures about 2.5 in (6.4 cm) tall and 2.75 in (7.0 cm) wide.
Shaping: With the RS facing out, fold both side edges toward the center. Lap the right edge over the left for 1 in (2.5 cm) up from the base point. Sew the overlap with the tail to form a cone, leaving the upper part open and flared. Gently roll the top edge back on either side of the tip so it curls outward.
Spadix (Make 3)
Use color C.
- Foundation: Ch 8.
- Rnd 1: Sc in 2nd ch from hook and next 5 ch, 3 sc in last ch. Working along the opposite side of the chain, sc in next 6 ch. Sl st to first sc. (15 sc)
Fasten off and leave a 6 in (15.2 cm) tail. Fold the piece in half lengthwise and whipstitch the long edges together to make a plump rod about 1.75 in (4.4 cm) long.
Push the rod’s base deep into a spathe cone and sew it on through the overlap. About 1.25 in (3.2 cm) of yellow should show above the opening.
Stems (Make 3)
Use color B. A 4.0 mm hook gives a slimmer stem.
| Stem | Chain | Slip stitches | Length |
|---|---|---|---|
| Long | ch 25 | 24 | 6 in (15.2 cm) |
| Medium | ch 21 | 20 | 5 in (12.7 cm) |
| Short | ch 17 | 16 | 4 in (10.2 cm) |
For each stem, sl st into the back bump of the 2nd ch from the hook and of each ch across. Fasten off and leave a 10 in (25.4 cm) tail.
Leaves (Make 3)
Use color B and the 5.0 mm hook.
Large leaf (make 2):
- Ch 21.
- Starting in the 2nd ch from hook, work: sl st, sc in next 2 ch, hdc in next 3 ch, dc in next 8 ch, hdc in next 3 ch, sc in next 2 ch, 3 sc in last ch. (22 sts)
- Working along the opposite side of the chain: sc in next 2 ch, hdc in next 3 ch, dc in next 8 ch, hdc in next 3 ch, sc in next 2 ch, sl st in last ch. (19 sts)
Total: 41 sts. Each large leaf is about 5 in (12.7 cm) long and 1.5 in (3.8 cm) wide.
Small leaf (make 1):
- Ch 15.
- Starting in the 2nd ch from hook, work: sl st, sc in next 2 ch, hdc in next 2 ch, dc in next 5 ch, hdc in next 2 ch, sc in next ch, 3 sc in last ch. (16 sts)
- Working along the opposite side of the chain: sc in next ch, hdc in next 2 ch, dc in next 5 ch, hdc in next 2 ch, sc in next 2 ch, sl st in last ch. (13 sts)
Total: 29 sts. The small leaf is about 3.5 in (8.9 cm) long.
Finish each leaf with a ch-2 point at the tip, then fasten off and leave a 12 in (30.5 cm) tail.
Vein: With a strand of A, surface sl st along the center foundation chain from the base to just below the tip.
Arranging and Sewing the Appliqués
Flatten the tube with the center-back seam underneath. Pin all the pieces in place before you sew anything.
- Stems: Bring the three stem bases together about 3 in (7.6 cm) above the bottom rim and 1.5 in (3.8 cm) in from the left fold.
- Curve the long stem up toward the top center.
- Run the medium stem up and to the right.
- Angle the short stem up and to the left.
- Lilies: Sew one spathe at the top of each stem, tip pointing up and slightly outward. The highest lily should sit about 3 in (7.6 cm) below the top rim. The three lilies should overlap slightly in a staggered column, as in the photo.
- Leaves:
- Tuck one large leaf behind the stem bundle so it rises along the left side.
- Set the second large leaf along the right side, its tip reaching up beside the highest lily.
- Place the small leaf low, curving out from the bundle.
- Sewing:
- Sew the stems down along their centers with small running stitches in B.
- Sew the leaves around their edges in B.
- Sew the spathes only at the cone base and the lower overlap, so the flared tops stand away from the tube.
Sew through the outer layer of the tube only. Slip a rolled towel inside the tube while you work so you don’t stitch the front to the back.
Final Blocking
- Weave in any remaining ends inside the tube.
- Lightly mist the tube with water, or steam it gently from 1 in (2.5 cm) away. Don’t press the iron down onto the fabric.
- Fold the tube flat with a rolled towel inside, and pin it to 5.5 in (14.0 cm) × 17 in (43.2 cm).
- Shape the spathe cones over a fingertip and pinch each tip upward.
- Smooth the leaves into gentle curves and pin their tips.
- Let everything dry completely before you hang the holder.
Final Quality-Control Checklist
- The tube measures 5.5 in (14.0 cm) flat and about 17 in (43.2 cm) tall.
- Both rims have 44 rev sc and roll evenly, without ruffling.
- The center-back seam runs straight up the back.
- The strap ends sit at the two side folds, with no twist and nothing showing outside.
- Each spathe has a crisp picot tip and a yellow spadix that stands upright.
- The stems meet in one neat bundle, and no stitching shows through the leaves.
- The bags pull smoothly out of the bottom opening.
Troubleshooting
- The tube spirals: Make sure you join every round with a sl st into the first sc, and that your ch 1 is never counted as a stitch.
- The tube is too narrow or too wide: Recheck your gauge and change hook size. Don’t add or remove stitches, or the border counts will no longer match.
- The rim flares: Your rev sc is too loose. Go down one hook size for the border rounds only.
- The spathe won’t hold a cone: Increase the base overlap to 1.25 in (3.2 cm) and add a few extra stitches along it.
- The leaves curl: Pin them flat, mist them, and let them dry before sewing.
- The strap stretches: Make sure both slip-stitch edgings are worked firmly.
Care
Hand wash in cool water with mild soap, reshape, and dry flat. Don’t wring the holder or tumble dry it, so the lilies keep their shape.

Final Notes
Everything in this holder follows one measurement chain:
- 16 sc = 4 in (10.2 cm), so 44 sts gives 11 in (27.9 cm) around, or 5.5 in (14.0 cm) flat.
- 18 rounds = 4 in (10.2 cm), so 72 rounds gives 16 in (40.6 cm).
- Two border rounds at each end bring the height to about 17 in (43.2 cm).
The strap, the 2.5 in (6.4 cm) lilies, and the 5 in (12.7 cm) leaves are all sized to fit that front panel. If your gauge matches, everything else will fit.
Happy crocheting!