

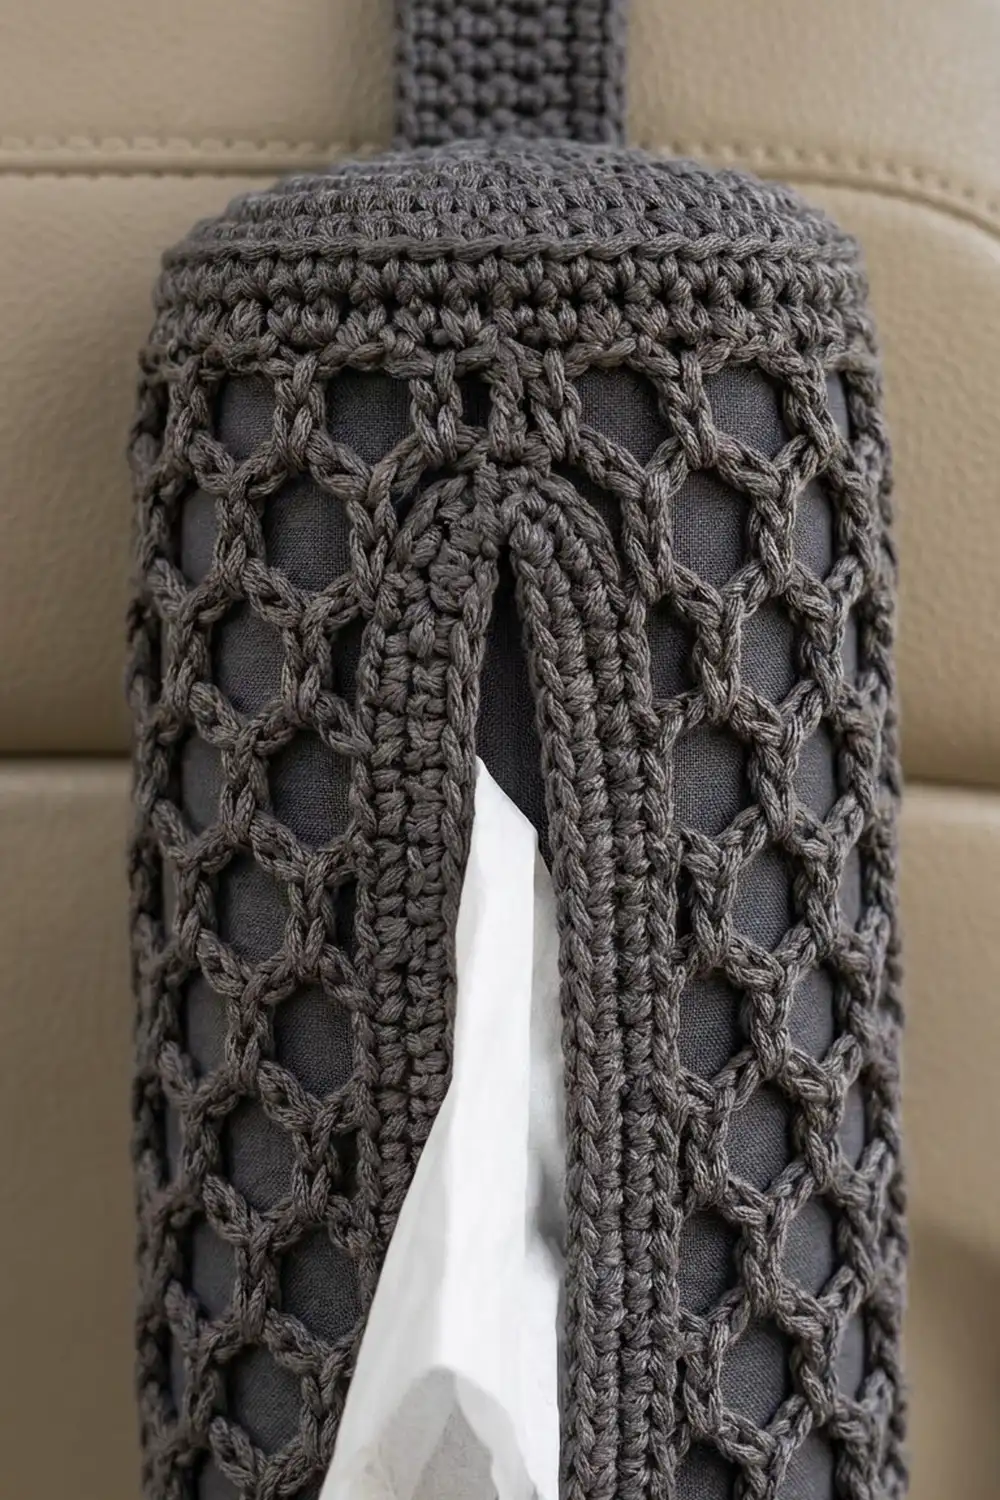
This tissue holder hangs on the back of a car seat. It is a tall, soft oval tube in charcoal gray. The base and top are solid single crochet, and the body is an open honeycomb mesh. A narrow slot on the front lets you pull out one tissue at a time. A sturdy strap wraps around the headrest post.
The whole piece is one color. A dark gray liner or tissue pouch sits inside, so the mesh shows as a crisp charcoal web over a smooth, darker background. The look is modern and neutral and suits most car interiors.
The pattern uses US crochet terms. The finished holder is about 5 in (12.7 cm) wide, 2.25 in (5.7 cm) deep and 10.2 in (25.9 cm) tall, not counting the strap.
Construction is straightforward:
- Crochet a solid oval base and turn it up into a short wall.
- Work the mesh body in rounds.
- Partway up, switch to turned rows to leave the slot open, then join back into rounds.
- Finish the top with a solid band and join on a separate oval lid with single crochet.
- Edge the slot with two rounds and sew on the strap last.
Finished Size and Construction
- Finished size: 5 in (12.7 cm) wide x 2.25 in (5.7 cm) deep x 10.2 in (25.9 cm) tall
- Circumference: 12 in (30.5 cm)
- Skill level: Easy-Intermediate
- Terminology: US crochet terms
- Yarn weight: Worsted weight (#4), cotton or cotton blend
- Hook: US H-8 (5.0 mm)
- Number of pieces: 3 crocheted parts (body with built-in base, top oval, strap), assembled into one finished item
- Layout: One vertical oval tube, with the slot centered on one long side
- Oval size (base and top): 5 in x 2.25 in (12.7 x 5.7 cm), 48 sts around
- Slot size before edging: 6 in (15.2 cm) tall x 1.5 in (3.8 cm) wide
- Edging depth: 2 rounds of sc, about 0.44 in (1.1 cm) on each side
Materials
Choose a smooth, tightly twisted worsted cotton. It shows the honeycomb clearly, holds its shape and does not shed onto tissues. Acrylic also works, but it stretches more, so check the mesh gauge carefully.
- Charcoal gray: 85 g, about 145 m
Tools:
- US H-8 (5.0 mm) crochet hook
- Tapestry needle
- 4 locking stitch markers
- Scissors and a soft measuring tape
- One 0.75 in (1.9 cm) flat button and matching sewing thread
- Dark gray liner: a soft tissue pouch, or a fabric piece cut 13 in x 11 in (33.0 x 27.9 cm) and stitched into a tube with a slit that matches the slot
- Rustproof pins and a spray bottle
The yarn amount includes a margin of about 15% for your gauge swatch and any adjustments.
Abbreviations (US Terms)
- ch – chain
- sc – single crochet
- dc – double crochet
- sl st – slip stitch
- sk – skip
- sp – space
- st(s) – stitch(es)
- sc2tog – single crochet 2 together
- BLO – back loop only
- RS / WS – right side / wrong side
Special stitch – honeycomb mesh round: [ch 5, sc in next ch-5 sp] around, ending with ch 2, dc in the first sc of the round. The ch 2 + dc counts as the last loop and leaves your hook at the center of that loop, ready for the next round. Each round shifts by half a loop, which makes the staggered honeycomb cells.
Gauge and Checkpoints
- Solid sc: 16 sc and 18 rnds = 4 in (10.2 cm)
- Mesh: 3 loops = 3 in (7.6 cm) wide and 5 mesh rounds = 3 in (7.6 cm) tall, measured while gently stretched over the liner
Crochet one piece first, the base oval (Rnds 1–5). It also works as your gauge swatch.
Checkpoints:
- After Rnd 5: the oval is 5 in x 2.25 in (12.7 x 5.7 cm), with 48 sts.
- After Rnd 9: the wall is 0.9 in (2.3 cm) tall.
- After Mesh Rnd 2: total height is 2.1 in (5.3 cm).
- After Slot Row 10: total height is 8.1 in (20.6 cm).
- After Mesh Rnd 14: total height is 9.3 in (23.6 cm).
- After joining the top: total height is 10.2 in (25.9 cm).
If your oval is too big, go down one hook size. If it’s too small, go up one size. If only the mesh is off, change the chain length. Ch 4 makes the mesh shorter and tighter, and ch 6 makes it taller and looser. Keep using your original hook for the sc sections.
Body
Base Oval
Rnd 1: Ch 12. 3 sc in 2nd ch from hook, sc in next 9 ch, 3 sc in last ch. Rotate and work along the other side of the foundation chain: sc in next 9 ch. Join with sl st to first sc. (24 sts: [3 end, 9 side] twice)
Rnd 2: Ch 1, [2 sc in each of next 3 sts, sc in next 9] twice, join. (30 sts)
Rnd 3: Ch 1, [(sc in next st, 2 sc in next) 3 times, sc in next 9] twice, join. (36 sts)
Rnd 4: Ch 1, [(sc in next 2 sts, 2 sc in next) 3 times, sc in next 9] twice, join. (42 sts)
Rnd 5: Ch 1, [(sc in next 3 sts, 2 sc in next) 3 times, sc in next 9] twice, join. (48 sts)
The oval now has two curved ends of 15 sts and two straight sides of 9 sts. Each round grew by exactly 6 sts, 3 at each end.
Bottom Band
Rnd 6: Ch 1, sc in BLO of each st around, join. (48 sts) This ridge turns the base up into a wall.
Rnds 7–9: Ch 1, sc in each st around, join. (48 sts)
Check: the wall is 0.9 in (2.3 cm) tall.
Mesh Body
Mesh Rnd 1: Sl st in next 26 sts. Ch 1, sc in same st, [ch 5, sk 3, sc in next st] 11 times, ch 2, sk 3, dc in first sc. (12 loops)
The mesh drifts half a loop each round. Starting 26 sts along puts the slot at the center of a long side.
Mesh Rnd 2: Ch 1, sc around the post of the dc, [ch 5, sc in next ch-5 sp] 11 times, ch 2, dc in first sc. (12 loops)
Slot Rows
Now work in turned rows. The part of the round you leave unworked becomes the slot.
Row 1 (RS): Ch 1, sc in top of the dc you just made, [ch 5, sc in next ch-5 sp] 11 times. Turn. (11 loops, 12 sc) The second half of loop 11 and all of loop 12 stay unworked, which leaves a gap 1.5 loops wide.
Row 2 (WS): Ch 5 (counts as dc + ch 2), sc in first ch-5 sp, [ch 5, sc in next ch-5 sp] 10 times, ch 2, dc in last sc. Turn. (10 full loops + 2 half loops)
Row 3 (RS): Ch 1, sc in first dc, [ch 5, sc in next ch-5 sp] 10 times, ch 5, sc in 3rd ch of turning ch. Turn. (11 loops, 12 sc)
Rows 4–10: Repeat Rows 2 and 3 three more times, then work Row 2 once more. (Row 10: 10 full loops + 2 half loops)
Check: lying flat, the slot gap is 6 in (15.2 cm) tall and 1.5 in (3.8 cm) wide. Total height is 8.1 in (20.6 cm).
Rejoin into Rounds
Mesh Rnd 13 (RS): Ch 1, turn, sc in first dc, [ch 5, sc in next ch-5 sp] 10 times, ch 5, sc in 3rd ch of turning ch, ch 5, dc in first sc of this round. (12 loops: 11 loops + 1 bridge)
The ch 5 + dc bridge crosses the top of the slot and closes the round.
Mesh Rnd 14: Ch 1, sc around the post of the dc, [ch 5, sc in next ch-5 sp] 11 times, ch 2, dc in first sc. (12 loops)
Top Band
Rnd 15: Ch 1, 4 sc in each loop around, join. (48 sts: 12 loops x 4 sc)
This is a conversion round. Every loop takes exactly 4 sc, which brings you back to the same 48 sts as the base.
Rnds 16–17: Ch 1, sc in each st around, join. (48 sts)
Check: total height is 10.0 in (25.4 cm). Do not fasten off. Slip the liner or tissue pouch inside now.
Top Oval
Work Rnds 1–5 exactly as for the base oval. (48 sts) Fasten off and weave in the tail.
Place a marker in the center st of each curved end. This is the 8th st of each 15-st end section.
Joining
Method: Single crochet join through both layers, worked from the outside.
Stitch-to-stitch logic: The top band of the body has 48 sts, and the top oval has 48 sts. You work 1 sc through one body st and one oval st at a time. There is no easing and no extra stitch.
- Flatten the body with the slot centered on the front. Place markers at the two side folds of Rnd 17.
- Hold the top oval on the body opening, WS down. Match the end markers on the oval to the fold markers on the body.
- Joining round: Ch 1, sc through both layers in each st around, join. (48 sts) Fasten off.
This round makes the raised rim at the top and counts as the 4th round of the top band.
Tension: Keep the hook loose and even. The join should look like the bottom band, with no puckering or flaring. If it ruffles, you skipped a stitch. If it pulls in, you worked into a stitch twice.
Size checkpoint: Total height is 10.2 in (25.9 cm). The top and bottom both measure 12 in (30.5 cm) around.
Strap
Row 1: Ch 6, sc in 2nd ch from hook and each ch across. Turn. (5 sts)
Rows 2–33: Ch 1, sc in each st across. Turn. (5 sts)
Row 34 (buttonhole): Ch 1, sc in first st, ch 3, sk 3, sc in last st. Turn. (2 sc + ch-3 sp)
Row 35: Ch 1, sc in first st, 3 sc in ch-3 sp, sc in last st. Turn. (5 sts: 2 sc worked 1-per-st + 3 sc in the space)
Row 36: Ch 1, sc in each st across. (5 sts) Fasten off, leaving a 12 in (30.5 cm) tail.
The strap is 1.25 in (3.2 cm) wide and 8 in (20.3 cm) long.
Sew Rows 1–4 flat to the center of the top oval so the strap points straight up. Sew the button to the outside of the strap, centered on Row 7. Wrap the strap around the headrest post and button it closed.
Border
The border is the two-round edging around the slot. It firms up the opening, narrows it and forms the solid frame around the slot.
Border gauge: 2 sc per mesh row end. Each row is 0.6 in (1.5 cm) tall, so the sides work out to about 3.3 sc per in. That is a little looser than the 4 sc per in body gauge on purpose. The slot edge gets stretched over the liner, and slightly fewer stitches keep it snug so it doesn’t flare.
Join yarn with RS facing at the bottom right corner of the slot.
Border Rnd 1:
- Right side: 2 sc in each of the 10 row ends. (20 sts)
- Top end: 6 sc around the ch-5 bridge. (6 sts)
- Left side: 2 sc in each of the 10 row ends. (20 sts)
- Bottom end: 3 sc in the unworked half of loop 11 of Mesh Rnd 2, then 3 sc in the ch-2 sp of loop 12. (6 sts)
Join to first sc. (52 sts: 20 + 6 + 20 + 6)
Border Rnd 2:
- Right side: sc in each of 20 sts. (20 sts)
- Top end: sc2tog, sc in next 2 sts, sc2tog. (4 sts)
- Left side: sc in each of 20 sts. (20 sts)
- Bottom end: sc2tog, sc in next 2 sts, sc2tog. (4 sts)
Join and fasten off. (48 sts: 40 side sts worked 1-per-st + 12 end sts worked into 8)
Why the math works: Edging rounds around a hole move in toward its center, so each round follows a shorter path than the one before. The straight sides stay at 20 sts. Only the curved ends shrink, so you take away 2 sts at each end. That gives the slot rounded ends without cupping.
Each round adds about 0.22 in (0.6 cm) to each side. Two rounds shrink the 1.5 in (3.8 cm) gap to an opening about 0.6 in (1.5 cm) wide and 5.1 in (13.0 cm) tall. That keeps the tissues inside but still lets you pull one out easily.
Final Blocking
- Take out the liner and weave in all ends.
- Mist the holder evenly with cool water until it is damp but not soaked.
- Slide the liner back inside, or use a rolled towel shaped to 5 in x 2.25 in (12.7 x 5.7 cm).
- Line up the slot so it runs straight up the center of the front.
- Gently open each honeycomb cell with your fingers so the cells look even.
- Pin the slot edging flat and straight.
- Pin the strap flat at 1.25 in (3.2 cm) wide.
- Let it dry completely, then remove the pins and add the tissues.
Final Quality-Control Checklist
- The base and top ovals each have 48 sts and measure 5 in x 2.25 in (12.7 x 5.7 cm).
- The bottom band is 0.9 in (2.3 cm) tall, with a clean BLO ridge.
- Every full mesh round has 12 loops.
- The slot is centered on a long side and runs straight.
- Border Rnd 1 has 52 sts, and Border Rnd 2 has 48 sts.
- Total height is 10.2 in (25.9 cm).
- The top join is even, with no puckers.
- The strap is 8 in (20.3 cm) long, and the button fits snugly through the buttonhole.
- All ends are woven in securely.
Troubleshooting
The oval curls up like a bowl. Your sc are too tight. Go up one hook size for the oval only.
The oval ruffles. You added extra increases. Count each round: 24, 30, 36, 42, 48.
The slot is off center. Check Mesh Rnd 1. Sl st in exactly 26 sts before you start.
The slot edges are wavy. Use exactly 2 sc per row end. Too many stitches make waves.
The slot is too wide. Add a 3rd border round: sc in each side st, and sc2tog twice at each end. (44 sts: 40 side sts + 4 end sts)
The mesh is too short. Use ch 6 instead of ch 5 for each loop.
Tissues won’t pull out. The slit in the liner is too small. Trim it to match the slot opening.
Care
Hand wash in cool water with mild soap and lay it flat over the liner to dry. Don’t tumble dry, because heat and tumbling can stretch the mesh and the strap.

Final Notes
Every measurement follows from the 48-st oval. It sets the 12 in (30.5 cm) circumference, which becomes 12 mesh loops in every full round. The slot rows leave 1.5 loops open, and the bridge closes the round again. The top band turns the 12 loops back into 48 sts, and the top oval joins 48 sts to 48 sts.
If your first oval matches gauge, the rest of the piece will follow. Check the height at each checkpoint and count your loops, and your holder will hang neatly behind the seat.
Happy crocheting!