

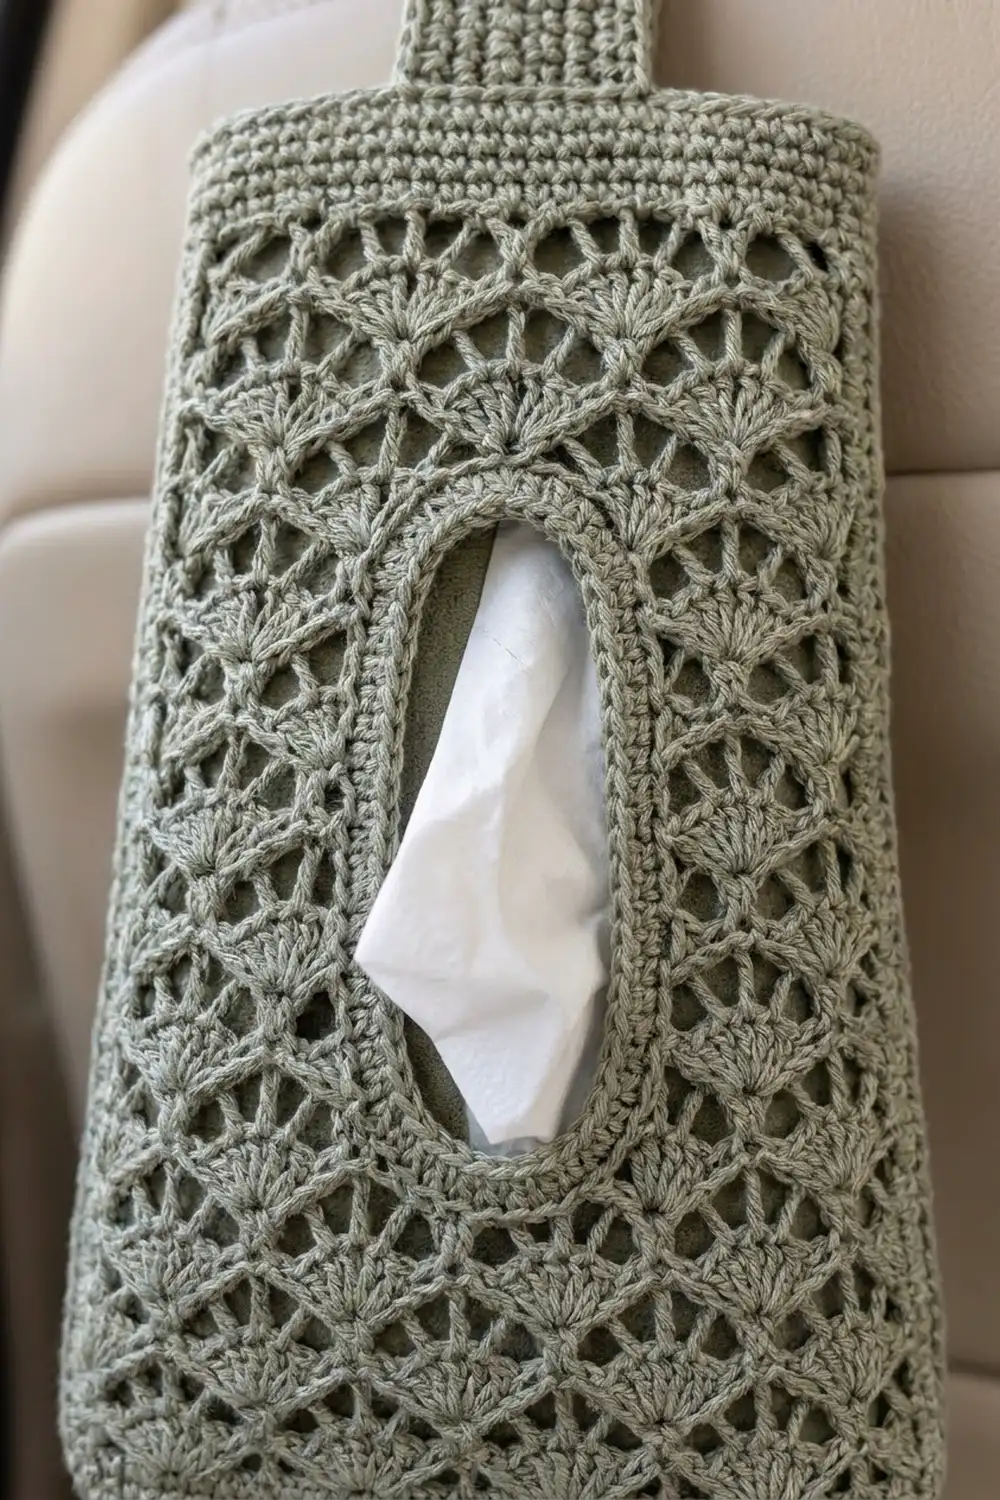
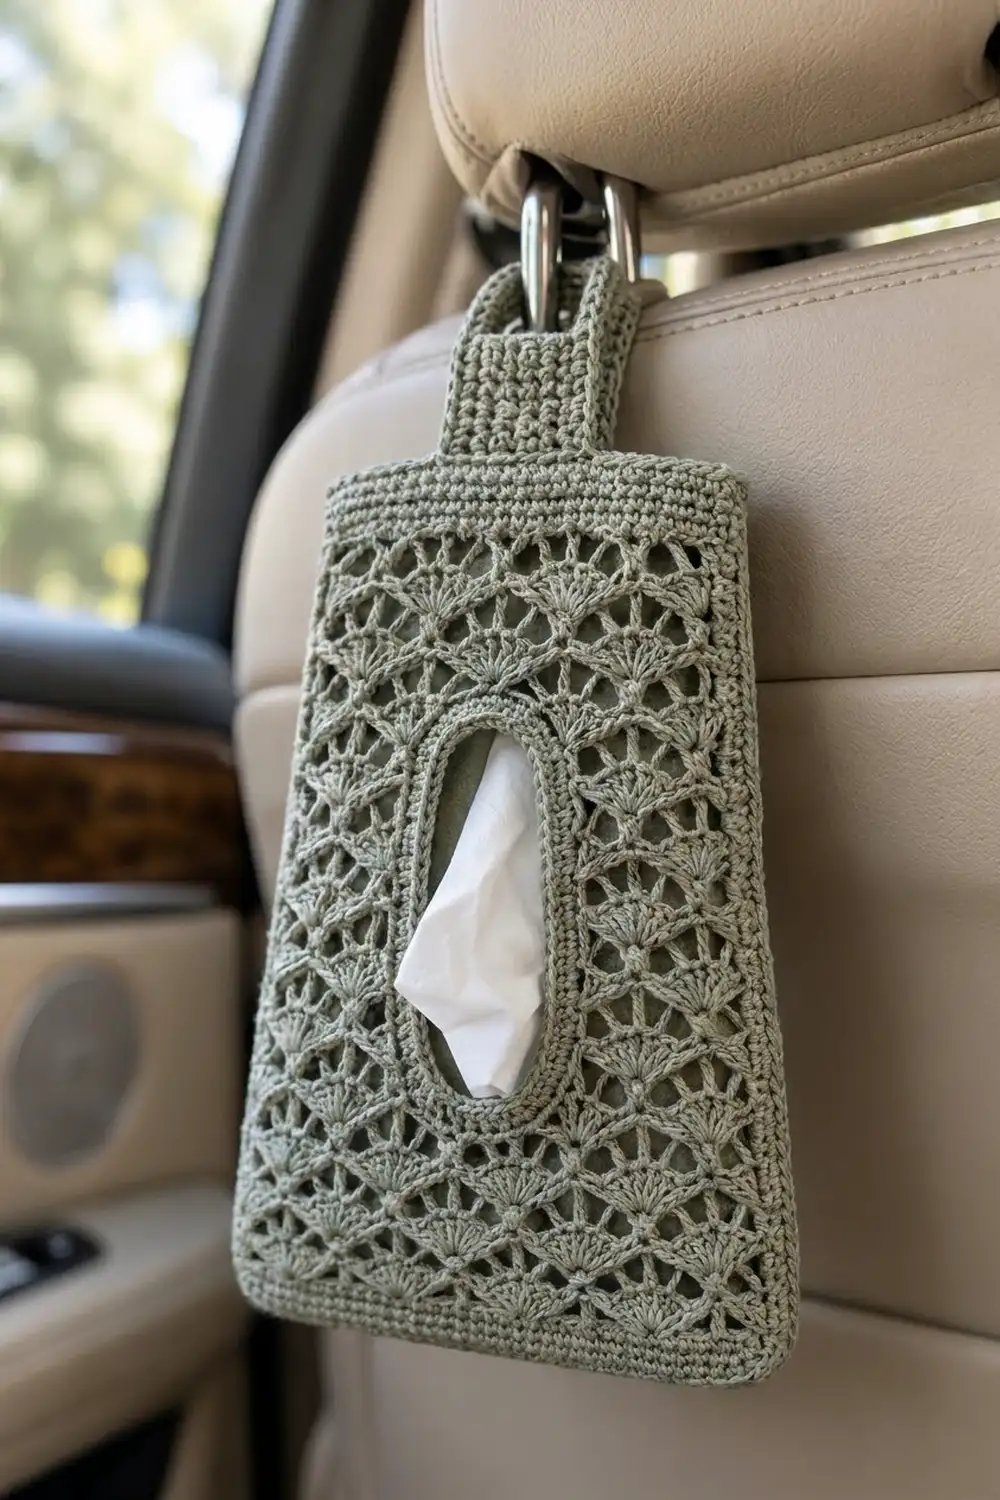
This tissue holder hangs from the headrest posts of a car seat and keeps tissues within reach for back-seat passengers. It is a soft sage green pouch with a solid oval base, a body of open fan lace, a tall oval slot at the front and a sturdy hanging loop.
The design uses one color in a matte cotton, so the lace texture is the main feature. The fans line up in offset columns that look like overlapping scallops. A firm single-crochet rim around the slot and a solid band at the top give the open fabric some structure.
The pattern uses US crochet terms. The finished pouch is about 10 in (25.4 cm) tall. It measures 8 in (20.3 cm) across the lower body when flat and tapers to 6 in (15.2 cm) at the top band. The strap loop adds 4 in (10.2 cm).
You work it as one seamless piece. First crochet an oval base in rounds, then turn up the sides and work the lace in rounds. For the slot section you switch to turned rows, then close the gap with a chain bridge and go back to rounds. To finish, convert to single crochet, close the top through both layers, crochet the strap and edge the slot.
Finished Size and Construction
- Finished size: 10 in (25.4 cm) tall × 8 in (20.3 cm) wide at the lower body, 6 in (15.2 cm) wide at the top
- Base: about 6.5 in × 1.75 in (16.5 cm × 4.4 cm)
- Skill level: Intermediate
- Terminology: US
- Yarn weight: DK (#3), cotton or cotton blend
- Hook: 4.0 mm (G-6)
- Number of pieces: 1 (the base, body, top and strap are worked continuously)
- Layout: a single hanging pouch with the slot centered on the front
- Lace body: 80-stitch foundation, 10 fan repeats around (5 on the front, 5 on the back)
- Size before edging: slot opening about 1.6 in (4.1 cm) wide
- Edging depth: 2 rounds, about 0.2 in (0.5 cm), giving a finished slot of about 1.25 in × 4 in (3.2 cm × 10.2 cm)
Materials
Choose a smooth, matte DK cotton. Cotton holds the fan shapes well, doesn’t stretch much under the weight of tissues and doesn’t shed onto car upholstery. Avoid fuzzy or very slippery yarns, which hide the lace pattern.
- Sage Green: about 75 g / 185 m (202 yd)
Tools:
– 4.0 mm (G-6) crochet hook
– 4 locking stitch markers
– Tapestry needle
– Scissors
– Rust-proof pins and a blocking mat
– Spray bottle
The yarn quantity includes a margin of about 15% for your gauge swatch and small tension differences.
Abbreviations (US Terms)
- ch – chain
- sl st – slip stitch
- sc – single crochet
- sc2tog – single crochet 2 together
- dc – double crochet
- BLO – back loop only
- sk – skip
- sp(s) – space(s)
- st(s) – stitch(es)
- PM – place marker
- RS / WS – right side / wrong side
Special stitch:
– Fan: (dc, ch 1, dc, ch 1, dc, ch 1, dc) all in the same st. Each Fan has 4 dc and 3 ch-1 sps. The center sp is the 2nd ch-1 sp.
– Beginning Fan: ch 4 (counts as dc + ch 1), then (dc, ch 1, dc, ch 1, dc) in the same st.
– Half Fan: (dc, ch 1, dc) in the same st. At the start of a row, work ch 4 (counts as dc + ch 1) and then dc in the same st.
Gauge and Checkpoints
- Single crochet: 20 sts × 20 rnds = 4 in (10.2 cm)
- Fan lace: 1 repeat (8 foundation sts) = 1.6 in (4.1 cm) wide; 5 lace rnds = 3 in (7.6 cm) tall, so each lace rnd is about 0.6 in (1.5 cm)
The base is your test piece. Work Rnds 1–4 and measure before you go any further.
Checkpoints:
1. After Rnd 4, the base measures 6.5 in × 1.75 in (16.5 cm × 4.4 cm).
2. After Rnd 10, the body stands about 2.8 in (7.1 cm) above the base edge.
3. After Row 17, the slot rows add 4.2 in (10.7 cm).
4. After Row 26, the total height is 10 in (25.4 cm) and the top is 6 in (15.2 cm) wide.
If your base is too big, go down half a hook size (3.75 mm). If it is too small, go up to 4.5 mm. A base just 0.25 in (0.6 cm) too long turns into a noticeably wider lace body, so fix gauge here rather than later.
Pattern
Base
Ch 27.
Rnd 1: Work 2 sc in 2nd ch from hook, sc in next 24 ch, 4 sc in last ch. Rotate and work along the opposite side of the foundation: sc in next 24 ch, 2 sc in the same ch as the first sts. Join with sl st to first sc. (56 sts: 2 + 24 + 4 + 24 + 2)
Rnd 2: Ch 1, 2 sc in each of next 2 sts, sc in next 24, 2 sc in each of next 4, sc in next 24, 2 sc in each of last 2. Join. (64 sts)
Rnd 3: Ch 1, [sc in next st, 2 sc in next] 2 times, sc in next 24, [sc in next, 2 sc in next] 4 times, sc in next 24, [sc in next, 2 sc in next] 2 times. Join. (72 sts)
Rnd 4: Ch 1, [sc in next 2, 2 sc in next] 2 times, sc in next 24, [sc in next 2, 2 sc in next] 4 times, sc in next 24, [sc in next 2, 2 sc in next] 2 times. Join. (80 sts)
Each round adds 8 sts, all at the two curved ends, so the 24-st straight sides keep the base flat and oval.
Turning the Walls
Rnd 5: Ch 1, sc BLO in each st around. Join. (80 sts) The front loops left behind form a crisp ridge around the bottom edge.
Rnd 6: Ch 1, sc in each st around. Join. (80 sts)
Choose one long side as the front. Find the st closest to the middle of that straight edge. Being off by one st is fine.
Lower Lace Body
Rnd 7: Work a Beginning Fan in the joining st. Ch 2, sk 3, sc in next st, ch 2, sk 3, Fan in next st. Repeat from * 8 more times. Then ch 2, sk 3, sc in next st, ch 2, sk 3, and join with sl st to the 3rd ch of the beginning ch-4. (10 Fans, 10 sc; 10 repeats × 8 sts = 80)
The sc nearest the middle of the front is center front. PM in it.
Rnd 8: Sl st in first ch-1 sp, sl st in next dc, sl st in center sp. Ch 1, sc in same sp, ch 2, Fan in next sc, ch 2. Sc in center sp of next Fan, ch 2, Fan in next sc, ch 2. Repeat from * 8 more times. Join to first sc. (10 Fans, 10 sc) The Fan worked into the marked sc is center front. Move the marker up to it.
Rnd 9: Work a Beginning Fan in the joining sc, ch 2, sc in center sp of next Fan, ch 2. Fan in next sc, ch 2, sc in center sp of next Fan, ch 2. Repeat from * 8 more times. Join to 3rd ch of beginning ch-4. (10 Fans, 10 sc) Move the marker to the sc at center front.
Rnd 10: Repeat Rnd 8. (10 Fans, 10 sc) The Fan at center front is the Center Fan, which becomes the rounded bottom of the slot. PM in it. Fasten off.
Tissue Slot Rows
Work these rows back and forth around the body, leaving the Center Fan unworked.
Row 11 (RS): With the RS facing, join yarn with sl st in the sc just after the Center Fan, moving in the working direction. Work a Half Fan in the same sc, ch 2, sc in center sp of next Fan, ch 2. Fan in next sc, ch 2, sc in center sp of next Fan, ch 2. Repeat from * 7 more times. Work a Half Fan in the next sc (the one just before the Center Fan). Turn. (8 Fans, 9 sc, 2 Half Fans)
Row 12 (WS): Ch 1, sc in first dc. Ch 2, Fan in next sc, ch 2, sc in center sp of next Fan. Repeat from * 7 more times. Ch 2, Fan in next sc, ch 2, sc in 3rd ch of the turning ch-4. Turn. (9 Fans, 8 center sc + 2 edge sc)
Row 13 (RS): Ch 4 (counts as dc + ch 1), dc in first sc for a Half Fan. Ch 2, sc in center sp of next Fan, ch 2. Fan in next sc, ch 2, sc in center sp of next Fan, ch 2. Repeat from * 7 more times. Work a Half Fan in the last sc. Turn. (8 Fans, 9 sc, 2 Half Fans)
Rows 14 and 16: Repeat Row 12.
Rows 15 and 17: Repeat Row 13. Do not turn after Row 17.
Checkpoint: the slot section measures 4.2 in (10.7 cm), and the gap stays about 1.6 in (4.1 cm) wide.
Closing the Slot
Rnd 18 (RS): Ch 1 and sc in the top of the last dc made (edge sc). Ch 7 across the gap to make the bridge. Sc in the 3rd ch of Row 17’s beginning ch-4 (edge sc), then ch 2. Fan in next sc, ch 2, sc in center sp of next Fan, ch 2. Repeat from * 7 more times. Fan in next sc, ch 2, and join to the first edge sc. (9 Fans, 10 sc, 1 ch-7 bridge)
Rnd 19: Work a Beginning Fan in the joining sc. Ch 2, sc in 4th ch of the bridge, ch 2, Fan in next sc, ch 2. Sc in center sp of next Fan, ch 2, Fan in next sc, ch 2. Repeat from * 7 more times. Sc in center sp of the last Fan, ch 2, and join to 3rd ch of beginning ch-4. (10 Fans, 10 sc)
The bridge stands in for the missing Fan, so the full count of 10 repeats is back.
Rnd 20: Repeat Rnd 8. (10 Fans, 10 sc)
Top Band
Rnd 21 (conversion): Ch 1. Sc in next sc, sc in ch-2 sp, sc in 2nd dc of Fan, sc in center sp, sc in 3rd dc, sc in next ch-2 sp. Repeat from * 9 more times. Join. (60 sts = 60 worked one per placement point + 0 extra)
Leaving out the outer dc and outer ch-1 sps of each Fan is what narrows the top to 6 in (15.2 cm).
Rnds 22–25: Ch 1, sc in each st around. Join. (60 sts)
Flatten the pouch with the slot centered on the front. Sl st loosely to the right-hand fold.
Row 26 (closing): Ch 1. Working through both layers together, sc across. (30 sts) Do not fasten off.
Checkpoint: the pouch measures 10 in (25.4 cm) tall and 6 in (15.2 cm) across the top.
Strap
Row 1: Turn so the front faces you. Sl st across to st 13 and sc in sts 13–18. Turn. (6 sts, which leaves 12 sts on each side)
Rows 2–44: Ch 1, sc in each st across. Turn. (6 sts)
The strap is 8.8 in (22.4 cm) long and 1.2 in (3.0 cm) wide. Fold it over toward the back and let the last 0.8 in (2.0 cm) overlap the top band on the back. Whipstitch it in place. This makes a 4 in (10.2 cm) loop: (8.8 − 0.8) ÷ 2 = 4.
Border: Slot Edging
Border gauge: 5 sc per 1 in (2.5 cm), the same as the main sc gauge.
Rnd 1: With the RS facing, join yarn in the ch-2 sp to the right of the Center Fan.
– Bottom: sc in that ch-2 sp, sc in each dc and ch-1 sp of the Center Fan (7), sc in next ch-2 sp (9 sts)
– Left side: 3 sc in each of the 7 row ends (21 sts)
– Top: sc in each of the 7 free loops on the underside of the bridge (7 sts)
– Right side: 3 sc in each of the 7 row ends (21 sts)
Join. (58 sts)
Rnd 2: Sl st in each sc around. (58 sl sts) Fasten off and weave in the ends.
Why the math works: each side is 4.2 in (10.7 cm) tall, and 4.2 × 5 = 21 sts. The bottom curve and the top bridge each span about 1.6 in (4.1 cm), and 7 to 9 sts fit that span. Rnd 2 adds firmness without adding width.
Final Blocking
- Spray the pouch evenly until it is damp, not soaked.
- Lay it flat with the slot centered on the front.
- Pin the lower body to 8 in (20.3 cm) wide and the top to 6 in (15.2 cm).
- Pin the full height to 10 in (25.4 cm).
- Pin the bottom of each Fan column so the scallops sit evenly.
- Shape the slot into an even oval about 1.25 in × 4 in (3.2 cm × 10.2 cm).
- Lay the strap flat and straight.
- Let it dry completely before you unpin it.
Final Quality-Control Checklist
- The base is 80 sts, flat and oval, with a visible ridge from the BLO round.
- Every lace round has 10 Fans.
- The slot is centered and both sides have the same number of row ends.
- The bridge sits level, with no pucker.
- The top band is 60 sts and the closing row is 30 sts.
- The strap is centered, with 12 sts on each side.
- All ends are woven in securely.
Troubleshooting
- Body flares or ripples: your dc are too loose. Go down a hook size for the lace only.
- Slot leans to one side: the marker drifted between rounds. Check that the Center Fan sits directly above the center marker.
- Bridge puckers: work the ch-7 more loosely, or make it ch 8. If you use ch 8, put the Rnd 19 sc in the 4th or 5th ch and work 8 sc across the top of the slot edging.
- Top won’t lie flat: make sure Rnd 21 has exactly 60 sts.
- Strap stretches: tighten your tension, or add a sl st edge along both sides of the strap.
Care
Hand wash in cool water and reshape while damp. Lay flat to dry, away from direct sun inside the car so the sage color doesn’t fade.
Final Notes
Each measurement leads to the next one. An 80-st base of 6.5 in × 1.75 in (16.5 cm × 4.4 cm) sets up a lace body 16 in (40.6 cm) around with 10 repeats. Seven slot rows make a 4.2 in (10.7 cm) gap, and the bridge brings the count back to 10 repeats. The 60-st band closes into a top 6 in (15.2 cm) wide, and an 8.8 in (22.4 cm) strap folds into a 4 in (10.2 cm) loop. If you check gauge at the base, everything after it should come out to size.
Happy crocheting!