
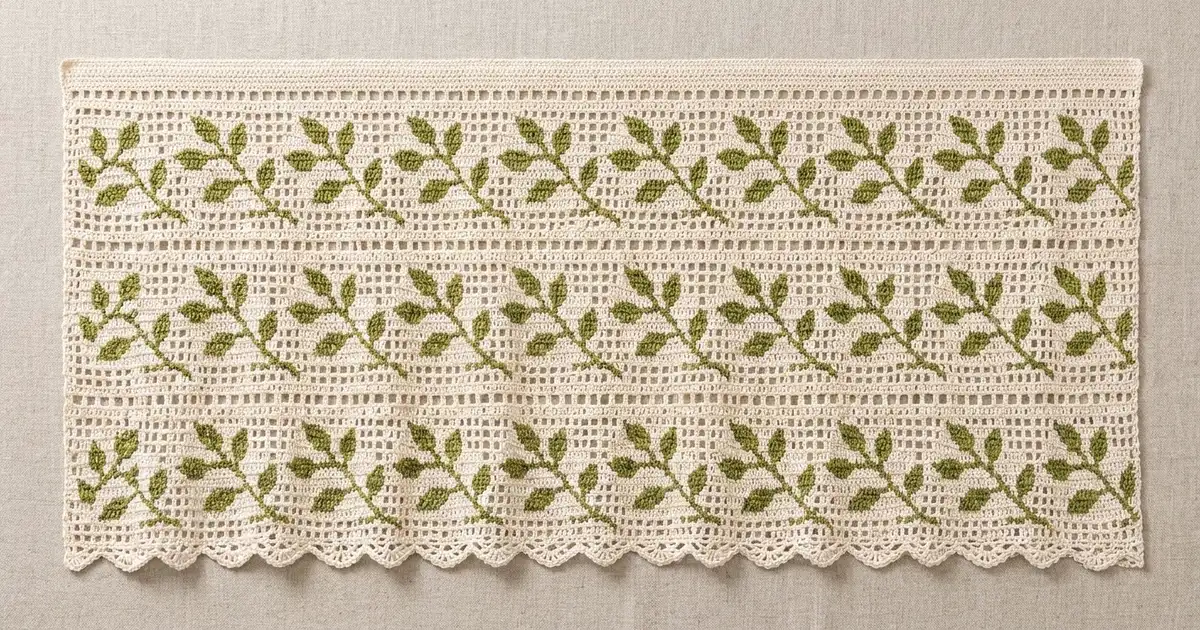
This curtain panel is a light, airy filet crochet grid in soft cream, crossed by horizontal bands of olive-green leafy sprigs. Each sprig is a short diagonal stem with small two-block leaves on alternate sides, and five sprigs sit side by side across every band. A row of open mesh and a scalloped shell edge finish the bottom hem.
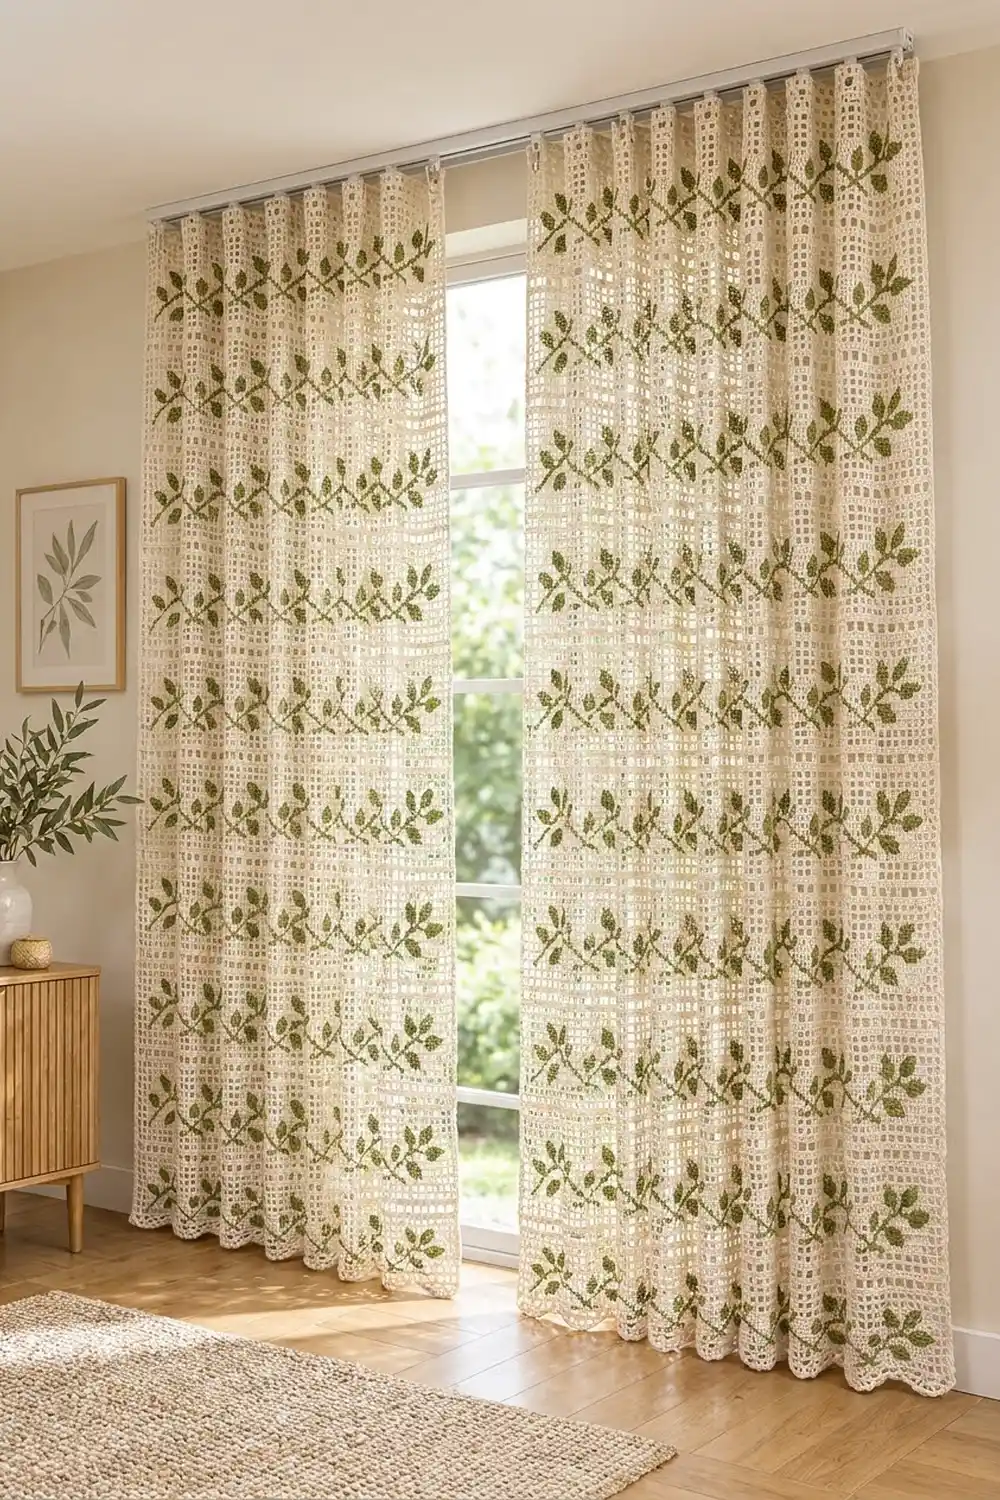
The style is cottage garden and calm. The open mesh lets daylight through, and the solid green leaves show clearly against the window. Using only two colors, cream and green, makes the panel easy to match to any room.
The pattern uses US crochet terms. The finished panel measures 30.4 in (77.2 cm) wide by 61.1 in (155.2 cm) long, including the border. The top edge is a firm single crochet heading that takes curtain hooks or clips directly, so you don’t need a casing.
The construction is simple. You work one rectangular piece flat in rows from the bottom up, adding the green blocks with small bobbins. Then you add a single crochet heading, a single crochet round, and a mesh-and-scallop edge along the bottom. For a pair, make two identical panels.
Finished Size and Construction
- Finished size: 30.4 in x 61.1 in (77.2 cm x 155.2 cm)
- Skill level: Intermediate (filet crochet plus bobbin color changes)
- Terminology: US
- Yarn weight: Fingering (#1) mercerized cotton
- Hook: 2.75 mm (US C/2)
- Number of pieces: 1 panel, worked in one piece
- Layout: 75 meshes wide x 148 filet rows, with 9 vine bands of 5 sprigs each
- Panel size before heading and border: 30 in x 59.2 in (76.2 cm x 150.4 cm)
- Size before border (with heading): 30 in x 59.8 in (76.2 cm x 151.9 cm)
- Border depth: 0.2 in (0.5 cm) on the sides and top; 1.1 in (2.8 cm) at the bottom
Materials
Choose a smooth mercerized cotton in fingering weight. It gives crisp mesh and clean leaf edges, and it holds its shape while it hangs. Avoid fuzzy or very stretchy yarns, which blur the filet grid and sag over time.
- Cream (main color): 200 g, about 640 m (700 yd)
- Olive green (contrast): 100 g, about 320 m (350 yd)
Both amounts include about 15–20% extra for the gauge swatch, bobbin tails, and normal differences in tension.
Tools:
- 2.75 mm (US C/2) crochet hook
- 6 to 10 small yarn bobbins or clothespins for the green lengths
- Tapestry needle
- Stitch markers
- Tape measure
- Blocking mats or a clean sheet, plus rust-proof pins
- Spray bottle
Abbreviations (US Terms)
- ch: chain
- sc: single crochet
- dc: double crochet
- sl st: slip stitch
- sk: skip
- sp: space
- st(s): stitch(es)
- RS / WS: right side / wrong side
Special stitches:
- Open mesh (OM): ch 2, sk 2 sts (or the ch-2 sp), dc in next dc.
- Block (BL): dc in each of the next 2 sts (2 dc in a ch-2 sp, or 1 dc in each of 2 dc), then dc in next dc.
- Green block (GB): a block with all 3 dc worked in green. Switch to green on the last yarn over of the dc before the block. Switch back to cream on the last yarn over of the block’s final dc. Work the green dc over the cream strand so the cream travels hidden inside the block.
- Row start: If the first mesh is an OM, ch 5 (counts as dc + ch 2), sk 2, dc in next dc. If it is a block, ch 3 (counts as dc), then finish the block.
Every filet row has 75 meshes, which is 226 sts (75 x 3 + 1).
Gauge and Checkpoints
Filet gauge: 10 meshes and 10 rows = 4 in (10.2 cm). Each mesh is 0.4 in (1.0 cm) square.
Single crochet gauge: 30 sc = 4 in (10.2 cm); 5 sc rows = 1 in (2.5 cm).
Test swatch: Before you start the panel, make one swatch that includes a full sprig. Ch 56 and work 17 meshes per row:
- 2 rows of OM
- the 8 motif rows, with 1 OM on each side of the 15-mesh repeat
- 2 more rows of OM
After a light steam, it should measure 6.8 in x 4.8 in (17.3 cm x 12.2 cm).
If the swatch is too big, go down to a 2.5 mm hook. If it’s too small, go up to a 3.0 mm hook. The meshes must stay square. If they’re taller than they are wide, shorten your dc slightly by pulling up the first loop less.
Checkpoints on the panel:
- After Row 4: 30 in (76.2 cm) wide and 1.6 in (4.1 cm) tall
- After Row 20 (first band done): 8 in (20.3 cm) tall
- After Row 84: 33.6 in (85.3 cm) tall
- After Row 148: 59.2 in (150.4 cm) tall
- After the heading: 59.8 in (151.9 cm) tall
Measure the piece flat, without stretching it. If the width is off by more than 0.5 in (1.3 cm), check the tension of your ch-2s before you continue.
Panel
Foundation and Lower Mesh
With cream, ch 230 (75 x 3 + 5).
Row 1 (RS): Dc in 8th ch from hook, *ch 2, sk 2 ch, dc in next ch; rep from * across. Turn. (75 OM; 226 sts)
Rows 2-4: Row start with OM, then OM across. Turn. (75 OM; 226 sts)
The Vine Band
Each band is one 16-row unit: 8 motif rows followed by 8 rows of open mesh. One unit measures 6.4 in (16.3 cm). The motif is a 15-mesh repeat, worked 5 times across each row (5 x 15 = 75 meshes), so every band has 5 sprigs.
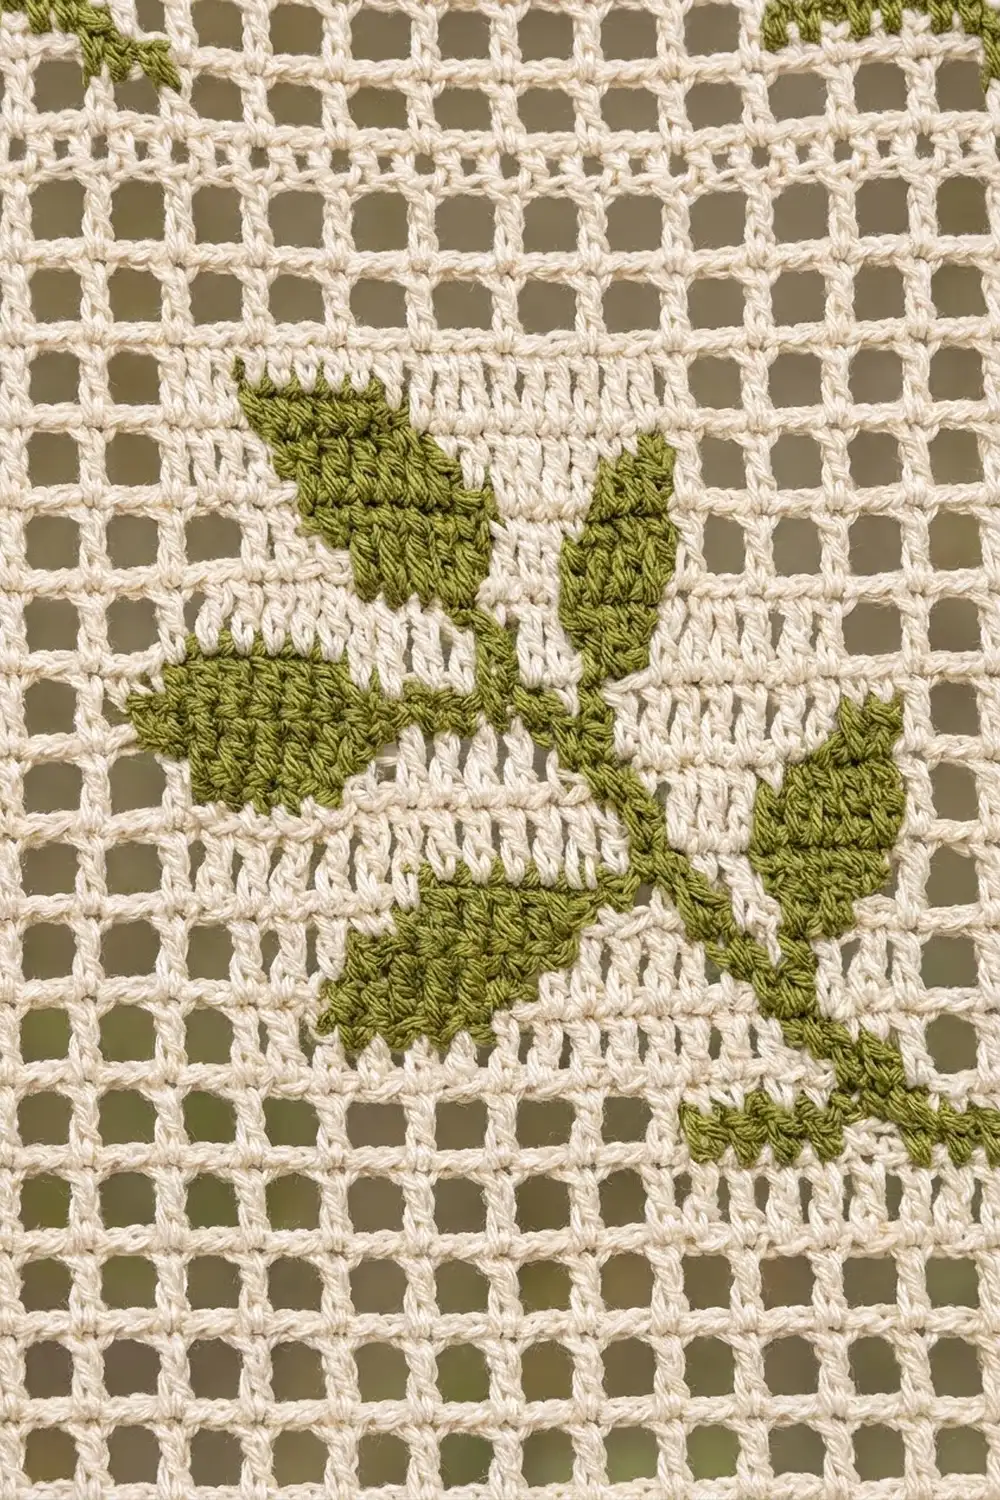
Read the chart from the bottom (M1) up. X = green block and . = cream open mesh. Columns are numbered 1 to 15 from the right as seen on the RS, so column 1 is the right-most character.
      15 ............ 1
M8:   XX..XX.........
M7:   .X.XX..XX......
M6:   ..XXX.XX.......
M5:   ..XX.XXX.....X.
M4:   .XX..XX.XXX.XX.
M3:   ....XX.....XXX.
M2:   .........XX....
M1:   ........XX.....
On RS rows, work each repeat from column 1 to 15. On WS rows, work each repeat from column 15 back to 1. Odd-numbered motif rows are always RS rows, because each unit has an even number of rows.
Here are the green blocks in each repeat, written out:
- M1: cols 6-7 (2 GB per repeat; 10 per row)
- M2: cols 5-6 (2; 10)
- M3: cols 2-4 and 10-11 (5; 25)
- M4: cols 2-3, 5-7, 9-10 and 13-14 (9; 45)
- M5: col 2, cols 8-10 and 12-13 (6; 30)
- M6: cols 8-9 and 11-13 (5; 25)
- M7: cols 7-8, 11-12 and col 14 (5; 25)
- M8: cols 10-11 and 14-15 (4; 20)
All other meshes are cream OM, and every row still has 226 sts. One sprig uses 38 green blocks, so each band has 190.
Shape check: The stem climbs diagonally from column 2 (M3) to column 14 (M7). Leaves sit above the stem in M4-M5, M6-M7 and M7-M8, and below it in M1-M2, M3-M4 and M4-M5. A two-block tip leaf ends the sprig in M8.
Bobbins: Give each separate green patch its own bobbin of about 2 yd (1.8 m). When a patch continues straight up into the next row, keep using the same bobbin. Leave 4 in (10.2 cm) tails and weave them into the green blocks later.
In M8, the column-15 block falls at the start of each WS row. Ch 3 in cream, then work the 3 dc in green.
Building the Length
Rows 5-12: Motif rows M1-M8.
Rows 13-20: OM across (75 OM).
Repeat this 16-row unit 8 more times. The motif rows start on Rows 21, 37, 53, 69, 85, 101, 117 and 133. The last unit ends on Row 148 with an 8-row open-mesh band. Don’t fasten off.
Heading
Row 149 (RS): Ch 1, sc in each dc and 2 sc in each ch-2 sp across. Turn. (75 x 2 + 76 = 226 sc)
Rows 150-151: Ch 1, sc in each sc across. Turn. (226 sc)
Fasten off. The heading adds 0.6 in (1.5 cm) and gives the hooks a solid edge to grip.
Border
Border gauge: 30 sc = 4 in (10.2 cm), the same as the heading. The side edges get 3 sc per filet row: each row is 0.4 in (1.0 cm) tall, and at 7.5 sc per inch that is 3 sc.
Round 1 (RS): Join cream at the top-right corner. Sc around all 4 edges, with ch 1 at each corner. The corner ch-1 sps are not counted in the side totals.
- Top: 1 sc in each heading sc = 226 sc
- Each side: 3 sc in each filet row-end (148 x 3 = 444) plus 1 sc in each heading row-end (3) = 447 sc
- Bottom: Working into the foundation chain, 2 sc in each ch-2 sp and 1 sc at the base of each dc (75 x 2 + 76) = 226 sc
Sl st to the first sc and fasten off. (1,346 sc + 4 corner ch-1 sps)
Row 2 (bottom edge only, RS): With the RS facing, join cream in the first sc of the bottom edge after the corner ch-1. Ch 5 (counts as dc + ch 2), sk 2 sc, dc in next sc, *ch 2, sk 2 sc, dc in next sc; rep from * across the bottom. Fasten off. (75 ch-2 sps)
Row 3 (scallops, RS): With the RS facing, sl st into the first dc of Row 2 to join. *Sc in next ch-2 sp, 9 dc in next ch-2 sp, sc in next ch-2 sp; rep from * 24 more times. Sl st in the last dc and fasten off. (25 scallops; 275 sts)
Why the math works: The bottom edge has 226 sc because 75 meshes x 3 + 1 = 226. Row 2 uses those 226 sc in steps of 3, which gives exactly 75 spaces. Each scallop uses 3 spaces, and 25 x 3 = 75, so the scallops end evenly at both corners. Each scallop is 1.2 in (3.0 cm) wide.
Round 1 adds 0.2 in (0.5 cm) on every edge. At the bottom, Row 2 adds 0.4 in (1.0 cm) more and Row 3 adds 0.5 in (1.3 cm).
- Width: 30 + 0.2 + 0.2 = 30.4 in (77.2 cm)
- Length: 59.8 + 0.2 + 1.1 = 61.1 in (155.2 cm)
Final Blocking
- Weave in all the green tails inside green blocks and all the cream tails along dc posts.
- Hand wash the panel in cool water with a mild detergent and let it soak for 15 minutes.
- Press the water out in a towel. Don’t wring it.
- Lay the panel flat on mats or a sheet, RS up.
- Pin the side edges straight to 30.4 in (77.2 cm) wide, measuring at the top, middle and bottom.
- Pin the length to 61.1 in (155.2 cm), then pin each of the 25 scallops into a rounded arch.
- Check that the meshes are square and the vine bands run level.
- Let it dry completely, about 24 hours.
Final Quality-Control Checklist
- Every filet row has 75 meshes (226 sts).
- There are 9 vine bands, each with 5 matching sprigs.
- Each sprig has 38 green blocks in the charted shape.
- The heading is 3 rows of 226 sc.
- Round 1 has 226 sc on the top and bottom, 447 sc on each side, and 4 corner ch-1 sps.
- The bottom edge has 75 mesh spaces and 25 even scallops.
- The panel blocks to 30.4 in x 61.1 in (77.2 cm x 155.2 cm).
- All tails are hidden, and the cream doesn’t show strongly through the leaves.
Troubleshooting
Meshes are taller than they are wide: Your dc are too long. Pull up the first loop less, or try a smaller hook.
The panel gets narrower or wider: Count your meshes every few rows. An extra or missing OM at the row ends is the usual cause.
Cream shows through the green blocks: Keep the carried cream strand snug along the top of the previous row, and work the green dc firmly over it.
Bobbins tangle: Turn clockwise at one end of the row and counterclockwise at the other so the twists undo themselves, and keep the bobbin lengths short.
The sides ripple after the border: Your stitches are too loose. Rework at a firmer tension, but keep the count at 447 so the corners stay square.
Scallops cup: Work the 9 dc a little looser, or use a 3.0 mm hook for Row 3 only.
Care
Hand wash in cool water and dry flat, re-pinning the scallops if needed. Cotton can fade in strong sun, so swap the panel to a different window now and then.
Final Notes
Each mesh is 0.4 in (1.0 cm). The 75 meshes give 30 in (76.2 cm) of width, and the 148 rows give 59.2 in (150.4 cm) of length. The 3 heading rows bring the length to 59.8 in (151.9 cm). The border adds 0.2 in (0.5 cm) around the edges plus 1.1 in (2.8 cm) of scallops at the bottom, for a finished panel of 30.4 in x 61.1 in (77.2 cm x 155.2 cm). For a longer panel, add extra 16-row units before the heading. Each unit adds 6.4 in (16.3 cm), and you add 48 sc to each side count in Round 1.
Happy crocheting!