

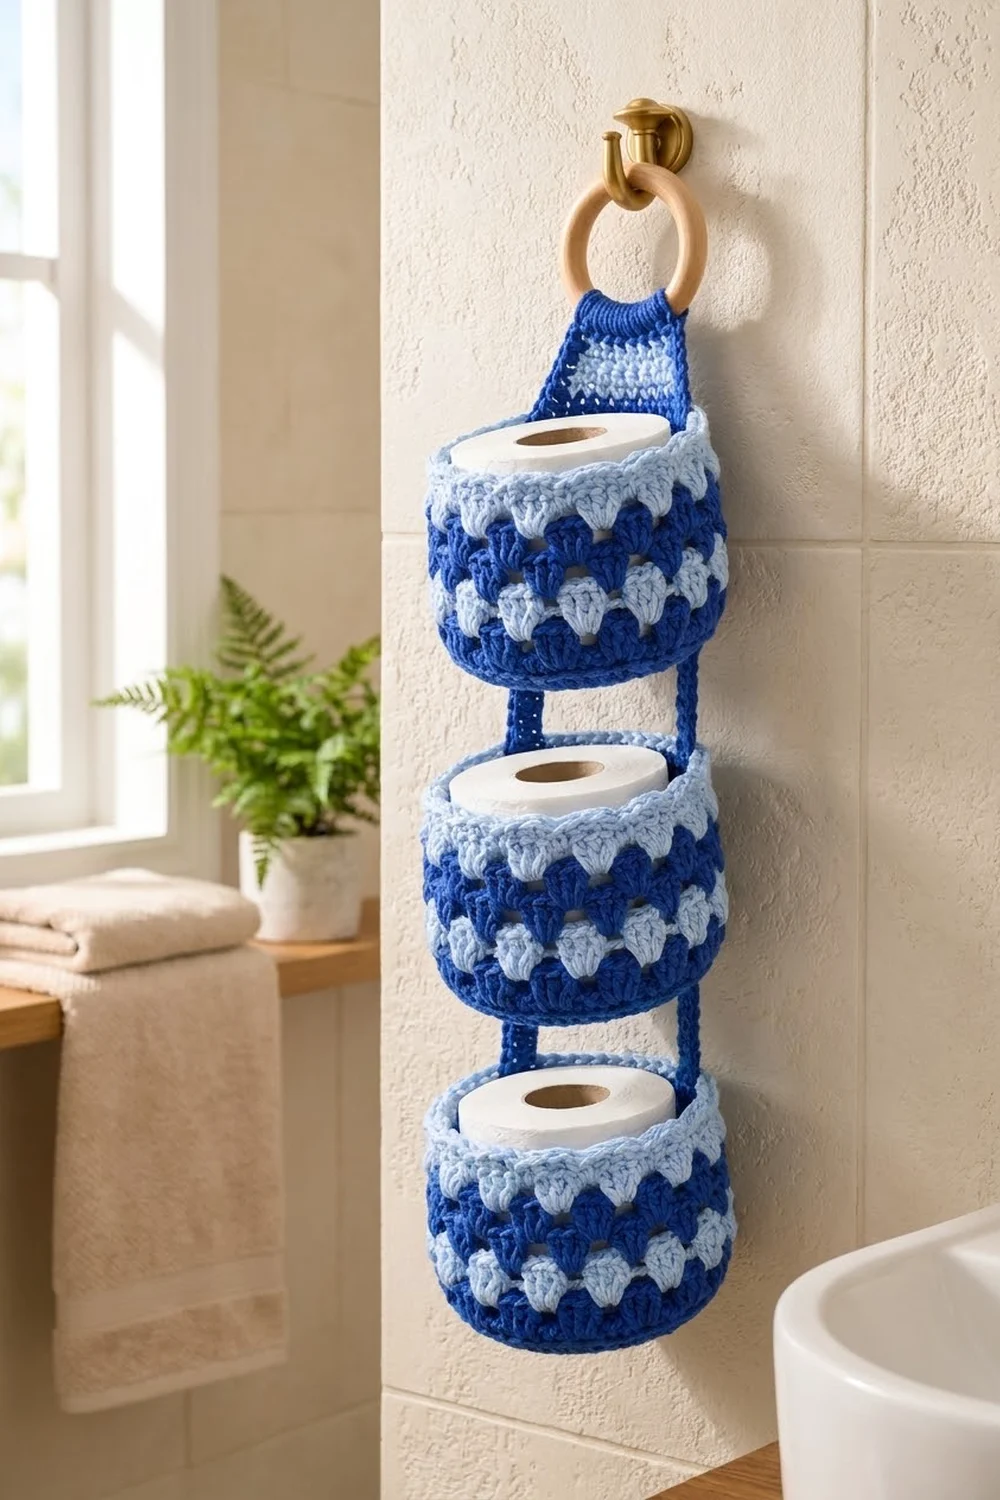
The Cobalt Cascade holder is a three-tier wall organizer that holds three spare rolls. Three round baskets hang one below the other on short straps. A tapered tab at the top loops over a wooden ring, so the holder can hang from any towel hook.
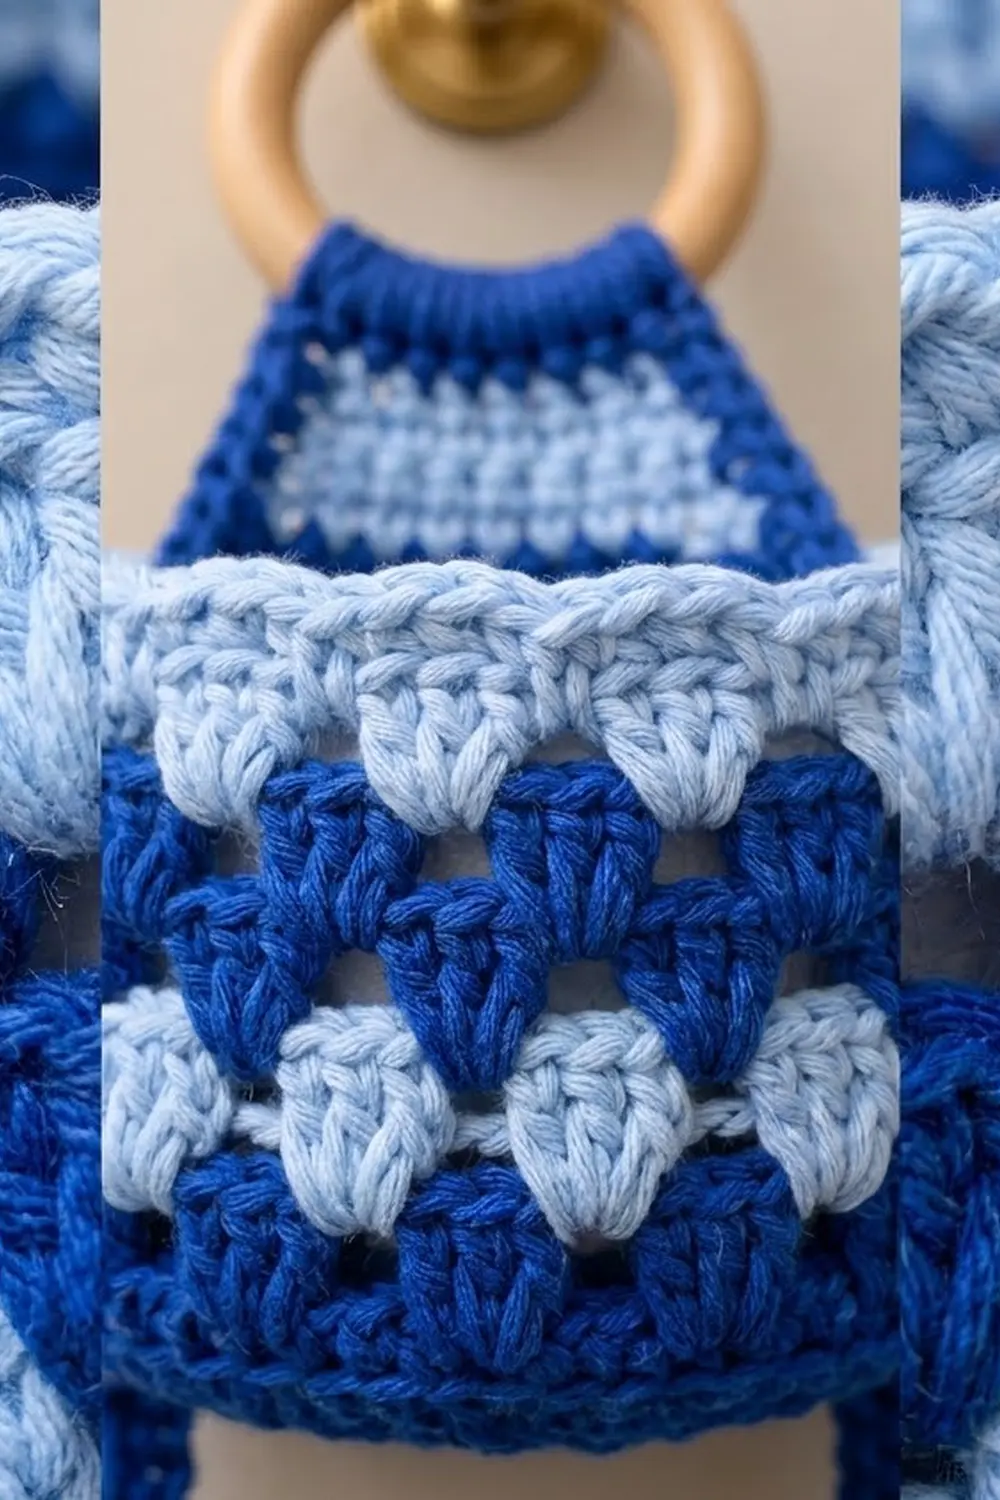
Two colors carry the design: deep royal blue and soft light blue. Each basket has a flat royal blue base and a solid band at the bottom of the wall. Above that, staggered rounds of puffy clusters alternate between the two blues to make a honeycomb pattern. A light blue rim with a corded reverse single crochet edge finishes the top. The overall look is crisp and a little coastal.
The pattern uses US crochet terms. Each basket is 5.25 in (13.3 cm) across and 3.5 in (8.9 cm) tall. The assembled holder is about 17 in (43.2 cm) long, not counting the ring.
You’ll work each basket in the round from the center of the base up, then add the rim. After that you make four straps and one tab in rows, sew everything together, and fold the tab over the ring.
Finished Size and Construction
- Finished size: about 5.25 in (13.3 cm) wide x 17 in (43.2 cm) long, ring not included
- Skill level: Easy-intermediate
- Terminology: US crochet terms
- Yarn weight: Worsted (#4) cotton
- Hook: 5.0 mm (US H-8)
- Number of pieces: 8 (3 baskets, 4 straps, 1 hanging tab)
- Layout: 3 baskets in a vertical column, with 2 straps in each gap
- Piece size: each basket is 5.25 in (13.3 cm) across x 3.5 in (8.9 cm) tall
- Size before rim: wall is 3 in (7.6 cm) tall after the last cluster round
- Rim depth: 0.5 in (1.3 cm), 3 rounds
Materials
Choose a smooth, firm worsted-weight cotton or cotton blend. Cotton keeps its shape on the wall and won’t stretch under the weight of a roll. Acrylic also works, but the baskets will be softer.
- Color A, royal blue: 160 g (about 272 m)
- Color B, light blue: 90 g (about 153 m)
Tools:
- 5.0 mm (US H-8) crochet hook
- Wooden ring, 3 in (7.6 cm) outer diameter
- Tapestry needle
- 4 locking stitch markers
- Scissors and measuring tape
- Pins or clips
These quantities include a margin of at least 15 percent, which covers gauge testing and small differences in tension.
Abbreviations (US Terms)
- ch: chain
- sl st: slip stitch
- sc: single crochet
- sc2tog: single crochet 2 together
- dc: double crochet
- BLO: back loop only
- rev sc: reverse single crochet (crab stitch), worked left to right
- sp: space
- st(s): stitch(es)
- rnd(s): round(s)
Cluster (cl): [Yarn over, insert hook in the stitch or space given, yarn over and pull up a loop, yarn over and draw through 2 loops] 3 times, then yarn over and draw through all 4 loops on the hook.
Beginning cluster (beg cl): Ch 2, then [yarn over, insert hook, yarn over and pull up a loop, yarn over and draw through 2 loops] 2 times, then yarn over and draw through all 3 loops. The ch-2 and this cluster together count as 1 cl.
Gauge and Checkpoints
Gauge: 16 sc and 17 rnds = 4 in (10.2 cm) in sc worked in the round.
Use your first basket as the test piece. Its base is the same fabric you’ll be measuring, so it tells you more than a separate swatch would.
Checkpoints:
- After Rnd 6 (36 sts): the circle is about 2.75 in (7.0 cm) across.
- After Rnd 11 (66 sts): the base is 5.25 in (13.3 cm) across and lies flat.
- After Rnd 18: the wall is 3 in (7.6 cm) tall.
- After Rnd 21: the wall is 3.5 in (8.9 cm) tall, and a standard roll drops in with about 0.5 in (1.3 cm) showing above the rim.
If the base is too big, use a hook 0.5 mm smaller. If it’s too small, use a hook 0.5 mm larger. Change the hook rather than the stitch count, because the cluster rounds need an even number of stitches.
Basket (Make 3)
Use Color A unless told otherwise. Join each round with a sl st to the first stitch. The ch 1 at the start of a sc round does not count as a stitch.
Base
Rnd 1: Make a magic ring. Ch 1, 6 sc in the ring, join. (6 sts)
Rnd 2: Ch 1, 2 sc in each st around. (12 sts)
Rnd 3: Ch 1, *sc in next st, 2 sc in next st; rep from * around. (18 sts)
Rnd 4: Ch 1, *sc in next 2 sts, 2 sc in next st; rep from * around. (24 sts)
Rnd 5: Ch 1, *sc in next 3 sts, 2 sc in next st; rep from * around. (30 sts)
Rnd 6: Ch 1, *sc in next 4 sts, 2 sc in next st; rep from * around. (36 sts)
Rnd 7: Ch 1, *sc in next 5 sts, 2 sc in next st; rep from * around. (42 sts)
Rnd 8: Ch 1, *sc in next 6 sts, 2 sc in next st; rep from * around. (48 sts)
Rnd 9: Ch 1, *sc in next 7 sts, 2 sc in next st; rep from * around. (54 sts)
Rnd 10: Ch 1, *sc in next 8 sts, 2 sc in next st; rep from * around. (60 sts)
Rnd 11: Ch 1, *sc in next 9 sts, 2 sc in next st; rep from * around. (66 sts)
The base should now be 5.25 in (13.3 cm) across and flat. If it ripples, your tension is too loose for this hook. If it cups, your tension is too tight.
Wall
Rnd 12 (turning round): Ch 1, sc in BLO of each st around. (66 sts) The unused front loops form a neat ridge, and the wall starts to rise.
Rnd 13: Ch 1, sc in each st around. (66 sts) Change to Color B on the last yarn over of the join.
Rnd 14 (Color B): Beg cl in first st, ch 1, skip next st, *cl in next st, ch 1, skip next st; rep from * around, join to top of beg cl. (33 cl + 33 ch-1 sps = 66 sts) Change to Color A.
Rnd 15 (Color A): Sl st into first ch-1 sp, beg cl in same sp, ch 1, *cl in next ch-1 sp, ch 1; rep from * around, join to top of beg cl. (33 cl + 33 ch-1 sps = 66 sts) Change to Color B.
Each new cluster sits in the gap between two clusters of the round below. That offset creates the staggered honeycomb pattern.
Rnd 16 (Color B): Rep Rnd 15. (66 sts) Change to Color A.
Rnd 17 (Color A): Rep Rnd 15. (66 sts) Change to Color B.
Rnd 18 (Color B): Rep Rnd 15. (66 sts) Change to Color A.
Instead of cutting the unused color, carry it up the inside of the wall. Trap it under the beginning cluster of each round so it stays flat.
Checkpoint: the wall is now 3 in (7.6 cm) tall from the BLO ridge. Finish each basket with the Rim rounds below before you join any pieces.
Make All Pieces
Straps (Make 4)
With Color A, ch 5.
Row 1: Sc in 2nd ch from hook and in each ch across, turn. (4 sts)
Rows 2-15: Ch 1, sc in each st across, turn. (4 sts)
Fasten off and leave a 12 in (30.5 cm) tail. Each strap is 1 in (2.5 cm) wide and 3.5 in (8.9 cm) long.
Hanging Tab (Make 1)
With Color A, ch 21.
Row 1: Sc in 2nd ch from hook and in each ch across, turn. (20 sts)
Rows 2-4: Ch 1, sc across, turn. (20 sts) Change to Color B at the end of Row 4.
Row 5 (Color B): Ch 1, sc2tog, sc in next 16 sts, sc2tog, turn. (18 sts)
Row 6: Ch 1, sc across, turn. (18 sts)
Row 7: Ch 1, sc2tog, sc in next 14 sts, sc2tog, turn. (16 sts)
Row 8: Ch 1, sc across, turn. (16 sts)
Row 9: Ch 1, sc2tog, sc in next 12 sts, sc2tog, turn. (14 sts)
Row 10: Ch 1, sc across, turn. (14 sts)
Row 11: Ch 1, sc2tog, sc in next 10 sts, sc2tog, turn. (12 sts)
Row 12: Ch 1, sc across, turn. (12 sts) Change to Color A.
Row 13 (Color A): Ch 1, sc2tog, sc in next 8 sts, sc2tog, turn. (10 sts)
Row 14: Ch 1, sc across, turn. (10 sts)
Row 15: Ch 1, sc2tog, sc in next 6 sts, sc2tog, turn. (8 sts)
Rows 16-22: Ch 1, sc across, turn. (8 sts) Fasten off and leave a 16 in (40.6 cm) tail.
Side edging: Join Color A at the corner of Row 1. Work 1 sc into the end of each row from Row 1 to Row 15 (15 sc), then fasten off. Repeat on the other side (15 sc). This edging frames the light blue panel in royal blue and makes the bottom of the tab 5.5 in (14.0 cm) wide.
Quantities and Layout
- Each basket: about 40 g Color A and 22 g Color B
- Each strap: about 2.5 g Color A
- Tab: about 6 g Color A and 3 g Color B
          ( RING )
          [ TAB  ]
       [ BASKET 1 ]
        |S|    |S|
       [ BASKET 2 ]
        |S|    |S|
       [ BASKET 3 ]
S = strap. The straps run down the back of the baskets, on the side that faces the wall.
Joining
Sew all pieces with Color A using a whip stitch.
Mark the back. On each basket, place a marker in any Rnd 13 stitch to mark the center back. The marked stitch plus 16 stitches on each side make up the 33-stitch back half. Divide those 33 stitches as follows: 7 free, 4 for a strap, 11 between straps, 4 for a strap, 7 free (7 + 4 + 11 + 4 + 7 = 33). The two straps end up 2.75 in (7.0 cm) apart.
Strap to upper basket. Lay the first 4 rows of a strap flat on the outside back wall of Basket 1. Line up Row 1 with Rnd 12, and line up the strap’s 4 stitches with the 4 marked wall stitches. Sew the strap end stitch to stitch, then sew the row ends to the matching rounds. This covers about 1 in (2.5 cm) of the wall.
Strap to lower basket. Leave 1.5 in (3.8 cm) of strap free to form the gap. Lay the last 4 rows on the outside back wall of Basket 2, with Row 15 just below the rev sc edge and the strap in the same 4-stitch position. Sew it the same way.
Repeat with the second strap. Then join Basket 2 to Basket 3 the same way.
Tension: Keep the whip stitches snug but not tight enough to pucker the wall. Only catch the back bars of the wall stitches, so the sewing doesn’t show between the clusters.
Tab. Center Rows 1-4 of the tab on the center-back marker of Basket 1, on the outside of the wall. The tab will cover about 22 wall stitches. Line up Row 4 with Rnd 20 and sew all around the overlap. Pass Rows 16-22 through the ring, fold them to the back, and sew Row 22 to the back of Row 15.
Size checkpoint: Hang the holder empty. Each gap should be 1.5 in (3.8 cm), and the total length should be about 17 in (43.2 cm). If a gap is too long, sew that strap end one row higher.
Rim
Work the rim on each basket straight after Rnd 18.
Rim gauge: 16 sc = 4 in (10.2 cm), the same as the base. At 66 stitches, the rim measures 16.5 in (41.9 cm) around, which matches the base.
Rnd 19 (Color A): Ch 1, sc in top of each cl and in each ch-1 sp around. (33 sc in clusters + 33 sc in spaces = 66 sts) Change to Color B.
Rnd 20 (Color B): Ch 1, sc in each st around. (66 sts)
Rnd 21 (Color B): Ch 1, rev sc in each st around, join. (66 sts) Fasten off and weave in the ends on the inside.
Why the math works: Each cluster round has 33 clusters and 33 spaces, which makes 66 working points. Rnd 19 puts exactly 1 sc on each point and adds nothing, so the count stays at 66, the same as Rnds 11 and 12. Because the count never changes from the base edge to the rim, the wall stays a straight cylinder 5.25 in (13.3 cm) across. The rev sc gives a firm corded edge that doesn’t flare.
Final Blocking
- Mist each basket lightly with water until it’s damp but not soaked.
- Put a roll, or a towel rolled to the same size, inside each basket.
- Straighten the walls and press each base flat.
- Check that each cluster sits centered over the gap below it.
- Pin the tab flat and square up the light blue panel.
- Let everything dry completely, about 24 hours.
- Hang the holder and check that the straps hang straight down.
Final Quality-Control Checklist
- Rnds 11, 12, 13, 19, 20, and 21 each have 66 sts.
- Every cluster round has 33 clusters.
- Each base is 5.25 in (13.3 cm) across and flat.
- Each wall is 3.5 in (8.9 cm) tall.
- Rnds 14-18 run B, A, B, A, B.
- The straps are 2.75 in (7.0 cm) apart and centered on the back.
- Both gaps are 1.5 in (3.8 cm).
- The tab is centered, the ring loop is secure, and no ends show.
Troubleshooting
Base ripples: Recount each round. If the counts are right, use a hook 0.5 mm smaller.
Base cups: You’ve probably missed an increase. Check each round against the stated counts.
Clusters spiral: Join into the top of the beg cl, not into the ch-2.
Rim flares: The rev sc is too loose. Rework Rnd 21 with firmer tension.
Basket tilts: One strap is sewn higher than the other. Measure both and re-sew to match.
Carried yarn shows: Trap the carried yarn more often, about every 4 clusters.
Care
Hand wash in cool water with mild soap and roll in a towel to remove water. Dry flat with a roll inside each basket so it keeps its shape.
Final Notes
Each measurement depends on the one before. A gauge of 16 sc = 4 in (10.2 cm) gives a 66-stitch base 5.25 in (13.3 cm) across. The count stays at 66 up through the clusters and rim, which makes a 3.5 in (8.9 cm) tall cylinder. Straps 3.5 in (8.9 cm) long leave 1.5 in (3.8 cm) gaps, and the tab brings the total length to about 17 in (43.2 cm). If you measure at each checkpoint, the holder will hang straight and hold three rolls neatly.
Happy crocheting!