

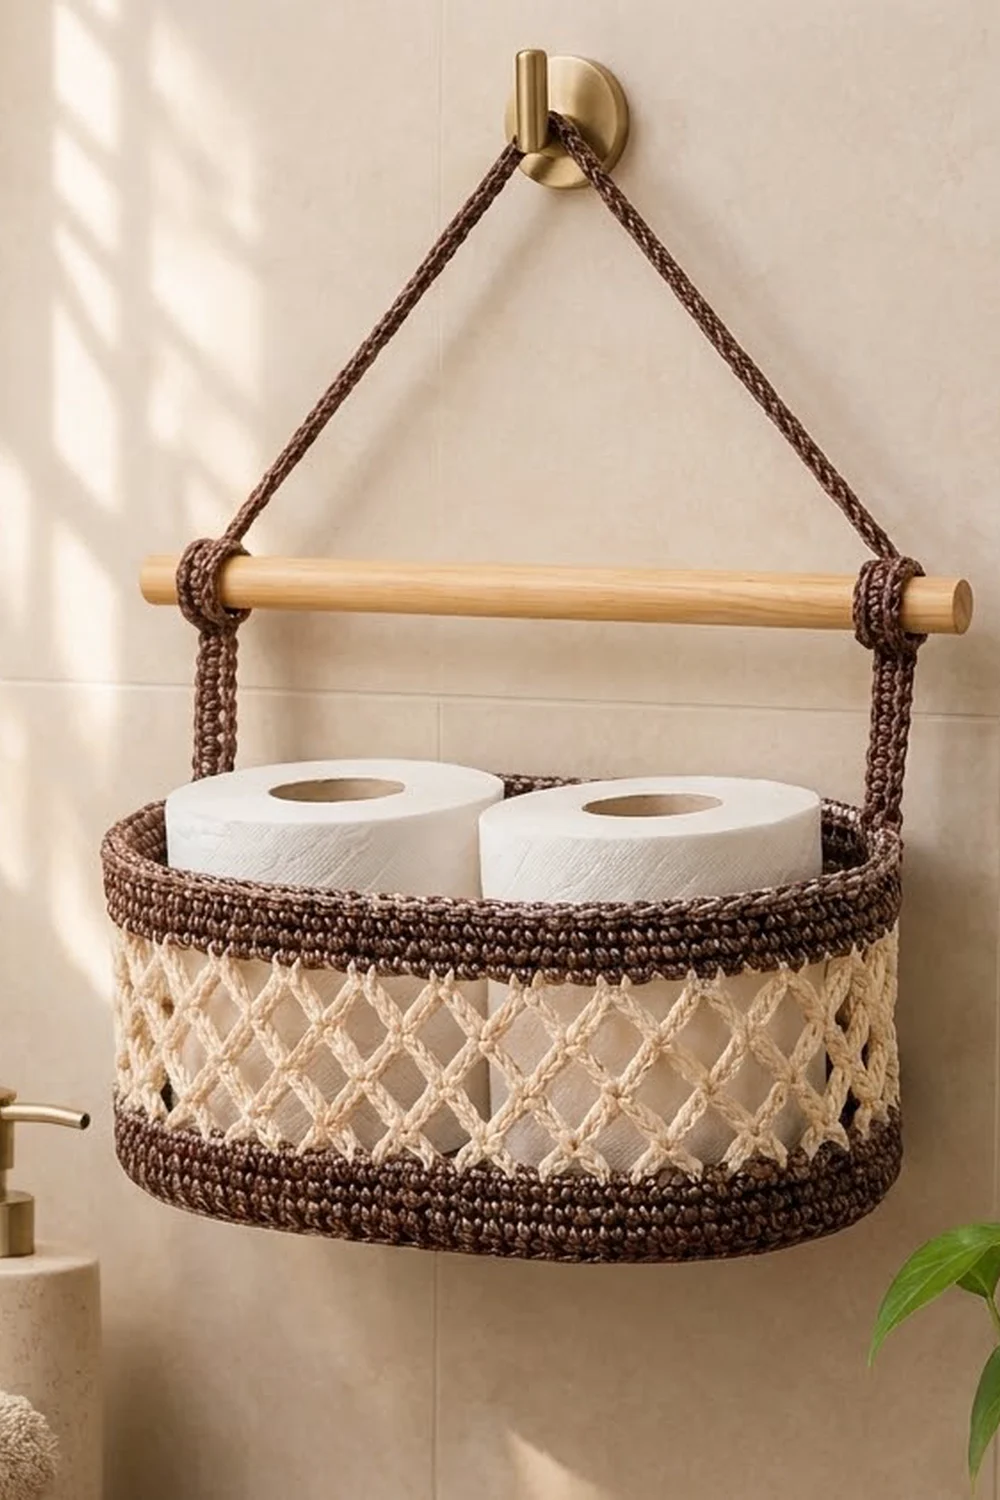
The Cocoa Lattice Hanging Basket is a small oval basket that hangs on the wall and holds two spare toilet rolls, hand towels or bath supplies. Solid chocolate-brown bands frame an open cream diamond lattice, so you can see what is inside while the basket still looks neat.
The palette uses only two colors: a deep cocoa brown and a soft natural cream. The style is warm and modern. It looks at home on beige tile, natural wood and brass fixtures.
This pattern uses US crochet terms. The finished basket measures about 10″ long × 5″ wide × 5″ tall (25.4 × 12.7 × 12.7 cm), and the top rim measures 26″ (66.0 cm) around.
You will make seven crocheted pieces: an oval base, a bottom band, a lattice panel, a top band, two strap loops and a hanging cord. You make the flat pieces first, seam them into rings and stack them on the base. A two-round border then finishes the rim, and the straps and cord connect the basket to a wooden dowel and a wall hook.
Finished Size and Construction
- Finished size: 10″ × 5″ × 5″ (25.4 × 12.7 × 12.7 cm)
- Skill level: Intermediate
- Terminology: US
- Yarn weight: Worsted / Aran cotton (#4)
- Hook: 4.5 mm (US 7)
- Number of pieces: 7 crocheted pieces, plus a dowel and wall hook
- Layout: base → bottom band → lattice → top band → border, with straps at both short ends
- Piece sizes: base 10″ × 5″ (25.4 × 12.7 cm); each band and the lattice panel 26″ (66.0 cm) long
- Height before border: 4.5″ (11.4 cm)
- Border depth: 0.4″ (1.0 cm)
Materials
Use a smooth, firm cotton or cotton blend so the basket holds its shape. Avoid soft acrylic, which lets the walls slump.
- Color A (Cocoa Brown): 150 g, about 255 m
- Color B (Natural Cream): 50 g, about 85 m
These quantities include a margin of roughly 15–20% for gauge differences and swatching.
Tools:
– 4.5 mm (US 7) crochet hook
– Tapestry needle
– 6–8 locking stitch markers
– Scissors and sewing pins
– Wooden dowel, 12″ (30.5 cm) long, 0.75″ (1.9 cm) in diameter
– Wall hook with screws and wall anchors
Abbreviations (US Terms)
- ch – chain
- sc – single crochet
- sl st – slip stitch
- sk – skip
- st(s) – stitch(es)
- sp – space
- rnd – round
- rev sc – reverse single crochet (crab stitch)
Reverse single crochet: work from left to right (right-handed). Insert the hook into the next stitch to the right, yarn over, pull up a loop, then yarn over and pull through both loops. This makes the corded rolled rim.
Gauge and Checkpoints
- Single crochet gauge: 16 sc and 18 rows = 4″ (10.2 cm)
- Lattice gauge: 4 ch-5 loops = 4″ (10.2 cm) wide; 4 mesh rows = 2″ (5.1 cm) tall
Test the base first, because every other piece is built to fit its stitch count.
Checkpoints:
– Rnd 1 of the base is about 5.25″ (13.3 cm) long.
– The finished base is 10″ × 5″ (25.4 × 12.7 cm), within 0.25″ (0.6 cm).
– Each band and the lattice panel is 26″ (66.0 cm) long before seaming.
If your pieces come out too big, go down 0.5 mm in hook size. If they are too small, go up 0.5 mm. Keep the stitch counts the same, because the matching counts are what make the pieces fit together.
Oval Base (make 1, Color A)
Join each round with a sl st to the first sc and ch 1. The ch-1 does not count as a stitch. The round starts at one end of the oval.
Ch 22.
Rnd 1: 3 sc in 2nd ch from hook (end 1), sc in next 19 ch (side 1), 3 sc in last ch (end 2). Working along the opposite side of the foundation chain, sc in next 19 ch (side 2). (44 sts)
Rnd 2: [2 sc in each of next 3 sts, sc in next 19 sts] twice. (50 sts)
Rnd 3: [(sc in next st, 2 sc in next st) 3 times, sc in next 19 sts] twice. (56 sts)
Rnd 4: [(sc in next 2 sts, 2 sc in next st) 3 times, sc in next 19 sts] twice. (62 sts)
Rnds 5–11: For each round, work one more plain sc before each increase than in the round before: [(sc in next (round number minus 2) sts, 2 sc in next st) 3 times, sc in next 19 sts] twice.
- Rnd 5: 68 sts
- Rnd 6: 74 sts
- Rnd 7: 80 sts
- Rnd 8: 86 sts
- Rnd 9: 92 sts
- Rnd 10: 98 sts
- Rnd 11: 104 sts
Each round adds 6 stitches, 3 at each end. After Rnd 11, each long side has 19 sts and each curved end has 33 sts: 19 + 33 + 19 + 33 = 104. Fasten off.
Checkpoint: 10″ × 5″ (25.4 × 12.7 cm).
Bottom Band (make 1, Color A)
Ch 105.
Row 1: Sc in 2nd ch from hook and in each ch across. (104 sts)
Rows 2–5: Ch 1, turn, sc in each st across. (104 sts)
Fasten off and leave a 12″ (30.5 cm) tail.
Checkpoint: 26″ × 1.1″ (66.0 × 2.8 cm).
Lattice Panel (make 1, Color B)
Ch 105.
Row 1: Sc in 2nd ch from hook and in each ch across. (104 sts)
Row 2: Ch 1, turn, sc in first st, [ch 5, sk 3 sts, sc in next st] 25 times, ch 5, sk 2 sts, sc in last st. (26 ch-5 loops)
Row 3: Ch 5 (counts as the first loop), turn, sc in first ch-5 sp, [ch 5, sc in next ch-5 sp] 25 times. (26 loops)
Rows 4–5: Repeat Row 3. (26 loops each)
Row 6: Ch 1, turn, 4 sc in each ch-5 sp across. (26 × 4 = 104 sts)
Fasten off. The sc anchors in the middle of each loop pull the chains into the diamond lattice.
Checkpoint: 26″ × 2.5″ (66.0 × 6.4 cm).
Top Band (make 1, Color A)
Work as for the Bottom Band, but stop after Row 4. (104 sts)
Checkpoint: 26″ × 0.9″ (66.0 × 2.3 cm).
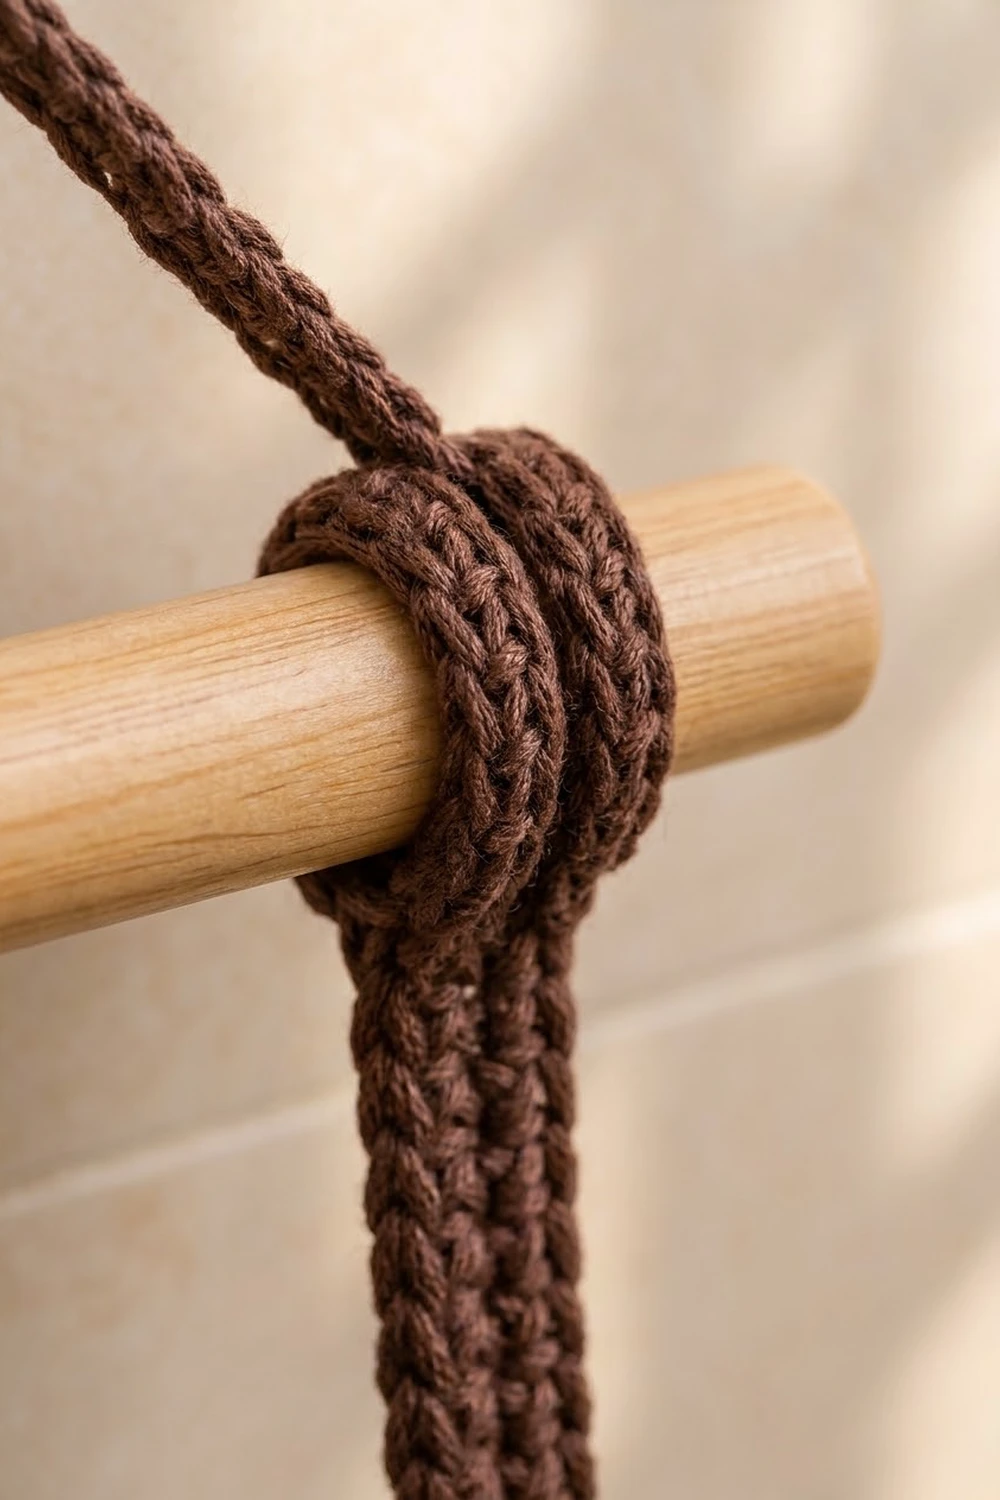
Strap Loops (make 2, Color A)
Ch 40. Sl st to the first ch to make a ring, taking care not to twist it.
Rnd 1: Ch 1, sc in each ch around, sl st to the first sc. (40 sts)
Fasten off. Leave a 12″ (30.5 cm) tail. Flattened, each strap is a long oval loop 5″ (12.7 cm) long and about 0.4″ (1.0 cm) wide.
Hanging Cord (make 1, Color A)
- Ch 8, sl st to the first ch to make a ring (loop 1).
- Ch 80.
- Ch 8, sl st to the 8th ch from hook to make a second ring (loop 2).
- Sl st in the back bump of each of the 80 ch, back to loop 1.
Fasten off. The cord is about 20″ (50.8 cm) long between the loops.
Make All Pieces
Color A (brown): 1 base, 1 bottom band, 1 top band, 2 strap loops, 1 hanging cord.
Color B (cream): 1 lattice panel.
Stacking layout (side view, top to bottom):
[ Border: 2 rnds, A ]          0.4" (1.0 cm)
[ Top band: 4 rows, A ]        0.9" (2.3 cm)
[ Lattice: 6 rows, B ]         2.5" (6.4 cm)
[ Bottom band: 5 rows, A ]     1.1" (2.8 cm)
[ Oval base: 11 rnds, A ]      10" × 5" (25.4 × 12.7 cm)
Every ring is 104 sts long, which matches Rnd 11 of the base.
Joining
1. Close the rings. Fold each band right sides together and whipstitch the short ends: 5 row-ends on the bottom band, 4 on the top band. Seam the lattice panel the same way, matching the sc rows and catching the end loops so the diamonds continue across the seam.
2. Join the base to the bottom band. Place the foundation-chain edge of the bottom band against Rnd 11 of the base, wrong sides together. Put the band seam at the center of one long side. With Color A, work 1 sc through both layers in each st around (104 sc). This makes a small, firm ridge along the bottom edge.
3. Join the lattice. Place Row 1 of the lattice on top of Row 5 of the bottom band, lining up the seams. With Color A and the tapestry needle, whipstitch on the inside, joining 1 lattice st to 1 band st (104 pairs).
4. Join the top band. Whipstitch the foundation edge of the top band to Row 6 of the lattice, again 1 st to 1 st (104 pairs).
Tension: pull each seam stitch just snug. If you pull too hard, the wall puckers and narrows. If you sew too loosely, the lattice sags.
Size checkpoint: before the border, the basket is 4.5″ (11.4 cm) tall, and the rim measures 26″ (66.0 cm) around.
Border
The border is worked in Color A into the free stitches of Row 4 of the top band. It uses the same gauge as the bands: 4 sts per inch (2.5 cm).
Before you start, place markers so each long side has 19 sts and each curved end has 33 sts. These line up with the sides and ends of the base.
Rnd 1: Join yarn at the center of one long side. Ch 1, sc in each st around. That is 19 + 33 + 19 + 33. Sl st to the first sc. (104 sts)
Rnd 2: Ch 1, rev sc in each st around. Again 19 + 33 + 19 + 33. Sl st to join. (104 sts)
Fasten off and weave in the end.
Why the math works: the base ends at 104 sts, and every ring was made 104 sts long: two bands of 104 sc and a lattice of 26 loops × 4. Because the border neither increases nor decreases, the walls rise straight up from the base and the rim stays 26″ (66.0 cm) around. Each side keeps exactly its own count, with no extra corner stitches.
Attaching the straps: mark the middle stitch (st 17) of each 33-st end. Center one strap on the inside of each end. Sew the bottom 1.5″ (3.8 cm) of the flattened strap flat against the top band, stitching through both strap layers. About 3.5″ (8.9 cm) of each loop stands above the rim.
Final Blocking
- Lightly spritz the basket, or soak it and gently squeeze out the water.
- Fill it with a box or rolled towels about 10″ × 5″ (25.4 × 12.7 cm).
- Push the walls straight up and line the diamonds up vertically.
- Pin or press the top border so it rolls evenly.
- Let it dry completely, then remove the filler.
- Do not block the straps or the cord.
Final Quality-Control Checklist
- The base lies flat and measures 10″ × 5″ (25.4 × 12.7 cm).
- All three rings and the base have 104 sts.
- The seams line up at the center back of one long side.
- The diamonds run evenly across the lattice seam.
- The rim measures 26″ (66.0 cm) and is 4.9–5″ (12.4–12.7 cm) high.
- The straps are centered on the ends and sewn securely.
- The dowel slides through both straps, and the cord loops sit outside the straps.
Troubleshooting
- Base cups or ruffles: check your stitch count every round. A cupped base usually means too few stitches, and a ruffled base means too many or a tension change.
- Pointed oval ends: move the increases one stitch to the left on every other round.
- Ring is longer than the base: your rows have spread out. Go down a hook size or tighten the joining stitches.
- Lattice sags: try ch 4 loops, then check that you still have 26 loops per row.
- Basket tilts when hanging: recheck that each strap sits at st 17 of its end.
- Rim flares: redo the border with a smaller hook.
Care
Hand wash in cool water, reshape, and dry flat around a box. Do not tumble dry.
Final Notes
The whole basket depends on one chain of measurements. The base reaches 104 sts at 10″ × 5″ (25.4 × 12.7 cm). Each band and the lattice is 104 sts and 26″ (66.0 cm) long. The walls stack to 4.5″ (11.4 cm), and the 104-st border brings the basket to about 5″ (12.7 cm). If those numbers match at each checkpoint, the pieces will fit together and the basket will hang straight. Happy crocheting!