

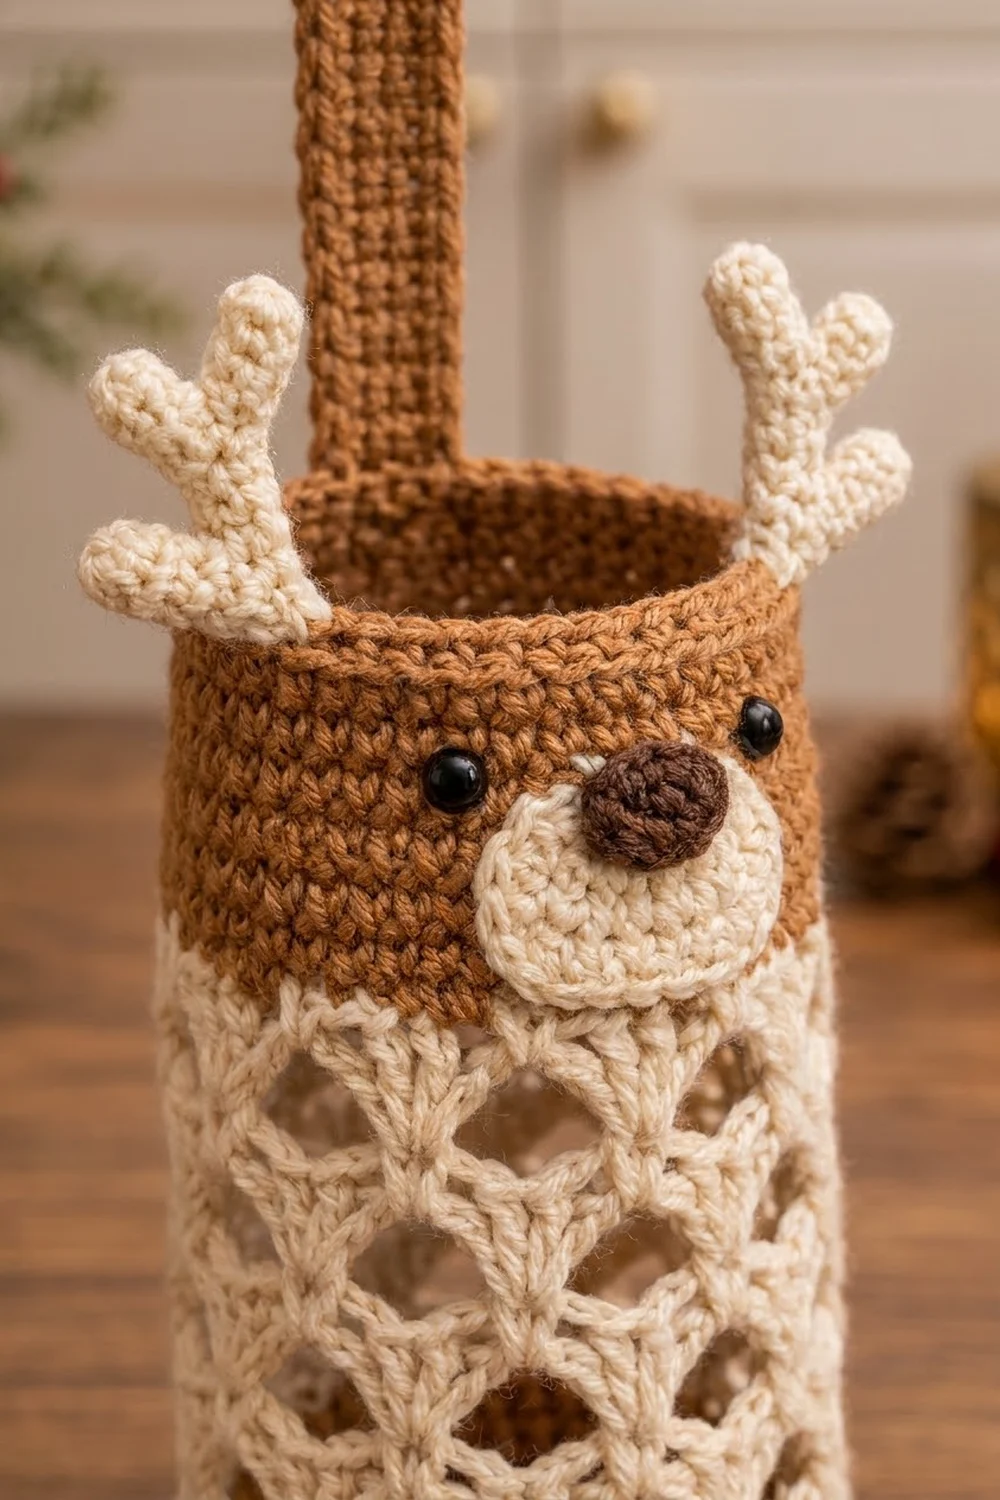
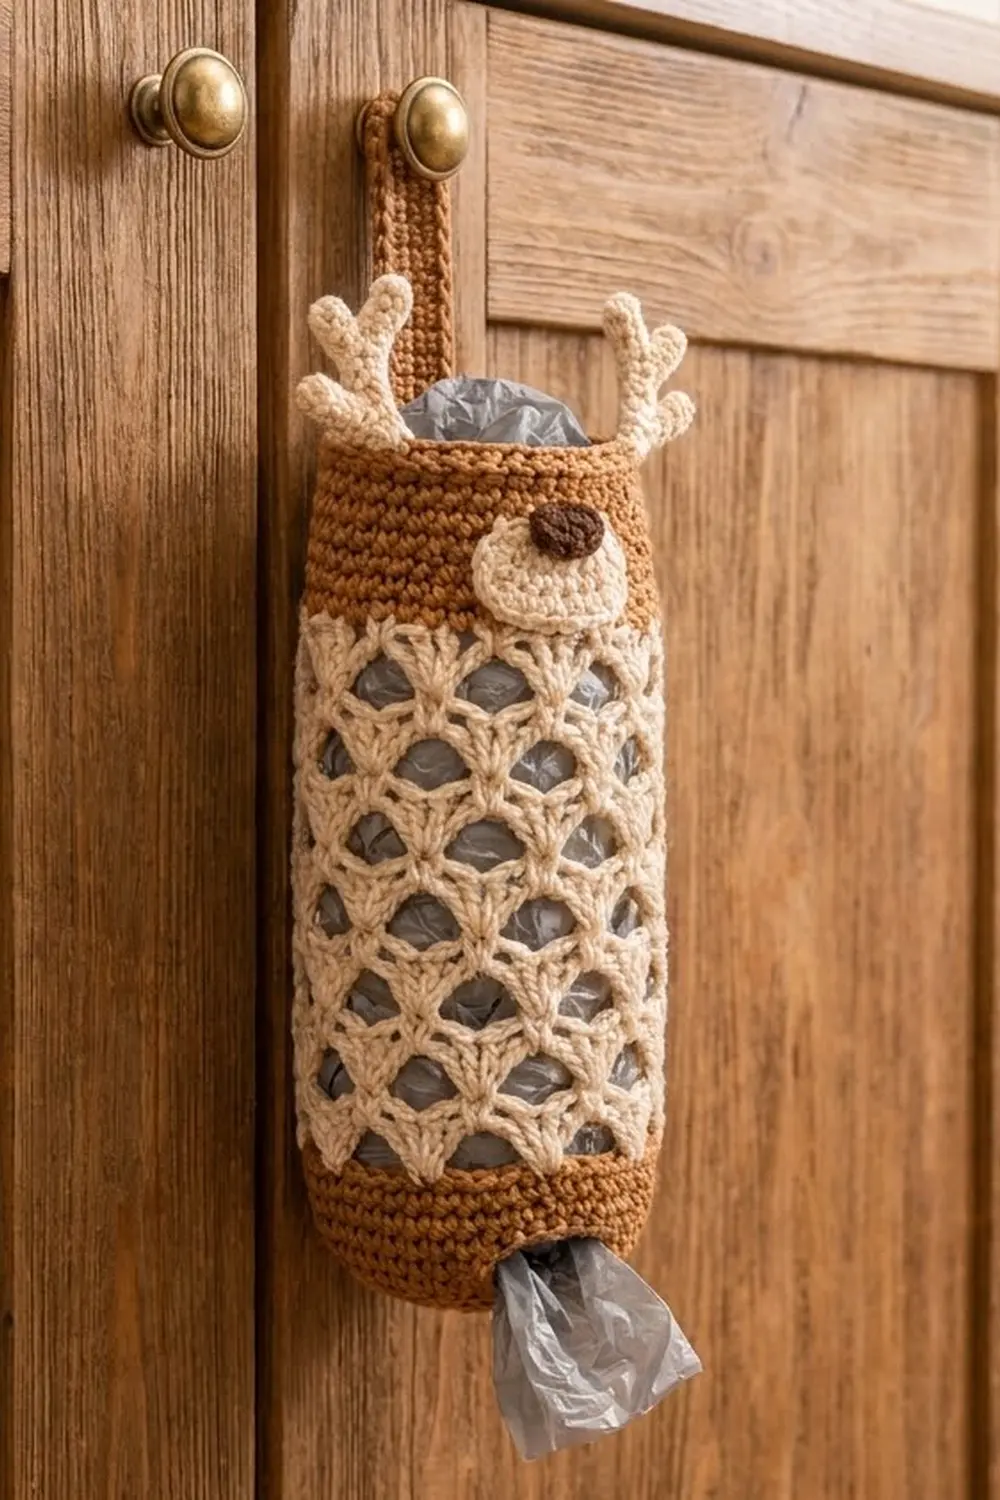
This cheerful reindeer keeps your plastic bags tidy and turns a kitchen cabinet into a little holiday display. The body is a tall tube with a solid caramel-brown base, an airy cream honeycomb of shells in the middle, and a solid brown band at the top that becomes the reindeer’s face.
The face is simple: a flat cream oval muzzle, a small puffed dark brown nose, and two cream antlers with three rounded tines each. A brown strap at the back hangs from a knob or hook. Stuff bags in at the top and pull them out one at a time through the hole in the base.
All instructions use US crochet terms. The finished holder measures about 8.5 in (21.6 cm) wide laid flat and 15.5 in (39.4 cm) tall from base to rim, plus the strap and antlers.
Construction is straightforward. You work the body in joined rounds from the bottom opening up: single crochet base, shell lace, then a single crochet top band and slip-stitch rim. The strap, muzzle, nose, and antlers are made separately and sewn on.
Finished Size and Construction
- Finished size: 8.5 in (21.6 cm) wide laid flat, about 17 in (43.2 cm) around, 15.5 in (39.4 cm) tall
- Skill level: Easy-intermediate
- Terminology: US
- Yarn weight: Worsted (#4)
- Hook: 5.0 mm (H-8)
- Number of pieces: 1 body, 1 strap, 1 muzzle, 1 nose, 2 antler beams, 6 antler tines
- Layout: One seamless tube worked in joined rounds; small parts appliquéd on
- Body before top band: 12.5 in (31.8 cm) tall (base plus lace)
- Top band (border) depth: 3 in (7.6 cm)
- Strap: 1.75 in (4.4 cm) wide, 9 in (22.9 cm) long, 7 in (17.8 cm) showing above the rim
Materials
Choose a smooth worsted-weight cotton or cotton blend. Cotton holds its shape well when the holder is packed with bags. Acrylic works too but will stretch more in the lace.
- Color A, caramel brown: 70 g / 140 m (base, top band, strap)
- Color B, cream: 80 g / 160 m (lace body, muzzle, antlers)
- Color C, dark chocolate brown: 5 g / 10 m (nose)
Quantities include a margin of about 15 percent for your gauge swatch and tails.
Tools:
- 5.0 mm (H-8) crochet hook
- Tapestry needle
- Stitch marker
- Small amount of polyester fiberfill
- Straight pins
- Measuring tape
- Scissors
For a taupe variation like the second holder in the photo, swap Color A for a gray-brown taupe in the same weight.
Abbreviations (US Terms)
- ch: chain
- sl st: slip stitch
- sc: single crochet
- dc: double crochet
- st(s): stitch(es)
- sp: space
- MR: magic ring
- rep: repeat
- Rnd: round
Special stitch:
- Shell: (2 dc, ch 2, 2 dc) in the indicated stitch or space.
Gauge and Checkpoints
Gauge: 14 sc and 16 rounds = 4 in (10.2 cm) in Color A.
Lace gauge: 4 lace rounds = 2.5 in (6.4 cm) tall; one 6-stitch repeat is about 1.7 in (4.3 cm) wide.
Test the base first. It is the most reliable gauge swatch because it is worked in solid sc on exactly 60 stitches.
Checkpoints:
- After Rnd 1: the bottom opening is about 2.7 in (6.9 cm) across.
- After Rnd 6: the base lies as a slightly domed ring; the outer edge measures about 17 in (43.2 cm) around.
- After Rnd 10: the base is 2.5 in (6.4 cm) tall and 8.5 in (21.6 cm) wide laid flat.
- After Rnd 26: the body is 12.5 in (31.8 cm) tall.
- After Rnd 39: the body is 15.5 in (39.4 cm) tall.
If your piece is too big, go down one hook size (4.5 mm). If it is too small, go up one size (5.5 mm). Do not change the stitch count; the lace needs exactly 60 stitches (10 repeats of 6).
Body
Work in joined rounds. The ch 1 at the start of sc rounds does not count as a stitch.
Base (Color A)
Foundation: Ch 30, sl st to first ch to form a ring, being careful not to twist.
Rnd 1: Ch 1, sc in each ch around, sl st to first sc. (30 sc)
Rnd 2: Ch 1, (sc in next 4 sts, 2 sc in next st) 6 times, sl st to first sc. (36 sc)
Rnd 3: Ch 1, (sc in next 5 sts, 2 sc in next st) 6 times, sl st to first sc. (42 sc)
Rnd 4: Ch 1, (sc in next 3 sts, 2 sc in next st, sc in next 3 sts) 6 times, sl st to first sc. (48 sc)
Rnd 5: Ch 1, (sc in next 7 sts, 2 sc in next st) 6 times, sl st to first sc. (54 sc)
Rnd 6: Ch 1, (sc in next 4 sts, 2 sc in next st, sc in next 4 sts) 6 times, sl st to first sc. (60 sc)
Rnds 7-10: Ch 1, sc in each st around, sl st to first sc. (60 sc each round)
The increase rounds curve the base inward around the opening, giving the domed bottom. Fasten off Color A.
Lace Body (Color B)
Rnd 11 (set-up): Join Color B with sl st in any st. Ch 3 (counts as dc), (dc, ch 2, 2 dc) in same st (first shell made), *skip 2 sts, sc in next st, skip 2 sts, shell in next st; rep from * 8 more times, skip 2 sts, sc in next st, skip last 2 sts, sl st to top of beginning ch-3. (10 shells, 10 sc)
Check: each repeat uses 6 stitches (shell st, 2 skipped, sc, 2 skipped), and 10 x 6 = 60.
Rnd 12: Sl st in next dc and in next ch-2 sp, ch 1, sc in same sp, *ch 2, shell in next sc, ch 2, sc in ch-2 sp of next shell; rep from * around, omitting the final sc, sl st to first sc. (10 sc, 10 shells, 20 ch-2 sps)
Each new shell sits on top of a sc, and each new sc sits in the center of a shell. This offset builds the honeycomb of diamond-shaped holes.
Rnds 13-26: Sl st in next ch-2 sp, sl st in next 2 dc, sl st in next ch-2 sp (shell center), ch 1, sc in same sp, then work as Rnd 12 from *. (10 sc, 10 shells, 20 ch-2 sps each round)
You now have 16 lace rounds (Rnds 11-26), about 10 in (25.4 cm) tall. Fasten off Color B.
Strap (Color A)
Foundation: Ch 7.
Row 1: Sc in 2nd ch from hook and in each ch across. (6 sc)
Rows 2-31: Ch 1, turn, sc in each st across. (6 sc)
Row 32 (hanging slot): Ch 1, turn, sc in next 2 sts, ch 2, skip 2 sts, sc in last 2 sts. (4 sc, 1 ch-2 sp)
Row 33: Ch 1, turn, sc in next 2 sts, 2 sc in ch-2 sp, sc in last 2 sts. (6 sc)
Rows 34-36: Ch 1, turn, sc in each st across. (6 sc)
Fasten off, leaving a long tail. The strap is 1.75 in (4.4 cm) wide and 9 in (22.9 cm) long. Slip the slot over a knob or hook.
Muzzle (Color B)
Foundation: Ch 7.
Rnd 1: Sc in 2nd ch from hook, sc in next 4 ch, 3 sc in last ch; working along the other side of the chain, sc in next 4 ch, 2 sc in last ch (same ch as first sc), sl st to first sc. (14 sc)
Rnd 2: Ch 1, 2 sc in first st, sc in next 4 sts, 2 sc in each of next 3 sts, sc in next 4 sts, 2 sc in each of last 2 sts, sl st to first sc. (20 sc)
Rnd 3: Ch 1, (sc in next st, 2 sc in next st) once, sc in next 4 sts, (sc in next st, 2 sc in next st) 3 times, sc in next 4 sts, (sc in next st, 2 sc in next st) twice, sl st to first sc. (26 sc)
Fasten off, leaving a long tail. The oval measures about 3 in x 1.75 in (7.6 cm x 4.4 cm).
Nose (Color C)
Rnd 1: 6 sc in MR, sl st to first sc. (6 sc)
Rnd 2: Ch 1, 2 sc in each st around, sl st to first sc. (12 sc)
Rnd 3: Ch 1, sc in each st around, sl st to first sc. (12 sc)
Rnd 3 cups the circle slightly. Fasten off with a long tail. Add a pinch of fiberfill when sewing so the nose stands about 0.25 in (0.6 cm) above the muzzle. It is about 1 in (2.5 cm) across.
Antlers (Color B, make 2)
Beam: Work in a continuous spiral. 6 sc in MR. Rnds 2-8: sc in each st around. (6 sc) Fasten off, leaving a long tail. The beam is about 2 in (5.1 cm) long.
Tines (make 3 per antler): 5 sc in MR. Rnds 2-3: sc in each st around. (5 sc) Fasten off with a tail. Each tine is about 0.75 in (1.9 cm) long.
Stuff the beam and tines lightly. Sew one tine to the closed top of the beam, angled outward. Sew the other two to the outer side of the beam, about 0.5 in (1.3 cm) apart, all pointing upward.
Top Band and Rim (Border, Color A)
The top band works like a border: it firms up the open lace, adds the face area, and gives the opening a stable edge.
Border gauge: Same as the base, 14 sc and 16 rounds = 4 in (10.2 cm).
Rnd 27 (conversion): Join Color A with sl st in first sc of Rnd 26. Ch 1, *sc in sc, sc in next ch-2 sp, skip next dc, sc in next dc, sc in shell ch-2 sp, sc in next dc, skip next dc, sc in next ch-2 sp; rep from * around, sl st to first sc. (60 sc)
Count breakdown: 1 sc per element worked, 10 (in sc) + 20 (in ch-2 sps) + 10 (in shell centers) + 20 (in inner dc) = 60, plus 0 extra stitches. The 20 outer dc are skipped.
Rnds 28-38: Ch 1, sc in each st around, sl st to first sc. (60 sc each round)
Rnd 39 (rim): Ch 1, sl st loosely in each st around, sl st to first sl st. (60 sl st)
Fasten off and weave in ends.
Why the math works: A tube has no corners, so there are no corner stitches to account for. Front and back each carry 30 stitches (30 + 30 = 60). The band holds the same 60 stitches as the base, which matches the 10 lace repeats of 6, so the holder stays straight-sided. Twelve sc rounds (Rnds 27-38) at 16 rounds per 4 in give 3 in (7.6 cm). Total height: 2.5 in + 10 in + 3 in = 15.5 in (39.4 cm).
Assembly
- Flatten the body with the round joins at center back.
- Pin the strap inside the back, centered, with the bottom 2 in (5.1 cm) (8 rows) overlapping the band. Whipstitch all four edges through the band only, so the stitches do not show on the front.
- Pin the muzzle on the front, centered, with its lower 0.5 in (1.3 cm) overlapping the top lace round. Whipstitch around the edge.
- Sew the nose on the upper edge of the muzzle, stuffing it lightly before closing.
- Sew one antler inside the rim at each side, with 0.75 in (1.9 cm) of beam inside the band.
Final Blocking
- Wet the holder in cool water and squeeze gently; do not wring.
- Roll in a towel to remove excess moisture.
- Slip a rolled towel or a 5.5 in (14.0 cm) diameter tube inside to hold the cylinder shape.
- Ease the lace so every diamond opens evenly and the shells stack in straight columns.
- Shape the antlers upright and smooth the muzzle flat.
- Check that the body is 15.5 in (39.4 cm) tall and 8.5 in (21.6 cm) wide flat.
- Air-dry completely before filling.
Final Quality-Control Checklist
- Base, lace, and top band each have 60 stitches or 10 repeats.
- The bottom opening is about 2.7 in (6.9 cm) across.
- The lace columns run straight, with no twist.
- The muzzle is centered under the nose and between the antlers.
- The strap is centered at the back and firmly sewn.
- All ends are woven in securely.
Troubleshooting
Lace is wider than the bands: Your dc are loose. Go down a hook size for the lace rounds only.
Lace columns slant: Make sure each round starts in the shell center, and join to the first sc, not the ch-1.
Bottom opening too tight for bags: Rework the foundation with a larger hook, keeping 30 chains.
Top rim flares: Work Rnd 39 with a smaller hook or tighter sl st.
Antlers droop: Add more fiberfill or sew a few extra anchoring stitches inside the band.
Care
Hand wash in cool water and lay flat to dry, reshaping over a rolled towel. Avoid the dryer so the lace and antlers keep their shape.
Final Notes
Everything rests on one measurement chain. Gauge of 14 sc per 4 in (10.2 cm) gives 60 stitches around and 8.5 in (21.6 cm) flat. The 60 stitches split into 10 lace repeats. The base adds 2.5 in (6.4 cm), the lace 10 in (25.4 cm), and the top band 3 in (7.6 cm), for 15.5 in (39.4 cm) total. Check each stage and your reindeer will stand tall and dispense bags neatly all season.
Happy crocheting!