

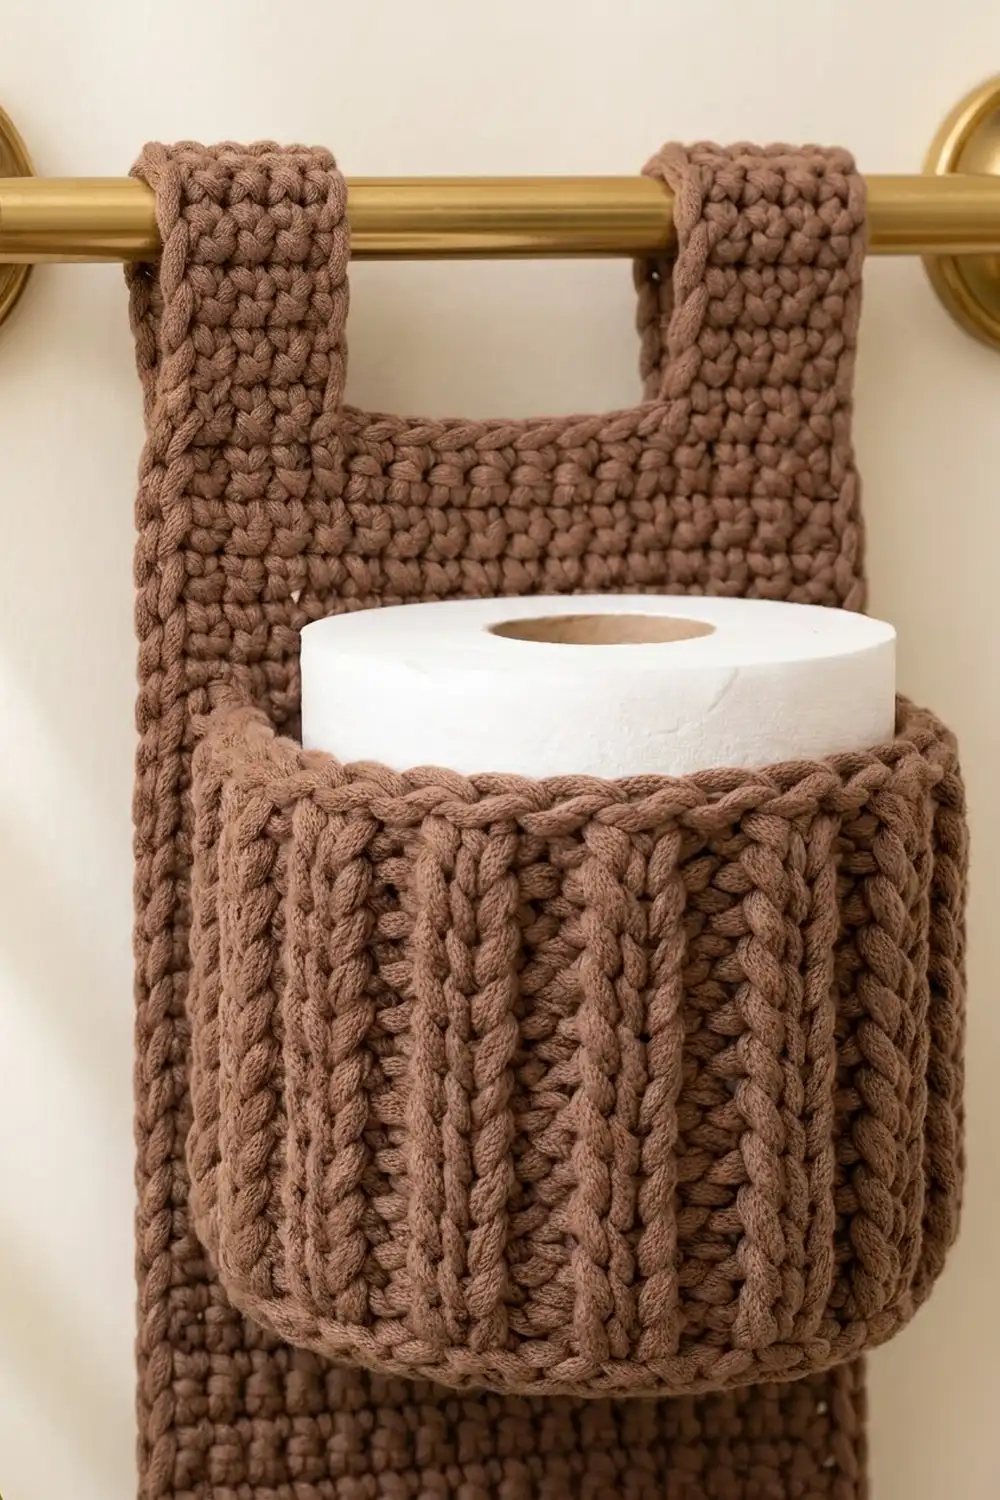
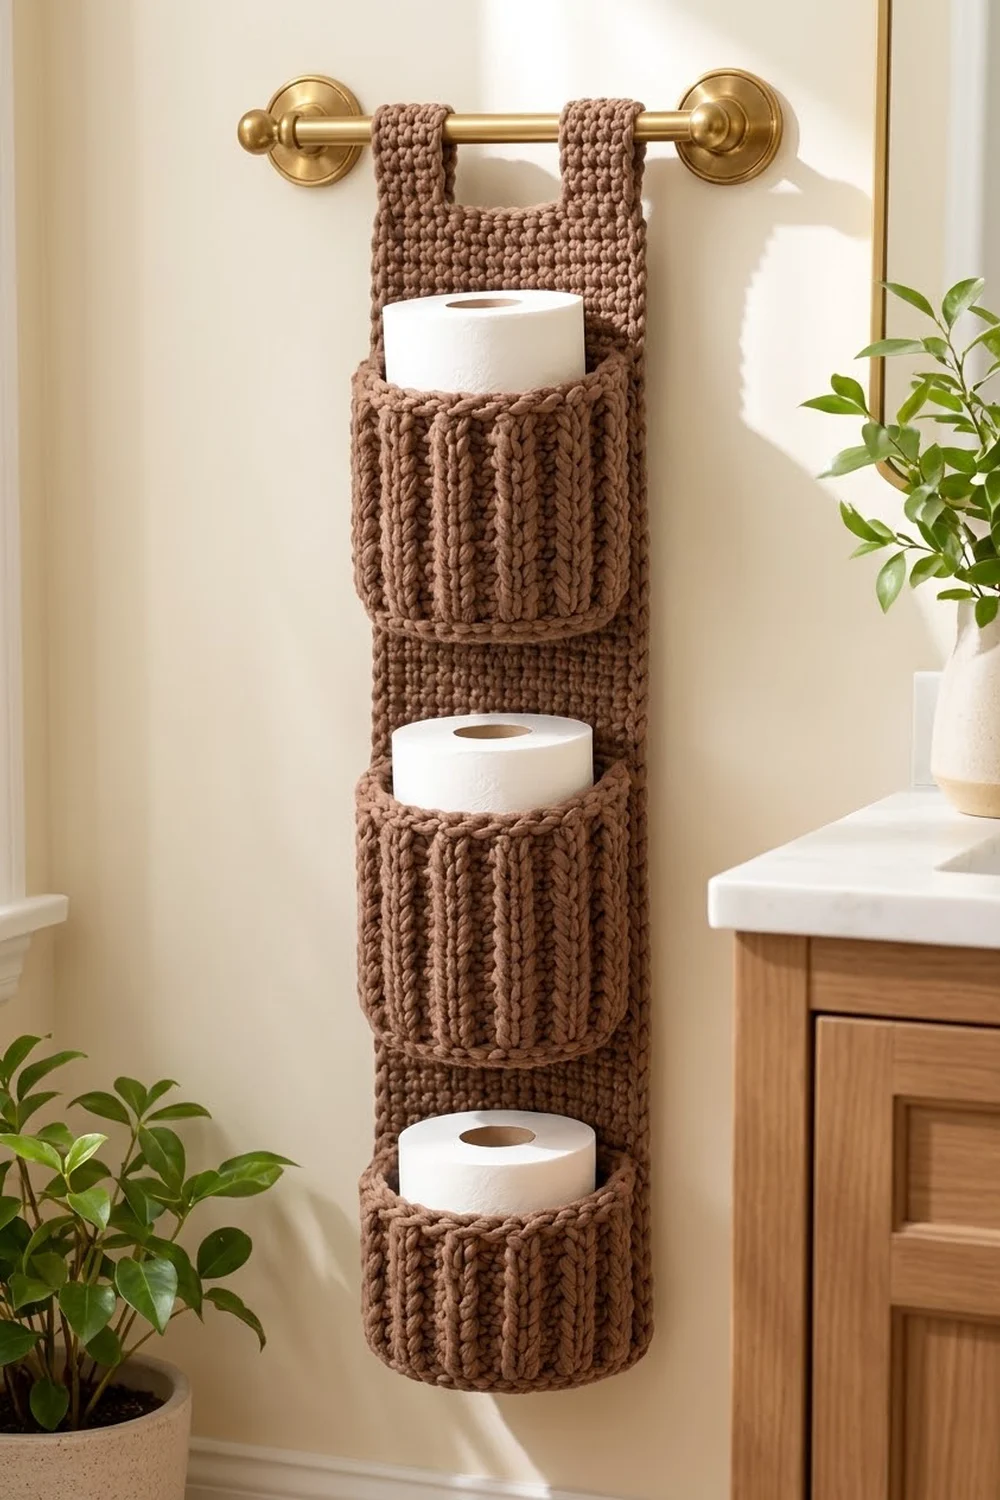
This hanging toilet paper holder is a long, solid back panel with three round, ribbed pockets stitched down its front. Each pocket holds one standard roll upright. Two straps at the top fold over a towel bar, so you don’t need any hardware.
The sample uses one warm cocoa brown in bulky yarn. The panel is plain single crochet, which makes a firm, flat background. The pockets use front-post and back-post double crochet ribbing, so they have strong vertical ribs that look almost knitted. Two rounds of single crochet finish each pocket with a rounded rim.
All instructions use US crochet terms. The finished panel measures about 7.2 x 29.2 in (18.3 x 74.2 cm), including the border. With the loops, it hangs about 32 in (81.3 cm) tall.
Here is the construction in order:
1. Crochet the panel in rows.
2. Add a two-round border.
3. Work two straps up from the top edge.
4. Make three identical pockets in the round, each starting from a flat circular base.
5. Sew each pocket to the panel inside a marked rectangle.
Finished Size and Construction
- Finished panel size: 7.2 x 29.2 in (18.3 x 74.2 cm) with border
- Total hanging height: about 32 in (81.3 cm)
- Skill level: Easy-intermediate
- Terminology: US crochet terms
- Yarn weight: Bulky (#5)
- Hook: 6 mm (US J-10)
- Number of pieces: 4 (1 back panel, 3 pockets)
- Layout: 3 pockets in a single vertical column, centered on the panel
- Pocket size: about 5.3 in (13.5 cm) across and 3.2 in (8.1 cm) tall
- Panel size before border: 6 x 28 in (15.2 x 71.1 cm)
- Border depth: 2 rounds, about 0.6 in (1.5 cm) on each side
Materials
Yarn: Use a smooth bulky (#5) acrylic, cotton blend, or wool blend. Smooth yarn shows the ribs clearly. Avoid very soft or fuzzy yarn, because the panel has to carry three rolls without stretching.
- Cocoa brown: about 230 g / 300 m
That amount includes a margin of about 15 percent. The sample used about 200 g / 260 m.
Tools:
- 6 mm (US J-10) crochet hook
- Tapestry needle
- 6–8 locking stitch markers
- Measuring tape
- Scissors
- Optional: three 4.5 in (11.4 cm) plastic canvas circles to stiffen the pocket bases
Abbreviations (US Terms)
- ch – chain
- sc – single crochet
- sl st – slip stitch
- inc – 2 sc in the same stitch
- BLO – back loop only
- st(s) – stitch(es)
- rnd – round
- MR – magic ring
Special stitches:
- FPdc (front post double crochet): Yarn over. Insert the hook from front to back to front around the post of the stitch below. Yarn over and pull up a loop, then (yarn over, pull through 2) twice. This stitch sits forward and makes a raised rib.
- BPdc (back post double crochet): Work like FPdc, but insert the hook from back to front to back around the post. This stitch sits behind and makes the groove between ribs.
Gauge and Checkpoints
- Single crochet: 12 sts and 14 rows = 4 in (10.2 cm)
- Post-stitch ribbing: 12 sts and 7 rnds = 4 in (10.2 cm)
Make one pocket first. It tests both gauges, because the base is single crochet and the wall is post stitches.
Checkpoints:
- Pocket base after Rnd 4: about 2.4 in (6.1 cm) across
- Pocket base after Rnd 8: about 4.75 in (12.1 cm) across and lying flat
- Finished pocket: 3.2 in (8.1 cm) tall
- Panel after Row 14: 6 x 4 in (15.2 x 10.2 cm)
- Panel after Row 98: 6 x 28 in (15.2 x 71.1 cm)
If your pieces are too big, change to a 5.5 mm (US I-9) hook. If they are too small, change to a 6.5 mm (US K-10.5) hook. A standard roll is about 4.5 in (11.4 cm) across, so the pocket base must be at least 4.6 in (11.7 cm) across.
Back Panel
The turning ch-1 does not count as a stitch.
Foundation: Ch 19.
Row 1: Sc in the 2nd ch from the hook and in each ch across, turn. (18 sts)
Rows 2–98: Ch 1, sc in each st across, turn. (18 sts)
Check the width every 10 rows. It should stay at 6 in (15.2 cm). If the edges pull in, you are probably missing the last stitch of the row.
After Row 98, the panel measures 6 x 28 in (15.2 x 71.1 cm). Don’t fasten off.
Panel Border
Border gauge: On the long sides, work 6 sc for every 7 row ends. This matches the 12-stitch by 14-row gauge, so the sides lie flat.
Rnd 1: Ch 1 and turn, so you are working along Row 98.
– Top edge: 3 sc in the first st, sc in the next 16 sts, 3 sc in the last st.
– Long side: Work 84 sc down the row ends. Work 1 sc in each row end, but skip every 7th row end (98 ÷ 7 × 6 = 84).
– Bottom edge: Along the foundation chain, 3 sc in the first ch, sc in the next 16 ch, 3 sc in the last ch.
– Second long side: Work 84 sc up the row ends the same way.
– Sl st to the first sc to join. (212 sts)
The center stitch of each 3-sc group is the corner center. Counting both corner centers, each short side has 20 sts and each long side has 88 sts. To check the total: 4 corner centers + (18 × 2) + (86 × 2) = 212.
Rnd 2: Ch 1. Sc in each st around, working 3 sc in each corner center. Sl st to join. (220 sts: 212 sts worked 1 per stitch + 8 added at the corners)
Counting both corner centers, each short side now has 22 sts and each long side has 90 sts. Fasten off. The panel now measures 7.2 x 29.2 in (18.3 x 74.2 cm).
Why the math works: At 3 sts per inch, 84 side stitches measure 28 in, the same as the panel length. Each 3-sc corner adds 2 sts per round, which is enough to turn the corner without cupping.
Hanging Straps
Count the 22 top stitches of Rnd 2 from one corner center to the other, and mark them:
– sts 1–6: Strap 1
– sts 7–16: gap of 10 sts, about 3.3 in (8.4 cm)
– sts 17–22: Strap 2
Strap 1, Row 1: With the right side facing, join yarn in st 1. Ch 1, sc in the same st and in the next 5 sts, turn. (6 sts)
Rows 2–21: Ch 1, sc in each st across, turn. (6 sts)
Fasten off and leave a 12 in (30.5 cm) tail.
Strap 2: Join yarn in st 17 and work as for Strap 1.
Each strap is 2 in (5.1 cm) wide and 6 in (15.2 cm) long. Fold each strap toward the back. Whipstitch Row 21 to the back of border Rnd 2, matching the 6 strap stitches 1 to 1 with 6 border stitches. Each loop fits a bar up to 1.5 in (3.8 cm) thick. If your bar has fixed ends, put the straps over the bar before you sew them down.
Pocket (Make 3)
The ch-1 or ch-2 at the start of a round does not count as a stitch.
Base
Rnd 1: 6 sc in MR, sl st to the first sc. (6 sts)
Rnd 2: Ch 1, inc in each st around, sl st to join. (12 sts)
Rnd 3: Ch 1, (sc in next st, inc) 6 times, sl st to join. (18 sts)
Rnd 4: Ch 1, (sc in next 2 sts, inc) 6 times, sl st to join. (24 sts)
Rnd 5: Ch 1, (sc in next 3 sts, inc) 6 times, sl st to join. (30 sts)
Rnd 6: Ch 1, (sc in next 4 sts, inc) 6 times, sl st to join. (36 sts)
Rnd 7: Ch 1, (sc in next 5 sts, inc) 6 times, sl st to join. (42 sts)
Rnd 8: Ch 1, (sc in next 6 sts, inc) 6 times, sl st to join. (48 sts)
The base should now be about 4.75 in (12.1 cm) across. If you are using a plastic canvas circle, trim it to fit inside Rnd 8.
Wall
Rnd 9 (turning ridge): Ch 1, sc in the BLO of each st around, sl st to join. (48 sts) This round makes a sharp fold so the wall stands straight up.
Rnd 10: Ch 2, (FPdc around next st, BPdc around next st) 24 times, sl st to the first FPdc. (48 sts, 24 ribs)
Rnds 11–13: Ch 2, (FPdc around the FPdc, BPdc around the BPdc) 24 times, sl st to join. (48 sts, 24 ribs)
Always work FPdc over FPdc and BPdc over BPdc. That keeps the ribs straight.
Rim
Rnds 14–15: Ch 1, sc in each st around, sl st to join. (48 sts)
These two rounds roll outward slightly to make the rounded rim. Fasten off and leave a 30 in (76.2 cm) tail for sewing.
The finished pocket is 3.2 in (8.1 cm) tall and about 5.3 in (13.5 cm) across the outside. A roll should drop in easily, with about 0.8 in (2.0 cm) showing above the rim.
Make All Pieces
- Back panel with straps (cocoa brown): 1
- Pockets (cocoa brown): 3
Layout grid (front view, top to bottom):
[ Strap ]   gap   [ Strap ]
| Rows 79–98: open panel |
| Rows 68–78: POCKET 3   |
| Rows 48–67: open panel |
| Rows 37–47: POCKET 2   |
| Rows 17–36: open panel |
| Rows 6–16:  POCKET 1   |
| Rows 1–5:   open panel |
A new pocket starts every 31 rows, or about 8.9 in (22.6 cm). That leaves 5.7 in (14.5 cm) of open panel between one rim and the next base, which gives you room to lift a roll out.
Joining
Method: Whipstitch with the pocket’s tail. Catch both loops on the pocket and one full stitch on the panel.
Marking the panel: Count rows from the bottom. For each pocket, mark panel sts 6 and 13 on the start row (6, 37, or 68) and on the row 10 rows above it (16, 47, or 78). This marks a rectangle 8 sts wide and 11 rows tall, with 5 body sts free on each side.
Marking the pocket: Choose 8 stitches in a row on Rnd 15 for the back of the pocket, with the round joins off to one side. Mark the 1st and 8th stitches. Run a contrast thread straight down the wall from each marker to the base.
Stitch-to-stitch logic:
- Bottom edge: Sew the 8 marked sts of Rnd 9 to panel sts 6–13 on the start row, 1 stitch to 1 stitch.
- Side seams: Sew each marked vertical line to its panel column, st 6 on one side and st 13 on the other, with 1 whipstitch per panel row. The pocket wall is 3 sc rounds plus 4 dc rounds, and each dc round is as tall as 2 sc rows. That adds up to 3 + 8 = 11 rows, which matches the 11 panel rows.
- Top edge: Sew the 8 marked sts of Rnd 15 to panel sts 6–13 on the top row of the rectangle, 1 stitch to 1 stitch.
Tension: Pull each stitch snug but not tight. Seams that are too tight make the panel pucker and narrow.
Size check: Lay the holder flat. It should still measure 7.2 x 29.2 in (18.3 x 74.2 cm). If it is narrower than 7 in (17.8 cm), loosen the side seams.
Final Blocking
- Lightly mist the whole piece with water.
- Lay it face up on a towel or blocking mat.
- Pin the panel to 7.2 x 29.2 in (18.3 x 74.2 cm), keeping the long edges straight.
- Put a roll wrapped in a plastic bag into each pocket so the pockets dry round.
- Pin the straps flat.
- Let it dry completely, usually 12–24 hours.
- Unpin it and hang it on the bar.
Final Quality-Control Checklist
- Panel is 18 sts wide and 98 rows long
- Border Rnd 2 has 220 sts: 22 on each short side and 90 on each long side
- Straps are 6 sts wide and 21 rows long, and sewn down securely
- Each pocket has 48 sts and 24 straight ribs
- All pockets are 3.2 in (8.1 cm) tall
- Pockets are centered, with 5 sts free on each side
- Pockets start every 31 rows
- Ends are woven in at least 2 in (5.1 cm)
Troubleshooting
Ribs slant or break: An FPdc was worked over a BPdc. Rip back to that round and rework it.
Base cups upward: The base is too tight. Use a hook half a size larger for Rnds 1–8.
Base ruffles: Each round from Rnd 2 to Rnd 8 should add exactly 6 sts. Recount to find the extra stitch.
Border sides wave: There are too many border stitches. Go back to 6 sc per 7 row ends.
Panel stretches when loaded: Your gauge is too loose. Use a smaller hook, or back the panel with felt.
Pockets tip forward: Sew a second row of tacking stitches through Rnd 15.
Care
Hand wash in cool water, roll the holder in a towel to remove water, and lay it flat to dry. While it is damp, reshape the pockets around a roll.
Final Notes
Each measurement depends on the one before it:
1. The gauge is 3 sts and 3.5 rows per inch.
2. 18 sts make the panel 6 in (15.2 cm) wide, and 98 rows make it 28 in (71.1 cm) long.
3. 6 sc per 7 row ends gives 84 sts on each long side.
4. Two border rounds bring the panel to 7.2 x 29.2 in (18.3 x 74.2 cm).
5. The 22 top stitches split into 6 + 10 + 6 for the straps.
6. Each 48-stitch pocket is sewn into an 8-stitch by 11-row rectangle, and a new pocket starts every 31 rows.
Happy crocheting!