

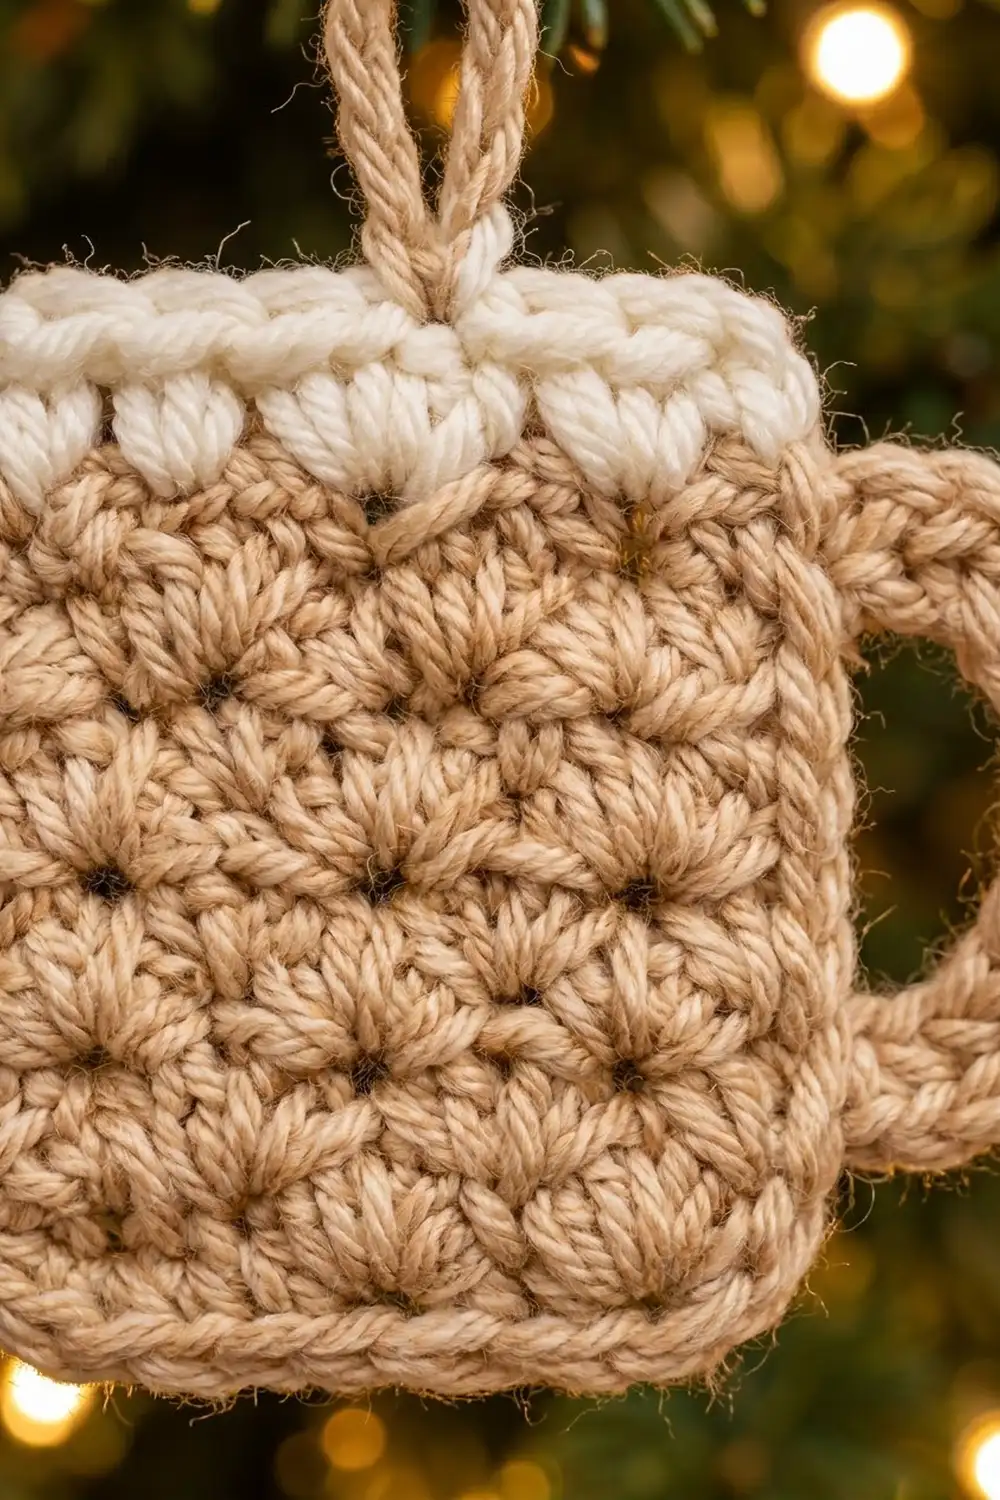
This little mug ornament looks like a cup of hot cocoa topped with a frothy layer of foam. The body is worked in star stitch, which covers the surface in tiny starbursts that catch the light from the tree. A cream bobble row forms the foam, and a chunky rope handle finishes the mug shape.
You need two colours: oatmeal beige for the mug and cream for the foam. Both are DK-weight yarn. The pattern uses US crochet terms.
The finished mug body measures 3.0 in (7.6 cm) wide by 2.875 in (7.3 cm) tall. With the handle, the ornament is 4.25 in (10.8 cm) wide. With the hanging loop, it is 3.625 in (9.2 cm) tall.
You work the body flat in rows from the bottom up. Next, you add a single crochet border around the sides and bottom. The handle is worked straight off the right-side border, so there is no sewing. A chain loop at the top finishes the ornament.
Finished Size and Construction
- Finished body size: 3.0 in wide × 2.875 in tall (7.6 × 7.3 cm)
- Overall size: 4.25 in (10.8 cm) wide with handle; 3.625 in (9.2 cm) tall with loop
- Skill level: Easy-intermediate (star stitch, bobbles, colour change)
- Terminology: US crochet terms
- Yarn weight: DK / light worsted (#3)
- Hook: 3.5 mm (E-4)
- Number of pieces: 1 (handle and loop are worked onto the piece)
- Layout: single motif, no assembly
- Body size before border: 2.75 in × 2.75 in (7.0 × 7.0 cm)
- Border depth: 0.125 in (0.3 cm) on the left, right and bottom edges
Materials
Choose a smooth DK cotton, cotton blend or acrylic so the star eyes show clearly. Fuzzy yarns blur the texture. Yardage below assumes about 230 m per 100 g.
- Colour A – Oatmeal beige: 10 g, about 23 m (body, border, handle, loop)
- Colour B – Cream: 3 g, about 7 m (foam band)
These quantities include a margin of about 25% for your gauge swatch and yarn tails.
Tools:
– 3.5 mm (E-4) crochet hook
– Tapestry needle
– Scissors
– Stitch marker
– Rust-proof pins and a foam blocking mat
– Ruler or tape measure
Abbreviations (US Terms)
- ch – chain
- sl st – slip stitch
- sc – single crochet
- hdc – half double crochet
- dc – double crochet
- st(s) – stitch(es)
- yo – yarn over
- RS / WS – right side / wrong side
Star (special stitch): A star gathers 6 loops on the hook, using loops pulled up as directed. Yo, draw through all 6 loops, then ch 1 to close. That closing ch is the star’s eye.
Bobble: Work (yo, insert hook in st, pull up a loop, yo, draw through 2 loops) 4 times in the same st. You now have 5 loops on the hook. Yo and draw through all 5. Bobbles worked on a WS row puff out toward the RS.
Gauge and Checkpoints
Your first ornament is your test piece. Check it at each stage, since a small piece shows small errors.
- After Row 1: 14 sc = 2.75 in (7.0 cm) wide.
- After Row 5: body height = 1.25 in (3.2 cm).
- After Row 9: body height = 2.25 in (5.7 cm). Each star row plus hdc row adds 0.5 in (1.3 cm).
- After Row 11: body = 2.75 in × 2.75 in (7.0 × 7.0 cm).
- After Border: body = 3.0 in × 2.875 in (7.6 × 7.3 cm).
- After Handle: overall width = 4.25 in (10.8 cm).
Too big? Go down to a 3.25 mm or 3.0 mm hook. Too small? Go up to a 3.75 mm or 4.0 mm hook. A difference of 0.125 in (0.3 cm) is fine on an ornament. Change hooks only if you are off by more than 0.25 in (0.6 cm).
Mug Body
Use Colour A, unless a row says otherwise.
Row 1 (WS): Ch 15. Sc in 2nd ch from hook and in each ch across. (14 sc)
Check that the width is 2.75 in (7.0 cm).
Row 2 (RS, star row): Ch 3, turn.
- First star: Pull up a loop in the 2nd ch from hook and in the 3rd ch from hook. Then pull up a loop in each of the first 3 sts: the st at the base and the next 2. That makes 6 loops on the hook. Yo, draw through all 6, ch 1 to close the eye.
- Next star: Pull up a loop in the eye just made. Pull up a loop in the back of the last loop of the previous star. Pull up a loop in the same st as the last loop of the previous star. Pull up a loop in each of the next 2 sts. That makes 6 loops. Yo, draw through all 6, ch 1.
- Repeat “next star” 4 more times.
- Hdc in the last st.
(6 stars + 1 hdc)
Stitch check: The first star uses sts 1–3. Each of the next 5 stars uses the last st of the star before it plus 2 new sts, which takes you to st 13. The hdc goes into st 14. Every st of Row 1 is used.
Row 3 (WS, hdc row): Ch 2 (counts as hdc), turn. Work 2 hdc in the eye of each star across. Hdc in the top of the beginning ch-3. (14 hdc: 1 + 12 + 1)
Rows 4, 6 and 8 (RS): Repeat Row 2. (6 stars + 1 hdc each)
Rows 5 and 7 (WS): Repeat Row 3. (14 hdc each)
Checkpoint after Row 5: height 1.25 in (3.2 cm).
Row 9 (WS): Repeat Row 3. On the last hdc, change to Colour B in the final yo. (14 hdc) Cut Colour A, leaving a 6 in (15.2 cm) tail.
Checkpoint: height 2.25 in (5.7 cm), width 2.75 in (7.0 cm). You now have 4 star rows, which give the four bands of stars.
Foam Band
Use Colour B.
Row 10 (RS): Ch 1, turn. Sc in each st across. (14 sc)
Row 11 (WS, bobble row): Ch 1, turn. Sc in the first st, bobble in next st, sc in next st. Repeat from * 5 more times, then sc in the last st. (14 sts: 1 sc + 6 bobbles + 6 sc + 1 sc)
The pattern leaves 1 sc at one edge and 2 sc at the other. The border’s corner stitches hide this difference.
Fasten off Colour B, leaving a 6 in (15.2 cm) tail. Turn so the RS faces you. The bobbles should sit on the front as rounded bumps.
Checkpoint: body = 2.75 in × 2.75 in (7.0 × 7.0 cm).
Border
The border runs down the left side, across the bottom and up the right side. The top edge stays cream and bumpy, like foam spilling over the rim.
Border gauge: about 5.5 sc per inch along the row ends and about 5 sc per inch along the bottom. Along row ends, put 2 sc on tall star rows and 1 sc on shorter rows.
Border Row (RS): With the RS facing, join Colour A with a sl st at the top-left corner, in the side of Row 11. Ch 1.
Left side, working down: Work 15 sc along the row ends:
- Row 11: 1 sc
- Row 10: 1 sc
- Rows 9, 7, 5, 3 (hdc rows): 1 sc each, for 4 sc
- Rows 8, 6, 4, 2 (star rows): 2 sc each, for 8 sc
- Row 1: 1 sc
(15 sc)
Bottom, working into the free loops of the foundation chain: Work 3 sc in the first ch, sc in each of the next 12 ch, and 3 sc in the last ch. (18 sc: 14 chs worked 1 per st + 4 extra corner sts)
Right side, working up: Work 15 sc along the row ends, mirroring the left side. Row 1 gets 1 sc, star rows get 2 sc each, hdc rows get 1 sc each, Row 10 gets 1 sc and Row 11 gets 1 sc. (15 sc)
Border total: 15 + 18 + 15 = 48 sc
Do not fasten off yet.
Why the math works:
- Sides: 15 sc over 2.75 in (7.0 cm) is about 5.5 sc per inch. That matches the side gauge, so the edges stay flat without ruffling or pulling in.
- Bottom: One sc in each of the 14 foundation chs matches the 14-st body width. The 2 extra sc at each corner (4 in total) let the edge turn the corner and give the soft rounded corners of a mug base.
- Size: The border adds 0.125 in (0.3 cm) to each side and the bottom. That gives 2.75 + 0.25 = 3.0 in (7.6 cm) wide and 2.75 + 0.125 = 2.875 in (7.3 cm) tall.
Handle
You are now at the top of the right side, with the RS facing. Number the 15 right-side border sc from 1 at the bottom to 15 at the top.
- Sl st down into border sc 12, working into the sts. Place a marker in sc 12.
- Ch 14.
- Skip border sc 11 through 5. Sl st into border sc 4.
- Turn. Work 20 sc over the ch-14 loop, working into the loop rather than into the chains.
- Sl st into marked border sc 12. (20 sc)
Fasten off, leaving an 8 in (20.3 cm) tail.
Packing 20 sc onto a 14-ch loop crowds the stitches. That pushes the handle into a rounded D shape with a rope-like texture. The handle’s two ends are about 1.5 in (3.8 cm) apart. The handle sticks out about 1.25 in (3.2 cm) from the body.
Checkpoint: overall width 4.25 in (10.8 cm).
Use the 8 in tail to work 1 or 2 hidden stitches at each base of the handle so it doesn’t flop. Then weave in the tail.
Hanging Loop
With the RS facing, find the middle of the top edge, between sts 7 and 8 of Row 11.
- Join Colour A with a sl st into st 7.
- Ch 12.
- Sl st into st 8.
Fasten off. On the WS, tie the two tails together in a square knot, then weave them in separately. The loop stands about 0.75 in (1.9 cm) above the foam.
Final Blocking
- Weave in all remaining ends on the WS. Run each tail through stitches of its own colour.
- Lightly mist the ornament with water, or steam it from 1 in (2.5 cm) above. Never press the iron onto the yarn, especially acrylic.
- Lay the ornament RS up on the blocking mat.
- Pin the body to 3.0 in × 2.875 in (7.6 × 7.3 cm). Put one pin at each bottom corner and one at each top corner.
- Shape the handle into an even D, 1.25 in (3.2 cm) deep, and pin the top of its curve.
- Pin the hanging loop straight up.
- Gently push each bobble forward from the back with a fingertip.
- Leave it to dry completely, usually 2 to 4 hours.
Final Quality-Control Checklist
- [ ] Body has 4 clear bands of 6 stars each
- [ ] Row 1 and all hdc rows have 14 sts
- [ ] Foam band has 6 bobbles, all puffing to the RS
- [ ] Border total is 48 sc (15 + 18 + 15)
- [ ] Bottom corners are rounded and flat
- [ ] Handle has 20 sc, its ends sit at border sc 4 and 12, and it is about 1.25 in (3.2 cm) deep
- [ ] Hanging loop is centred and secure
- [ ] Body measures 3.0 × 2.875 in (7.6 × 7.3 cm); overall width is 4.25 in (10.8 cm)
- [ ] No ends show on the RS
Troubleshooting
The stars lean or the rows get narrower. You probably skipped the loop in the back of the previous star, or the same-st loop. Each star after the first needs exactly 6 loops from 5 places. The hook’s own loop is the sixth.
The hdc row has 13 or 15 sts. Make sure the ch-2 counts as the first hdc. Check that each eye gets exactly 2 hdc and that the last hdc goes into the top of the beginning ch-3.
The stars look flat. Pull each loop up to the same height before you yo through all 6. Short, tight loops hide the starburst.
The bobbles sit on the back. Row 11 must be a WS row. If it ended up on the RS, flip the piece and treat that face as the RS. The border is the same from either side.
The side borders ruffle. Work 1 sc instead of 2 on one or two of the star rows. The sides pull in: add 1 sc on Row 10 or Row 11.
The handle is floppy or flat. Check that you have 20 sc on the loop. If it is still floppy, work 22 sc.
Care
Hand wash in cool water with a mild soap, press out the water in a towel and dry flat. Re-block if the handle loses its curve.

Final Notes
This ornament is built on one simple measurement chain:
- 14 sts = 2.75 in (7.0 cm) wide.
- Four star-and-hdc pairs plus Row 1 = 2.25 in (5.7 cm) tall.
- The cream foam band brings the body to 2.75 in × 2.75 in (7.0 × 7.0 cm).
- The 48-sc border takes it to 3.0 in × 2.875 in (7.6 × 7.3 cm).
- The rope handle brings the total width to 4.25 in (10.8 cm).
If each checkpoint matches, the finished mug will too. Once you know the rhythm, it takes under an hour. Make one for every branch, or tie one onto a gift.
Happy crocheting!