

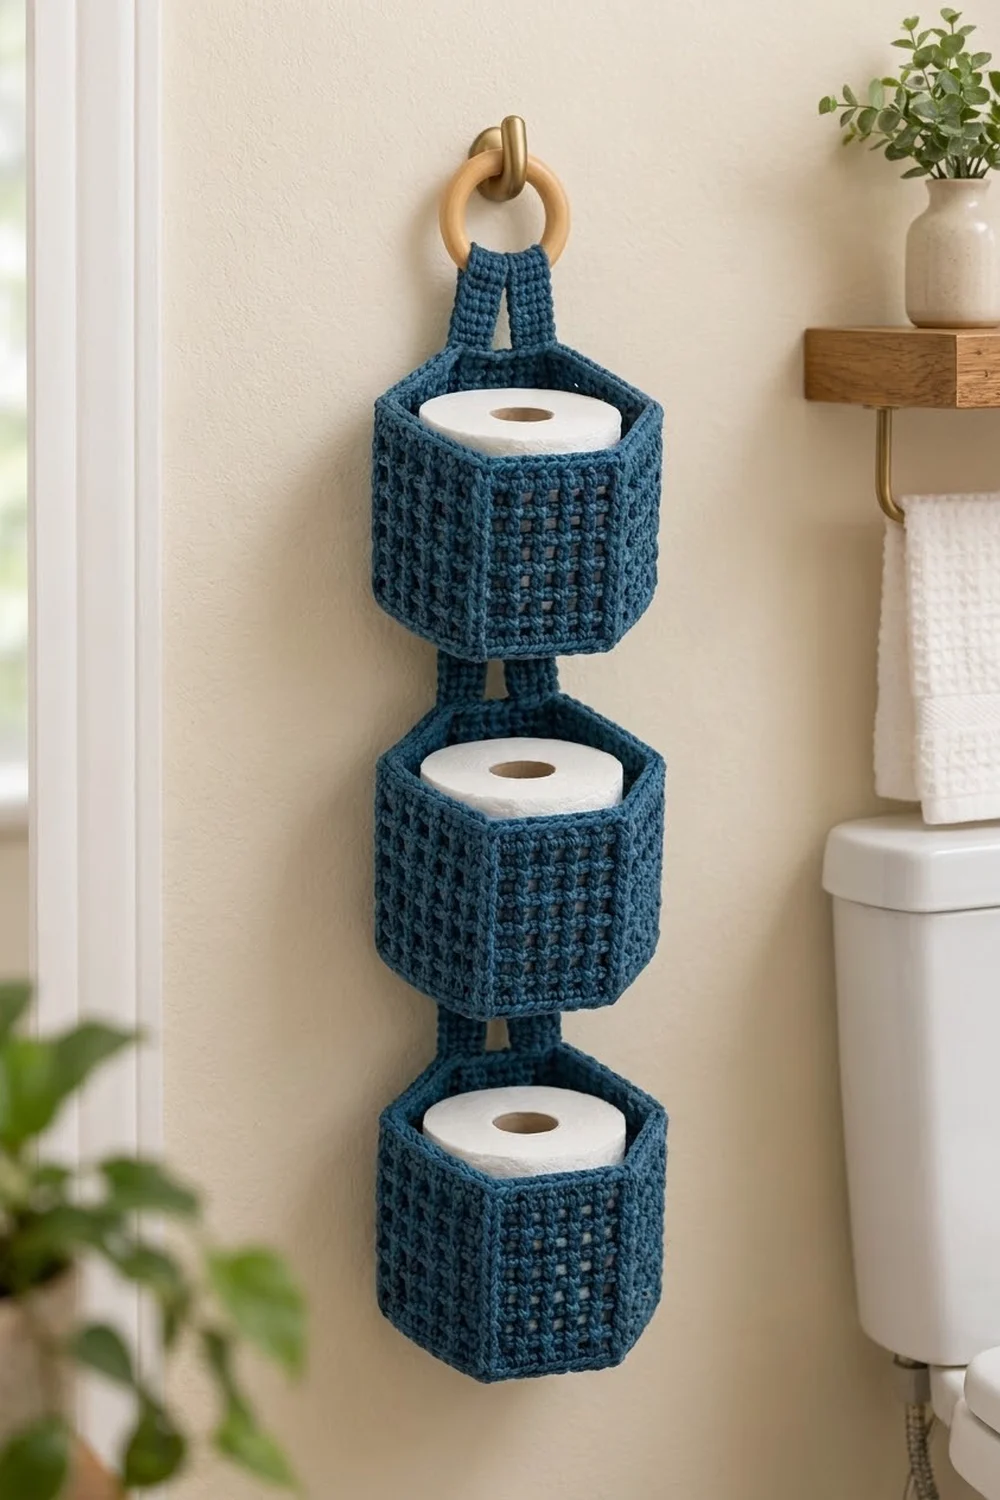
The Harbor Hex holder is three hexagonal baskets stacked vertically, each holding one toilet paper roll. A sturdy strap runs down the back of all three baskets and forms a loop around a wooden ring, so the whole piece hangs from a single wall hook.
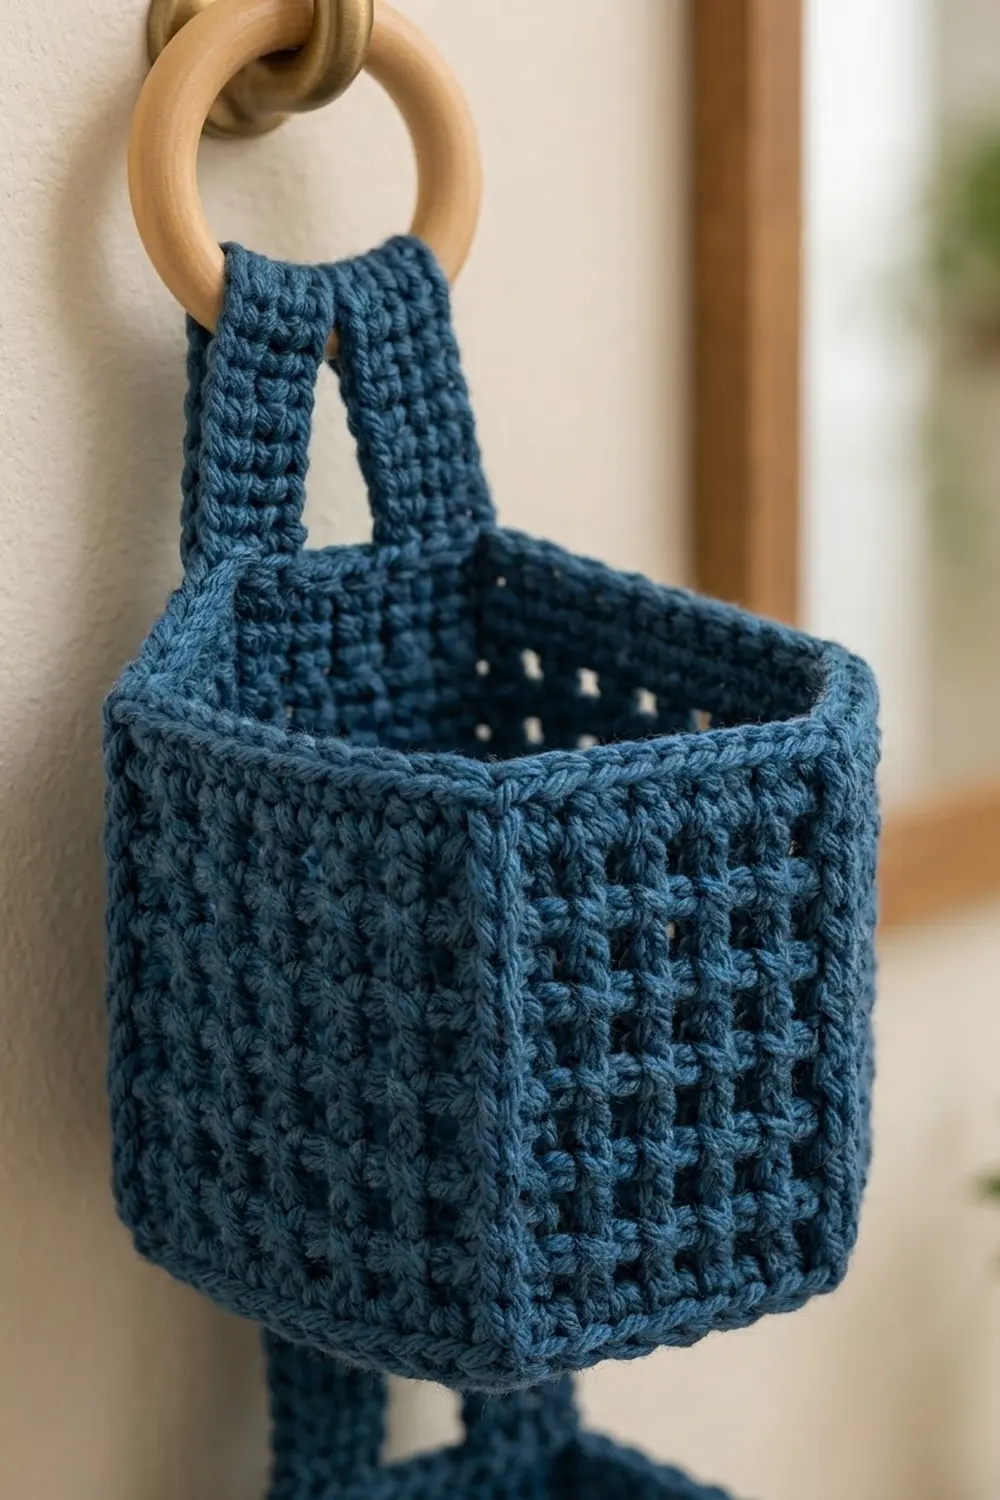
The sample is made in one color, a deep denim blue, so the texture does the decorating. Each basket has a flat hexagon base in solid single crochet. The walls are a grid of double crochet columns with small square openings, and a raised front post ridge runs up every corner to keep the six sides crisp. A solid single crochet band and a reverse single crochet edge finish the rim.
The pattern uses US crochet terms. Each basket is 5 in (12.7 cm) flat-to-flat and 5 in (12.7 cm) tall. The finished holder hangs 21 in (53.3 cm) from the top of the loop to the bottom of the lowest basket.
You work each basket in joined rounds, from the center of the base up to the rim. Then you crochet one long, narrow strap in rows, fold it around the ring, and sew its two legs to the back panel of each basket.
Finished Size and Construction
- Finished size: 21 in (53.3 cm) long including the loop; 5.7 in (14.5 cm) at the widest point
- Skill level: Easy-Intermediate (front post double crochet, reverse single crochet)
- Terminology: US crochet terms
- Yarn weight: Worsted (#4) cotton
- Hook: 5.0 mm (H-8)
- Number of pieces: 4 (3 identical baskets + 1 strap), plus a wooden ring
- Layout: 1 column of 3 baskets with 1.5 in (3.8 cm) gaps between them
- Basket size: 5 in (12.7 cm) flat-to-flat, 5.7 in (14.5 cm) corner-to-corner, 5 in (12.7 cm) tall
- Basket height before border: 4.75 in (12.1 cm)
- Border depth: 0.25 in (0.6 cm), 1 round of reverse single crochet
Materials
Yarn: Choose a smooth, firm worsted weight cotton or cotton blend. Cotton holds the hexagon shape, handles bathroom humidity, and washes well. Avoid soft, splitty yarns. The amounts below assume about 190 m per 100 g (208 yd per 100 g).
- Denim Blue: about 280 g / 532 m (582 yd) total
- Each basket: about 65 g / 124 m
- Strap: about 45 g / 86 m
These quantities include a margin of about 15% for swatching, seaming, and differences between brands.
Tools:
- 5.0 mm (H-8) crochet hook
- 1 wooden macramé ring, 3 in (7.6 cm) across
- 6 locking stitch markers, plus spares
- Yarn needle
- Scissors
- Measuring tape
- Rustproof pins and a container about 5 in (12.7 cm) across, for blocking
Abbreviations (US Terms)
- ch – chain
- sl st – slip stitch
- sc – single crochet
- dc – double crochet
- BLO – back loop only
- sk – skip
- sp – space
- st(s) – stitch(es)
- rep – repeat
Special stitches
- FPdc (front post double crochet): Yarn over and insert the hook from front to back to front around the post of the stitch. Yarn over and pull up a loop, then (yarn over, pull through 2 loops) twice. This stitch makes the raised corner ridges.
- Reverse sc (crab stitch): Work from left to right (right to left if you’re left-handed). Insert the hook into the next stitch to the right, yarn over, pull up a loop, yarn over, and pull through both loops. This makes a corded, rounded edge.
Gauge and Checkpoints
Gauge: 14 sc and 16 rows = 4 in (10.2 cm) in sc rows.
Mesh gauge: 14 stitches and chains (counted together) and 8 mesh rounds = 4 in (10.2 cm).
Make one basket first and check it against these measurements:
- After Round 6 (36 sts): about 3 in (7.6 cm) flat-to-flat.
- After Round 10 (60 sts): 5 in (12.7 cm) flat-to-flat, 2.9 in (7.4 cm) per side, and 17.1 in (43.4 cm) around.
- After Round 19: the wall is 4.25 in (10.8 cm) tall, measured from the base fold.
- After Round 21: 4.75 in (12.1 cm) tall.
- After Round 22 (border): 5 in (12.7 cm) tall.
If the basket is too big, go down 0.5 mm in hook size. If it’s too small, or a roll won’t slide in easily, go up 0.5 mm. Keep the stitch counts the same either way, because the strap layout depends on a 5 in (12.7 cm) basket.
Basket (Make 3)
Work the base in joined rounds of sc, without turning. The increases stack directly on top of each other and form six straight corner lines.
Round 1: Magic ring, ch 1, 6 sc in ring, sl st to the first sc. (6 sts)
Round 2: Ch 1, 2 sc in each st around, sl st to the first sc. (12 sts)
Round 3: Ch 1, *2 sc in next st, sc in next st; rep from * 5 more times, sl st to the first sc. (18 sts)
Rounds 4–10: Ch 1, *2 sc in next st, sc in next (R − 2) sts; rep from * 5 more times, sl st to the first sc. R is the round number.
- Round 4: sc in next 2 (24 sts)
- Round 5: sc in next 3 (30 sts)
- Round 6: sc in next 4 (36 sts)
- Round 7: sc in next 5 (42 sts)
- Round 8: sc in next 6 (48 sts)
- Round 9: sc in next 7 (54 sts)
- Round 10: sc in next 8 (60 sts)
Each round starts with an increase, so the first sc of every increase sits on top of the first sc of the increase below. In Round 10, mark the first sc of each of the 6 increases. These are the corner stitches. Each side now has 10 sts: 1 corner st and 9 more.
Round 11 (turning round): Ch 1, sc in BLO of each st around, sl st to the first sc. (60 sts) Move each marker up to the sc worked into the marked stitch, so the corners are sts 1, 11, 21, 31, 41, and 51. The unused front loops form a fold line, and the wall turns upward from here.
Round 12 (first mesh round): Ch 2 (doesn’t count). *FPdc around next marked corner sc, [ch 1, sk 1 st, dc in next st] 4 times, ch 1, sk 1 st; rep from * 5 more times, sl st to the top of the first FPdc.
Per side: 1 FPdc + 4 dc + 5 ch-1 sps = 10. Round total: 6 FPdc + 24 dc + 30 ch-1 sps = 60.
Rounds 13–19: Ch 2 (doesn’t count). *FPdc around next FPdc, [ch 1, sk ch-1 sp, dc in next dc] 4 times, ch 1, sk ch-1 sp; rep from * 5 more times, sl st to the top of the first FPdc. (60 per round: 30 sts + 30 ch-1 sps)
The stacked ch-1 spaces form the square openings, the dc columns form the vertical bars, and the FPdc builds a raised ridge at each corner. The wall should now measure 4.25 in (10.8 cm).
Round 20 (conversion round): Ch 1. *Sc in top of FPdc, [sc in next ch-1 sp, sc in next dc] 4 times, sc in next ch-1 sp; rep from * 5 more times, sl st to the first sc.
Count: 60 worked 1-per-existing st or sp + 0 added = 60 sts, or 10 per side. Mark the 6 sc worked into the FPdc tops.
Round 21: Ch 1, sc in each st around, sl st to the first sc. (60 sts)
The basket is now 4.75 in (12.1 cm) tall. Don’t fasten off. Go straight on to the Border section.
Make All Pieces
Baskets: Make 3 in Denim Blue, about 65 g / 124 m each (195 g total).
Strap: Make 1 in Denim Blue, about 45 g / 86 m.
Ch 5.
Row 1: Sc in 2nd ch from hook and in each ch across. (4 sts)
Rows 2–168: Ch 1, turn, sc in each st across. (4 sts)
Fasten off, leaving an 18 in (45.7 cm) tail. At 4 rows per inch, the strap is 42 in (106.7 cm) long and about 1.1 in (2.8 cm) wide.
Strap edge: Join the yarn at a corner and loosely sl st around the whole strap. Work 1 sl st in each row-end along both long edges (168 per edge) and 1 in each st across both short ends (4 per end), for 344 sl sts total. This firms up the edges without adding width.
Mark the strap, counting rows from the Row 1 end:
- Leg A: rows 1–20 (bottom basket), 21–26 (gap), 27–46 (middle basket), 47–52 (gap), 53–72 (top basket), 73–84 (loop)
- Leg B: rows 85–96 (loop), 97–116 (top basket), 117–122 (gap), 123–142 (middle basket), 143–148 (gap), 149–168 (bottom basket)
Each leg is 84 rows, or 21 in (53.3 cm). Each basket takes 20 rows (5 in / 12.7 cm), each gap 6 rows (1.5 in / 3.8 cm), and the loop 12 rows (3 in / 7.6 cm).
Layout grid:
     ( wooden ring )
       loop .......... 3 in (7.6 cm)
     [  BASKET 1  ] .. 5 in (12.7 cm)
        ||    || ..... 1.5 in (3.8 cm)
     [  BASKET 2  ] .. 5 in (12.7 cm)
        ||    || ..... 1.5 in (3.8 cm)
     [  BASKET 3  ] .. 5 in (12.7 cm)
Joining
Method: Whipstitch with a yarn needle and Denim Blue.
- Attach the ring. Slip the ring onto the strap at the fold between rows 84 and 85. Hold the legs wrong sides together and whipstitch rows 81–84 to rows 85–88 along both long edges. This locks the ring in a 1 in (2.5 cm) closed section. Below that, the legs open into a V for the remaining 2 in (5.1 cm) of the loop.
- Place the legs. Pick one side of each basket as the back panel. It’s 2.9 in (7.4 cm) wide between two corner ridges. Lay the legs vertically on the outside of the panel, with each leg’s outer edge along a corner ridge. The two 1.1 in (2.8 cm) legs leave a center gap of about 0.6 in (1.5 cm).
- Line up the rows. Align the first row of each 20-row basket section with that basket’s Round 11 fold, and the last row with the top of Round 22.
- Sew row to round. The wall’s 12 rounds (Rounds 11–22) cover the same 5 in (12.7 cm) as 20 strap rows, so sew 5 strap row-ends to every 3 wall rounds. Whipstitch both long edges of each leg. On the bottom basket, also sew across the 4 sts of each short end.
Tension: Keep the stitches snug so the strap lies flat, but not so tight that the wall puckers or the back panel narrows. Sew through dc posts and sc sts, not across the mesh openings.
Size checkpoint: Hang the holder and check that 1.5 in (3.8 cm) of strap shows between baskets and the total length is 21 in (53.3 cm).
Border
Border gauge: Reverse sc works at 3.5 sts per inch, the same as the sc gauge. That makes 10 sts per side = 2.9 in (7.4 cm), the same width as the wall.
Each basket gets its own border before you attach the strap. The baskets aren’t joined side by side, so you don’t add any seam stitches.
Round 22: Continuing from Round 21, ch 1, reverse sc in each st around, sl st to the first st. (60 sts, 10 per side including the corner st) Fasten off and weave in the ends.
Why the math works: Every round from 11 to 22 has 60 sts, so the wall rises straight with no flare. Since 60 = 6 × 10, each side always has 10 sts, and the corner ridges stay in line with the base corners. The border adds 0.25 in (0.6 cm) of height and no width. That brings each basket to 5 in (12.7 cm), which matches its 20 strap rows exactly.
Final Blocking
- Weave in all ends, but don’t trim them yet.
- Soak the holder in cool water for 10 minutes, then press out the water without wringing.
- Roll it in a towel to remove the extra moisture.
- Slide each basket over a plastic-wrapped container about 5 in (12.7 cm) across. Push the corners out so all six sides are flat.
- Pin the loop and gaps flat so each gap measures 1.5 in (3.8 cm).
- Let it dry completely, then trim the tails.
Final Quality-Control Checklist
- Each basket has 60 sts in every round from 10 to 22.
- Six straight corner ridges line up with the base corners.
- Each basket is 5 in (12.7 cm) flat-to-flat and 5 in (12.7 cm) tall.
- The strap has 168 rows and folds between rows 84 and 85.
- The legs run along the back corner ridges, about 0.6 in (1.5 cm) apart.
- The gaps are 1.5 in (3.8 cm) and the loop is 3 in (7.6 cm).
- The total length is 21 in (53.3 cm).
- The ring is locked in and all seams are secure.
Troubleshooting
- Base cups: Your tension is too tight. Use a larger hook for the base only.
- Base ruffles: Use a smaller hook for the base.
- Corners spiral: Start every round with the increase and join into the first sc.
- Mesh openings slant: Work each dc into the top of a dc, never into a ch-1 sp.
- Corner ridges look flat: Work the FPdc loosely around the post.
- Wall leans outward: Go down 0.5 mm for Rounds 12–19.
- Roll fits too tightly: Go up 0.5 mm and remake the basket. Don’t add stitches, or the strap layout won’t line up.
- Holder sags: Add more tacking stitches near the bottom of each basket, where the weight pulls most.
Care
Remove the rolls first. Hand wash, or machine wash on a gentle cycle in cool water, then reshape while damp and lay flat or hang to dry.
Final Notes
The whole pattern follows one chain of measurements. The 14-sc gauge gives a 60-stitch hexagon, 5 in (12.7 cm) across with 10 sts per side. Those 60 sts rise straight to a 5 in (12.7 cm) basket, including the 0.25 in (0.6 cm) border. Each basket matches 20 strap rows, each 1.5 in (3.8 cm) gap takes 6 rows, and the loop takes 12. That adds up to 84 rows per leg, 168 rows in total, and a 21 in (53.3 cm) holder. Check the first basket against the measurements, and everything else will fit.
Happy crocheting!