

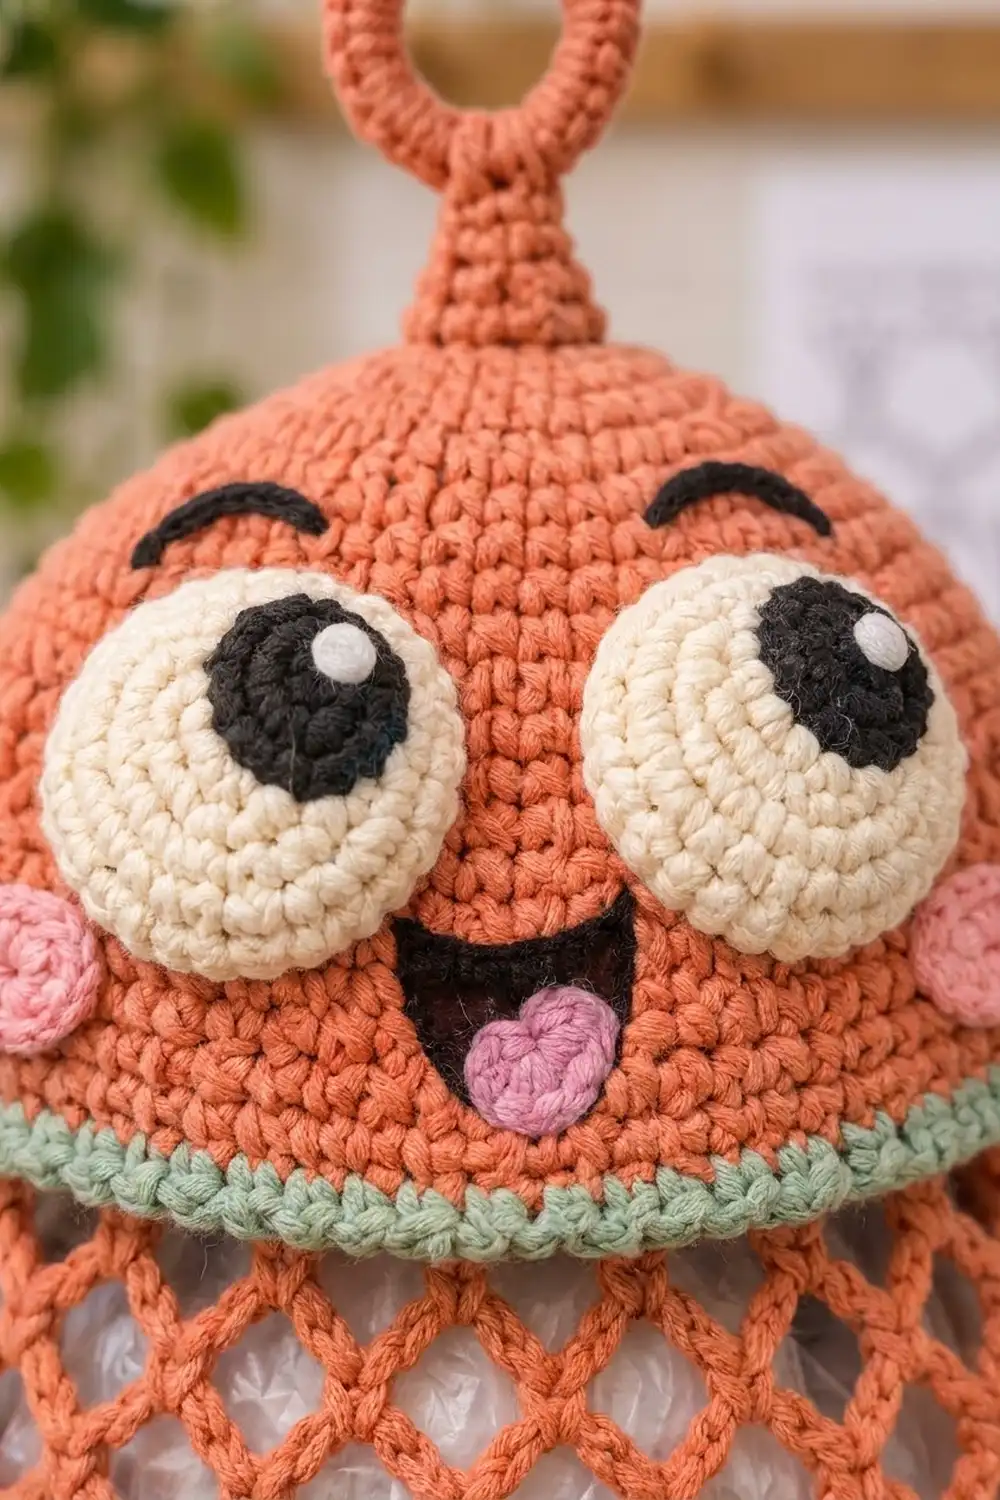
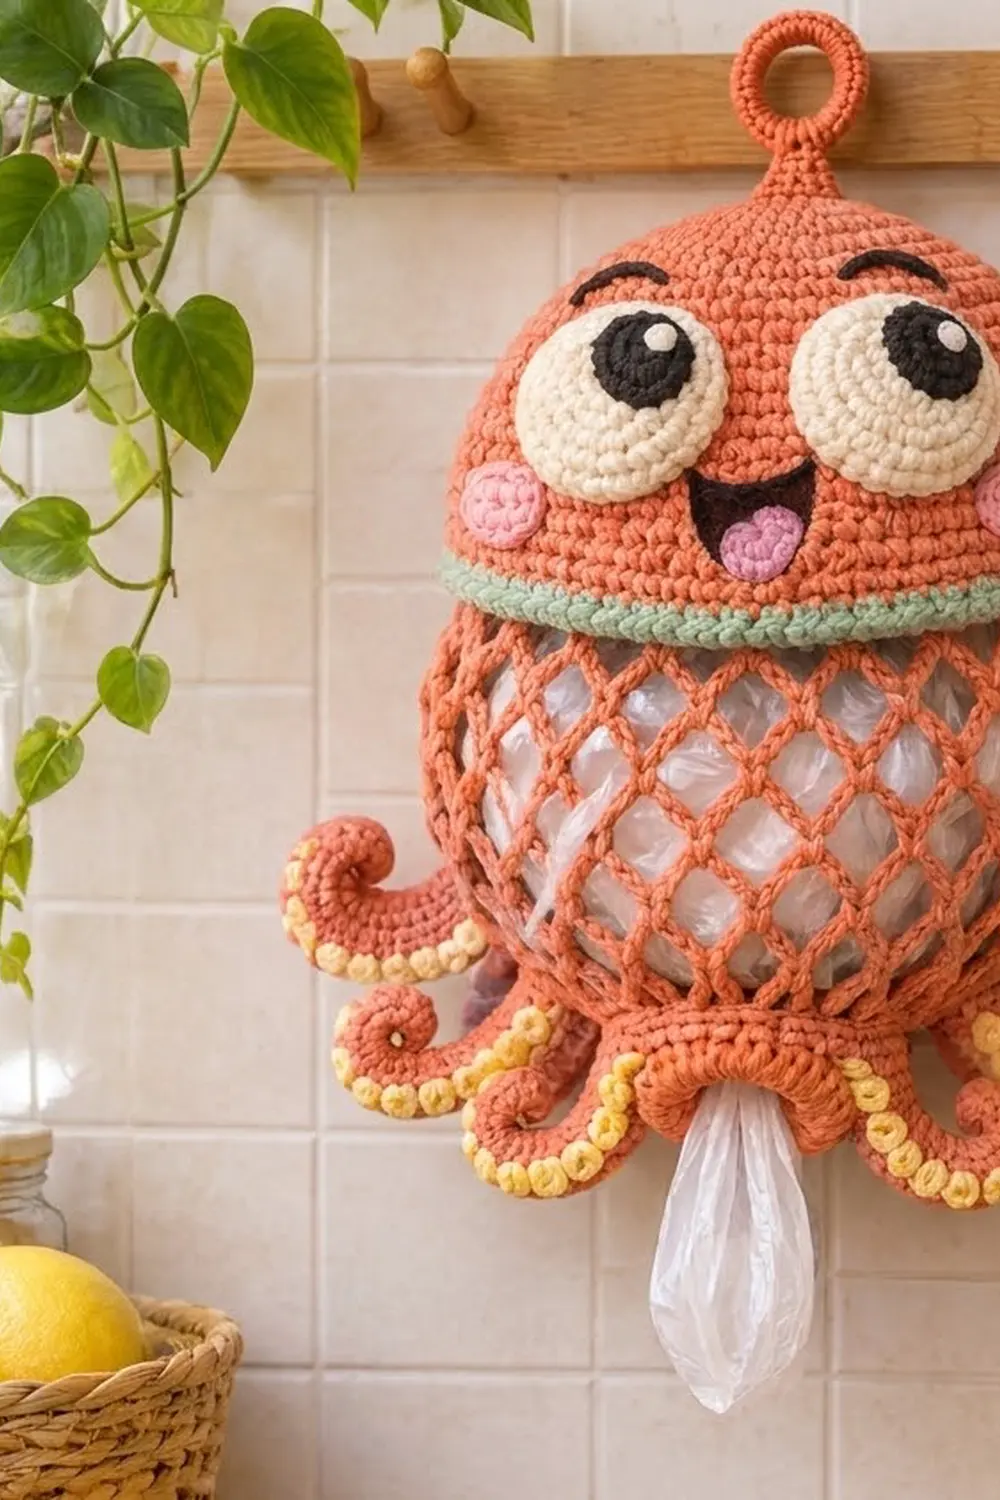
Meet the Coral Cove Octopus, a cheerful plastic bag dispenser that hangs from a peg rail and keeps your grocery bags tidy. The head is a smooth single crochet dome that doubles as a lid. The belly is an open diamond mesh, and eight curly tentacles with pale yellow sucker bumps circle the bottom opening.
The body is coral and the lid has a sage green brim. The suckers are pale butter yellow. The eyes are cream with black pupils, the smile and eyebrows are black, and the cheeks and tongue are soft pink.
This pattern uses US crochet terms. The finished octopus is about 15 in (38.1 cm) tall from the top of the hanging ring to the bottom ring. It is about 12 in (30.5 cm) wide across the tentacles, and the mesh belly stretches to about 9 in (22.9 cm) wide when filled.
You’ll work the dome lid from the top down. Then you’ll work the mesh body from its top rim down to a small dispensing ring and add eight tentacles around that ring. Last, you’ll sew on the face, stem, and hanging ring. The lid is hinged at the back so it lifts open for refilling.
Finished Size and Construction
- Finished size: about 15 in (38.1 cm) tall x 12 in (30.5 cm) wide across the tentacles
- Skill level: Intermediate
- Terminology: US crochet terms
- Yarn weight: #4 worsted, 100% cotton
- Hook: 4.0 mm (G-6)
- Number of pieces: one finished dispenser, assembled from a lid, a mesh body, 8 tentacles, a stem, a ring, and face appliqués
- Layout: the lid is hinged on top of the body; the tentacles are evenly spaced around the bottom ring
- Lid size: 20 in (50.8 cm) around the brim, about 5 in (12.7 cm) tall
- Body size before edging: about 6.25 in (15.9 cm) tall, 80 stitches around the rim
- Edging depth: the lid brim is 2 rounds, about 0.5 in (1.3 cm); the bottom ring is 3 rounds, about 0.75 in (1.9 cm)
Materials
Choose a smooth, firmly twisted worsted cotton. Cotton holds the dome shape, resists stretching under the weight of the bags, and stands up to kitchen washing. The amounts below assume about 85 m per 50 g ball.
- Coral (main color): 175 g, about 298 m
- Sage green (brim): 15 g, about 26 m
- Pale yellow (suckers): 30 g, about 51 m
- Cream (eyes, highlights): 10 g, about 17 m
- Black (pupils, mouth, eyebrows): 10 g, about 17 m
- Pink (cheeks, tongue): 5 g, about 9 m
All quantities include a safety margin of roughly 15-20%.
Tools:
- 4.0 mm (G-6) crochet hook
- Tapestry needle
- 4 locking stitch markers
- A small handful of fiberfill (for the stem)
- Sewing pins and scissors
- A bowl about 6 in (15.2 cm) across, for blocking the lid
Abbreviations (US Terms)
- ch – chain
- sl st – slip stitch
- sc – single crochet
- dc – double crochet
- inc – 2 sc in the same stitch
- sc2tog – single crochet 2 together
- MR – magic ring
- st(s) – stitch(es)
- rnd(s) – round(s)
- yo – yarn over
Special stitch – Sucker Bump (bp): *Yo, insert hook in the stitch, yo and pull up a loop, yo and pull through 2 loops*. Repeat from * to * 2 more times in the same stitch (4 loops on hook), then yo and pull through all 4 loops. This is a 3-dc bobble. When you work it on a wrong-side row, it pops out on the right side.
Gauge and Checkpoints
Gauge: 16 sc and 18 rnds = 4 in (10.2 cm) in sc with a 4.0 mm hook.
Use the lid as your test piece. Work Rnds 1-7; the flat circle should measure about 3 in (7.6 cm) across. If it does, your lid will come out the right size.
Checkpoints:
- Lid after Rnd 7: about 3 in (7.6 cm) across.
- Lid after Rnd 13: 80 sts; the opening is about 6.4 in (16.3 cm) across and 20 in (50.8 cm) around.
- Lid after Rnd 28: about 5 in (12.7 cm) tall.
- Body after Rnd 2: 20 in (50.8 cm) around, the same as the lid brim.
- Body after Rnd 19: about 7 in (17.8 cm) tall unstretched; the bottom opening is about 2.5 in (6.4 cm) across.
If your pieces are too big, go down to a 3.75 mm hook. If they are too small, go up to a 4.5 mm hook. Keep your tension firm. Loose stitches will make the lid sag and let the bottom ring stretch out of shape.
Lid (Head)
Work in continuous spiral rounds unless the pattern says to join. Mark the first st of each rnd and move the marker up as you go.
With coral:
- Rnd 1: 8 sc in MR. (8)
- Rnd 2: inc in each st. (16)
- Rnd 3: (sc, inc) x8. (24)
- Rnd 4: (2 sc, inc) x8. (32)
- Rnd 5: (3 sc, inc) x8. (40)
- Rnd 6: (4 sc, inc) x8. (48)
- Rnd 7: (5 sc, inc) x8. (56)
Checkpoint: about 3 in (7.6 cm) across.
- Rnd 8: sc in each st. (56)
- Rnd 9: (6 sc, inc) x8. (64)
- Rnd 10: sc in each st. (64)
- Rnd 11: (7 sc, inc) x8. (72)
- Rnd 12: sc in each st. (72)
- Rnd 13: (8 sc, inc) x8. (80)
The plain rounds between the increase rounds round the top into a dome.
- Rnds 14-26: sc in each st (13 rounds). (80)
Change to sage green.
- Rnds 27-28: sc in each st. (80) Sl st in the next st and fasten off, leaving a 24 in (61.0 cm) tail for sewing the hinge.
Mesh Body
You’ll work the body from the top rim down. The chain loops get longer through the middle rounds so the belly bulges, then get shorter again to gather into the bottom ring.
With coral:
- Rnd 1: ch 80 and join with a sl st to the first ch, without twisting. Ch 1, sc in each ch around, sl st to the first sc. (80)
- Rnd 2: ch 1, sc in each st around, sl st to the first sc. (80)
Checkpoint: 20 in (50.8 cm) around, the same as the lid brim.
- Rnd 3: ch 1, sc in the first st, *ch 5, skip 3 sts, sc in the next st*. Repeat from * to * 18 more times. Ch 5, skip 3 sts, sl st to the first sc. (20 ch-5 loops) Check: 20 repeats x 4 sts = 80 sts.
- Rnd 4: sl st in each of the first 3 ch to reach the center of the loop. Ch 1, sc in the same loop, *ch 5, sc in the next loop*. Repeat from * around, ending with ch 5, then sl st to the first sc. (20 ch-5 loops)
- Rnd 5: repeat Rnd 4. (20 ch-5 loops)
- Rnds 6-9: work as Rnd 4, but ch 6 between the sc. (20 ch-6 loops)
- Rnds 10-11: work as Rnd 4. (20 ch-5 loops)
- Rnds 12-13: work as Rnd 4, but begin with 2 sl sts and ch 4 between the sc. (20 ch-4 loops)
- Rnd 14: work as Rnd 4, but begin with 2 sl sts and ch 3 between the sc. (20 ch-3 loops)
Each sc lands in the center of a loop, so each round’s loops sit halfway between the loops of the round before. That offset creates the diamond lattice.
- Rnd 15 (conversion round): sl st into the first ch-3 loop, ch 1, then work 2 sc in each ch-3 loop around: 1 sc per loop (20) + 1 extra sc per loop (20) = 40 sc. Sl st to the first sc. (40)
- Rnd 16: ch 1, (3 sc, sc2tog) x8, sl st to the first sc. (32)
Checkpoint: the body measures about 6.25 in (15.9 cm) from the rim to Rnd 16, unstretched.
Bottom Ring (Edging)
This ring is the dispensing opening and the base for the tentacles. Because the piece is round, each edging round is one continuous “side.”
Edging gauge: 4 sc per 1 in (2.5 cm), the same as the main fabric.
- Rnd 17: ch 1, sc in each st, sl st to the first sc. (32)
- Rnd 18: ch 1, sc in each st, sl st to the first sc. (32)
- Rnd 19: sl st in each st around. (32) Fasten off.
Why the math works: At 4 sc per inch, 32 sts make a ring 8 in (20.3 cm) around and about 2.5 in (6.4 cm) across. That’s snug enough to hold the bags but still lets you pull one out. The count also divides evenly: 32 sts ÷ 8 tentacles = 4 sts per tentacle. The slip stitch round locks the edge so it won’t stretch with use.
The lid brim (Rnds 27-28) has 80 sts, the same as body Rnd 1, so the hinge is sewn 1 st to 1 st.
Tentacles (make 8)
With coral:
- Row 1: ch 21, sc in the 2nd ch from the hook and in each ch across. (20)
- Row 2: ch 1, turn, inc in each of the first 10 sts, sc in each of the last 10 sts. (30)
The increased half curls into the tip, and the plain half becomes the base.
Change to pale yellow.
- Row 3 (wrong side): ch 1, turn, *sc in the next st, bp in the next st*. Repeat from * to * 14 more times. (15 sc + 15 bp = 30 sts) Fasten off. Use the coral starting tail at the base end to sew the tentacle on later.
Each tentacle is about 5 in (12.7 cm) long before it curls and about 3.5 in (8.9 cm) long once curled. The yellow bumps sit along the outer curve.
Stem and Hanging Ring
Stem: With coral:
- Rnd 1: 6 sc in MR. (6)
- Rnds 2-4: sc in each st. (6)
- Rnd 5: (sc, inc) x3. (9)
- Rnd 6: sc in each st. (9)
- Rnd 7: (2 sc, inc) x3. (12)
- Rnd 8: (3 sc, inc) x3. (15)
Fasten off, leaving a long tail, and stuff lightly. The stem is about 1.25 in (3.2 cm) tall.
Ring: With coral, ch 18 and sl st to the first ch to form a ring. Ch 1, work 28 sc into the ring, then sl st to the first sc. (28) Fasten off, leaving a long tail. The ring is about 2 in (5.1 cm) across.
Face
Eyes (make 2): With cream:
- Rnd 1: 6 sc in MR. (6)
- Rnd 2: inc in each st. (12)
- Rnd 3: (sc, inc) x6. (18)
- Rnd 4: (2 sc, inc) x6. (24)
Each eye is about 1.75 in (4.4 cm) across.
Pupils (make 2): With black, 6 sc in MR, then inc in each st. (12) Each pupil is about 0.9 in (2.3 cm) across. Sew each pupil to the upper inner part of its eye so the octopus looks upward. Add a cream French knot highlight to each pupil.
Cheeks (make 2): With pink, 6 sc in MR, then inc in each st. (12) Each cheek is about 0.9 in (2.3 cm) across.
Mouth: With black, work in rows:
- Row 1: MR, ch 1, 4 sc in the ring; do not join. (4)
- Row 2: ch 1, turn, inc in each st. (8)
- Row 3: ch 1, turn, (sc, inc) x4. (12)
Pull the ring tight. You’ll have a D-shaped half circle with a flat top edge about 1.3 in (3.3 cm) wide.
Tongue: With pink, MR, ch 1, 5 sc in the ring, then pull tight; do not join. (5) Sew it inside the lower curve of the mouth.
Assembly
- Face: Pin the eyes over lid Rnds 14-21, centered on the front and about 0.25 in (0.6 cm) apart. Pin the mouth below them over Rnds 21-24 with the flat edge on top. Pin a cheek on each side of the mouth over Rnds 22-24. Sew everything in place. With black, backstitch an arched eyebrow about 0.75 in (1.9 cm) long above each eye, over Rnds 11-12.
- Hinge: Find the 20 sts at the back of lid Rnd 28, directly opposite the face. Whipstitch them to 20 sts of body Rnd 1, 1 st to 1 st. Sew the hinge twice, because it carries the weight of the body and bags.
- Stem and ring: Sew the open end of the stem to the top center of the lid, covering Rnds 1-2. Sew the ring to the tip of the stem.
- Tentacles: Mark the bottom ring into 8 sections of 4 sts each. Sew the straight base end of one tentacle over Rnds 17-18 in each section. Turn the bumps outward so the tips curl up and out.
Final Blocking
- Wet the lid, roll it in a towel to squeeze out the water, and stretch it over the upturned bowl until dry.
- Lightly mist the mesh body. Stuff it with towels until it’s about 9 in (22.9 cm) wide and let it dry so the diamonds open evenly.
- Curl each damp tentacle tip around your finger and pin it until dry.
- Steam the green brim gently so it sits flat on the body rim.
- Don’t press the eyes or the sucker bumps flat.
Final Quality-Control Checklist
- The lid brim has 80 sts and measures 20 in (50.8 cm) around.
- Body Rnd 1 has 80 sts and matches the brim.
- Every mesh round has exactly 20 loops.
- The bottom ring has 32 sts and is about 2.5 in (6.4 cm) across.
- All 8 tentacles are 4 sts apart, and each has 15 sucker bumps.
- The eyes, cheeks, and mouth are placed symmetrically.
- The hinge is sewn twice and the hanging ring is secure.
- All ends are woven in.
Troubleshooting
- The lid ruffles: your tension is loose. Go down a hook size, and check that Rnds 8, 10, and 12 were worked without increases.
- The mesh twists: your sc aren’t landing in the loop centers. Count the starting sl sts on each round.
- The bottom ring is too loose: add a second sl st round, or redo Rnd 16 with a smaller hook.
- The tentacles don’t curl: check that Row 2 has 30 sts.
- The bumps face the wrong way: Row 3 must be worked on the wrong side.
- The lid sits crooked: resew the hinge 1 st to 1 st.
Care
Hand wash in cool water with mild soap, roll in a towel to remove the water, and reshape to dry. Don’t tumble dry, because heat can soften the dome.
Final Notes
Every measurement builds on the one before it. A gauge of 4 sc per inch gives a 3 in (7.6 cm) circle at lid Rnd 7. That grows to 80 sts and 20 in (50.8 cm) around at Rnd 13, which matches the 80-st body rim. The 20 mesh loops then gather into 40 sts, then 32 sts, giving an 8 in (20.3 cm) bottom ring with exactly 4 sts for each of the 8 tentacles.
Check each stage as you go and your octopus will hang straight and fill evenly. For a second one, swap the coral for lilac and keep all the other colors the same.
Happy crocheting!