

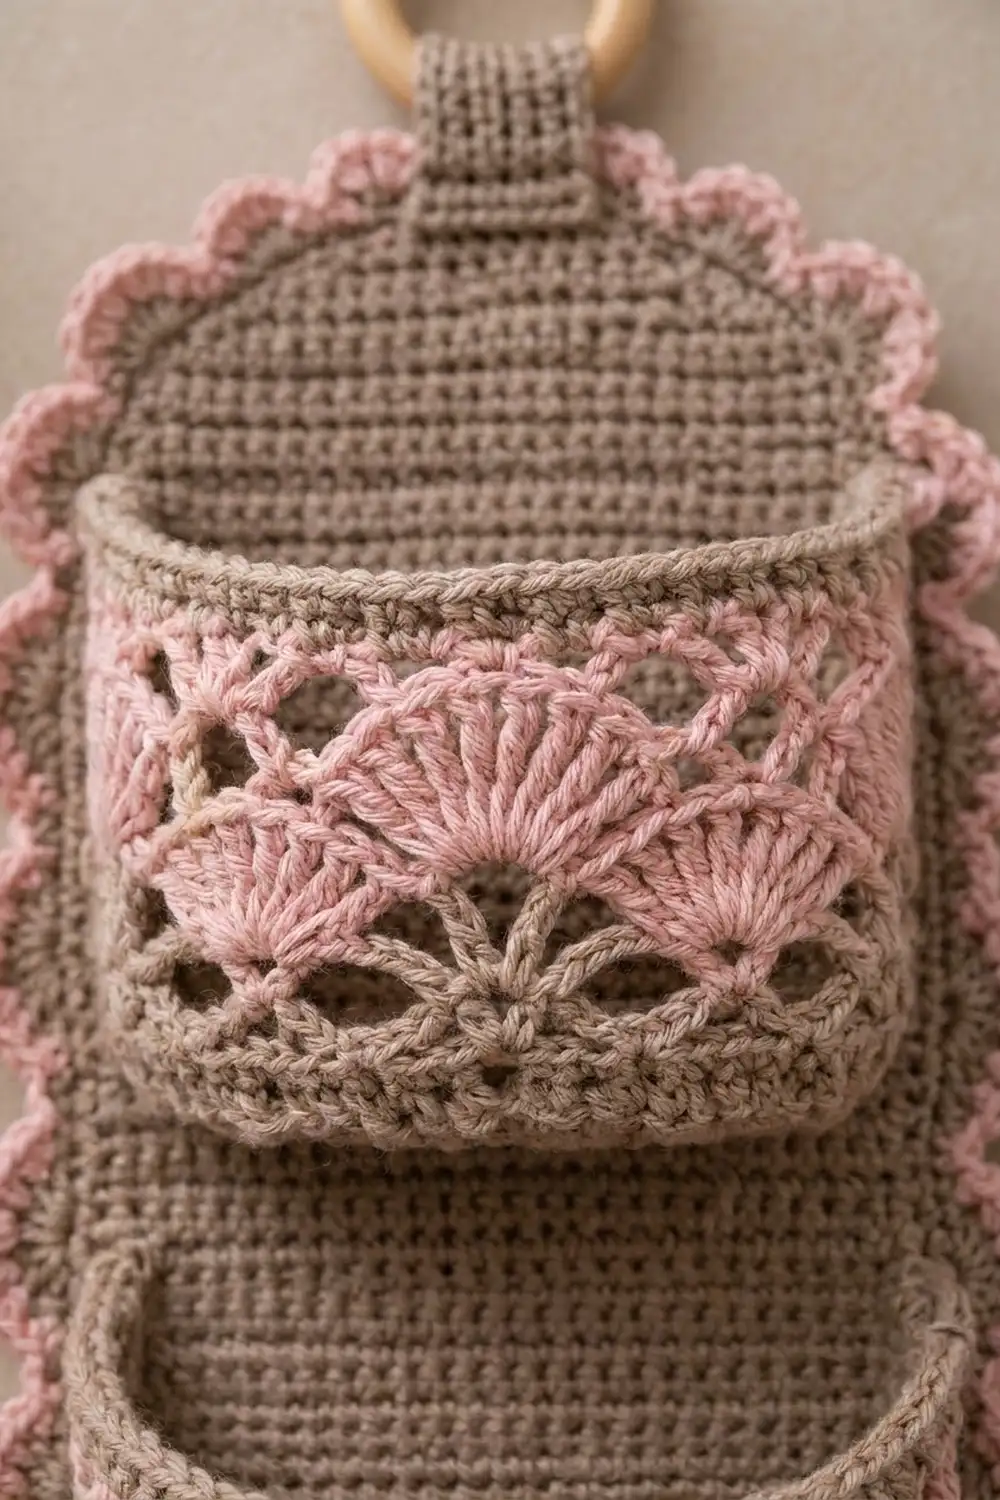
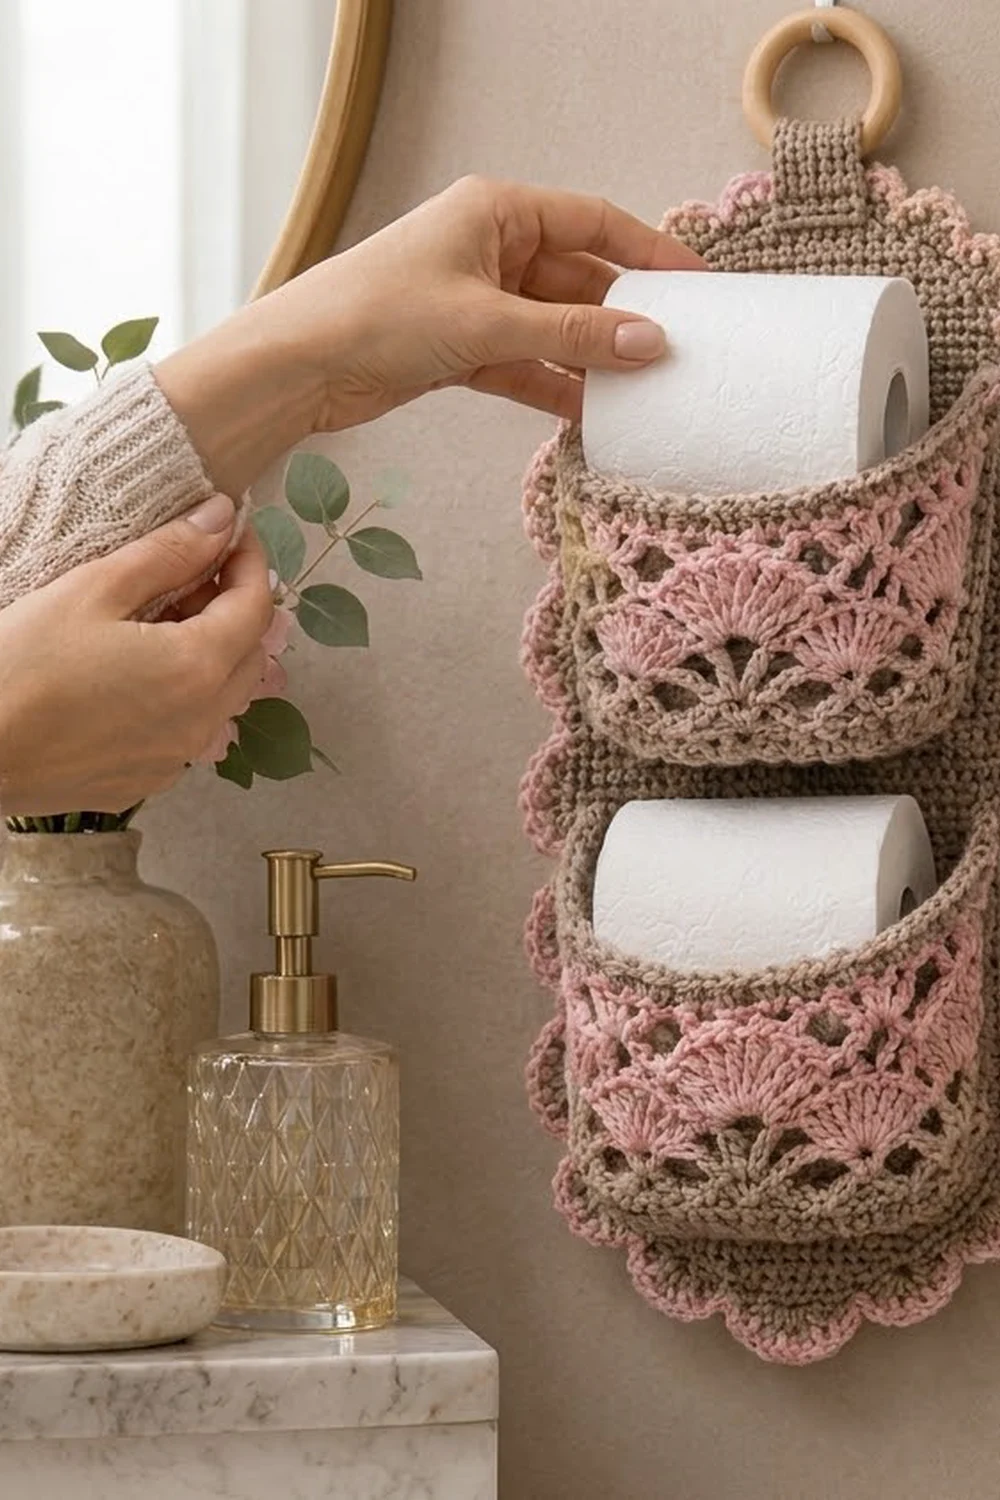
The Rosewood Fan holder is a soft, practical wall organizer for spare rolls. A tall taupe backing panel hangs from a wooden ring. Two deep pockets hold one roll each, and a pink scalloped border runs all the way around the edge.
The palette is calm and spa-like: warm taupe for the solid parts and dusty pink for the fans and scallops. The pockets use a classic fan-and-lattice lace. Pink shells sit between taupe chain arches, and each fan row is offset from the one below it so the fans stagger.
This pattern uses US crochet terms. The finished holder measures about 8.5 in (21.6 cm) wide by 21.5 in (54.6 cm) tall without the tab and ring. Counting the tab and ring, it is about 24.75 in (62.9 cm) tall.
Construction is simple. You crochet the backing panel in rows of single crochet, shaping the rounded ends with increases and decreases. Each pocket starts with a flat base worked in rows, and its lace wall is then worked back and forth around three sides of that base. You sew the pockets and tab to the panel, then work the two-round border around the panel’s edge.
Finished Size and Construction
- Finished size: 8.5 in (21.6 cm) wide x 21.5 in (54.6 cm) tall, plus about 3.25 in (8.3 cm) of tab and ring
- Skill level: Intermediate
- Terminology: US
- Yarn weight: Worsted (#4) cotton or cotton blend
- Hook: 5.0 mm (H-8)
- Number of pieces: 4 crocheted pieces (1 backing panel, 2 pockets, 1 tab) plus 1 wooden ring
- Layout: A single vertical panel with the two pockets stacked on it
- Panel size before border: 7 in (17.8 cm) wide x 20 in (50.8 cm) tall
- Pocket base: 6 in (15.2 cm) wide x 4 in (10.2 cm) deep
- Pocket wall height: about 4 in (10.2 cm)
- Border depth: 0.75 in (1.9 cm) on every edge
Materials
Choose a smooth, firm worsted cotton. Cotton holds the pockets’ shape, stands up to bathroom humidity and washes well. Avoid very drapey yarns, because the pockets will sag.
- Taupe (Color A): 240 g, about 408 m
- Dusty pink (Color B): 60 g, about 102 m
- 5.0 mm (H-8) crochet hook
- Wooden ring, 2 in (5.1 cm) across
- Tapestry needle
- Stitch markers (4)
- Measuring tape
- Rust-proof pins and a spray bottle for blocking
These quantities include a safety margin of about 15%, so you will have yarn left over.
Abbreviations (US Terms)
- ch – chain
- sl st – slip stitch
- sc – single crochet
- dc – double crochet
- sc2tog – single crochet 2 together
- st(s) – stitch(es)
- sp – space
- sk – skip
- RS – right side
- rep – repeat
Fan: 5 dc worked in the same stitch. The 3rd of these dc is the center dc.
Half fan: 3 dc worked in the same stitch, used at the ends of offset fan rows.
Gauge and Checkpoints
Gauge: 16 sc and 18 rows = 4 in (10.2 cm) in sc worked in rows.
Test one piece first. Make the hanging tab before anything else, because it doubles as your gauge swatch. Its 8 sts should measure 2 in (5.1 cm) across, and after 18 rows it should measure 4 in (10.2 cm) long.
Checkpoints:
– Panel, Row 10: 28 sts, 7 in (17.8 cm) wide, about 2.2 in (5.6 cm) tall
– Panel, Row 45: about 10 in (25.4 cm) tall
– Panel, Row 90: 20 in (50.8 cm) tall
– Pocket base, Row 18: 6 in (15.2 cm) wide at the back edge, 4 in (10.2 cm) deep
– Bordered panel: 8.5 in x 21.5 in (21.6 cm x 54.6 cm)
If your piece is too big: go down a half or full hook size. If it is too small: go up a size. Change hooks rather than changing stitch counts, because every later count depends on these numbers.
Hanging Tab (Make 1)
With Color A, ch 9.
Row 1: Sc in 2nd ch from hook and in each ch across, turn. (8 sc)
Rows 2–36: Ch 1, sc in each st across, turn. (8 sc)
Fasten off and leave a 12 in (30.5 cm) tail. The tab measures 2 in x 8 in (5.1 cm x 20.3 cm).
Backing Panel (Make 1)
With Color A, ch 17.
Row 1: Sc in 2nd ch from hook and in each ch across, turn. (16 sc)
Shaping the rounded bottom. On increase rows, work 2 sc in the first st, sc across to the last st, then 2 sc in the last st.
- Row 2 (increase): 2 sc in first st, sc in next 14, 2 sc in last st. (18 sc)
- Row 3 (increase): (20 sc)
- Row 4 (increase): (22 sc)
- Row 5: Sc in each st. (22 sc)
- Row 6 (increase): (24 sc)
- Row 7: Sc in each st. (24 sc)
- Row 8 (increase): (26 sc)
- Row 9: Sc in each st. (26 sc)
- Row 10 (increase): (28 sc)
Checkpoint: 7 in (17.8 cm) wide.
Rows 11–81: Ch 1, sc in each st across, turn. (28 sc)
Shaping the rounded top. On decrease rows, work sc2tog over the first 2 sts, sc across to the last 2 sts, then sc2tog over the last 2 sts.
- Row 82 (decrease): (26 sc)
- Row 83: Sc in each st. (26 sc)
- Row 84 (decrease): (24 sc)
- Row 85: Sc in each st. (24 sc)
- Row 86 (decrease): (22 sc)
- Row 87: Sc in each st. (22 sc)
- Row 88 (decrease): (20 sc)
- Row 89 (decrease): (18 sc)
- Row 90 (decrease): (16 sc)
Fasten off. The top shaping mirrors the bottom exactly, so both ends come out the same shape.
Checkpoint: 7 in x 20 in (17.8 cm x 50.8 cm).
Pockets (Make 2)
Base
With Color A, ch 25.
Row 1: Sc in 2nd ch from hook and in each ch across, turn. (24 sc)
Row 1 becomes the straight back edge that you sew to the panel.
Rows 2–13: Ch 1, sc in each st across, turn. (24 sc)
Rounding the front corners:
– Row 14: Sc2tog, sc in next 20, sc2tog. (22 sc)
– Row 15: Sc in each st. (22 sc)
– Row 16: Sc2tog, sc in next 16, sc2tog. (20 sc)
– Row 17: Sc2tog, sc in next 14, sc2tog. (18 sc)
– Row 18: Sc2tog, sc in next 12, sc2tog. (16 sc)
Do not fasten off.
Checkpoint: 6 in (15.2 cm) wide at Row 1, 4 in (10.2 cm) deep.
Wall
You work the wall back and forth around three sides of the base: one side, the front and the other side. The Row 1 back edge stays free.
Row 1 (Color A): Ch 1. Work 16 sc evenly down the row ends of the first side, placing 8 sc over every 9 row ends (skip every 9th row end). Sc in each of the 16 sts of Row 18. Work 16 sc up the row ends of the second side in the same way. Turn. (48 sc)
Row 2 (conversion): Ch 1, sc in first 24 sts, 2 sc in next st, sc in last 23 sts, turn. This row is 48 sc worked one per stitch, plus 1 extra, for 49 sc.
Row 3: Ch 1, sc in each st, turn. (49 sc) Change to Color B on the last st.
Row 4 (Color B, fans): Ch 1, sc in first st, *sk 1, fan in next st, sk 1, sc in next st; rep from * 11 more times, turn. (12 fans, 13 sc) Change to Color A.
Row 5 (Color A, lattice): Ch 5 (counts as dc + ch 2), sc in center dc of first fan, ch 2. *Dc in next sc, ch 2, sc in center dc of next fan, ch 2; rep from * 10 more times. Dc in last sc, turn. (13 dc, 12 sc, 24 ch-2 sps) Change to Color B.
Row 6 (Color B, offset fans): Ch 3 (counts as dc), 2 dc in the same st. *Sc in next sc, fan in next dc; rep from * 10 more times. Sc in next sc, then 3 dc in the 3rd ch of the turning ch, turn. Skip all ch-2 sps. (11 fans, 2 half fans, 12 sc) Change to Color A.
Row 7 (Color A, lattice): Ch 1, sc in first dc, ch 2, dc in next sc, ch 2. *Sc in center dc of next fan, ch 2, dc in next sc, ch 2; rep from * 10 more times. Sc in top of turning ch, turn. (13 sc, 12 dc, 24 ch-2 sps) Change to Color B.
Row 8 (Color B, fans): Ch 1, sc in first sc, *fan in next dc, sc in next sc; rep from * 11 more times, turn. Skip all ch-2 sps. (12 fans, 13 sc) Change to Color A.
Row 9 (Color A, back to solid sc): Ch 1, sc in first sc. *Sk the first dc of the fan, sc in next 3 dc, sk the last dc, sc in next sc; rep from * 11 more times, turn. (49 sc: 1 + 12 x 4)
Row 10: Ch 1, sc in each st, turn. (49 sc) Change to Color B.
Row 11 (Color B): Ch 1, sc in each st. (49 sc)
Fasten off and leave a 20 in (50.8 cm) Color A tail at the starting corner for sewing. The wall is about 4 in (10.2 cm) tall. Its top edge is 49 sts, about 12.25 in (31.1 cm) long, so it bulges well forward of the 6 in (15.2 cm) back edge.
Make All Pieces
Before joining, check that you have every piece:
- Color A: 1 backing panel, 1 tab, 2 pocket bases with the solid wall rows and lattice rows
- Color B: fan rows and top rows on both pockets
- Hardware: 1 wooden ring
Layout (from top to bottom of the panel):
[ ring + tab, centered on back ]
[ panel top, Rows 82–90 ]
[ UPPER POCKET, base on Row 50 ]
[ open panel ]
[ LOWER POCKET, base on Row 14 ]
[ panel bottom, Rows 1–9 ]
Joining
Method: Whipstitch with Color A through both loops of each piece. Sew with the panel’s RS facing you.
Placing the pockets: Place a marker in the 3rd and 26th sts of Row 14 on the panel. Do the same on Row 50. The 22 sts between each pair of markers, plus the 2 marked sts, make 24 sts. That matches the 24 foundation loops on each pocket base exactly, leaving 2 sts of the 28-st row free on each side.
Stitch-to-stitch logic:
- Sew each base’s 24 foundation loops to the 24 marked panel sts, one loop to one stitch. The lower pocket goes on Row 14, about 3.1 in (7.9 cm) above the bottom edge. The upper pocket goes on Row 50, about 11.1 in (28.2 cm) above the bottom edge.
- Sew each wall’s short end straight up the marked stitch column, from the base to the top row. The wall’s 11 rows span about 18 panel rows. Put 1 to 2 stitches into each wall row end, spacing them so the wall’s top corner meets the panel at the same height on both sides.
Tab: Thread the tab through the ring and fold it in half. Center both ends on the back of the panel at the top, overlapping the panel by 1.5 in (3.8 cm). Sew around all edges of the overlap through the back layer only, so no stitches show on the RS.
Tension: Keep the whipstitches snug but not puckered. The panel should lie flat behind each pocket.
Size checkpoint: The panel should still measure 7 in x 20 in (17.8 cm x 50.8 cm). If it has narrowed, the base seams are too tight.
Border
The border is worked around the backing panel only, with the pockets and tab already attached. There is just one bordered piece, so its count comes straight from the panel’s edge. There are no seam stitches to add.
Border gauge: 4 sc per inch (2.5 cm), the same as the panel.
The panel has no sharp corners, so no corner stitches are added. Each “side” below is a stretch of edge.
Round 1 (Color A): With RS facing, join in the first st of Row 90.
– Top: Sc in each of the 16 sts. (16)
– First side: 9 sc over the 9 row ends of Rows 90–82. Then 64 sc over Rows 81–10, placing 8 sc per 9 row ends. Then 9 sc over Rows 9–1. (82)
– Bottom: Sc in each of the 16 foundation loops. (16)
– Second side: Work as the first side, going up. (82)
Sl st to the first sc. Total: 16 + 82 + 16 + 82 = 196 sc.
Round 2 (Color B): Join in any sc. Ch 1, sc in the same st, *sk 1, 5 dc in next st, sk 1, sc in next st; rep from * around, omitting the last sc. Sl st to the first sc. (49 scallops)
Why the math works: Along the straight sides, 64 sc over 72 rows is 16 in (40.6 cm) at 4 sc per inch, which matches the 72 rows’ height of 16 in (40.6 cm), so the edge neither ruffles nor pulls in. Each scallop uses exactly 4 sts, and 196 ÷ 4 = 49, so the scallops close evenly with no partial repeat. Round 1 adds 0.25 in (0.6 cm) and Round 2 adds 0.5 in (1.3 cm), for 0.75 in (1.9 cm) per edge. That brings the panel to 8.5 in x 21.5 in (21.6 cm x 54.6 cm).
Final Blocking
- Weave in all ends along same-color stitches.
- Lay the holder face up on a blocking mat.
- Pin the panel to 8.5 in x 21.5 in (21.6 cm x 54.6 cm), with one pin at the center of each scallop.
- Spray the panel and the scallops evenly until they are damp.
- Fill each pocket with a roll of toilet paper wrapped in plastic so the pockets dry in shape.
- Spray the pocket walls lightly and shape the fans with your fingers.
- Let everything dry completely, usually 12–24 hours, before unpinning.
Final Quality-Control Checklist
- The panel measures 8.5 in x 21.5 in (21.6 cm x 54.6 cm) with its border.
- The top and bottom curves match each other.
- Border Round 1 has 196 sc and Round 2 has 49 scallops.
- Each pocket has 12 fans in Rows 4 and 8, and 11 fans plus 2 half fans in Row 6.
- The pocket bases sit 2 sts in from each panel edge.
- Both pockets are centered and level.
- The tab is centered and none of its stitches show on the front.
- The holder hangs straight from the ring.
- All ends are secure.
Troubleshooting
- The panel edges wave: You put too many sc on the sides in Border Round 1. Rework it at 8 sc per 9 rows.
- The border cups or pulls in: You skipped too many row ends. Check that Round 1 has 196 sts.
- The fans lean or the rows don’t line up: You missed a stitch in Row 2 or Row 3. Recount to 49.
- The pocket gapes at the sides: Add a few more whipstitches up each wall end.
- The pocket sags: Your tension is too loose. Use a smaller hook for the base, or block the pocket with a roll inside.
- The holder tilts: The tab is off center. Re-sew it at the panel’s center 8 sts.
Care
Hand wash in cool water with mild soap, press out the water in a towel and dry flat. Reshape the pockets while they are damp.
Final Notes
The sizes all follow from one gauge. With 16 sc and 18 rows = 4 in (10.2 cm), the panel is 7 in x 20 in (17.8 cm x 50.8 cm). Each pocket base is 6 in x 4 in (15.2 cm x 10.2 cm) and sits on 24 of the panel’s 28 sts. The 196-stitch border carries 49 scallops and brings the holder to 8.5 in x 21.5 in (21.6 cm x 54.6 cm). Check your gauge on the tab first, and the rest of the measurements will come out right.
Happy crocheting!