

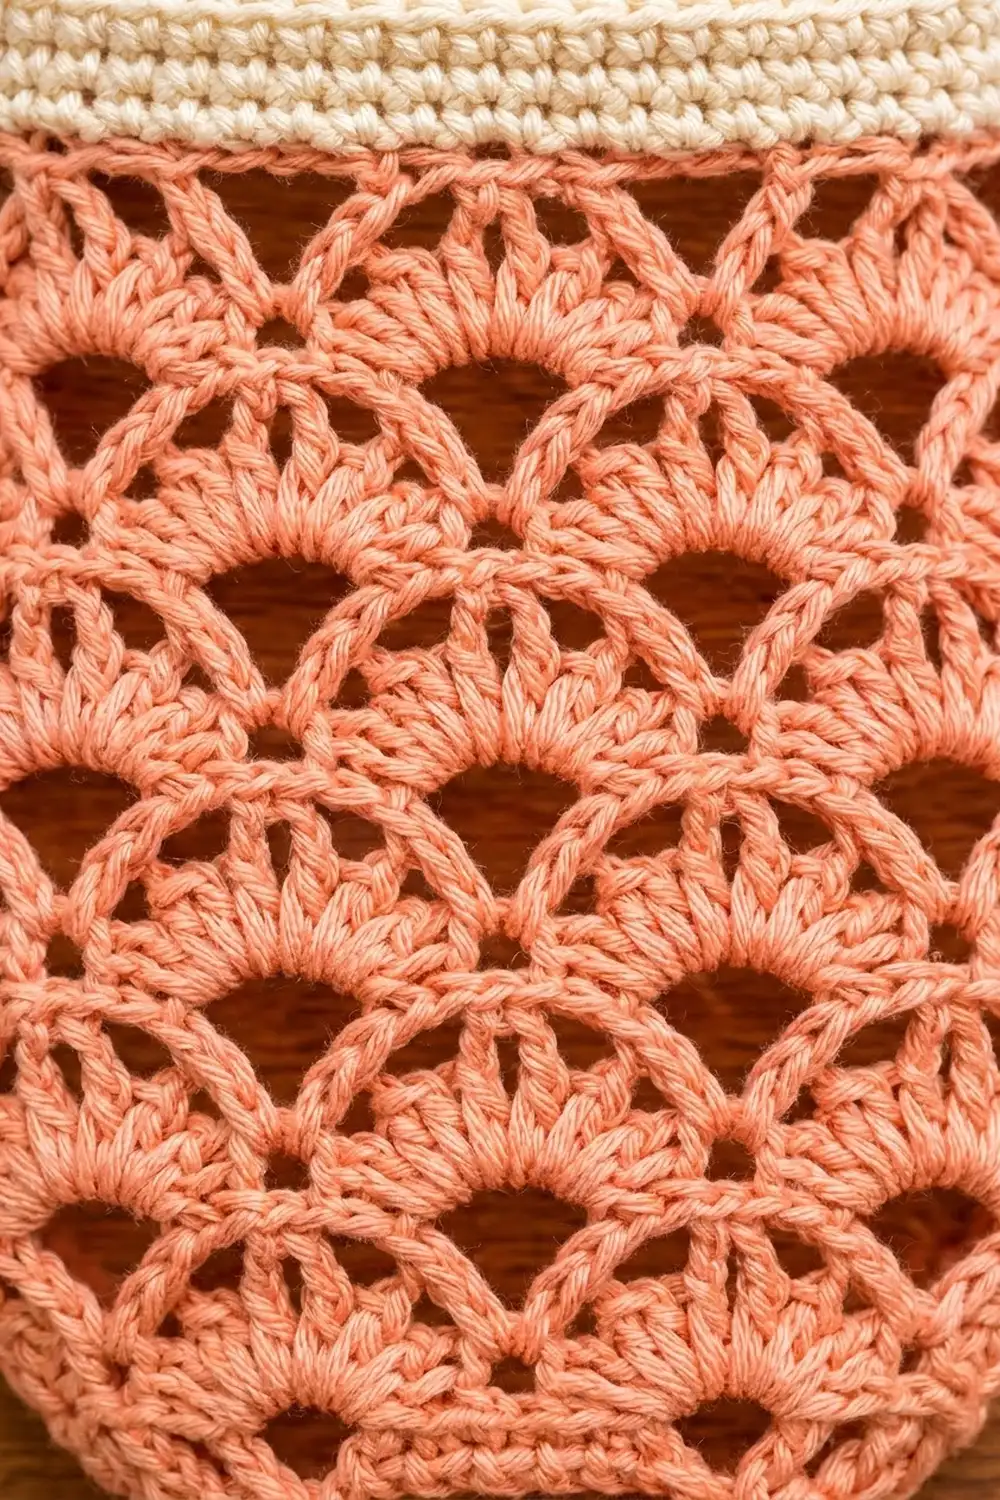
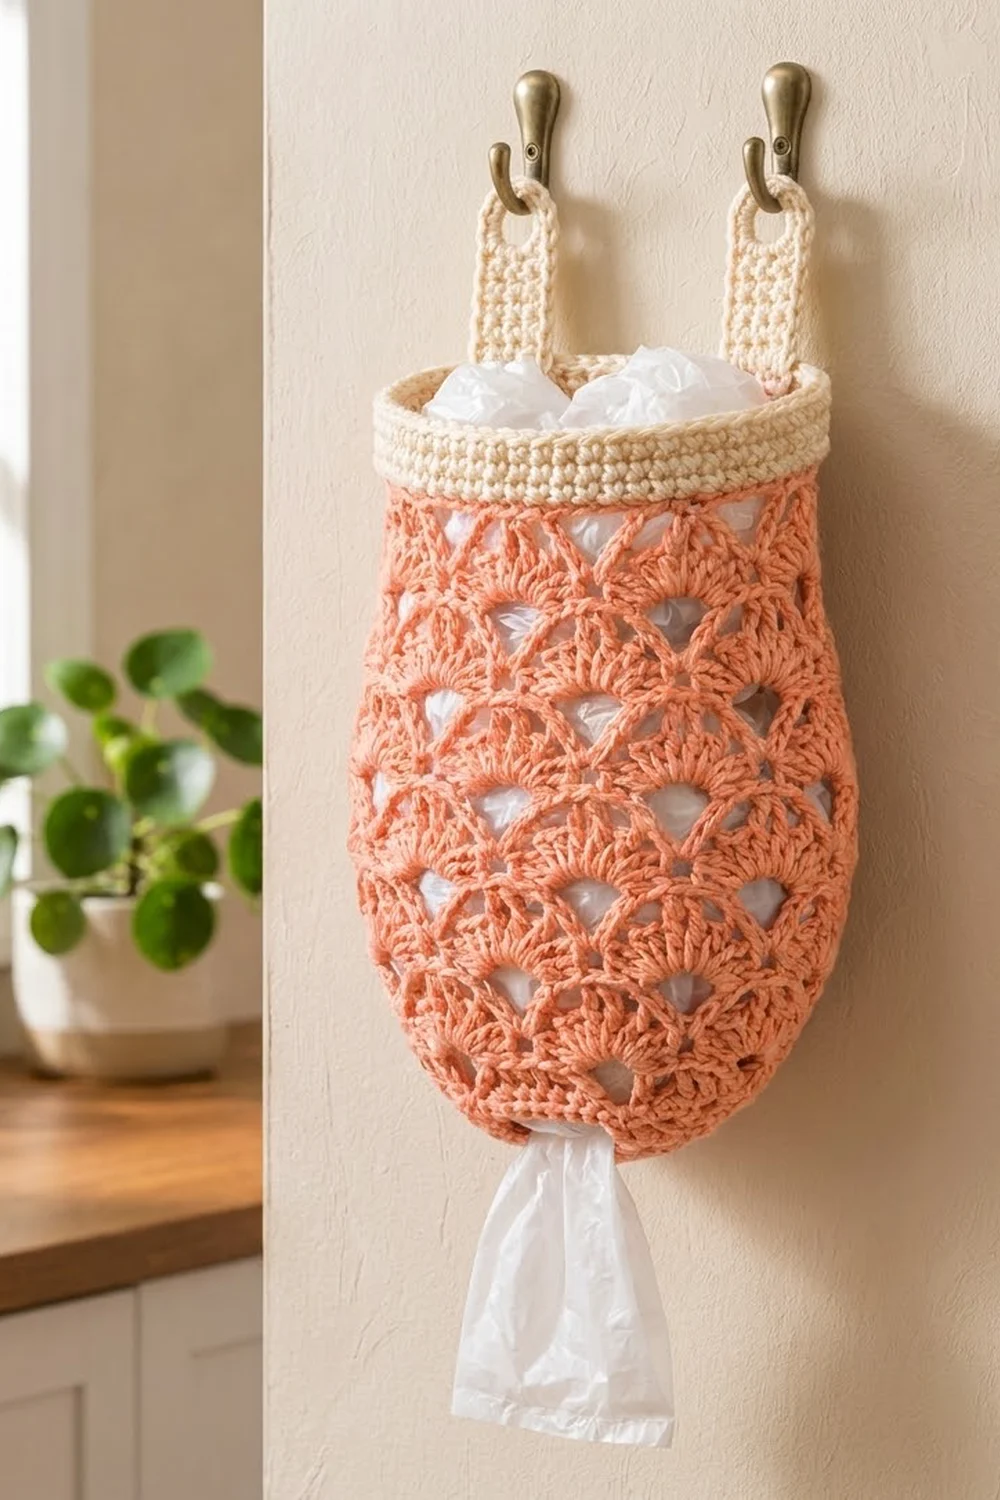
This plastic bag holder is a soft, rounded pouch covered in staggered lace fans. Each fan sits under a chain arch, and the arches shift by half a fan every round, so the fans line up like fish scales. A solid cream rim and two cream hanging tabs frame the coral lace. A slot at the bottom lets you pull out one bag at a time.
The color scheme is warm coral (salmon pink) for the body and natural cream for the rim and tabs. It suits a kitchen, laundry room or pantry. The open lace also lets you see at a glance how many bags are left.
The pattern uses US crochet terms. The finished holder is 7.5 in (19.1 cm) wide at the rim, 8 in (20.3 cm) wide at its widest point and 9 in (22.9 cm) tall. With the tabs, it hangs 11.75 in (29.8 cm) from the tops of the tabs to the bottom.
You start by chaining a ring that becomes the bottom slot. Next you work a flared single-crochet base in joined rounds. The body is made of alternating arch and fan rounds, and changing the shell size shapes the belly. A single-crochet round closes the top of the lace, and a cream rim goes on top of that. Last, you make two flat tabs with eyelet holes and sew them inside the back of the rim.
Finished Size and Construction
- Finished size: 7.5 in (19.1 cm) wide at the rim, 8 in (20.3 cm) at the widest point, 9 in (22.9 cm) tall; 11.75 in (29.8 cm) including tabs
- Skill level: Easy-intermediate
- Terminology: US
- Yarn weight: Worsted (#4) cotton
- Hook: 4.5 mm (US 7)
- Number of pieces: 3 (1 body, 2 tabs)
- Layout: Body worked in joined rounds; 2 tabs sewn inside the back of the rim
- Body size before rim: 7.5 in (19.1 cm) wide × 7.75 in (19.7 cm) tall, laid flat
- Rim (border) depth: 1.25 in (3.2 cm)
- Tab size: 1.25 in (3.2 cm) wide × 4 in (10.2 cm) long
Materials
Use a smooth worsted-weight cotton or cotton blend. Cotton holds the arches open, doesn’t stretch much under the weight of the bags, and can go in the wash. Avoid fuzzy or brushed yarns, because they hide the fan texture.
- Coral (Color A): 80 g / 123 m
- Cream (Color B): 25 g / 39 m
Tools:
- 4.5 mm (US 7) crochet hook
- Locking stitch markers (at least 4)
- Tapestry needle
- Scissors
- Measuring tape
- Rust-proof pins and a blocking mat
- Optional: two wall hooks about 2.5–3 in (6.4–7.6 cm) apart
These quantities include a margin of about 15% for checking gauge and weaving in ends.
Abbreviations (US Terms)
- ch – chain
- sl st – slip stitch
- sc – single crochet
- dc – double crochet
- sc2tog – single crochet 2 together
- rev sc – reverse single crochet (crab stitch)
- BLO – back loop only
- inc – 2 sc in the same stitch
- st(s) – stitch(es)
- sp – space
- rnd(s) – round(s)
Special stitch – Shell: Work the stated number of dc (5 or 7) into the same chain arch. On a 5-dc shell the center dc is the 3rd dc. On a 7-dc shell it is the 4th dc.
Beginning shell: Ch 3 (counts as the first dc), then work the rest of the shell’s dc in the same arch.
Gauge and Checkpoints
Sc gauge: 16 sc and 18 rnds = 4 in (10.2 cm).
You don’t need a separate swatch, because the base works as one. Crochet the base first and measure it before you start the lace.
- After Rnd 1: Laid flat, the ring forms a slot 3 in (7.6 cm) wide.
- After Rnd 4: The outer edge measures 15 in (38.1 cm) around.
- After Rnd 10: Folded flat, the body is about 8 in (20.3 cm) across.
- After Rnd 18: Folded flat, the body is 7.5 in (19.1 cm) across and 7.75 in (19.7 cm) tall.
- After Rnd 24: The holder is 9 in (22.9 cm) tall.
Too big? If Rnd 4 measures more than 15.5 in (39.4 cm), switch to a 4 mm (US G-6) hook and start again.
Too small? If Rnd 4 measures less than 14.5 in (36.8 cm), switch to a 5 mm (US H-8) hook.
Small differences in the lace only change the belly a little, but the rim has to sit flat. If you change hooks, use the new hook for the whole holder.
Body
Work the body in joined rounds without turning. Put a marker in the first stitch of each round.
Base (Color A)
Rnd 1: Ch 24 loosely. Sl st to the first ch to form a ring, making sure the chain isn’t twisted. Ch 1, sc in each ch around, sl st to first sc. (24 sc)
This ring becomes the bottom slot that the bags come out of. If you chain tightly, use a hook one size larger for the chain only.
Rnd 2: Ch 1, sc in next st, inc in next st 12 times, sl st to first sc. (36 sc)
Rnd 3: Ch 1, sc in next 2 sts, inc in next st 12 times, sl st to first sc. (48 sc)
Rnd 4: Ch 1, sc in next 3 sts, inc in next st 12 times, sl st to first sc. (60 sc)
The base will cup into a shallow bowl. That’s expected: it forms the rounded bottom of the pouch.
Lace Body (Color A)
Rnd 5 (arch): Ch 1, sc in first st, ch 5, skip 5 sts, sc in next st 9 times, ch 5, skip 5 sts, sl st to first sc. (10 sc, 10 ch-5 arches)
Check: 10 sc + 50 skipped sts = 60. ✓
Rnd 6 (fan, 5-dc): Sl st in first arch, beginning 5-dc shell in same arch, sc in next sc, 5-dc shell in next arch, sc in next sc 9 times, sl st to top of beginning ch-3. (10 shells = 50 dc, plus 10 sc)
Rnd 7 (arch): Sl st in next 2 dc (center of first shell), ch 1, sc in same st, ch 5, sc in center dc of next shell 9 times, ch 5, sl st to first sc. (10 sc, 10 ch-5 arches)
Each arch runs from the center of one shell to the center of the next. That places every new fan halfway between the two fans below it.
Rnd 8 (fan, 7-dc): Sl st in first arch, beginning 7-dc shell in same arch, sc in next sc, 7-dc shell in next arch, sc in next sc 9 times, sl st to top of beginning ch-3. (10 shells = 70 dc, plus 10 sc)
Rnd 9 (arch): Sl st in next 3 dc, ch 1, sc in same st, ch 6, sc in center dc of next shell 9 times, ch 6, sl st to first sc. (10 sc, 10 ch-6 arches)
Rnds 10, 12 and 14 (fan, 7-dc): Work as Rnd 8. (10 shells = 70 dc, plus 10 sc)
Rnds 11 and 13 (arch): Work as Rnd 9. (10 sc, 10 ch-6 arches)
The 7-dc shells and ch-6 arches widen the belly. Measure the width at Rnd 10.
Rnd 15 (arch): Sl st in next 3 dc, ch 1, sc in same st, ch 5, sc in center dc of next shell 9 times, ch 5, sl st to first sc. (10 sc, 10 ch-5 arches)
Rnd 16 (fan, 5-dc): Work as Rnd 6. (10 shells = 50 dc, plus 10 sc)
Rnd 17 (arch): Sl st in next 2 dc, ch 1, sc in same st, ch 4, sc in center dc of next shell 9 times, ch 4, sl st to first sc. (10 sc, 10 ch-4 arches)
The shorter arches pull the top in, so the pouch narrows slightly under the rim.
Rnd 18 (conversion): Ch 1, sc in next sc, 5 sc in next ch-4 arch 10 times, sl st to first sc. (10 sc worked 1-per-existing-sc + 50 sc added in arches = 60 sc)
Fasten off Color A.
Checkpoint: Folded flat, the body is 7.5 in (19.1 cm) wide and 7.75 in (19.7 cm) tall, measured from the bottom fold to Rnd 18.
Make All Pieces
Make:
- Color A: 1 body
- Color B: 2 tabs
Layout as it hangs (back view):
   [Tab]       [Tab]
 [====== Rim ======]
 [                 ]
 [   Lace  Body    ]
 [                 ]
 [_____ slot ______]
Tab (make 2, Color B)
Foundation: Ch 6.
Row 1: Sc in 2nd ch from hook and in each ch across, turn. (5 sc)
Rows 2–14: Ch 1, sc in each st across, turn. (5 sc)
Row 15 (eyelet): Ch 1, sc in first st, ch 3, skip 3 sts, sc in last st, turn. (2 sc, 1 ch-3 sp)
Row 16: Ch 1, sc in first st, 3 sc in ch-3 sp, sc in last st, turn. (5 sc)
Row 17: Ch 1, sc2tog, sc in next st, sc2tog, turn. (3 sts)
Row 18: Ch 1, sc in each st across. (3 sc)
Fasten off, leaving a 12 in (30.5 cm) tail for sewing. The decreases round off the top above the eyelet.
Checkpoint: Each tab is 1.25 in (3.2 cm) wide and 4 in (10.2 cm) long, with an eyelet about 0.75 in (1.9 cm) across.
Joining
Sew the tabs on after the rim is finished (see Border below). Only the tabs are joined; the body is already one continuous piece.
Flatten the holder so the round joins sit at one side fold. Starting from that fold, count the 30 back stitches of Rnd 24 and number them 1–30. Pin one tab over sts 6–10 and the other over sts 21–25. That leaves 5 sts (1.25 in / 3.2 cm) between each fold and the nearest tab, and 10 sts (2.5 in / 6.4 cm) between the tabs.
Overlap the bottom 6 rows of each tab (1.25 in / 3.2 cm) with the inside of the rim. The tab stitches line up one-to-one with the rim stitches, so each tab’s 5 sts sit on 5 rim sts.
Whipstitch across the bottom edge of each tab and up both sides. Catch only the inside loops so the sewing doesn’t show from the front. Keep the stitches snug but not tight enough to pucker; the rim behind the tab should stay smooth.
Size checkpoint: 2.75 in (7.0 cm) of each tab shows above the rim, for a total hanging height of 11.75 in (29.8 cm).
Border (Cream Rim)
Border gauge: 16 sc = 4 in (10.2 cm). Five sc rnds plus 1 rev sc rnd = 1.25 in (3.2 cm).
The body has 60 sts, so it has 30 sts on each side when folded flat. There is one body along each side, so each side starts with 1 × 30 = 30 sts. The rim is a tube, so it has no corners and no corner stitches to add.
Rnd 19: Join Color B with a standing sc in any st of Rnd 18. Sc in each st around, sl st to first sc. (60 sc: 30 per side)
Rnds 20–23: Ch 1, sc in BLO of each st around, sl st to first sc. (60 sc: 30 per side)
Working in the back loops makes the fine horizontal ridges on the band.
Rnd 24: Ch 1, rev sc in each st around, sl st to first st. (60 rev sc: 30 per side)
Fasten off and weave in the ends.
Why the math works: 30 sts at 4 sts per in = 7.5 in (19.1 cm), the same as the width of Rnd 18. The rim has no increases or decreases, so it neither flares nor pulls in. The rev sc gives the top edge a firm, rounded finish.
Final Blocking
- Soak the holder in cool water, then gently squeeze the water out. Don’t wring it.
- Roll it in a towel to remove excess moisture.
- Lay it flat with the round joins at one side fold.
- Shape it to 7.5 in (19.1 cm) wide at the rim and 8 in (20.3 cm) at the belly, rounding the bottom curve evenly.
- Pin each arch at its peak so the fans open evenly.
- Pin the tabs straight up and push a pencil through each eyelet to hold it open.
- Let it dry completely before you unpin it.
Final Quality-Control Checklist
- Base Rnds 1–4 have 24, 36, 48 and 60 sc
- There are 6 fan rnds with 10 shells each
- Every shell is centered in its arch
- Rnd 18 has 60 sc
- Every rim rnd has 60 sts and the rim lies flat
- The tabs are the same length, the eyelets are open, and the tabs are 10 sts apart
- The bottom slot is 3 in (7.6 cm) wide and not tight
- All ends are woven in securely
Troubleshooting
The fans don’t line up. Each arch round has to start at the center dc of a shell. Recount your slip stitches: 2 for 5-dc shells, 3 for 7-dc shells.
The base ruffles badly. Your increases are too loose for your tension. Go down one hook size for Rnds 2–4.
The bags won’t come out. The slot is too tight. Remake Rnd 1 with a larger hook for the chain.
The rim flares. Your tension with Color B is looser than with Color A. Go down one hook size for the rim.
The tabs tip forward. Sew them lower so all 6 overlap rows sit inside the rim.
Care
Hand wash, or machine wash on a gentle cycle in cool water. Reshape and dry flat. Don’t tumble dry, because heat can shrink cotton and distort the arches.
Final Notes
Here is the full measurement chain. The 24-st ring makes a 3 in (7.6 cm) slot. The base grows to 60 sts, or 15 in (38.1 cm) around. The lace widens to 8 in (20.3 cm), then comes back to 60 sts at Rnd 18, which measures 7.5 in (19.1 cm) flat. The rim adds 1.25 in (3.2 cm), for a 9 in (22.9 cm) body. The tabs add 2.75 in (7.0 cm), so the holder hangs 11.75 in (29.8 cm). Check each measurement as you reach it, and the finished holder will come out the right size.
Happy crocheting!