

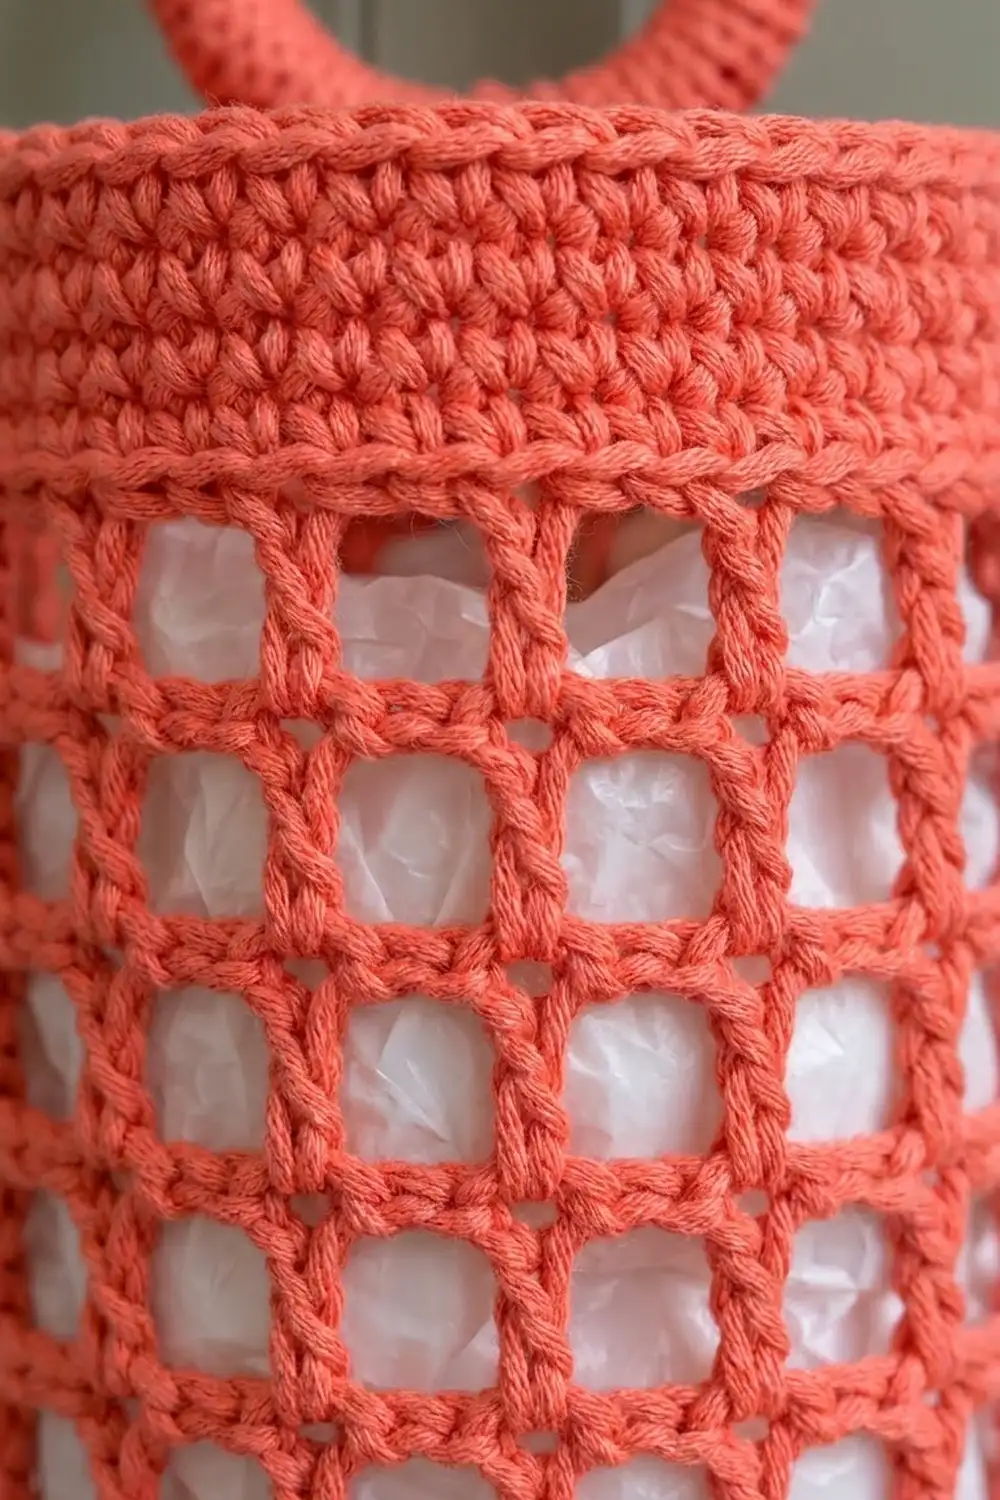
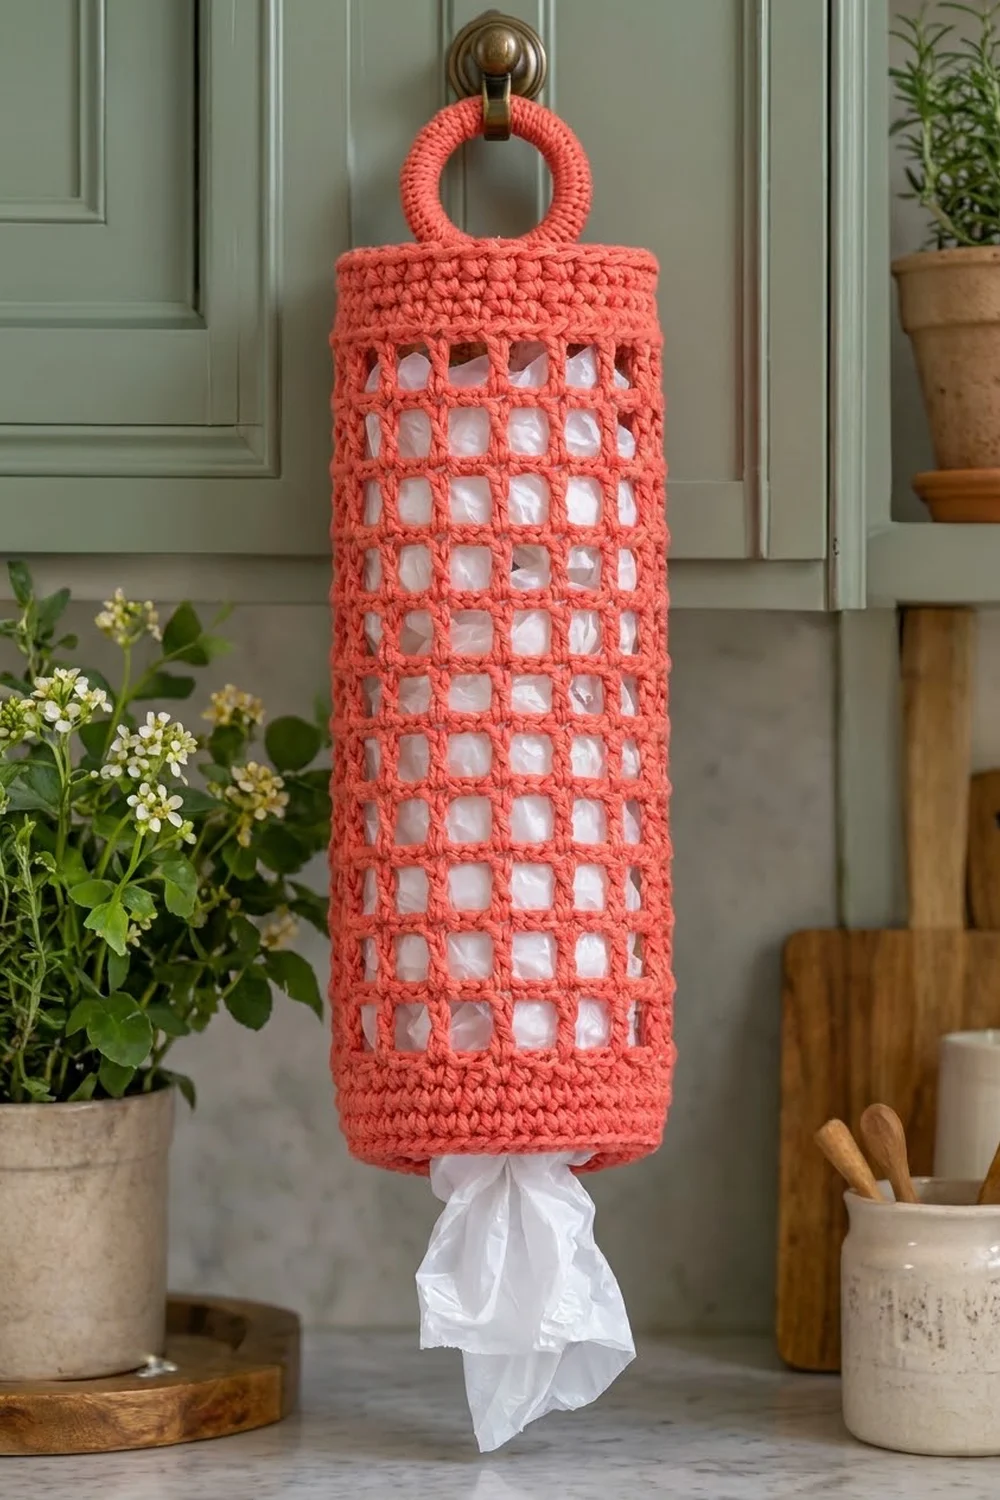
This plastic bag holder is a tall, open-grid cylinder in warm coral cotton. It has a solid single crochet base with a round hole for pulling bags out and a short solid band at each end. Between the bands is a crisp filet-style mesh that shows the white bags inside. A wooden ring covered in matching single crochet sits at the top, so you can hang the holder on a cabinet knob, hook, or door handle.
The look is clean and a little retro, like a lantern made of yarn. It uses only one color and two basic stitch textures, so it fits farmhouse, modern, and cottage kitchens equally well.
This pattern uses US crochet terms. The finished holder is about 4.75 in (12.1 cm) across and 14.2 in (36.1 cm) tall, not counting the ring. The covered ring adds about 2.75 in (7.0 cm) above the rim.
The body is worked in one piece from the bottom up. You start with a flat ring of single crochet that forms the base and the dispenser hole. Then you turn the edge upward, work a solid band, change to double crochet mesh for the main tube, and finish with a solid top band. Last, you cover a wooden ring and sew it to the back of the top band.
Finished Size and Construction
- Finished size: 4.75 in (12.1 cm) diameter x 14.2 in (36.1 cm) tall, plus a 2.75 in (7.0 cm) hanging ring
- Skill level: Easy
- Terminology: US crochet terms
- Yarn weight: Worsted (#4), 100% cotton
- Hook: 5.0 mm (H-8)
- Number of pieces: 1 body worked in one piece, plus 1 covered ring sewn on
- Layout: Single standing cylinder; no motif grid
- Base size: 60 sts around, 4.75 in (12.1 cm) across, with a 1.9 in (4.8 cm) center hole
- Size before top band: 13.1 in (33.3 cm) tall
- Top band (border) depth: 1.1 in (2.8 cm), 5 rounds
Materials
Choose a smooth, firm worsted-weight cotton or cotton blend with about 170 m (186 yd) per 100 g. Cotton holds the mesh squares open and stretches very little under the weight of stuffed bags. Avoid acrylic if you can, because it tends to sag over time. A tightly plied cotton also shows the grid lines more crisply than a soft, loosely spun one.
- Coral cotton, worsted (#4): about 60 g, 105 m (115 yd)
These quantities include a margin of about 30% for gauge swatching and weaving in ends.
Tools:
- 5.0 mm (H-8) crochet hook
- 1 wooden or metal ring, 2 in (5.1 cm) outer diameter
- Stitch marker
- Tapestry needle
- Scissors
- Measuring tape
- A can, bottle, or rolled towel about 4.75 in (12.1 cm) wide for blocking
Abbreviations (US Terms)
- ch – chain
- sl st – slip stitch
- sc – single crochet
- dc – double crochet
- inc – 2 sc in the same stitch
- BLO – back loop only
- sp – space
- st(s) – stitch(es)
Special stitch – mesh square: One mesh square is 1 dc followed by ch 2. On the first mesh round, each ch 2 skips 2 sts of the round below. On later rounds, you work each dc into the dc of the round below, so the squares stack in straight columns.
Gauge and Checkpoints
- Single crochet gauge: 16 sc and 18 rounds = 4 in (10.2 cm)
- Mesh gauge: 5 mesh squares (15 sts) = 3.75 in (9.5 cm) wide; 7 mesh rounds = 4 in (10.2 cm) tall
Use the base as your test piece. Work Rounds 1–7 and measure before you go on. It only takes a few minutes and tells you whether your gauge is right.
Checkpoints:
- After Round 1, the center hole is about 1.9 in (4.8 cm) across.
- After Round 7, the base lies flat and is 4.75 in (12.1 cm) across.
- After Round 12, the solid bottom band is 1.1 in (2.8 cm) tall.
- After 7 mesh rounds, the mesh section is 4 in (10.2 cm) tall.
- After all 21 mesh rounds, the piece is 13.1 in (33.3 cm) tall.
If your base is too big, go down a hook size to 4.5 mm (7). If it’s too small, go up to 5.5 mm (I-9). If the base ruffles, your stitches are too tall for the increase rate, so go down a hook size. If it cups, go up one.
Pattern
Work in joined rounds, closing each round with a sl st. The ch 1 at the start of sc rounds does not count as a stitch.
Base
Foundation: Ch 24, sl st to the first ch to form a ring. Don’t twist the chain.
Round 1: Ch 1, sc in each ch around, sl st to first sc. (24 sts)
Round 2: Ch 1, sc in next 3 sts, inc 6 times, sl st to first sc. (30 sts)
Round 3: Ch 1, sc in next 4 sts, inc 6 times, sl st to first sc. (36 sts)
Round 4: Ch 1, sc in next 5 sts, inc 6 times, sl st to first sc. (42 sts)
Round 5: Ch 1, sc in next 6 sts, inc 6 times, sl st to first sc. (48 sts)
Round 6: Ch 1, sc in next 7 sts, inc 6 times, sl st to first sc. (54 sts)
Round 7: Ch 1, sc in next 8 sts, inc 6 times, sl st to first sc. (60 sts)
Check: the base is a flat ring 4.75 in (12.1 cm) across. Each round adds exactly 6 sts, the right increase rate for a flat sc circle at this gauge.
Bottom Band
Round 8: Ch 1, sc in BLO of each st around, sl st to first sc. (60 sts) The unused front loops form a neat ridge, and the edge starts to turn upward.
Rounds 9–12: Ch 1, sc in each st around, sl st to first sc. (60 sts)
Check: the band is 1.1 in (2.8 cm) tall, and the base sits flat like the bottom of a cup. Place a marker in the joining stitch to mark the back of the holder.
Mesh Body
Mesh Round 1: Ch 5 (counts as dc + ch 2), skip next 2 sts, dc in next st, ch 2, skip next 2 sts 19 times, sl st to 3rd ch of beginning ch-5. (20 dc and 20 ch-2 sps = 60 sts)
Mesh Rounds 2–21: Ch 5 (counts as dc + ch 2), dc in next dc, ch 2 19 times, sl st to 3rd ch of beginning ch-5. (20 dc and 20 ch-2 sps = 60 sts)
Every round has exactly 20 open squares. Always work the dc into the top of the dc below, never into the chain space, so the columns stay vertical.
All the joins line up in one column at the back, next to your marker. That column becomes the back of the holder, where the ring will go, so any small unevenness at the joins stays out of sight.
Check: after Mesh Round 7, the mesh is 4 in (10.2 cm) tall. After Mesh Round 21, the mesh is 12 in (30.5 cm) tall, and the whole piece is 13.1 in (33.3 cm) tall. For a longer holder, add mesh rounds in groups of 7. Each group adds 4 in (10.2 cm).
Covered Hanging Ring
Make a slip knot and hold it behind the ring. Insert the hook through the center of the ring, yarn over, and pull up a loop. Yarn over and pull through both loops. That is 1 sc around the ring.
Work about 40 sc around the 2 in (5.1 cm) ring, or as many as it takes to cover it completely with stitches packed side by side. Sl st to the first sc. Fasten off, leaving a 12 in (30.5 cm) tail for sewing.
Slide the stitches around the ring until the join sits at the bottom, where it will be hidden.
Top Band (Border)
The top band is the border of this piece. It closes off the mesh with a firm rim that keeps the tube round and gives the ring a solid place to attach.
Border gauge: 16 sc = 4 in (10.2 cm), the same as the base. At 4 sts per inch, 60 sts make 15 in (38.1 cm) around, exactly the circumference of the base.
Top Round 1 (conversion round): Ch 1, sc in next dc, 2 sc in next ch-2 sp 20 times, sl st to first sc. (20 sc worked 1-per-dc + 40 sc worked into ch-2 sps = 60 sts)
Top Rounds 2–5: Ch 1, sc in each st around, sl st to first sc. (60 sts)
Fasten off and weave in the end.
To check your count more easily, split the round into four quarters of 15 sts each. Each quarter covers 5 mesh squares: 5 sc in the dc + 10 sc in the spaces = 15 sts. Four quarters x 15 sts = 60 sts.
Why the math works: each mesh square is 3 sts wide (1 dc and 2 chains). The conversion round puts back exactly 3 sc per square: 1 in the dc and 2 in the space. So 20 squares x 3 sts = 60 sts, the same count as the bottom band. The top and bottom bands are the same width, so the cylinder stays straight with no flare or pinch.
Dispenser hole edge: On the underside of the base, join yarn in the foundation ring. Sl st loosely in each of the 24 foundation chains, then sl st to the first st. (24 sts) This firms up the hole so it holds its 1.9 in (4.8 cm) shape and grips each bag lightly as it comes out. Fasten off and weave in the end.
Attach the ring: Find the marker at the back of the holder. Center the covered ring on the marker against the inside of the top band, with the join at the bottom and the ring standing above the rim. Use the tail to sew the lower edge of the ring to Top Rounds 3–5 across 8 sts. Go over the same spot two or three times for strength. Weave in the end.
Final Blocking
- Soak the holder in cool water, then gently squeeze out the excess. Don’t wring it.
- Roll it in a towel and press to remove more water.
- Slide it over a can, bottle, or rolled towel about 4.75 in (12.1 cm) wide.
- Straighten the mesh columns so each dc stands vertical and each square is open and even.
- Press the base flat and round out the dispenser hole with your fingers.
- Check that the body is 14.2 in (36.1 cm) tall.
- Let it dry completely before you remove the form.
Final Quality-Control Checklist
- The base lies flat with 60 sts and is 4.75 in (12.1 cm) across.
- The dispenser hole is round and about 1.9 in (4.8 cm) across.
- The bottom band has 5 rounds, is 1.1 in (2.8 cm) tall, and shows the BLO ridge.
- Every mesh round has 20 dc and 20 ch-2 spaces.
- The mesh columns run straight from bottom to top.
- The top band has 5 rounds of 60 sc and is 1.1 in (2.8 cm) tall.
- The body is 14.2 in (36.1 cm) tall.
- The ring is fully covered, with no wood showing, and is sewn securely at the back.
- All ends are woven in and secure.
Troubleshooting
The base ruffles. Your stitches are too loose or tall for the increase rate. Go down a hook size or crochet a little tighter, then redo Rounds 2–7.
The base cups up. Your stitches are too tight. Go up a hook size for the base only.
The mesh columns slant. You’re working the dc into the chain space or the chain next to the dc. Work each dc into the top of the dc below.
The squares look tall and narrow. Your dc stitches are too long. Pull the yarn snug on the last loop, or use a smaller hook for the mesh only.
The holder flares at the top. Check Top Round 1. You may have worked 3 sc into some spaces. It must be exactly 2 sc per space, for 60 sts.
Bags fall out too easily. Work the dispenser hole edge a little tighter, or add a second round of sl sts.
The ring tilts forward. Sew it across a wider area, up to 10 sts, and stitch through both the front and back loops.
Care
Hand wash in cool water, then lay it flat or reshape it on a bottle to dry. Cotton can shrink slightly in a hot dryer, so avoid high heat.
Final Notes
Everything in this holder comes back to one number: 60 sts around. The base grows from 24 sts to 60 sts at 6 sts per round and reaches 4.75 in (12.1 cm) across. The bottom band keeps those 60 sts for 1.1 in (2.8 cm). The mesh splits the same 60 sts into 20 squares of 3 sts each and runs for 12 in (30.5 cm). The top band converts back to 60 sc for another 1.1 in (2.8 cm), bringing the body to 14.2 in (36.1 cm). A covered 2 in (5.1 cm) ring, 2.75 in (7.0 cm) tall once covered, finishes it off.
Check your gauge on the base, follow the counts, and you’ll have a sturdy, cheerful bag holder that keeps the kitchen tidy.
Happy crocheting!