

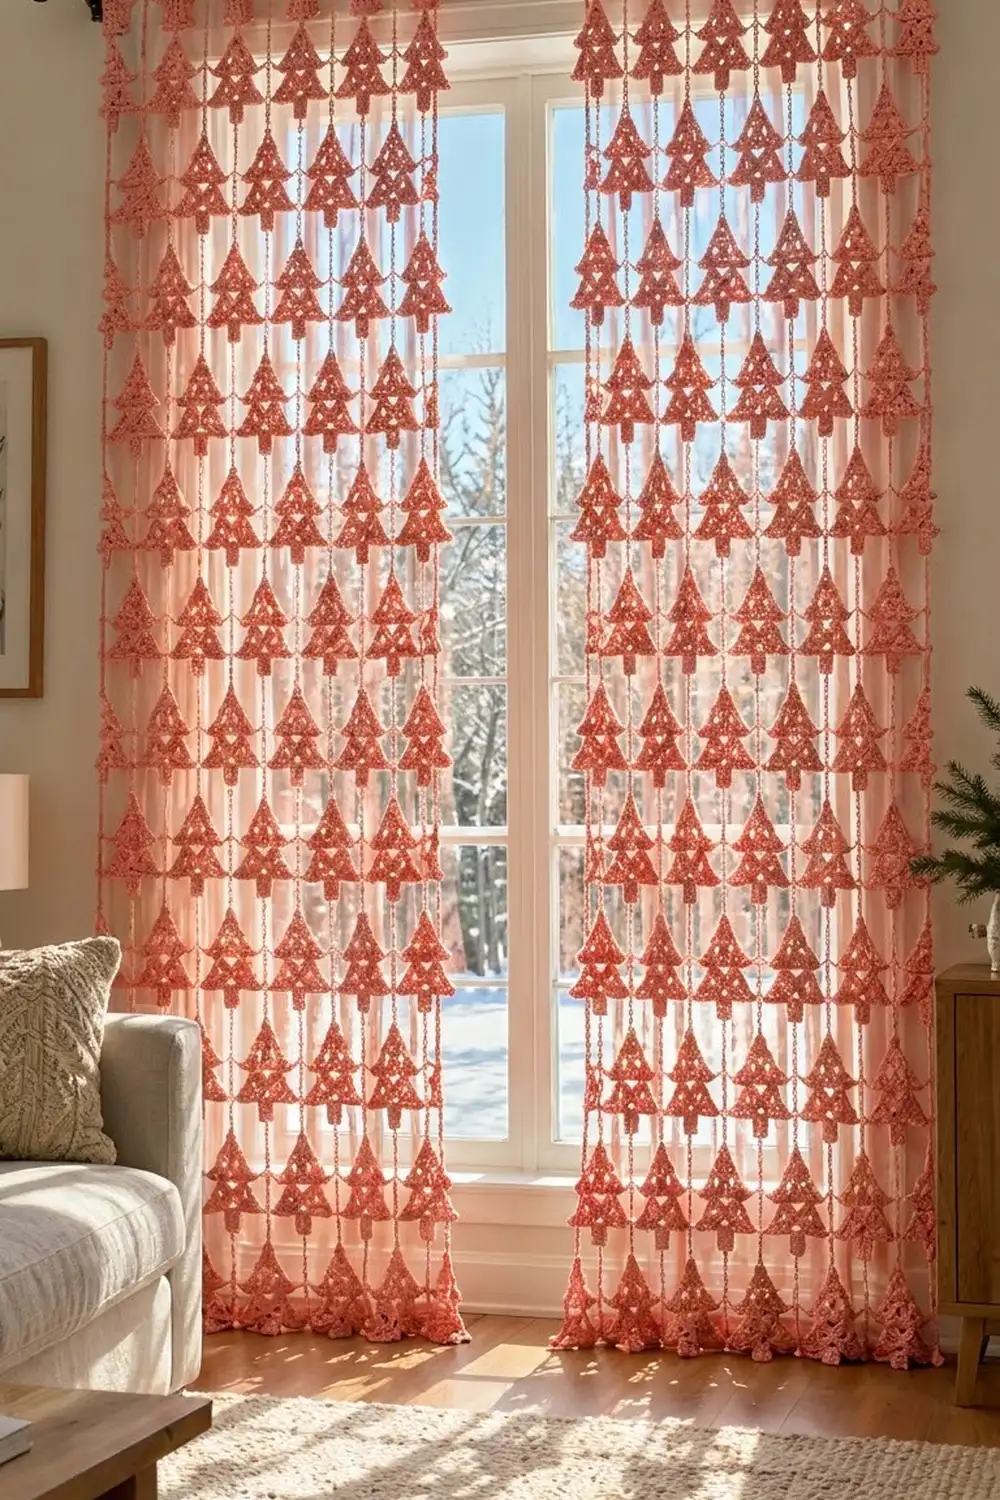
This curtain turns a plain window into a soft winter forest. Rows of small lace pine trees hang in neat columns, linked by fine chain strands. Light comes through every open space, so the trees seem to float against the glass.
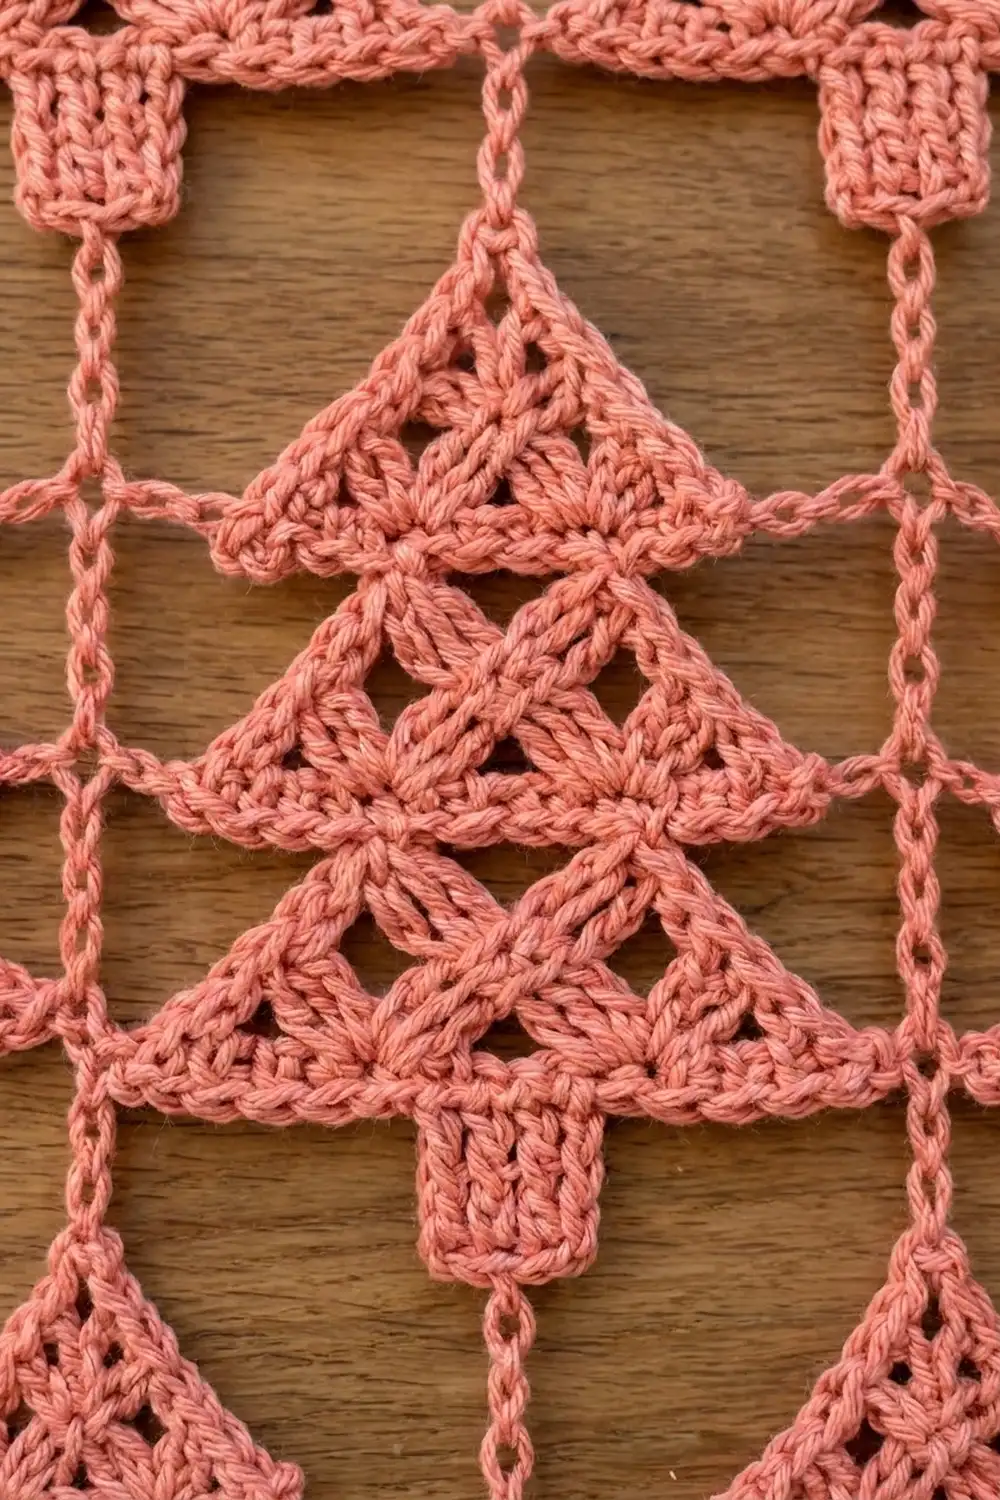
The whole curtain is worked in one warm coral-pink cotton. Each tree has three layered lace tiers and a short, solid trunk. Without color changes, the stepped silhouettes and the open lattice carry the design. It looks festive at the holidays and still fits in after the season ends.
The pattern uses US crochet terms. Each finished panel measures 35 in (88.9 cm) wide and 97 in (246.4 cm) long, including the top band. Each tree is 4 in (10.2 cm) wide and 7 in (17.8 cm) tall.
Construction is modular. For each tree you make three granny-style triangles, stack and sew them, and add a trunk. Then you link the trees into columns with chains, hang the columns from a crocheted top band with rod loops, and tie them together with horizontal chain strands.
Finished Size and Construction
- Finished panel size: 35 in (88.9 cm) wide x 97 in (246.4 cm) long
- Skill level: Intermediate (simple stitches, a lot of careful assembly)
- Terminology: US crochet terms
- Yarn weight: Worsted (#4) cotton or cotton blend
- Hook: 4.5 mm (US 7)
- Number of pieces: 84 trees per panel, 168 for the pair (each tree is 3 tiers plus a trunk)
- Layout: 7 columns x 12 rows of trees per panel
- Piece size: Each tree is 4 in (10.2 cm) x 7 in (17.8 cm). Each grid cell is 5 in (12.7 cm) wide x 8 in (20.3 cm) tall.
- Size before border: 35 in (88.9 cm) cell grid x 96 in (243.8 cm)
- Border depth: 1 in (2.5 cm) top band with rod loops. The sides and bottom are left as open tree edges.
Materials
Choose a smooth, mercerized or combed worsted cotton with about 190 m per 100 g. Cotton keeps the triangle points crisp and hangs straight. It also stretches less than acrylic over a long drop.
- Coral pink: 800 g, about 1,520 m for two panels (400 g, about 760 m per panel)
These quantities include a margin of about 15% for swatching, tails and differences in tension.
Tools:
- 4.5 mm (US 7) crochet hook
- Tapestry needle
- Locking stitch markers
- Measuring tape and scissors
- Blocking mats, rust-proof pins and a spray bottle
- A curtain rod up to 1 in (2.5 cm) in diameter
Abbreviations (US Terms)
- ch: chain
- sl st: slip stitch
- sc: single crochet
- hdc: half double crochet
- dc: double crochet
- sp(s): space(s)
- st(s): stitch(es)
- beg: beginning
- rep: repeat
- RS / WS: right side / wrong side
Corner cluster (special stitch): Work (3 dc, ch 2, 3 dc) in the same ch-2 corner space.
Gauge and Checkpoints
Gauge: 16 hdc and 12 rows of hdc = 4 in (10.2 cm). 5 ch = 1 in (2.5 cm), measured slightly relaxed.
Make one complete tree before you start production, and check each stage:
- Rnd 1 of any tier: 1.25 in (3.2 cm) per side
- Top tier: 2 in (5.1 cm) per side after Rnd 2, and 2.5 in (6.4 cm) after the edge round
- Middle tier: 2.75 in (7.0 cm) per side after Rnd 3, and 3.25 in (8.3 cm) after the edge round
- Bottom tier: 3.5 in (8.9 cm) per side after Rnd 4, and 4 in (10.2 cm) after the edge round
- Trunk: 1.25 in (3.2 cm) wide x 1 in (2.5 cm) tall
- Assembled tree: 4 in (10.2 cm) x 7 in (17.8 cm)
If your bottom tier measures more than 4 in (10.2 cm) per side, go down one hook size. If it measures less than 3.75 in (9.5 cm), go up one size. Every grid measurement depends on the tree size.
Tier Pattern
Every tier starts the same way. Stop after Rnd 2 for the top tier, after Rnd 3 for the middle tier and after Rnd 4 for the bottom tier, then work the edge round on all three. Keep the RS facing and don’t turn.
Rnd 1: Ch 4 and sl st in the first ch to form a ring. Ch 3 (counts as dc), 2 dc in ring, ch 2, [3 dc in ring, ch 2] twice, sl st in top of beg ch-3. (9 dc, 3 ch-2 corner sps)
Rnd 2: Sl st in next 2 dc and into the ch-2 sp. Ch 3 (counts as dc), (2 dc, ch 2, 3 dc) in same sp, ch 1, [corner cluster in next ch-2 sp, ch 1] twice, sl st in top of beg ch-3. (18 dc: 6 dc and 1 ch-1 sp per side, plus 3 corners)
Rnd 3: Sl st in next 2 dc and into the ch-2 sp. Ch 3, (2 dc, ch 2, 3 dc) in same sp, ch 1, 3 dc in next ch-1 sp, ch 1, [corner cluster in next ch-2 sp, ch 1, 3 dc in next ch-1 sp, ch 1] twice, sl st in top of beg ch-3. (27 dc: 9 dc and 2 ch-1 sps per side, plus 3 corners)
Rnd 4: Sl st in next 2 dc and into the ch-2 sp. Ch 3, (2 dc, ch 2, 3 dc) in same sp, ch 1, [3 dc in next ch-1 sp, ch 1] twice, corner cluster in next ch-2 sp, ch 1, [3 dc in next ch-1 sp, ch 1] twice; rep from * once more, sl st in top of beg ch-3. (36 dc: 12 dc and 3 ch-1 sps per side, plus 3 corners)*
The center ring and the ch-1 gaps form the open lace windows. The 3-dc clusters make the solid texture between them.
Edge Round (all tiers)
This is a conversion round. Each dc and each ch-1 sp gets 1 hdc, and each ch-2 corner gets 3 hdc.
Ch 2 (doesn’t count as a st). Hdc in each dc and each ch-1 sp around, with 3 hdc in each ch-2 corner sp. Sl st in first hdc. Fasten off. Leave a 12 in (30.5 cm) tail on the top and middle tiers for sewing, and a 6 in (15.2 cm) tail on the bottom tier.
- Top tier: (21 sts worked 1 per dc or sp) + (9 corner hdc) = 30 hdc, or 11 sts per side counting both corner center sts
- Middle tier: (33) + (9) = 42 hdc, or 15 sts per side
- Bottom tier: (45) + (9) = 54 hdc, or 19 sts per side
To check: 3 sides x 19 = 57, minus the 3 shared corner sts = 54.
Trunk
Hold the bottom tier point up. Number the bottom-edge sts 1 to 19, starting at the right corner center st and ending at the left one. St 10 is the center.
Row 1 (RS): Join yarn with a sl st in st 8. Ch 2 (doesn’t count), hdc in sts 8–12. Turn. (5 hdc)
Rows 2–3: Ch 2, hdc in each st across. Turn. (5 hdc)
Fasten off and leave a 6 in (15.2 cm) tail. The trunk measures 1.25 in (3.2 cm) x 1 in (2.5 cm).
Stacking the Tiers
- Lay the bottom tier RS up with its point at the top.
- Place the middle tier on top of it, RS up. Its bottom edge should run across the bottom tier 1.25 in (3.2 cm) below the bottom tier’s point. Center it so its bottom corners extend past the bottom tier’s slanted sides.
- With the middle tier’s tail, whipstitch through the back loops of its bottom edge into the bottom tier wherever the layers overlap. Tack each corner with 2 small stitches.
- Attach the top tier to the middle tier the same way, again 1.25 in (3.2 cm) below the point.
Checkpoint: The tiers are about 2.2 in, 2.8 in and 3.5 in (5.6 cm, 7.1 cm, 8.9 cm) tall. With two 1.25 in (3.2 cm) overlaps, the stack stands 6 in (15.2 cm) tall. The trunk adds 1 in (2.5 cm), so the tree is 7 in (17.8 cm) tall.
Make All Pieces
- Per panel: 84 top tiers, 84 middle tiers, 84 bottom tiers and 84 trunks
- For two panels: 168 of each
Work the tiers in batches by size to keep your tension even. Then stack, sew and add the trunks. Weave in all tails except the trunk tails, which you’ll weave in after joining.
Layout grid (one panel, T = tree):
        C1  C2  C3  C4  C5  C6  C7
Band   [=============================]
Row 1    T   T   T   T   T   T   T
Row 2    T   T   T   T   T   T   T
 ...     (repeat through Row 12)
Row 12   T   T   T   T   T   T   T
Each T fills a cell 5 in (12.7 cm) wide x 8 in (20.3 cm) tall: 1 in (2.5 cm) of chain above, then the 7 in (17.8 cm) tree.
Joining
Vertical Links (Columns)
Each column has 12 trees joined by 11 links.
Link: Join yarn with a sl st in the center st (st 3) of the last trunk row. Ch 5, then sl st in the point corner st of the next tree’s top tier. Fasten off.
Top drop: Join yarn with a sl st in the point st of the first tree in the column. Ch 5 and fasten off, leaving a 6 in (15.2 cm) tail. You’ll catch the last ch of the drop in the band.
Each column has 12 chains of 5 ch, at 1 in (2.5 cm) each: 11 links plus the drop. So a column measures 12 x (1 in + 7 in) = 96 in (243.8 cm). Keep your chains relaxed, because tight links shorten the panel.
Horizontal Strands
Work these after the band so the columns hang straight. Make one strand per row of trees, running along the back of the trees’ bottom edges.
Strand: With the WS facing, join yarn with a sl st in the outer bottom corner st of the C1 tree. *Ch 20, sl st in the opposite bottom corner of the same tree, ch 5, sl st in the near bottom corner of the next tree; rep from * 5 more times. Ch 20, sl st in the far bottom corner of the C7 tree. Fasten off.
Stitch logic: 7 trees x 20 ch + 6 gaps x 5 ch = 170 ch. At 5 ch per inch, that’s 34 in (86.4 cm), which is the distance from the outer corner of the first tree to the outer corner of the last. Each 20-ch span backs a 4 in (10.2 cm) tree base, and each 5-ch span bridges a 1 in (2.5 cm) gap.
Checkpoint: Each strand should measure 34 in (86.4 cm). If it comes out short, rework it with a 5 mm hook for the chains only.
Border: Top Band with Rod Loops
Border gauge: 4 sc or 4 hdc = 1 in (2.5 cm), so 20 sts equal one 5 in (12.7 cm) cell.
Row 1 (joining row): Ch 141. Sc in 2nd ch from hook and in each ch across. On sc 10 of each 20-st cell (sts 10, 30, 50, 70, 90, 110 and 130), insert the hook through the foundation ch and through the last ch of that column’s top drop. This hangs columns C1 to C7 in order. Turn. (140 sc)
Row 2: Ch 2 (doesn’t count), hdc in each st across. Turn. (140 hdc)
Row 3: Ch 1, sc in each st across. Turn. (140 sc)
Row 4 (loop row): Ch 1, sc in next 9 sts, sc in next st, ch 16, sl st in top of the sc just made to form a rod loop, sc in next 10 sts; rep from * 6 more times. Fasten off. (140 sc + 7 rod loops)*
Each short side of the band is 4 rows deep, about 1 in (2.5 cm). Each rod loop is about 3.2 in (8.1 cm) around and sits directly above a column.
Why the math works: 7 columns x 20 sts per cell = 140 sts, and 140 ÷ 4 sts per inch = 35 in (88.9 cm). The trees take 28 in and the gaps take 6 in, leaving 0.5 in (1.3 cm) at each outer edge: 28 + 6 + 1 = 35 in. The joins add no stitches, because each drop is caught inside an existing sc.
Now work the 12 horizontal strands.
Final Blocking
- Pin the band flat at exactly 35 in (88.9 cm). If your mats are short, block in sections.
- Let the columns fall straight, with each tree centered under its rod loop.
- Pin the tier points and bottom corners so the tiers measure 2.5 in, 3.25 in and 4 in (6.4 cm, 8.3 cm, 10.2 cm) per side.
- Pin each trunk square, 1.25 in (3.2 cm) wide.
- Mist until damp and let dry completely before unpinning.
- Hang the panel on the rod for 24 hours so the length can settle.
Final Quality-Control Checklist
- 84 trees per panel in a 7 x 12 grid
- Every bottom tier has 54 edge sts, 19 per side
- Every trunk is 5 sts x 3 rows, centered on sts 8–12
- All vertical links and top drops are 5 ch
- Every horizontal strand is 170 ch and 34 in (86.4 cm) long
- The band has 140 sts, with 7 loops above the columns
- The panel measures 35 in (88.9 cm) x 97 in (246.4 cm)
- All tails are woven in
Troubleshooting
- Tiers cup: The corner chains are too tight. Work each ch 2 loosely.
- Edge round ruffles: Work 1 hdc per ch-1 sp, not 2.
- Trunk is off-center: Recount from the corner center st and start in st 8.
- Columns hang crooked: Make sure each drop is caught on sc 10 of its cell.
- Panel is too short: The links are too tight. Redo them with a 5 mm hook.
- Panel stretches too long: Shorten the lower links to 4 ch.
- Upper tier flaps: Add more tacking stitches across the overlap.
Care
Hand wash in cool water with mild soap and press the water out in a towel. Lay flat or re-hang damp to dry, and never wring or tumble dry.
Final Notes
The whole curtain follows one measurement chain. The tiers measure 2.5 in, 3.25 in and 4 in (6.4 cm, 8.3 cm, 10.2 cm) per side and stack into a 4 in x 7 in (10.2 cm x 17.8 cm) tree. Each tree plus its 1 in (2.5 cm) link fills an 8 in (20.3 cm) cell, and 12 cells make 96 in (243.8 cm). Seven 5 in (12.7 cm) cells make 35 in (88.9 cm), which matches the 140-st band. The band adds 1 in (2.5 cm), for a final length of 97 in (246.4 cm). If your first tree measures correctly, the rest will follow.
Happy crocheting!