

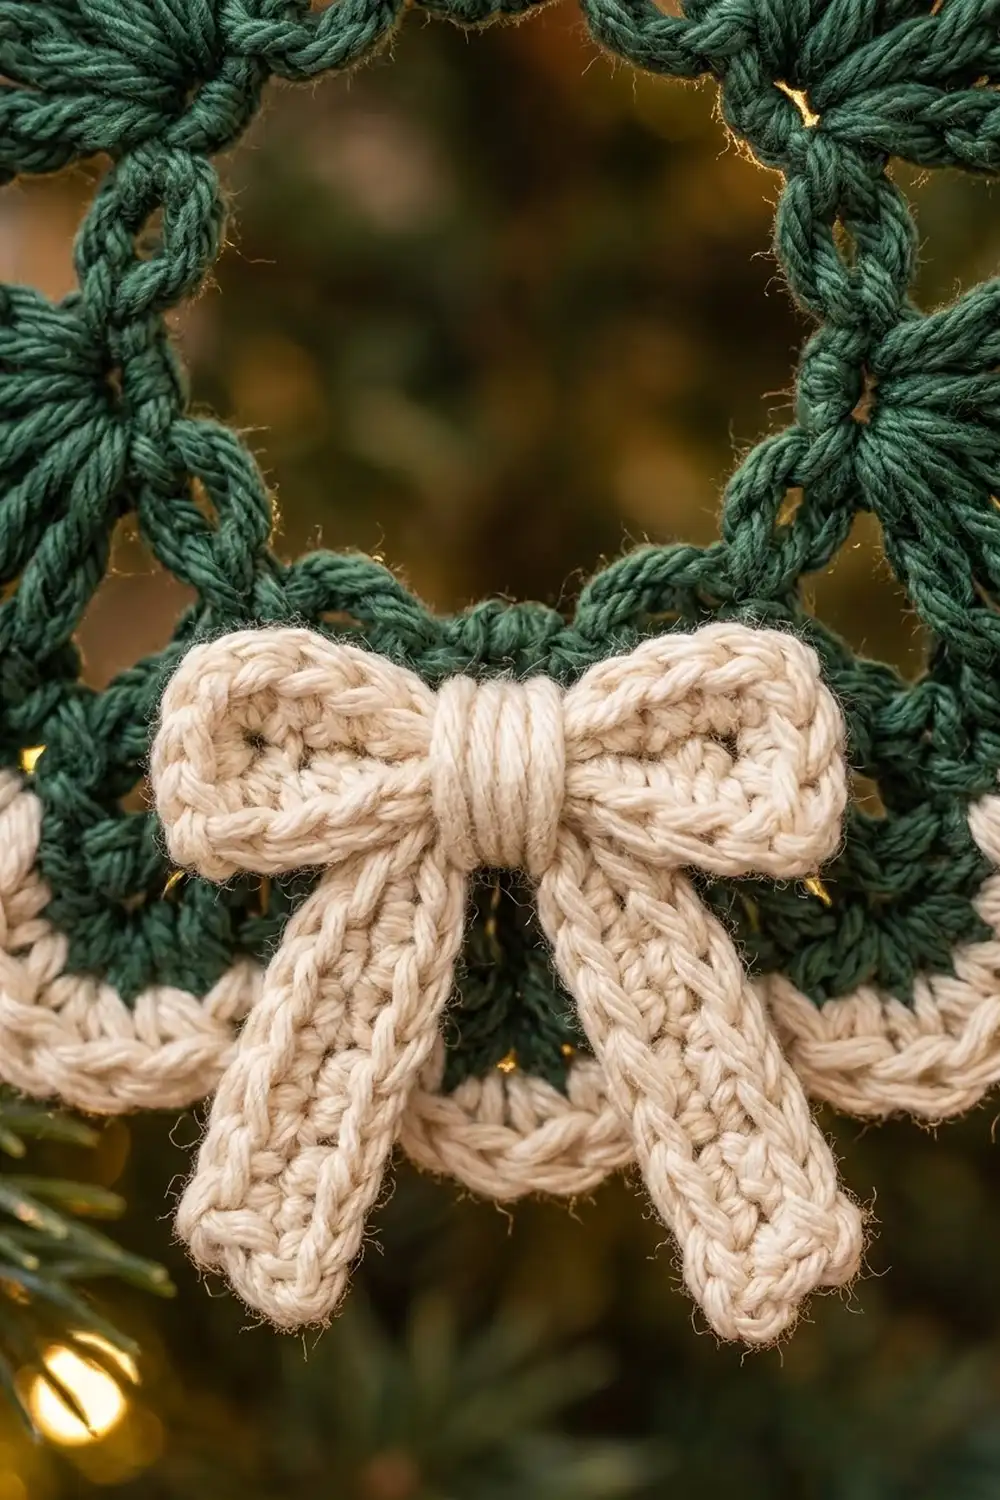
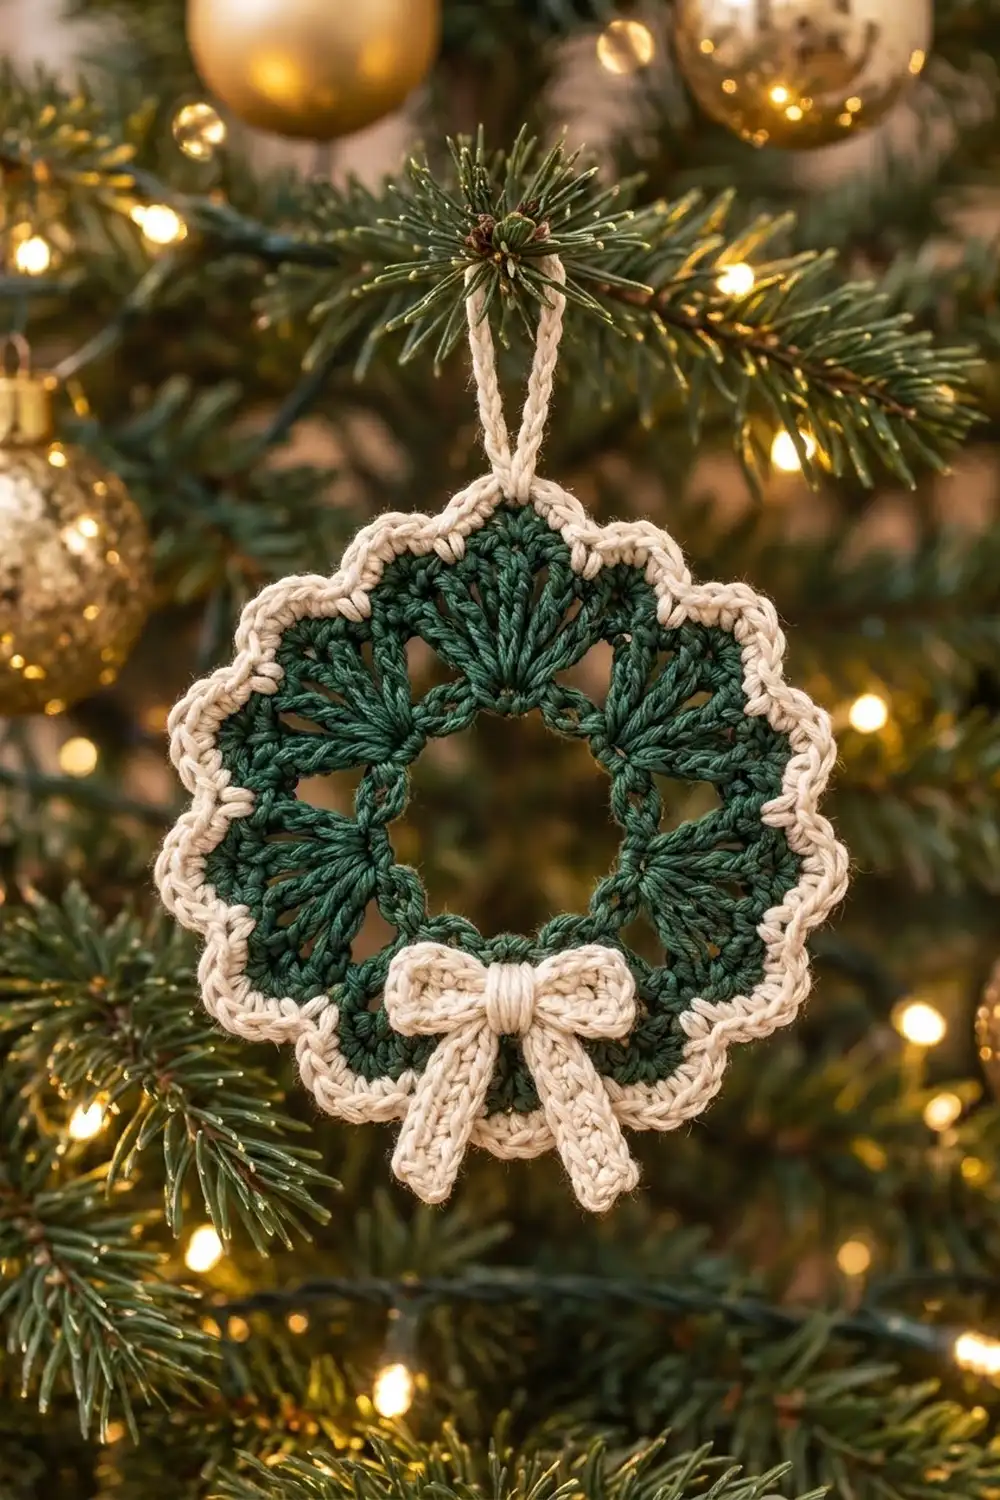
This little wreath ornament has a forest-green body with an open center and 8 rounded fans. A crisp cream border runs around the outside, and a neat cream bow sits at the bottom. It hangs from a simple chain loop, so it can go straight onto a tree, a gift, or a door handle.
The look is classic and cozy: two colors, clean texture, and a soft scalloped outline that reads clearly from across a room. The fans give the wreath a leafy feel, and the cream trim and bow keep it bright against dark branches.
All instructions use US crochet terms. The finished ornament measures 4 in (10.2 cm) across, not counting the hanging loop.
You start with a chain ring, add a round of chain loops, and then work 8 dc fans. Two cream rounds of sc trim the scallops. Finally, you make a small bow, attach the hanging loop, and sew the bow to the bottom of the wreath.
Finished Size and Construction
- Finished size: 4 in (10.2 cm) diameter
- Skill level: Easy
- Terminology: US crochet terms
- Yarn weight: DK (light #3) cotton or cotton blend
- Hook: 3.5 mm (E-4)
- Number of pieces: 1 wreath body, plus 1 bow made from 2 small parts and 1 chain hanging loop
- Layout: single ornament; no joining of motifs
- Wreath size before border: 3.25 in (8.3 cm) diameter
- Border depth: 3/8 in (1.0 cm) on each side, 2 rounds
- Center opening: about 1.25 in (3.2 cm)
- Bow size: about 1.6 in (4.1 cm) wide; the tails hang about 1.4 in (3.6 cm)
Materials
Choose a smooth, tightly plied cotton for the clearest stitch definition. Mercerized cotton shows the fans sharply and holds the scallops crisp. A matte cotton-acrylic blend gives a softer, cozier look. Avoid fuzzy yarns, because they blur the fan spokes.
Yarn (DK, about 115 m per 50 g):
- Forest green (wreath body): 8 g, about 18 m
- Cream (border, bow, hanging loop): 7 g, about 16 m
Both quantities include a safety margin of roughly 25%. One ornament uses less than this, and a single 50 g ball of each color makes about six ornaments.
Tools:
- 3.5 mm (E-4) crochet hook
- Tapestry needle
- Scissors
- Stitch marker
- Rust-proof pins and a foam blocking mat
- Spray bottle with water
- Optional: a little fabric stiffener, for a firmer ornament
Abbreviations (US Terms)
- ch – chain
- sl st – slip stitch
- sc – single crochet
- dc – double crochet
- st(s) – stitch(es)
- sp – space
- rnd – round
- RS – right side
Special stitch: standing sc. With a slipknot on the hook, insert the hook into the stitch indicated, yarn over, and pull up a loop. Yarn over and draw through both loops. This joins a new color without a sl st and ch-1.
Gauge and Checkpoints
Gauge: 20 sc and 22 rows = 4 in (10.2 cm) in DK cotton with a 3.5 mm hook.
Make one wreath completely before you plan a batch. The fans and the border depend on matching heights, so a whole test piece tells you more than a flat swatch.
Measurement checkpoints (lay the piece flat without stretching):
- After Rnd 1: outer edge about 1.5 in (3.8 cm); center opening about 1.25 in (3.2 cm)
- After Rnd 2: about 2 in (5.1 cm)
- After Rnd 3: 3.25 in (8.3 cm), measured from fan tip to opposite fan tip
- After Rnd 4: about 3.6 in (9.1 cm)
- After Rnd 5: 4 in (10.2 cm)
If your piece is too big (more than 1/4 in or 0.6 cm over at Rnd 3), go down to a 3.25 mm hook, or tighten the loops on your dc. If it is too small, go up to a 3.75 mm hook. Keep your tension steady across the whole wreath. A loose Rnd 3 combined with a tight border makes the fans cup.
Wreath Body (Forest Green)
The ch-3 at the start of a round counts as a dc. A ch-1 at the start of a round does not count as a stitch. Work every round with the RS facing you.
Foundation: With forest green, ch 24. Without twisting the chain, sl st into the first ch to form a ring.
Rnd 1: Ch 1. Work 1 sc in the same ch as the join and 1 sc in each remaining ch around. Sl st to the first sc. (24 sc)
The ring lies flat with a clean opening of about 1.25 in (3.2 cm). If it ruffles, your foundation chain is too loose. Redo it with a tighter chain or with 22 ch and 22 sc. If you change this count, see Troubleshooting.
Rnd 2: Ch 1. Sc in the same st as the join. Ch 4, skip the next 2 sc, sc in the next sc. Repeat from * to * 6 more times. Then ch 4, skip the last 2 sc, and sl st to the first sc. (8 sc and 8 ch-4 sps)
Each repeat uses 3 sts of Rnd 1 (the sc you work into plus the 2 skipped sts), and 8 × 3 = 24. These ch-4 loops form the open, airy ring you see just outside the center hole.
Rnd 3 (fans): Sl st into the first ch-4 sp. Ch 3 (counts as dc), then work 6 dc in the same sp. Sc in the next sc. Work 7 dc in the next ch-4 sp, then sc in the next sc. Repeat from * to * 6 more times. Sl st to the top of the beginning ch-3. (8 fans of 7 dc = 56 dc, plus 8 sc = 64 sts)
Each fan spreads from a single ch-4 sp, which makes the radiating spokes. The sc between the fans pulls each valley down and creates the scalloped outline. Fasten off the green and weave in the end on the wrong side.
Checkpoint: 3.25 in (8.3 cm) across, with 8 even fans. Gently pull each fan into a rounded shape with your fingers.
Border (Cream)
Border gauge: the border uses the same sc gauge as the bow, 20 sc = 4 in (10.2 cm). Two rounds of sc add about 3/8 in (1.0 cm) on each side. This takes the wreath from 3.25 in (8.3 cm) to 4 in (10.2 cm).
The border is worked in 8 repeats, one per scallop. A repeat is 1 valley stitch followed by the stitches of 1 fan.
Rnd 4: Join cream with a standing sc in any valley sc between two fans. Now work the fan that follows:
- 1 sc in each of the next 3 dc
- 3 sc in the next (center) dc
- 1 sc in each of the next 3 dc
Sc in the next valley sc, then repeat the fan stitches above. Repeat from * to * 6 more times. Sl st to the first sc. (80 sc)
Count for one repeat: 1 valley sc + 7 sc worked once into each dc + 2 extra sc at the peak = 10 sts. Then 8 repeats × 10 = 80.
In other words, Rnd 4 is 64 sts worked 1 per stitch plus 16 extra sts, for 80.
Checkpoint: about 3.6 in (9.1 cm). The center dc of each fan now ends in a 3-sc group, which marks a peak.
Rnd 5: Ch 1. Sc in the same st as the join. Sc in each st around. In the center sc of each 3-sc group, work 2 sc. Sl st to the first sc. (88 sc)
Count for one repeat: 10 sts worked 1 per stitch + 1 extra st at the peak = 11 sts. Then 8 repeats × 11 = 88. Expressed for the whole round, Rnd 5 is 80 sts worked 1 per stitch plus 8 extra sts, for 88.
Why the math works: a flat circle growing outward needs more stitches in every round. A scalloped edge also needs those extra stitches at the curved peaks, not spread evenly. Rnd 4 adds 2 sts at each peak to follow the strong curve of the fan tip. Rnd 5 adds only 1, because the curve is already rounded and the round sits just 3/16 in (0.5 cm) farther out. No stitches are added at the valleys, so they stay tucked in and each scallop keeps its shape. The border then lies flat instead of ruffling or cupping.
Hanging loop: Do not fasten off. Count to the peak of any scallop; this becomes the top. Sl st in each st up to the second sc of that peak’s 2-sc increase. Ch 20, then sl st into the same st to close the loop. Fasten off, and weave the end back through the base of the loop twice to secure it. The loop stands about 1.5 in (3.8 cm) tall.
Checkpoint: 4 in (10.2 cm) across, not counting the loop.
Bow (Cream)
The bow has two parts: a loop strip and a tail strip. You work each one flat in rows, then wrap them together at the center.
Loop strip:
Row 1: Ch 17. Sc in the 2nd ch from the hook and in each ch across. Turn. (16 sc)
Rows 2–4: Ch 1. Sc in each st across. Turn. (16 sc)
The strip measures about 3.2 in (8.1 cm) long and 0.75 in (1.9 cm) tall. Leave a 6 in (15.2 cm) tail and fasten off. Use the tail to sew the two short ends together, making a ring. Flatten the ring with the seam at the center back. It forms two loops about 1.6 in (4.1 cm) across.
Tail strip:
Row 1: Ch 15. Sc in the 2nd ch from the hook and in each ch across. Turn. (14 sc)
Row 2: Ch 1. Sc in each st across. (14 sc)
The strip measures about 2.8 in (7.1 cm) long and 0.4 in (1.0 cm) wide. Fasten off and weave in both ends. The sc rows run along the length of the strip, which gives the tails their lengthwise ridges.
Assemble the bow:
- Fold the tail strip in half to make an upside-down V, with the tails angled out.
- Lay the flattened loop strip on top, so the seam sits at the center back over the fold.
- Pinch the center of both layers together.
- Cut 8 in (20.3 cm) of cream yarn. Wrap it tightly around the pinched center 8 to 10 times to make a neat knot band about 1/4 in (0.6 cm) wide.
- Thread both ends onto the needle and pass them to the back. Knot them, but keep the ends long for sewing.
Attach the bow: Find the scallop directly opposite the hanging loop; this is the bottom peak. Place the bow center over the lower edge of the center opening so it sits on Rnds 2–3. The loops spread sideways, and the tails hang down over the cream border. Using the long ends, sew through the knot band and the green fabric with 3 or 4 small stitches. Add one tack stitch under each bow loop so the loops stay flat. Weave in the ends on the back.
Final Blocking
- Lightly spritz the whole ornament with water until it is damp but not dripping.
- Lay it RS up on the blocking mat.
- Pin the center opening into a true circle, 1.25 in (3.2 cm) across.
- Pin the tip of each of the 8 scallops so the outer diameter is 4 in (10.2 cm). Check two opposite tips with a ruler.
- Push each valley gently inward with a pin so the scallops look even.
- Shape the bow loops round and set the tails at matching angles.
- If you are using stiffener, dab it onto the green fans and the border only, not the bow.
- Let it dry completely, at least 6 hours, before you unpin.
Final Quality-Control Checklist
- Diameter is 4 in (10.2 cm) and the center opening is about 1.25 in (3.2 cm)
- 8 fans of 7 dc, all the same height
- Rnd 4 has 80 sc and Rnd 5 has 88 sc, with increases only at the peaks
- The border lies flat, without ruffles or cupping
- The hanging loop sits at a peak, directly opposite the bow
- The bow is centered, the loops are even, and the knot band is snug
- All ends are woven in on the wrong side and are invisible from the front
- The ornament hangs straight from its loop
Troubleshooting
The fans cup into a bowl. Rnd 3 is too tight compared with Rnd 2. Lengthen the ch-4 loops slightly, or use a hook one size larger for Rnd 3 only.
The fans flare or ripple. Your dc are too loose. Go down one hook size for Rnd 3.
The border ruffles. You are working too loosely in cream, or adding extra stitches at the valleys. Recount: there should be 10 sts per repeat in Rnd 4 and 11 in Rnd 5.
The border pulls the scallops flat. Your cream tension is too tight. Go up 0.25 mm for Rnds 4–5.
You changed the foundation chain. Keep it a multiple of 3. For example, with 21 ch you skip 2 and get 7 fans; adjust Rnds 4–5 to 7 repeats (70 and 77 sts).
The bow looks floppy. Wrap the center more tightly and add the tack stitch under each loop.
The ornament hangs crooked. The loop is not exactly opposite the bow. Move the loop to the correct peak.
Care
Hand wash in cool water with mild soap, press out the water in a towel, and dry the ornament flat, pinned back to shape. Store it flat or hang it so the bow does not crush.
Final Notes
The measurement chain is short and easy to check:
- A 24-ch ring with 24 sc gives a 1.25 in (3.2 cm) opening.
- 8 ch-4 loops bring the wreath to 2 in (5.1 cm).
- 8 seven-dc fans (64 sts) reach 3.25 in (8.3 cm).
- Two cream rounds of 80 and 88 sc add 3/8 in (1.0 cm) on each side, for a finished 4 in (10.2 cm) ornament.
Check each stage against these numbers and every wreath in your batch will match.
Happy crocheting!