

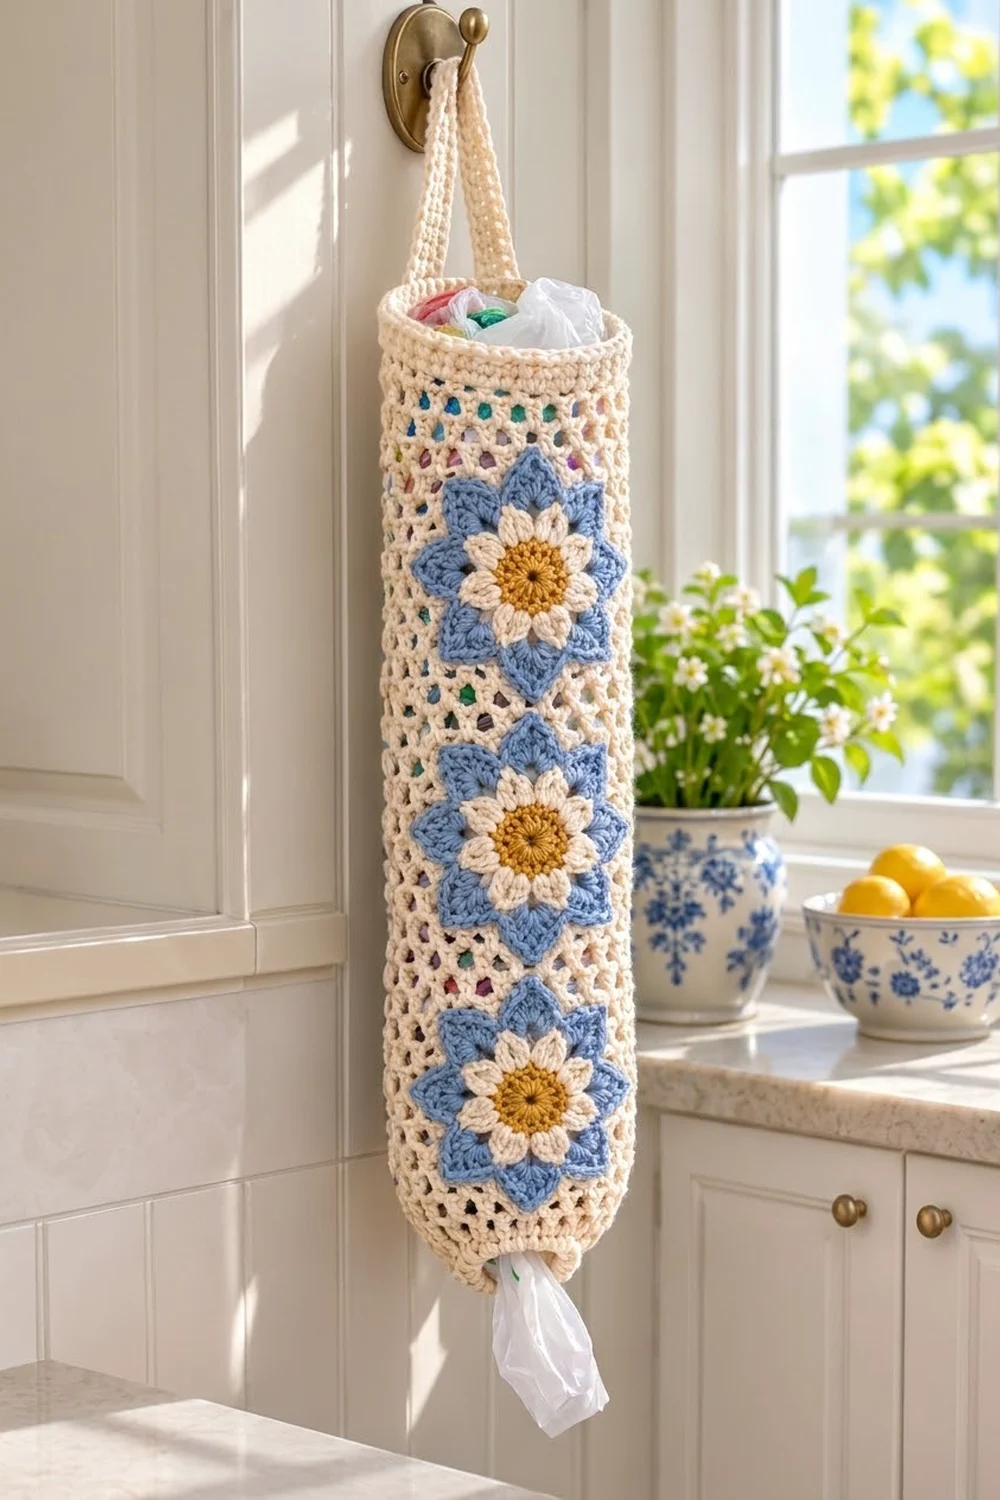
This plastic bag holder looks like a cottage kitchen. It has a cream mesh tube with three layered daisy-star flowers stacked down the front. Each flower has a warm mustard center, eight plump cream petals, and a cornflower-blue eight-pointed star behind them.
The mesh is airy, so you can see how many bags are left inside. The solid bands at the top and bottom keep the tube firm. Bags go in at the top and come out one at a time through the narrower bottom opening.
This pattern uses US crochet terms. The finished holder measures about 6 in (15.2 cm) wide flattened by 20 in (50.8 cm) long, plus a 9 in (22.9 cm) hanging loop. Each flower is 5 in (12.7 cm) from point to point.
You work the tube in joined rounds from the bottom up, then add the top rim. The strap is a short strip of rows. The three flowers are worked separately in rounds, then sewn onto the front.
Finished Size and Construction
- Finished size: 6 in (15.2 cm) wide flattened × 20 in (50.8 cm) long
- Circumference: 12 in (30.5 cm)
- Skill level: Easy+ (simple rounds, color changes, sewing)
- Terminology: US
- Yarn weight: #4 worsted cotton
- Hook: 4.0 mm (G-6)
- Number of pieces: 5 (1 tube, 1 strap, 3 flower motifs)
- Layout: 3 motifs in a single vertical column, centered on the front
- Motif size: 5 in (12.7 cm) point to point
- Tube size before top rim: 18.5 in (47.0 cm) long
- Top rim (border) depth: 1.5 in (3.8 cm)
Materials
Use a smooth worsted-weight cotton or cotton blend. Cotton holds its shape when the tube is full and doesn’t stretch out over time. Each color below is listed as worsted cotton at about 78 m (85 yd) per 50 g.
- Cream (A): 150 g, about 234 m (256 yd), for the tube, strap, and petals
- Cornflower blue (B): 50 g, about 78 m (85 yd), for the star rounds
- Mustard gold (C): 25 g, about 39 m (43 yd), for the centers
All quantities include a margin of about 10–15% for gauge differences and a test motif.
Tools:
– 4.0 mm (G-6) crochet hook
– Tapestry needle
– 6 stitch markers
– Rust-proof pins
– Measuring tape
– A piece of cardboard about 6 × 18 in (15.2 × 45.7 cm) to use for sewing and blocking
– Scissors
Abbreviations (US Terms)
- ch – chain
- sl st – slip stitch
- sc – single crochet
- hdc – half double crochet
- dc – double crochet
- tr – treble crochet
- sp – space
- st(s) – stitch(es)
- [ ] – repeat the bracketed steps the number of times stated
Special stitch: Petal – (hdc, 3 dc, hdc) all worked into the same stitch.
Turning chains: a ch 3 at the start of a dc round counts as 1 dc. A ch 4 at the start of a mesh round counts as 1 dc + ch 1. A ch 1 never counts as a stitch.
Gauge and Checkpoints
Gauge: 16 dc and 8 dc rounds = 4 in (10.2 cm). In mesh, 1 dc + ch 1 = 0.5 in (1.3 cm) wide, and each round is 0.5 in (1.3 cm) tall.
Make one flower motif before you start the tube. It uses all three colors and tells you right away if your tension is right.
Motif checkpoints:
– After Round 1: about 1.5 in (3.8 cm) across
– After Round 2: about 2 in (5.1 cm)
– After Round 3: about 3 in (7.6 cm) across the petals
– After Round 5: about 4 in (10.2 cm)
– After Round 6: 5 in (12.7 cm) point to point
Tube checkpoints:
– After Round 4: 12 in (30.5 cm) around, 6 in (15.2 cm) flattened
– After Round 24: 11.5 in (29.2 cm) long
– After Round 38: 18.5 in (47.0 cm) long
If your work is too big: go down to a 3.75 mm hook. If it is too small: go up to a 4.5 mm hook. Check the flattened width carefully. If it is less than 5.5 in (14.0 cm), the 5 in (12.7 cm) flowers will wrap around the sides.
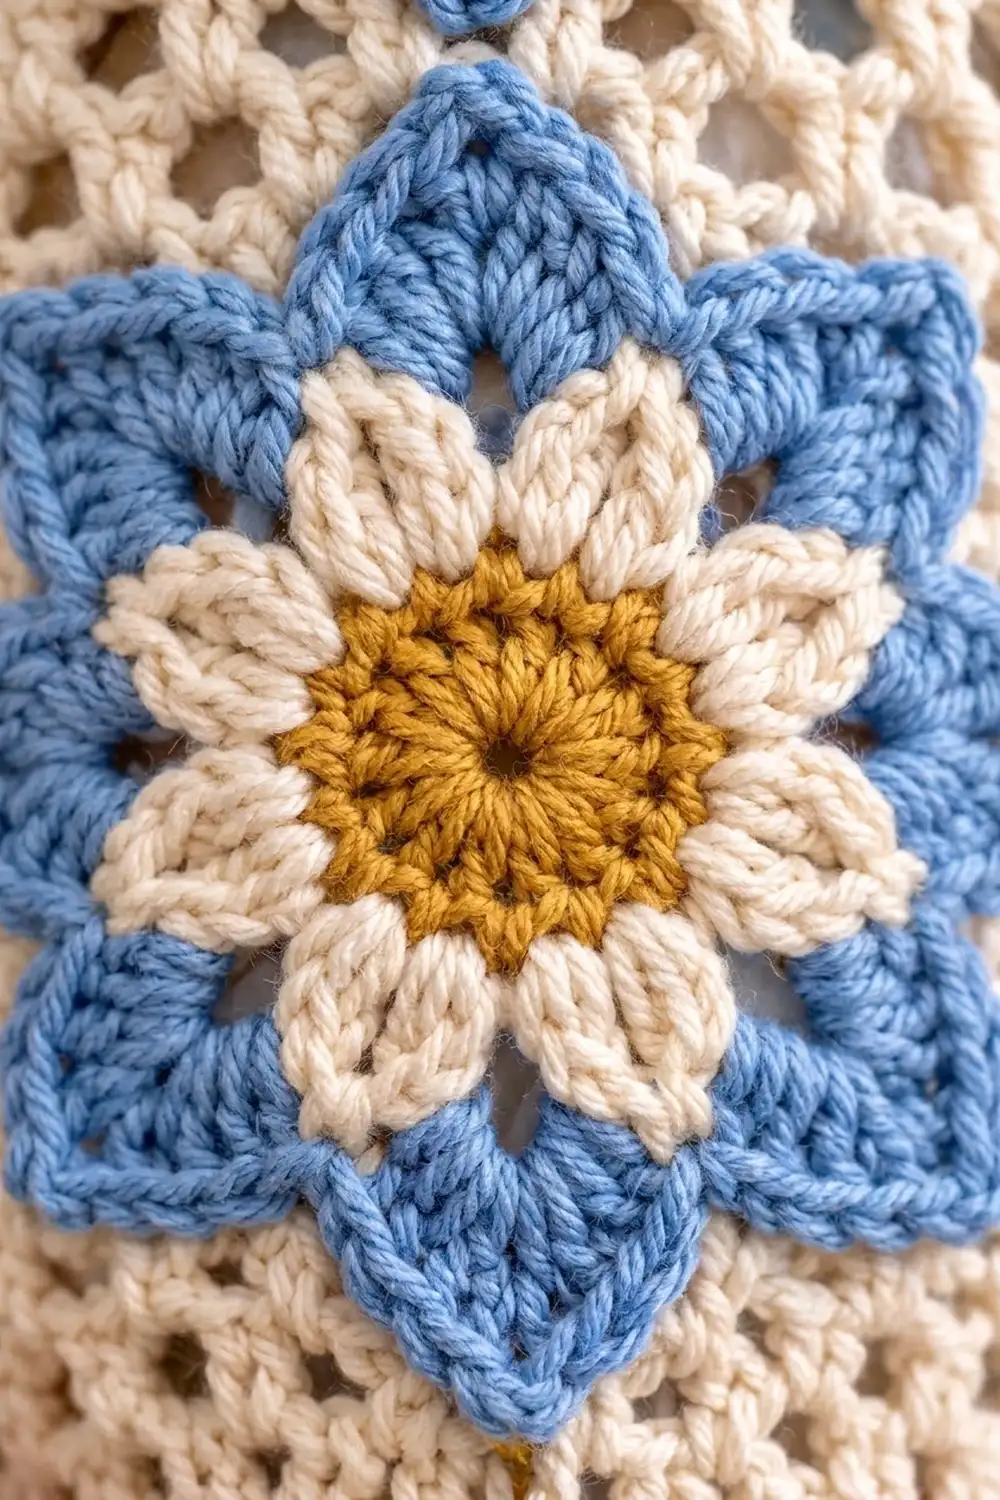
Flower Motif (make 3)
Round 1 (C, mustard)
Make a magic ring. Ch 3 (counts as dc), work 15 dc into the ring. Pull the ring closed and sl st to the top of the ch-3 to join.
Count: 16 dc.
Round 2 (C)
Ch 3 (counts as dc), dc in the same st, dc in the next st. [2 dc in the next st, dc in the next st] 7 times. Join with a sl st to the top of the ch-3.
Count: 24 dc (8 repeats of 3 sts). Fasten off C.
Round 3 (A, cream – petals)
Join A with a sc in any st. Petal in the next st, sc in the next st. [Sc in the next st, Petal in the next st, sc in the next st] 7 times. Join with a sl st to the first sc.
Count: 56 sts (8 repeats of 7 sts: 2 sc + 5 Petal sts). Fasten off A.
You now have 8 rounded petals. There are 2 sc between each pair of petals.
Round 4 (B, blue – loop base)
Each petal repeat starts with a sc. Join B with a sc in the first sc of any repeat (the sc right after a pair of petals meets). Ch 6 and hold the chain behind the next petal. [Sc in the first sc of the next repeat, ch 6 behind the petal] 7 times. Join with a sl st to the first sc.
Count: 8 sc + 8 ch-6 sps.
Each ch-6 loop sits directly behind one petal. This lines up each star point with a petal.
Round 5 (B)
Ch 1. [Sc in the sc, 8 dc in the next ch-6 sp] 8 times. Join with a sl st to the first sc.
Count: 72 sts (8 sc + 64 dc).
Round 6 (B – star points)
[Sl st in the sc, sc in the next dc, hdc in the next dc, dc in the next dc, (dc, tr) in the next dc, ch 2, (tr, dc) in the next dc, dc in the next dc, hdc in the next dc, sc in the next dc] 8 times. Join with a sl st to the first sl st.
Count: 88 sts + 8 ch-2 sps (8 repeats of 11 sts + 1 point sp).
Each set of 8 dc becomes one tapered point, centered over its petal. Fasten off B, leaving a 24 in (61.0 cm) tail for sewing. Weave in all the other ends.
Tube Body
Use Color A throughout.
Bottom Band
Round 1: Ch 32 and join with a sl st to form a ring, without twisting. Ch 1 and sc in each ch. Join. Count: 32 sc.
Round 2: Ch 1, sc in each st, join. Count: 32 sc.
The bottom opening is now 8 in (20.3 cm) around. This narrower opening holds the bags in.
Round 3 (conversion round): Ch 3 (counts as dc), 2 dc in the next st. [Dc in the next st, 2 dc in the next st] 15 times. Join to the top of the ch-3.
Count: 32 dc worked 1 per stitch + 16 extra dc = 48 dc.
Round 4: Ch 3, dc in each st around, join. Count: 48 dc.
Checkpoint: 12 in (30.5 cm) around, and the bottom band is 1.5 in (3.8 cm) tall.
Mesh
Round 5: Ch 4 (counts as dc + ch 1), skip the next st. [Dc in the next st, ch 1, skip the next st] 23 times. Join to the 3rd ch of the ch-4.
Count: 24 dc + 24 ch-1 sps = 48 sts.
Round 6 (offset mesh): Sl st into the first ch-1 sp. Ch 4 (counts as dc + ch 1). [Dc in the next ch-1 sp, ch 1] 23 times. Join to the 3rd ch of the ch-4.
Count: 24 dc + 24 ch-1 sps = 48 sts.
Each dc sits in a space from the round below. This staggers the holes and gives you the lattice look.
Rounds 7–38: Repeat Round 6. Count every round: 24 dc + 24 ch-1 sps.
That gives you 34 mesh rounds, which is 17 in (43.2 cm) of mesh. Place a marker every 10 rounds so you can track your count.
Checkpoint: The tube measures 18.5 in (47.0 cm) from the bottom edge.
Hanging Strap
Use Color A.
Row 1: Ch 41. Sc in the 2nd ch from the hook and in each ch across. Count: 40 sc.
Rows 2–3: Ch 1, turn, sc in each st across. Count: 40 sc.
The strap measures 10 in (25.4 cm) × 0.75 in (1.9 cm). Fasten off, leaving a 12 in (30.5 cm) tail.
Make All Pieces
- Tube: 1 (A)
- Strap: 1 (A)
- Flower motifs: 3 (C center, A petals, B star)
Front layout (flattened tube, top to bottom):
[ top rim  1.5 in / 3.8 cm ]
[ mesh     0.5 in / 1.3 cm ]
[ MOTIF 1  5 in / 12.7 cm  ]
[ gap      0.5 in / 1.3 cm ]
[ MOTIF 2  5 in / 12.7 cm  ]
[ gap      0.5 in / 1.3 cm ]
[ MOTIF 3  5 in / 12.7 cm  ]
[ mesh     0.5 in / 1.3 cm ]
[ bottom band 1.5 in / 3.8 cm ]
Check the total: 1.5 + 0.5 + 5 + 0.5 + 5 + 0.5 + 5 + 0.5 + 1.5 = 20 in (50.8 cm).
Top Rim (Border)
Work the rim before you sew anything on, so the finished length is fixed first.
Border gauge: same as the tube, 16 sts = 4 in (10.2 cm). That is 24 sts on each flattened side of 6 in (15.2 cm).
Round 39 (trim round): Ch 3 (counts as dc). Dc in each ch-1 sp and each dc around. Join.
Count: 24 dc worked into the dc + 24 dc worked into the ch-1 sps = 48 dc (24 per flattened side).
Round 40: Ch 3, dc in each st, join. Count: 48 dc.
Rounds 41–42: Ch 1, sc in each st, join. Count: 48 sc. Fasten off.
Why the math works: each mesh round already has 48 sts (24 dc + 24 spaces). Working 1 st into each one gives exactly 48, so the rim matches the 12 in (30.5 cm) circumference with no flaring or pulling. The rim adds 1 in (2.5 cm) of dc plus 0.5 in (1.3 cm) of sc, which equals 1.5 in (3.8 cm). The total is 18.5 + 1.5 = 20 in (50.8 cm).
Joining
Sewing the Motifs
- Flatten the tube so the beginning-of-round seam runs straight down the center back. Slide the cardboard inside.
- Center Motif 1 on the front, with its top point 2 in (5.1 cm) below the top edge. Point one star tip straight up.
- Place Motif 2 so that 0.5 in (1.3 cm) of mesh shows between its top point and the bottom point of Motif 1. Place Motif 3 the same way below Motif 2. Line up the side points so all three flowers sit straight.
- Pin each motif at all 8 ch-2 point spaces and at the 8 sl sts between the points.
- Use the B tail and a tapestry needle to whipstitch through the back loop of each Round 6 stitch and the mesh just behind it. Work all 88 sts plus the 8 point spaces. Take a small extra stitch at each point tip so the tips stay flat.
- Keep your stitches snug but not tight. If the mesh puckers, loosen up. Check by lifting the tube off the cardboard. The front should hang as smooth as the back.
Size checkpoint: after sewing, the tube still measures 6 in (15.2 cm) flat. If it’s narrower, the stitches are too tight.
Attaching the Strap
Fold the tube so the center back seam lies at one side. Mark the two fold lines at the rim, which are 24 sts apart. Lay each end of the strap 0.5 in (1.3 cm) down inside the rim at one mark, and sew it on securely with the A tail. Those two overlaps use 1 in (2.5 cm) of the strap’s 10 in (25.4 cm), so the hanging loop is 9 in (22.9 cm).
Final Blocking
- Weave in all remaining ends along stitches of the same color.
- Spray the holder lightly with water until it’s damp but not soaked.
- Slide the cardboard back inside and smooth the tube to 6 in (15.2 cm) wide by 20 in (50.8 cm) long.
- Pin the 8 points of each star outward so each motif lies at 5 in (12.7 cm).
- Shape each cream petal with your fingertips so it curves up slightly.
- Let it dry completely flat, then remove the pins and cardboard.
Final Quality-Control Checklist
- [ ] Each motif has 8 petals and 8 star points, with each point behind a petal
- [ ] Each motif measures 5 in (12.7 cm) point to point
- [ ] Tube is 12 in (30.5 cm) around and 20 in (50.8 cm) long
- [ ] Bottom opening is 8 in (20.3 cm) around
- [ ] Every mesh round has 24 dc + 24 ch-1 sps
- [ ] Top rim has 48 sts, with no flare
- [ ] Motifs are centered, evenly spaced, and straight
- [ ] Strap is securely sewn inside the rim at both fold lines
- [ ] All ends are woven in and hidden
Troubleshooting
The mesh spirals or leans. Make sure you start each round with a sl st into the first ch-1 sp, not into the dc.
The petals cup or ruffle. Your Petal stitches are too tight or too loose compared with the sc. Work the 3 dc evenly and keep the hdc short.
The star points are blunt. Check that you worked (dc, tr), ch 2, (tr, dc) across the two middle dc of each 8-dc group.
The star round pulls the petals flat. Loosen the ch-6 loops in Round 4. They should rest behind the petals without tugging.
The bottom opening is too loose or too tight. Adjust the Round 1 chain by 4 sts at a time, then rework the conversion round so it still ends at 48.
The tube puckers behind the motifs. Remove the stitches and resew more loosely with the cardboard inside.
Care
Hand wash in cool water and lay flat to dry. Reshape the points and petals while the holder is damp.
Final Notes
Every measurement builds on the one before. Here is the full chain:
- Gauge is 16 sts = 4 in (10.2 cm).
- The 48-st round gives a 12 in (30.5 cm) circumference, which is 6 in (15.2 cm) flattened.
- The 1.5 in (3.8 cm) bottom band plus 17 in (43.2 cm) of mesh makes 18.5 in (47.0 cm).
- The 1.5 in (3.8 cm) rim brings the tube to 20 in (50.8 cm).
- Three 5 in (12.7 cm) motifs with 0.5 in (1.3 cm) gaps fit neatly on the front.
Check each step as you go and the finished holder will come out right.
Happy crocheting!