

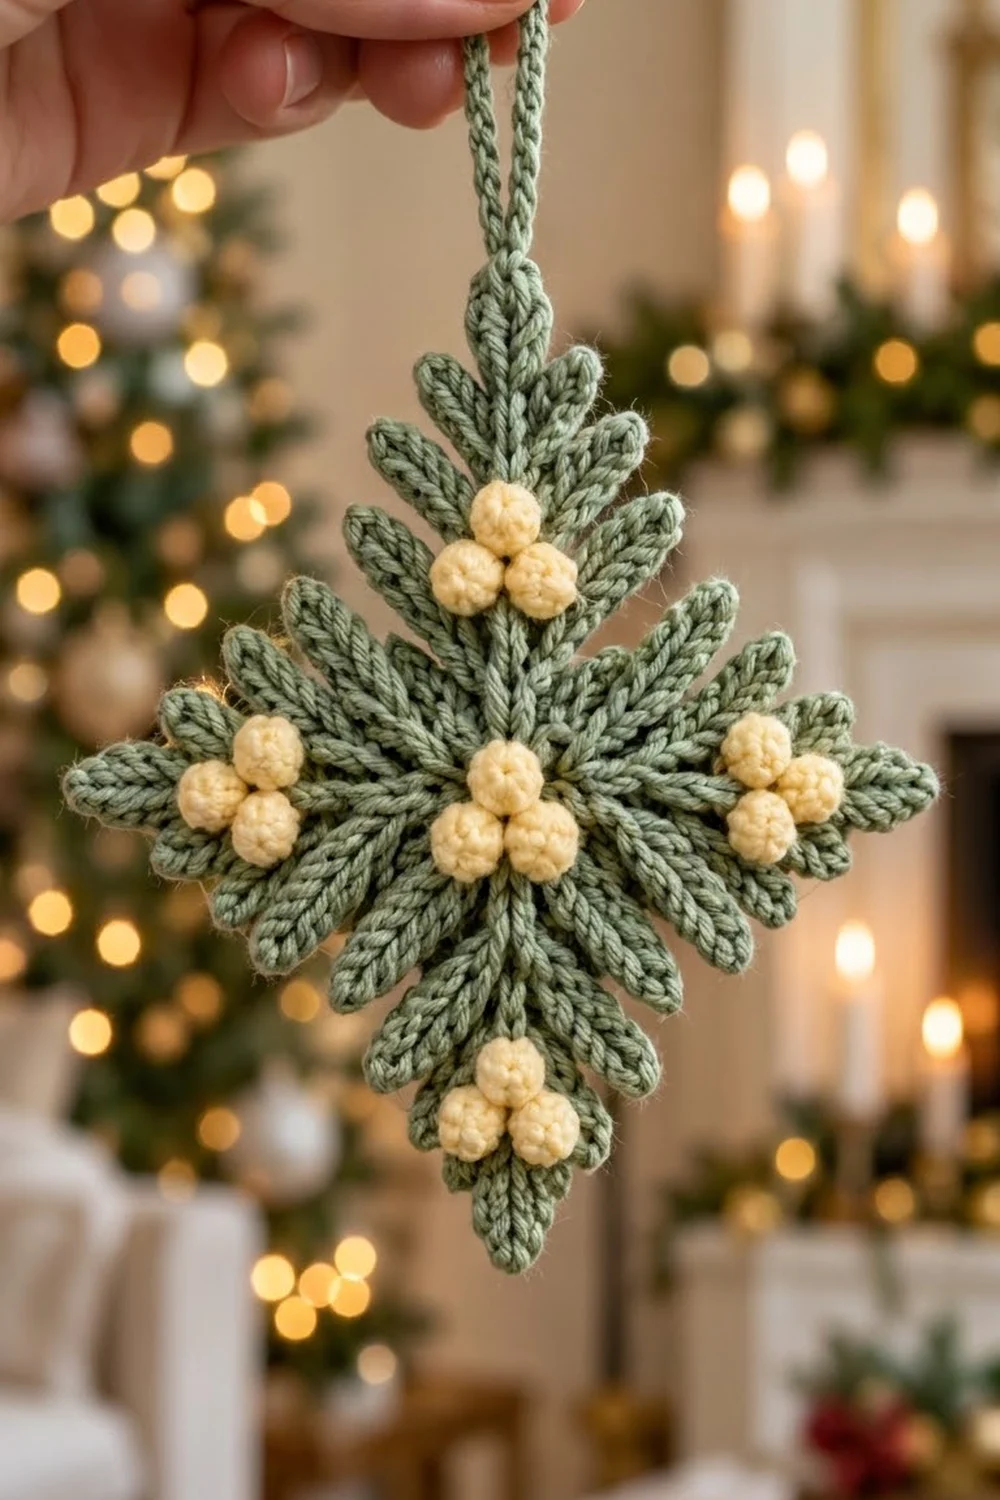
This little ornament looks like a fresh sprig of evergreen tied with cream berries. Four long sage-green sprigs point to the top, bottom and sides. Four shorter sprigs fill the diagonals, so the outline is a crisp diamond with a soft, needled edge.
The palette is just two colors: muted sage green for the foliage and butter cream for the berries. The style is quiet and natural. It looks good on a tree, on a garland, or tied onto a gift.
The pattern uses US crochet terms. The finished ornament is 5 in (12.7 cm) from tip to tip in both directions, not counting the hanging loop. With the loop, it is about 7 in (17.8 cm) tall.
You’ll make eight sprigs, fifteen berries and one small backing disc, then stack and sew everything at the center. Each sprig is a single chain. You work slip stitches up one side of it and back down the other, making a short chain “needle” every few stitches. A slip-stitch cord makes the hanging loop.
Finished Size and Construction
- Finished size: 5 in x 5 in (12.7 cm x 12.7 cm), tip to tip
- Height with loop: about 7 in (17.8 cm)
- Skill level: Easy to intermediate (lots of slip stitching; careful assembly)
- Terminology: US
- Yarn weight: Sport weight (#2), cotton or cotton blend
- Hook: 3.25 mm (US D/3)
- Number of pieces: 8 sprigs, 15 berries, 1 backing disc, 1 cord loop
- Layout: 4 long sprigs on the vertical and horizontal lines, 4 short sprigs on the diagonals, 5 berry clusters
- Long sprig size: 3 in (7.6 cm) long x 1.75 in (4.4 cm) wide
- Short sprig size: 2 in (5.1 cm) long x 1.4 in (3.6 cm) wide
- Size before border: 5 in x 5 in (12.7 cm x 12.7 cm)
- Border depth: 0 in (0 cm). The needle tips form the edge, so there is no separate border.
Materials
Use a smooth, tightly plied sport-weight cotton. The needles depend on clear chain definition, and fuzzy or splitty yarn blurs them. Mercerized cotton keeps a crisp shape and blocks well.
- Color A, sage green: 10 g, about 30 m (33 yd)
- Color B, butter cream: 5 g, about 15 m (16 yd)
Both amounts include a margin of roughly 20% for swatching, sewing tails and the odd ripped-back needle.
Tools:
– 3.25 mm (US D/3) crochet hook
– Tapestry needle with a small eye
– Scissors
– Stitch marker
– Rust-proof pins and a foam blocking mat
– Spray bottle with water
– Ruler or tape measure
Abbreviations (US Terms)
- ch: chain
- sl st: slip stitch
- sc: single crochet
- sc2tog: single crochet 2 together
- MR: magic ring
- st(s): stitch(es)
- rep: repeat
Special stitch: Needle (N). A needle is a short chain worked back on itself.
– N3: ch 3, sl st in 2nd ch from hook and in next ch (2 sl st)
– N4: ch 4, sl st in 2nd ch from hook and in each of next 2 ch (3 sl st)
– N5: ch 5, sl st in 2nd ch from hook and in each of next 3 ch (4 sl st)
– N6: ch 6, sl st in 2nd ch from hook and in each of next 4 ch (5 sl st)
Needle stitches don’t count toward the spine stitch count.
Gauge and Checkpoints
Spine gauge is 6 sl st = 1 in (2.5 cm) along the chain spine.
Make one long sprig before anything else. It is your gauge swatch.
Checkpoint 1, long sprig: 3 in (7.6 cm) from base to tip-needle point, and 1.75 in (4.4 cm) across the longest needles.
Checkpoint 2, short sprig: 2 in (5.1 cm) long and 1.4 in (3.6 cm) across.
Checkpoint 3, berry: 0.4 in (1.0 cm) across.
Checkpoint 4, backing disc: 1 in (2.5 cm) across.
If your sprig is too big: go down to a 3.0 mm hook or chain more tightly. Loose slip stitches also stretch the spine.
If your sprig is too small: go up to a 3.5 mm hook. Slip stitches tend to be tight, so pull each loop up to the full height of the hook shaft.
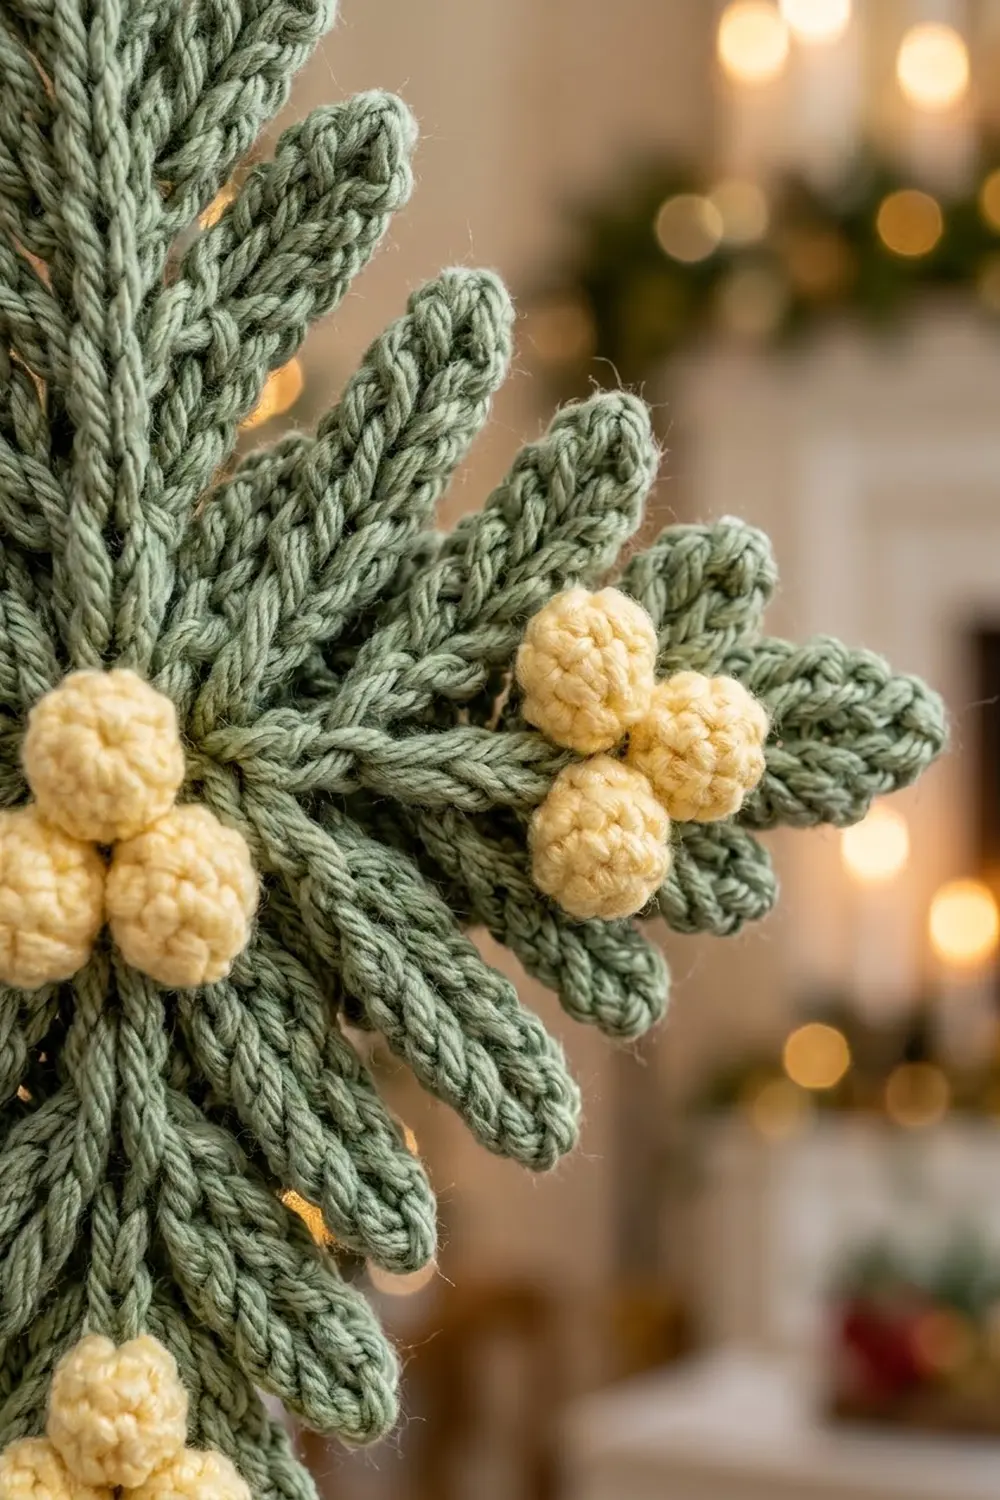
Long Sprig (Make 4, Color A)
The spine count is 16 sl st per side, and the sprig has 15 needles in total.
Foundation: ch 17.
Side A (tip to base):
1. Sl st in 2nd ch from hook. This is the tip stitch.
2. N4, sl st in next 2 ch.
3. N4, sl st in next 2 ch.
4. N5, sl st in next 2 ch.
5. N5, sl st in next 2 ch.
6. N6, sl st in next 2 ch.
7. N6, sl st in next 2 ch.
8. N6, sl st in next 2 ch.
9. Sl st in last ch. This is the base stitch.
Side A count: 1 + (7 x 2) + 1 = 16 spine sl st, 7 needles.
Side B (base to tip), worked into the free loops on the opposite side of the foundation chain:
1. Ch 1 (doesn’t count). Rotate the work and sl st in the free loop of the base ch.
2. Sl st in next 2 loops, N6.
3. Sl st in next 2 loops, N6.
4. Sl st in next 2 loops, N6.
5. Sl st in next 2 loops, N5.
6. Sl st in next 2 loops, N5.
7. Sl st in next 2 loops, N4.
8. Sl st in next 2 loops, N4.
9. Sl st in the free loop of the tip ch.
Side B count: 1 + (7 x 2) + 1 = 16 spine sl st, 7 needles.
Tip: N3, then sl st into the tip stitch. That gives 1 needle.
Total: 32 spine sl st and 15 needles (7 + 7 + 1). The needles are longest at the base and taper to the tip. This is what gives the sprig its pointed fern outline.
Fasten off and leave an 8 in (20.3 cm) tail at the base for sewing.
Short Sprig (Make 4, Color A)
The spine count is 10 sl st per side, and the sprig has 9 needles in total.
Foundation: ch 11.
Side A:
1. Sl st in 2nd ch from hook (tip stitch).
2. N4, sl st in next 2 ch.
3. N4, sl st in next 2 ch.
4. N5, sl st in next 2 ch.
5. N5, sl st in next 2 ch.
6. Sl st in last ch (base stitch).
Side A count: 1 + (4 x 2) + 1 = 10 sl st, 4 needles.
Side B:
1. Ch 1 (doesn’t count). Rotate and sl st in the free loop of the base ch.
2. Sl st in next 2 loops, N5.
3. Sl st in next 2 loops, N5.
4. Sl st in next 2 loops, N4.
5. Sl st in next 2 loops, N4.
6. Sl st in the free loop of the tip ch.
Side B count: 1 + (4 x 2) + 1 = 10 sl st, 4 needles.
Tip: N3, then sl st into the tip stitch.
Total: 20 spine sl st and 9 needles (4 + 4 + 1). Fasten off with an 8 in (20.3 cm) tail.
Berry (Make 15, Color B)
Rnd 1: MR, ch 1, 6 sc in ring. Pull the ring closed. (6 sts)
Rnd 2: Sc2tog 3 times. (3 sts)
Fasten off with a 6 in (15.2 cm) tail. Push the starting tail inside the berry as stuffing. Thread the long tail through the front loops of the last 3 sts and cinch closed. Roll the berry between your palms to round it. Keep the long tail for sewing.
Backing Disc (Make 1, Color A)
Rnd 1: MR, ch 1, 6 sc in ring. Sl st to the first sc. (6 sts)
Rnd 2: Ch 1, 2 sc in each st around. Sl st to the first sc. (12 sts)
Fasten off with a 10 in (25.4 cm) tail. The disc sits on the back and holds the stacked sprig bases together.
Make All Pieces
Before assembling, check that you have everything:
- Color A: 4 long sprigs, 4 short sprigs, 1 backing disc
- Color B: 15 berries, grouped as 5 clusters of 3
Layout grid (L = long sprig, S = short sprig, B = berry cluster, C = center):
            L (tip, loop here)
            B
      S     |     S
   L - B -- C(B) -- B - L
      S     |     S
            B
            L
The long sprig tips sit 2.5 in (6.4 cm) from the center. The short sprig tips sit 1.5 in (3.8 cm) from the center along the diagonals.
Joining (Assembly)
Method: stacked layers, sewn through the center with whipstitch and a few tacking stitches.
- Lay out the disc. Place it right side down on your mat with its center under the point where the arms will cross.
- Short sprigs (bottom layer). Place the four short sprigs on the diagonals with their bases over the center. Overlap the bottom 0.5 in (1.3 cm) of each one past the center. Each tip should land 1.5 in (3.8 cm) from center.
- Vertical long sprigs (middle layer). Place the top and bottom long sprigs, again overlapping 0.5 in (1.3 cm) past center. Tip to tip they should now measure 5 in (12.7 cm): 3 in + 3 in − 1 in of overlap.
- Horizontal long sprigs (top layer). Place the left and right sprigs the same way. Check that they also measure 5 in (12.7 cm) tip to tip.
- Pin, then sew. Use the disc tail to sew up through the stack. Go spine to spine, catching one spine sl st of every sprig in each pass. Work 8–10 small stitches in a circle about 0.75 in (1.9 cm) across. Weave the base tails of all the sprigs into the disc.
- Berry clusters. Sew three berries together in a tight triangle. Each cluster should be about 0.8 in (2.0 cm) across. Sew one cluster over the center stack, covering all the sprig bases. Sew one more cluster onto each long sprig spine, centered 1.5 in (3.8 cm) from the ornament center. Stitch only into spine sl sts, never into needles, so the needles stay free and splayed.
Tension advice: sew snugly enough that nothing shifts, but don’t pull. Tight sewing puckers the spines and makes the arms curve upward.
Size checkpoint: 5 in x 5 in (12.7 cm x 12.7 cm) tip to tip, with all four arms at right angles.
Hanging Loop and Edge
Why there is no border: the outline is the row of needle tips, and a border round would bury them. All the edge shaping comes from how the needle lengths taper. In place of a border, you add a cord loop at the top.
Edge count per diamond side. Each of the four edges runs from one long-sprig tip to the next. It has 7 needles from the first long sprig, 9 from the short sprig between them, and 7 from the second long sprig, for 23 needle points per side.
Why the math works. Each edge runs between two tips 2.5 in (6.4 cm) from center, so it measures about 3.5 in (8.9 cm). The short sprig tip sits 1.5 in (3.8 cm) out along the diagonal, which puts it right at the edge line. As a result, the diagonals fill in without poking past the diamond outline.
Cord loop:
1. Join Color A with a sl st into the N3 tip of the top long sprig.
2. Ch 25.
3. Sl st in 2nd ch from hook and in each ch across. (24 sl st)
4. Sl st into the same tip stitch to close the loop.
The cord is 4 in (10.2 cm) long, which folds into a 2 in (5.1 cm) loop. Fasten off and weave the end into the spine.
Final Blocking
- Lightly mist the ornament until it is damp but not wet.
- Lay it right side up on the blocking mat.
- Pin the four long tips into a 5 in x 5 in (12.7 cm x 12.7 cm) diamond.
- Spread the needles so they fan out evenly from each spine, with no needles crossing.
- Pin the short sprig tips 1.5 in (3.8 cm) from center along the diagonals.
- Re-round the berries with your fingertips. Don’t pin through them.
- Let it dry completely. Usually 4–6 hours is enough.
- Unpin it and hang it by the loop. Check that it hangs straight and that the bottom tip sits directly below the loop.
Final Quality-Control Checklist
- Each long sprig has 15 needles and each short sprig has 9.
- Tip to tip measures 5 in (12.7 cm) both ways.
- The four arms meet at right angles.
- No sprig bases show around the center cluster.
- There are 5 clusters of 3 berries, all round and firmly attached.
- The needles lie flat and fan out, with none twisted.
- The loop is 2 in (5.1 cm) tall and centered on the top tip.
- All tails are woven in on the back.
Troubleshooting
- Sprig curls into a C-shape: the sl sts on one side are tighter than on the other. Block it firmly, and next time loosen side B.
- Needles twist or flop: the needle chains are too loose. Go down a hook size for the chain portion only.
- Spine looks lumpy: you may have worked into both loops on side A. Work side A into the back bumps and side B into the free loops.
- Berry looks flat: add a small scrap of yarn as extra stuffing before you cinch it closed.
- Center is too thick: trim the sprig base tails short before weaving them in. Weave them through the disc, not the stack.
- Ornament hangs crooked: move the loop join to the exact N3 tip, then re-block.
Care
Hand wash in cool water with mild soap, press out water in a towel, and dry flat, re-pinning if needed. Store it flat or hanging so the needles aren’t crushed.
Final Notes
The measurement chain is short and easy to follow:
- Spine gauge: 6 sl st = 1 in (2.5 cm)
- Long sprig: 3 in (7.6 cm); short sprig: 2 in (5.1 cm)
- Overlap: 0.5 in (1.3 cm) past center
- Finished ornament: 5 in x 5 in (12.7 cm x 12.7 cm)
- Edge: 23 needle points per side
- Loop: 2 in (5.1 cm) on top
If your first long sprig measures right, the rest of the ornament will too. Make one, check it, and the remaining pieces should go quickly.
Happy crocheting!