

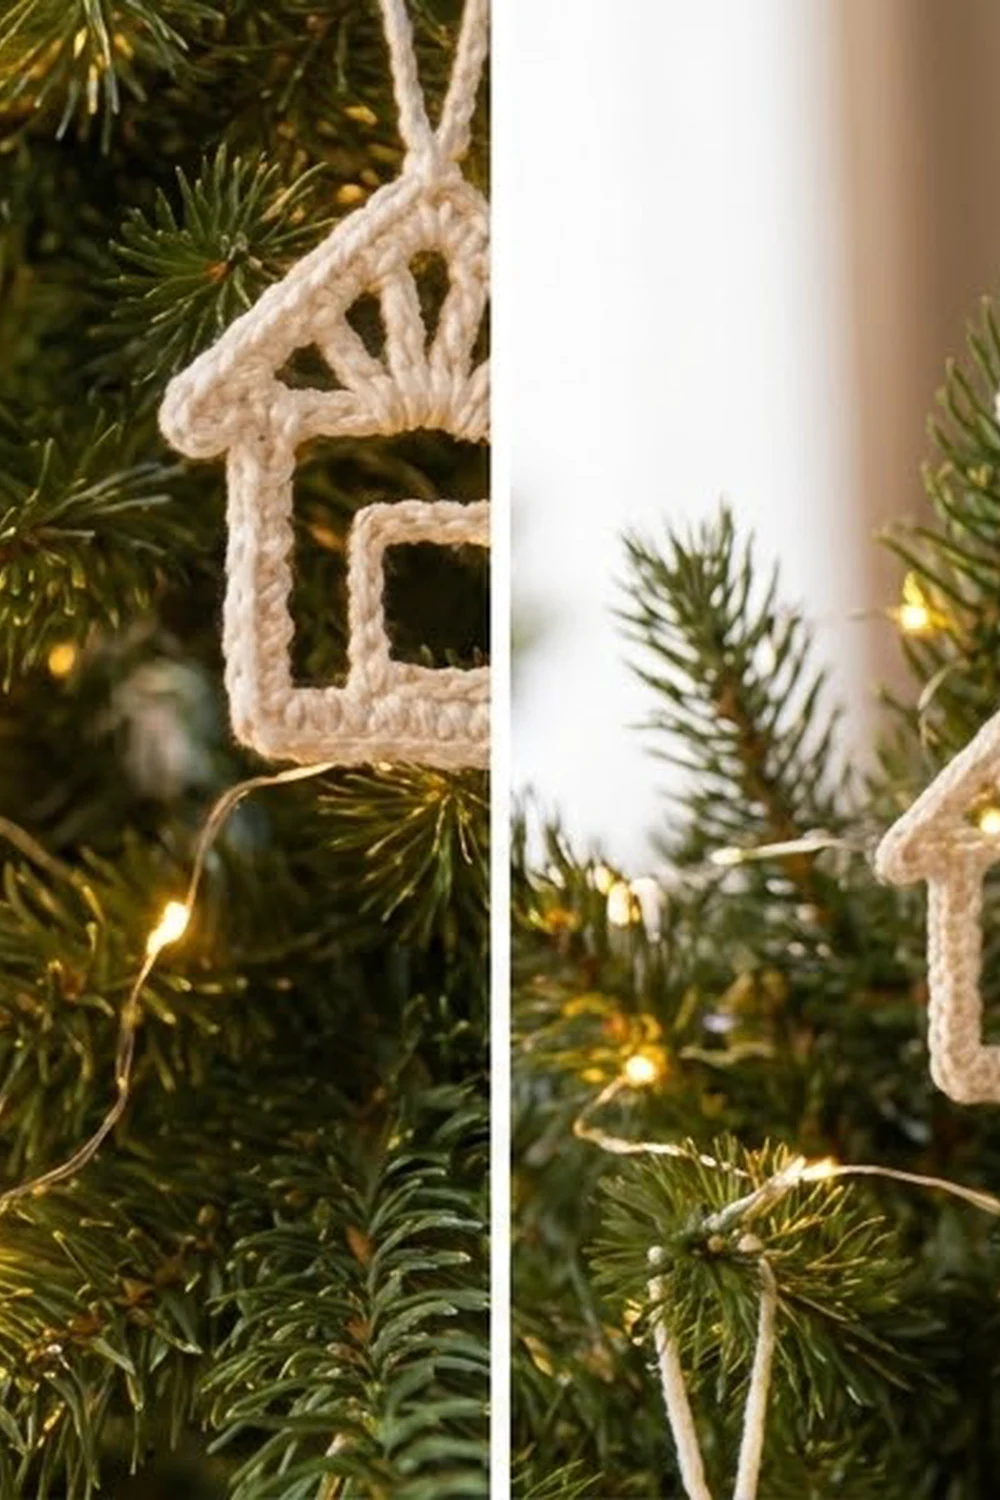
This little house is an open-frame ornament made entirely in cream cotton. It has a rectangular house body, a pointed roof with short eaves, a small square window held by short bars, and a fan of fine spokes under the roof that looks like a sunrise. A corded hanging loop sits at the peak.
The look is simple and Scandinavian. It uses one ivory color, crisp lines and lots of open space, so the branches and lights show through. It suits a natural tree, a gift tag or a window hanging.
This pattern uses US crochet terms. The finished ornament measures 4 in (10.2 cm) wide at the eaves and 4 in (10.2 cm) tall from the base to the peak, plus a 1.5 in (3.8 cm) hanging loop.
The ornament is built from chain “cores” covered with single crochet. You make the window first, then the house body, then a roof chain on top of the body. Next you join the window with short bars, add the gable spokes and the hanging loop, and finish with a slip-stitch edge. Everything is joined as you go, so you end up with one finished piece.
Finished Size and Construction
- Finished size: 4 in x 4 in (10.2 cm x 10.2 cm), plus a 1.5 in (3.8 cm) loop
- Skill level: Easy to intermediate
- Terminology: US crochet terms
- Yarn weight: Sport weight (#2) mercerized cotton
- Hook: 2.75 mm (C-2)
- Number of pieces: 1 finished ornament (the window, body and roof are joined as you go)
- Layout: Single motif, no assembly grid
- Window size: 1⅓ in (3.4 cm) square
- Body size: 3 in wide x 2.5 in tall (7.6 cm x 6.4 cm)
- Size before border: 4 in x 4 in (10.2 cm x 10.2 cm)
- Border depth: Flush slip-stitch edge. It firms the outline and adds less than 1/16 in (0.2 cm).
Materials
Choose a smooth, mercerized cotton. It shows each stitch clearly and holds straight lines and sharp corners. Acrylic or fuzzy yarn will soften the outline, and the spokes may sag.
- Cream/ivory sport-weight cotton: about 10 g (31 m / 34 yd) per ornament
Tools:
- 2.75 mm (C-2) crochet hook
- Tapestry needle
- Small scissors
- Stitch markers (4)
- Blocking board or foam mat, and rustproof pins
- Spray bottle, plus fabric stiffener (optional)
The yarn amount includes extra for your gauge check and for longer tails to weave in. One ornament uses about 6–7 g.
Abbreviations (US Terms)
- ch – chain
- sl st – slip stitch
- sc – single crochet
- st(s) – stitch(es)
- rep – repeat
- corner group – 3 sc worked into the same chain
Special technique – Spoke: Chain the number given and sl st in the target stitch. Then sl st in each ch back down to the starting stitch. This makes a fine, firm line about two strands thick.
Corner groups: Each 3-sc corner group has a first st, a center st and a third st. The center st is the corner point. Many joins and counts below use the center st.
Gauge and Checkpoints
Gauge: 6 sc = 1 in (2.5 cm), worked into a foundation chain.
Gauge matters here because the window, body and roof have to fit inside each other. Make the window first as your test piece. It is small and quick, and it shows right away whether your gauge is on target.
Checkpoints:
- Window after Round 1: 1⅓ in (3.4 cm) square, measured from corner point to corner point.
- Body after Round 1: 3 in (7.6 cm) wide x 2.5 in (6.4 cm) tall.
- After the roof: 4 in (10.2 cm) wide at the eaves x 4 in (10.2 cm) tall.
- Hanging loop: 1.5 in (3.8 cm) tall.
If your window is too big, go down a hook size, or chain a little more tightly. If it is too small, go up a hook size. Always recheck the window before you start the body. A window that is the wrong size will either crowd the bars or hang loosely.

Part 1: Window
Ch 28 and sl st in the first ch to form a ring. Take care not to twist the chain.
Round 1: Ch 1 (this does not count as a st). Sc in each of the next 6 ch, 3 sc in the next ch (corner group). Rep from * 3 more times. Sl st in the first sc to join. (36 sc)*
Check: 6 sc on each side plus four 3-sc corner groups = 24 + 12 = 36 sc. Each side is 8 sts from corner point to corner point (6 side sts + 2 corner center sts).
Fasten off and weave in the ends. Gently pull the corners so the ring settles into a square that measures 1⅓ in (3.4 cm) per side.
Part 2: House Body
Ch 62 and sl st in the first ch to form a ring, without twisting.
Round 1: Ch 1. 3 sc in the next ch (corner group), sc in each of the next 16 ch, 3 sc in the next ch (corner group), sc in each of the next 13 ch. Rep from * once more. Sl st in the first sc to join. (70 sc)*
Check: (3 + 16 + 3 + 13) x 2 = 70 sc, using (1 + 16 + 1 + 13) x 2 = 62 ch.
Fasten off and weave in the ends.
Lay the rectangle flat with the long sides at the top and bottom. Name the parts like this, going clockwise from the top left:
- Corner A – top-left corner group
- Top bar – 16 sc
- Corner B – top-right corner group
- Right wall – 13 sc
- Corner C – bottom-right corner group
- Bottom – 16 sc
- Corner D – bottom-left corner group
- Left wall – 13 sc
Each long side is 18 sts from corner point to corner point (16 + 2 center sts), which gives 3 in (7.6 cm). Each short side is 15 sts (13 + 2), which gives 2.5 in (6.4 cm).
Place markers in the 5th and 12th sc of the top bar, and in the 5th and 12th sc of the bottom. Count from the left in both cases. These markers show where the window bars go.
Part 3: Roof
The roof is a chain triangle worked off the two top corners of the body. The body’s top bar becomes the horizontal bar under the roof.
Roof chain: Join yarn with a sl st in the center st of Corner A. Ch 33 as follows:
- ch 2 (left eave)
- ch 1 (eave corner)
- ch 13 (left slope)
- ch 1 (peak)
- ch 13 (right slope)
- ch 1 (eave corner)
- ch 2 (right eave)
Sl st in the center st of Corner B.
Roof row: Ch 1. Work back along the chain, keeping the stitches on the outer side of the roof:
- sc in each of the next 2 ch
- 3 sc in the next ch
- sc in each of the next 13 ch
- 3 sc in the next ch (peak)
- sc in each of the next 13 ch
- 3 sc in the next ch
- sc in each of the next 2 ch
Sl st in the center st of Corner A. (39 sc)
Check: 2 + 3 + 13 + 3 + 13 + 3 + 2 = 39 sc, using 2 + 1 + 13 + 1 + 13 + 1 + 2 = 33 ch.
Fasten off and weave in the ends.
Why the shape works: Each eave reaches 3 sts (0.5 in / 1.3 cm) past the body corner, so the roof is 3 + 0.5 + 0.5 = 4 in (10.2 cm) wide. Each slope is 15 sts long (13 + 2 corner points), which is 2.5 in (6.4 cm). With a half-width of 2 in (5.1 cm), the roof stands 1.5 in (3.8 cm) tall, because the slope, half-width and height form a scaled-down 3-4-5 triangle. Total height is 2.5 + 1.5 = 4 in (10.2 cm).
Checkpoint: 4 in x 4 in (10.2 cm x 10.2 cm).
Part 4: Attach the Window
Center the window inside the body, with its corner points lined up under the markers.
- Join yarn with a sl st in the center st of the window’s top-left corner. Ch 3 and sl st in the marked 5th sc of the top bar. Sl st in each of the 3 ch back down to the window.
- Sl st in each of the next 9 sts along the window’s top edge, ending in the center st of the top-right corner. Ch 3, sl st in the marked 12th sc of the top bar, then sl st in each of the 3 ch back down.
- Sl st in each of the next 9 sts down the window’s right side, ending in the center st of the bottom-right corner. Ch 2, sl st in the marked 12th sc of the bottom, then sl st in each of the 2 ch back up.
- Sl st in each of the next 9 sts along the window’s bottom edge, ending in the center st of the bottom-left corner. Ch 2, sl st in the marked 5th sc of the bottom, then sl st in each of the 2 ch back up.
Fasten off, weave in the ends and remove the markers.
The window’s side is 8 sts, and the space between the markers is also 8 sts (sc 5 through sc 12). That is why the bars hang straight instead of slanting.
Part 5: Gable Spokes
The five spokes fan out from the center of the top bar. Number the sts on each roof slope from 1 to 13, starting next to the eave corner and counting up toward the peak.
- Join yarn with a sl st in the 8th sc of the top bar.
- Spoke 1: Ch 7, sl st in sc 6 of the left slope, sl st in each ch back down, then sl st in the same top-bar sc.
- Spoke 2: Ch 7, sl st in sc 11 of the left slope, sl st back down, then sl st in the same top-bar sc.
- Spoke 3 (center): Ch 8, sl st in the center st of the peak, sl st back down, then sl st in the same top-bar sc.
- Sl st in the 9th sc of the top bar.
- Spoke 4: Ch 7, sl st in sc 11 of the right slope, sl st back down, then sl st in the same top-bar sc.
- Spoke 5: Ch 7, sl st in sc 6 of the right slope, sl st back down, then sl st in the same top-bar sc.
Fasten off and weave in the ends. All the spokes start from two neighboring stitches, so their bases bunch into a small rounded “sun” at the middle of the bar.
Part 6: Hanging Loop
Join yarn with a sl st in the center st of the peak. Ch 20 and sl st in the same st to form a loop.
Ch 1, work 28 sc into the loop (over the chain), then sl st in the peak st. (28 sc)
Fasten off and weave the end through the roof stitches. The loop should stand 1.5 in (3.8 cm) tall.
Border: Slip-Stitch Edge
The border is one round of slip stitches around the outside of the house. It firms the outline and gives the edge its slightly raised, corded look.
Border gauge: 1 sl st in each st, worked loosely. This matches the 6 sts per 1 in (2.5 cm) of the sc underneath, so the border adds no width.
With the right side facing, join yarn with a sl st in the third st of Corner B (the st facing the right wall). This counts as the first st.
Border round: Sl st in each st as follows:
- Right side: 1 (Corner B third st) + 13 (right wall) = 14
- Bottom-right corner: 3 (Corner C) = 3
- Bottom: 16 = 16
- Bottom-left corner: 3 (Corner D) = 3
- Left side: 13 (left wall) + 1 (Corner A first st) = 14
- Left roof join: 1 (Corner A center st) = 1
- Roof: 2 + 3 + 13 + 3 + 13 + 3 + 2 = 39 (work under the base of the loop at the peak)
- Right roof join: 1 (Corner B center st) = 1
Sl st in the first st to join. (91 sl st)
Why the math works: 14 + 3 + 16 + 3 + 14 + 1 + 39 + 1 = 91. Every outer stitch gets exactly one sl st. You don’t add or skip any stitches at the corners, because the 3-sc corner groups already give you the turning stitches. That is why the ornament stays 4 in x 4 in (10.2 cm x 10.2 cm).
Fasten off and weave in the ends.
Final Blocking
- Spray the ornament lightly with water until it is damp, not soaked.
- Pin the base straight at 3 in (7.6 cm) wide. Pin both walls straight up at 2.5 in (6.4 cm) tall.
- Pin the eave tips 4 in (10.2 cm) apart, level with the top bar.
- Pin the peak 4 in (10.2 cm) above the base, centered.
- Square the window to 1⅓ in (3.4 cm) and check that its bars are vertical.
- Straighten each spoke so it runs in a clean line to the roof.
- Pin the loop upright at 1.5 in (3.8 cm) tall.
- For a stiffer ornament, brush on a thin coat of fabric stiffener.
- Let the ornament dry completely before you unpin it.
Final Quality-Control Checklist
- Window: 36 sc, 1⅓ in (3.4 cm) square
- Body: 70 sc, 3 in x 2.5 in (7.6 cm x 6.4 cm)
- Roof: 39 sc, eaves 4 in (10.2 cm) apart
- Total height: 4 in (10.2 cm), plus a 1.5 in (3.8 cm) loop
- All four window bars hang straight
- Five spokes, all meeting at the center of the top bar
- Border: 91 sl st, with no puckers
- All ends woven in securely and hidden
Troubleshooting
- The frame twists: The foundation chain was twisted when you joined it. Undo it and rejoin with all the chain “V”s facing the same way.
- The corners are rounded: Make sure all 3 sc go into one chain, and pin the corners firmly when blocking.
- The window bars slant: Recount the marker positions (sc 5 and sc 12) on both the top bar and the bottom.
- The spokes sag: The sl sts you worked back down are too loose. Work them firmly, or use stiffener.
- The roof is too flat or too steep: Check that each slope has 13 ch and that your chain tension was even.
- The border ruffles: Work the sl sts more loosely, or go up one hook size for the border only.
Care
Hand wash in cool water, roll the ornament in a towel to press out the water, and reshape it flat to dry. Store it flat between sheets of tissue paper so the loop and spokes keep their shape.
Final Notes
Each stage sets the size for the next one. The 1⅓ in (3.4 cm) window sits inside the 3 in x 2.5 in (7.6 cm x 6.4 cm) body. The roof brings the piece to 4 in x 4 in (10.2 cm x 10.2 cm), and the flush border keeps it at that size. Check each stage against its checkpoint, and your ornament will come out square, crisp and ready to hang.
Happy crocheting!