

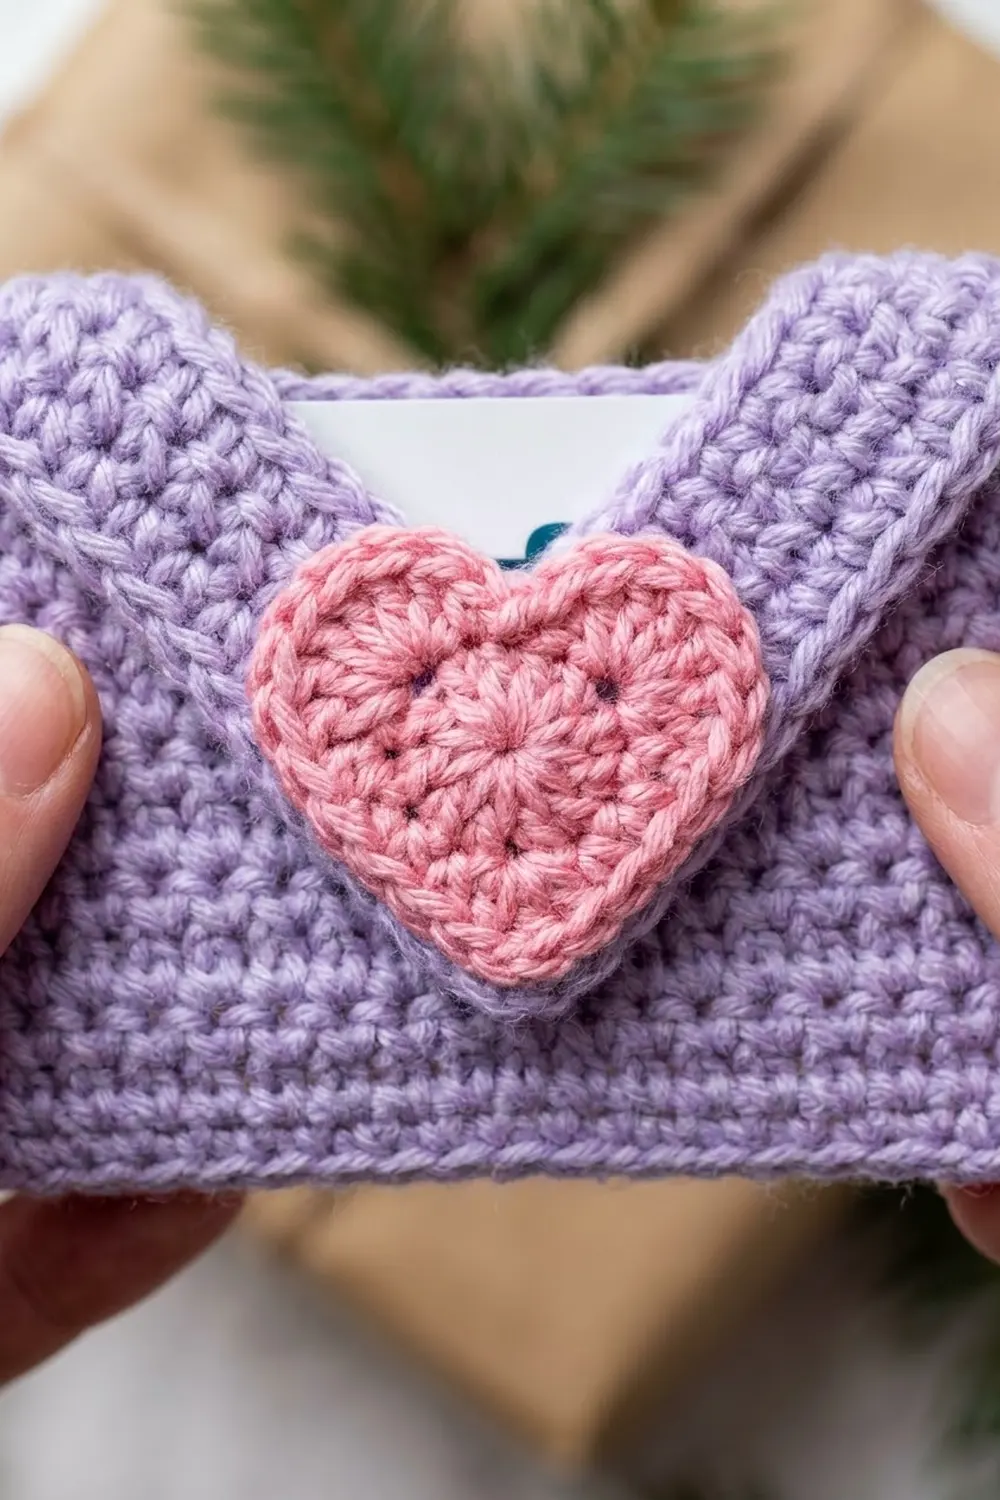
This little envelope is a gift card holder in soft lavender, closed with a small pink heart. A pocket opens behind the V-shaped front flap, so a standard gift card slides in and its top edge peeks out. A chain loop at the top lets you hang it on a tree branch or tie it onto a wrapped present.
The texture is plain, firm single crochet. A raised round of single crochet frames the whole envelope, and a separate trim row runs along the V opening. Two lines of surface slip stitches come up from the bottom corners toward the heart, which gives you the folded-paper look of a real envelope.
The pattern uses US crochet terms. The finished holder measures 4.5 in wide x 3.5 in tall (11.4 cm x 8.9 cm), not counting the hanging loop. It holds a standard 3.375 in x 2.125 in (8.6 cm x 5.4 cm) gift card with room to spare.
Construction is simple. You work a rectangular back panel and a front panel with a V notch, then add a trim row to the V. The front gets its fold lines, and one border round joins the two panels on three sides. Last, you sew on a crocheted heart and a slip-stitch hanging loop.
Finished Size and Construction
- Finished size: 4.5 in x 3.5 in (11.4 cm x 8.9 cm), loop not included
- Skill level: Easy
- Terminology: US crochet terms
- Yarn weight: Worsted (#4), cotton or acrylic
- Hook: 4.0 mm (US G-6)
- Number of pieces: 4 (back panel, front panel, heart, hanging loop), all joined into one finished holder
- Layout: Front panel stacked on back panel, wrong sides together; heart centered on the V point; loop at top center
- Panel size: 4 in x 3 in (10.2 cm x 7.6 cm)
- Size before border: 4 in x 3 in (10.2 cm x 7.6 cm)
- Border depth: 0.25 in (0.6 cm) on every side
Materials
Use a smooth worsted-weight yarn with good stitch definition. Cotton gives the crispest edges and keeps its shape when a card goes in and out. Soft acrylic works too, but it will be a bit more flexible.
- Lavender (main color): 15 g, about 30 m (33 yd)
- Pink (heart): 3 g, about 6 m (7 yd)
Tools:
- 4.0 mm (US G-6) crochet hook
- Tapestry needle
- Locking stitch markers (4)
- Scissors
- Sewing pins or clips
- A gift card or a 3.375 in x 2.125 in (8.6 cm x 5.4 cm) piece of card stock for test fitting
The yarn amounts include a margin of about 25% for your gauge swatch, tails and sewing.
Abbreviations (US Terms)
- ch – chain
- sl st – slip stitch
- sc – single crochet
- dc – double crochet
- tr – treble crochet
- sc2tog – single crochet 2 together
- MR – magic ring
- st(s) – stitch(es)
- sp – space
- RS / WS – right side / wrong side
Special stitch: surface slip stitch. Hold the yarn at the back of the fabric. Insert the hook from front to back through the fabric, yarn over and pull up a loop. Insert the hook at the next point on your line, yarn over, and pull the loop up through the fabric and through the loop on the hook. This makes a chain-like line on the front.
sc2tog: Insert hook in next st, yarn over, pull up a loop. Insert hook in following st, yarn over, pull up a loop. Yarn over and pull through all 3 loops.
Gauge and Checkpoints
Gauge: 16 sc and 16 rows = 4 in (10.2 cm) in sc rows.
Make the back panel first and use it as your gauge piece. Measure it flat before you go on.
Checkpoints:
- Back panel: 4 in x 3 in (10.2 cm x 7.6 cm).
- Front panel: 4 in (10.2 cm) wide. The corner points are 3 in (7.6 cm) tall and the V point is 1.5 in (3.8 cm) up from the bottom.
- Heart: about 1.5 in wide x 1.25 in tall (3.8 cm x 3.2 cm).
- Finished holder: 4.5 in x 3.5 in (11.4 cm x 8.9 cm).
If your back panel is larger than 4 in x 3 in, go down to a 3.75 mm hook. If it is smaller, go up to a 4.5 mm hook. The pocket still fits a card if it comes out 0.25 in (0.6 cm) smaller. Keep the stitches firm, though, because a loose fabric lets the card slip through.
Back Panel
Use lavender.
Foundation: Ch 17.
Row 1 (RS): Sc in 2nd ch from hook and in each ch across, turn. (16 sc)
Rows 2–12: Ch 1 (does not count as a st), sc in each st across, turn. (16 sc each row)
Fasten off. Weave in the ends.
Checkpoint: 4 in x 3 in (10.2 cm x 7.6 cm), with 16 sts along the top and bottom and 12 row-ends along each side.
Front Panel
Use lavender. The lower part is a full-width rectangle. Then you work each half separately, decreasing at the center so the two halves form the V.
Foundation: Ch 17.
Row 1 (RS): Sc in 2nd ch from hook and in each ch across, turn. (16 sc)
Rows 2–6: Ch 1, sc in each st across, turn. (16 sc each row)
Checkpoint: 4 in x 1.5 in (10.2 cm x 3.8 cm).
First Half
Work over sts 1–8 of Row 6 only.
Row 7: Ch 1, sc in next 6 sts, sc2tog, turn. (7 sc)
Row 8: Ch 1, sc2tog, sc in next 5 sts, turn. (6 sc)
Row 9: Ch 1, sc in next 4 sts, sc2tog, turn. (5 sc)
Row 10: Ch 1, sc2tog, sc in next 3 sts, turn. (4 sc)
Row 11: Ch 1, sc in next 2 sts, sc2tog, turn. (3 sc)
Row 12: Ch 1, sc2tog, sc in next st. (2 sc)
Fasten off.
Second Half
With RS facing, join lavender in st 9 of Row 6, the first unworked st next to the first half.
Row 7: Ch 1, sc2tog over sts 9 and 10, sc in next 6 sts, turn. (7 sc)
Row 8: Ch 1, sc in next 5 sts, sc2tog, turn. (6 sc)
Row 9: Ch 1, sc2tog, sc in next 4 sts, turn. (5 sc)
Row 10: Ch 1, sc in next 3 sts, sc2tog, turn. (4 sc)
Row 11: Ch 1, sc2tog, sc in next 2 sts, turn. (3 sc)
Row 12: Ch 1, sc in next st, sc2tog. (2 sc)
Fasten off.
In each half, the decreases fall at the center edge. That edge loses 6 sts over 6 rows, so it slopes at about 45 degrees. The outer edges stay straight, and each half ends in a 2-st point at the top corner.
V Trim Row
This trim row gives the V opening its raised edge. With RS facing, join lavender at the top inner corner of the first-half point (the end of Row 12 on the center side).
Trim row: Ch 1. Work 6 sc down the diagonal edge, 1 sc in each row-end. Work 1 sc into the center of the V, where the two halves meet at Row 6. Work 6 sc up the second diagonal, 1 sc in each row-end. Fasten off. (12 sc worked 1 per row-end + 1 center sc = 13 sc)
Don’t work across the 2-st points. The border will cover them.
Checkpoint: 4 in (10.2 cm) wide, 3 in (7.6 cm) tall at the corners, and 1.5 in (3.8 cm) at the V point.
Fold Lines
Lay the front panel RS up. Place a marker in st 1 of Row 1 and another in st 8 of Row 5. Pin a straight guide line between them, using a strand of contrast yarn or pins. With lavender, work surface slip stitches along that line, about one every half stitch-width. You should end up with about 9 surface sl sts. Fasten off on the WS.
Repeat on the other side, from st 16 of Row 1 to st 9 of Row 5. The two lines meet just below the V point, where the heart will cover their ends. Weave in all ends on the WS, through the front panel only.
Heart
Use pink.
Rnd 1: Make a MR. Into the ring, work: ch 3, 2 tr, 3 dc, ch 1, 1 tr, ch 1, 3 dc, 2 tr, ch 3, sl st into ring. Pull the ring tight to form the dip at the top of the heart. (11 sts, 2 ch-3, 2 ch-1 sps)
The single tr in the middle is the point at the bottom of the heart.
Rnd 2: Ch 1. Work 2 sc in each of the next 2 tr, 1 sc in each of the next 3 dc, 1 sc in the ch-1 sp, 3 sc in the point tr, 1 sc in the ch-1 sp, 1 sc in each of the next 3 dc, and 2 sc in each of the next 2 tr. Sl st into the center of the ring. (11 sts worked once + 4 extra in the tr pairs + 2 extra at the point + 2 in the ch-1 sps = 19 sc)
Fasten off and leave a 10 in (25.4 cm) tail for sewing.
Checkpoint: about 1.5 in x 1.25 in (3.8 cm x 3.2 cm).
Hanging Loop
Use lavender.
Ch 19. Sl st in back bump of 2nd ch from hook and in each ch across. (18 sl sts)
Fasten off and leave an 8 in (20.3 cm) tail. The cord is about 3.6 in (9.1 cm) long.
Make All Pieces
You need 1 of each piece:
- Back panel – lavender
- Front panel with V trim and fold lines – lavender
- Heart – pink
- Hanging loop – lavender
Stacking layout (side view, front to back):
[ heart ]          sewn to front panel, centered on V point
[ front panel ]    RS out, V opening at top
[ back panel ]     RS out
[ loop ]           ends sewn to back at top center
Joining
The joining happens inside border Round 1, so you don’t need a separate seam.
Lay the back panel RS down. Place the front panel on top, RS up, so the wrong sides are together. Line up the edges:
- Bottom: 16 front foundation sts on top of 16 back foundation sts
- Sides: 12 front row-ends on top of 12 back row-ends, on each side
- Top corners: 2-st front points on top of back sts 1–2 and 15–16 of Row 12
Pin or clip all four corners.
Wherever the panels overlap, insert the hook through both layers and work 1 sc into each matching stitch pair. Across the open top, work through the back panel only. Each pair takes one stitch, so the joined edges add no extra sts.
Keep your tension even. If it’s too tight, the sides pull in and the pocket narrows. If it’s too loose, the layers gape. Once the border round is done, slide your test card in. It should go in easily, and its top edge should stand about 0.6 in (1.5 cm) above the V point.
Border
Border gauge: 1 round of sc adds 0.25 in (0.6 cm) on each side.
Rnd 1 (joining round): With the back panel facing you and the top edge up, join lavender in the first st of Row 12 at the top right corner. Ch 1.
- Top: Work 3 sc in the corner st. Then sc in each of the next 14 sts. Go through the back panel only, except where the front points overlap, where you go through both layers. Work 3 sc in the last st.
- Side: Work 12 sc down the side, 1 in each row-end, through both layers.
- Bottom: Work 3 sc in the corner st (both layers), sc in the next 14 sts (both layers), then 3 sc in the corner st.
- Side: Work 12 sc up the second side through both layers.
Sl st to the first sc. (64 sc)
Per-side counts (each count includes both corner center sts):
- Top: 18 sc
- Bottom: 18 sc
- Each side: 16 sc
Why the math works: The panel has 16 + 16 + 12 + 12 = 56 edge positions, and you work 1 sc into each. The 4 corners each get 2 extra sc, so the total is 56 + 8 = 64.
To check the per-side counts: 18 + 18 + 16 + 16 = 68. Each corner center st is counted on two sides, so 68 − 4 = 64.
The finished size is 4 in + 2 x 0.25 in = 4.5 in (11.4 cm) wide and 3 in + 2 x 0.25 in = 3.5 in (8.9 cm) tall.
Fasten off and weave in the ends.
Attach the heart: Center the heart over the V point so the point of the heart covers the ends of the fold lines. Sew the lower half of the heart to the front panel only, using small stitches through the back loops of Rnd 2. Leave the top lobes free, or tack them lightly to the V trim only. Don’t sew them through to the back panel, or you will close the pocket.
Attach the loop: Fold the cord in half. Place both ends side by side on the WS of the back, over top border sts 9 and 10, overlapping the border by 0.25 in (0.6 cm). Sew them on firmly. The loop should stand about 1.5 in (3.8 cm) above the top edge.
Final Blocking
- Lightly spray the holder with water until it is damp, or hold a steam iron 1 in (2.5 cm) above it. Never press acrylic.
- Slide the test card into the pocket to hold the shape.
- Pin the holder flat to 4.5 in x 3.5 in (11.4 cm x 8.9 cm).
- Pin the V trim so both diagonals are straight and meet neatly under the heart.
- Pin the loop straight up.
- Let it dry completely, then remove the pins and the card.
Final Quality-Control Checklist
- Back panel: 16 sts x 12 rows, 4 in x 3 in (10.2 cm x 7.6 cm)
- Front Row 6: 16 sc; each half goes 7, 6, 5, 4, 3, 2 sc
- V trim row: 13 sc
- Heart Rnd 2: 19 sc
- Border Rnd 1: 64 sc (18 top, 18 bottom, 16 per side)
- Finished size: 4.5 in x 3.5 in (11.4 cm x 8.9 cm)
- Pocket is open between the front points, and the card slides in easily
- Heart is sewn to the front only
- All ends are woven in on the inside
Troubleshooting
The V is lopsided. One half probably has a misplaced decrease. Count each row of each half. The decreases must always fall at the center edge.
The pocket is too tight. Your gauge is tight, or the border round pulled in. Rework the border with a 4.5 mm hook, or block the holder over the card.
The card falls through the side. The border missed a layer. Every side and bottom stitch must go through both panels.
The border ripples. Check the count: you should have exactly 12 sc per side between the corner groups, not 13 or 14.
The heart is floppy. Rnd 1 wasn’t pulled tight. Tighten the magic ring tail before sewing.
The fold lines pucker. Your surface slip stitches are too tight. Redo them with a looser pull or a larger hook.
Care
Remove the gift card first. Hand wash in cool water and lay flat to dry, reshaping it over a card.

Final Notes
The measurement chain is short. The back panel sets the size at 4 in x 3 in (10.2 cm x 7.6 cm). The front panel matches it, with the V point at 1.5 in (3.8 cm). The 64-st border round joins the panels and brings the holder to 4.5 in x 3.5 in (11.4 cm x 8.9 cm). The 1.5 in (3.8 cm) heart and the hanging loop finish it. Check the back panel first, and everything after it will line up.
Happy crocheting!