

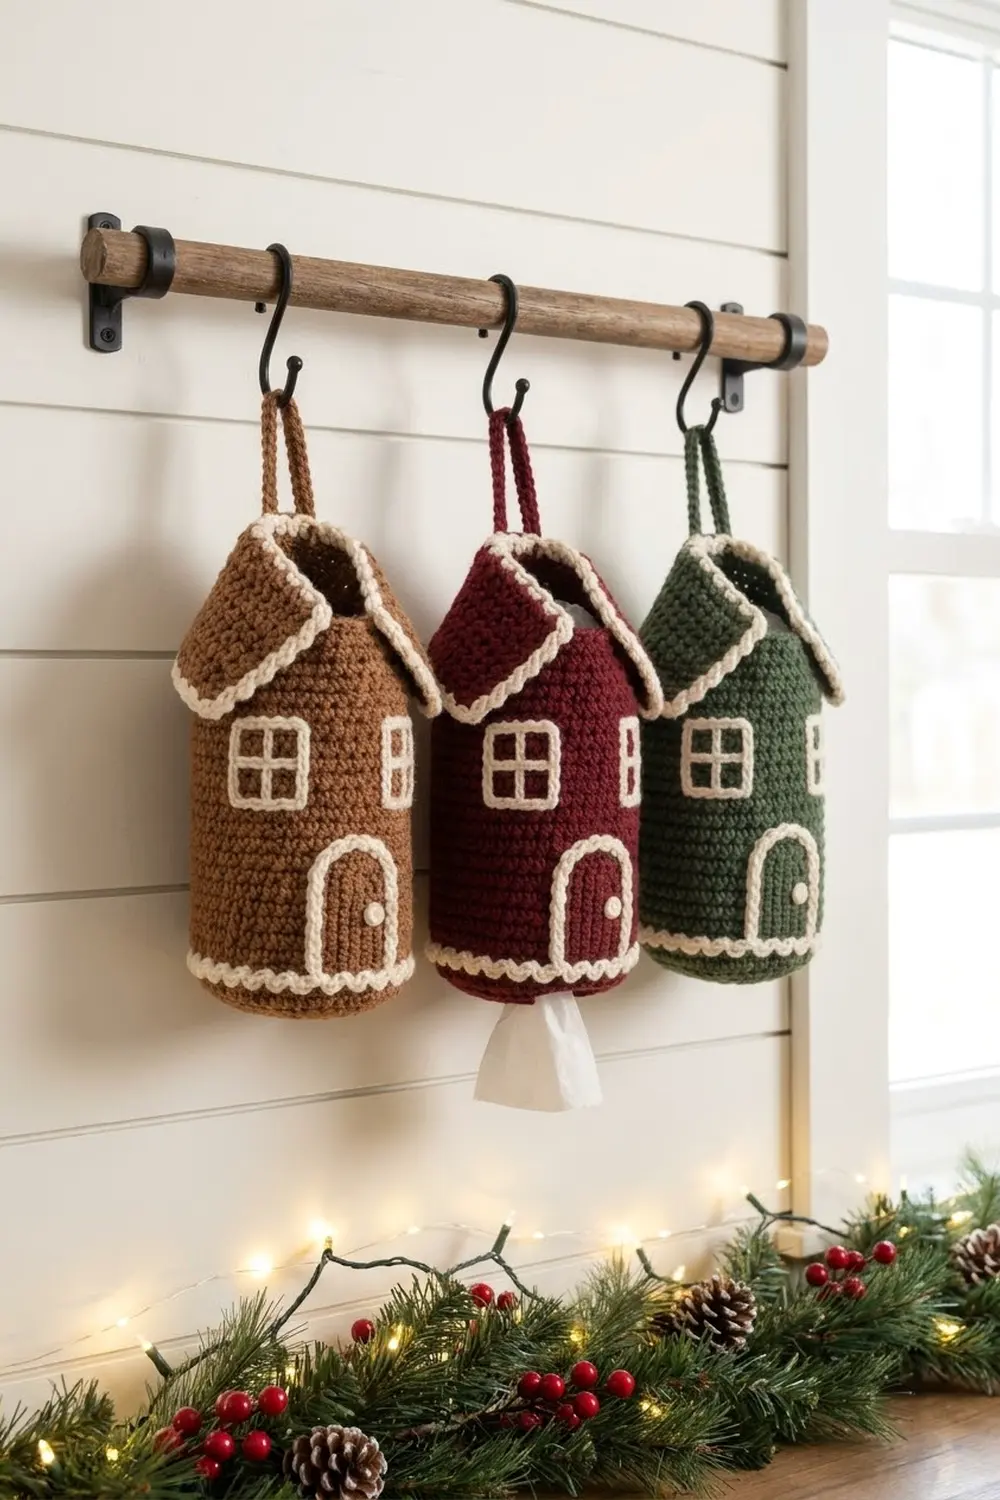
These little gingerbread houses are made to hang together as a set of three. Each one has a sturdy cylindrical body in single crochet, a peaked cream roof with pointed, ear-like flaps, two square windows, an arched doorway, and a scalloped cream trim around the base.
The body colors are tan/brown, deep burgundy red, and forest green. All of the accents are worked in cream/off-white: the roof, the window and door outlines, the base trim, and the twisted hanging cord. The roof uses moss stitch, which gives it a soft, bumpy texture that contrasts with the smooth body.
This pattern uses US crochet terms. Each finished house is about 4.5 in (11.4 cm) tall from the bottom of the trim to the roof ridge, not counting the cord loop. The body is 2.5 in (6.4 cm) across.
For each house, you start with a flat base and turn it into a cylinder by working into the back loops. You add the window and door outlines in surface slip stitch while the top is still open. Then you stuff the body lightly and close the top flat to form a gable. A folded moss-stitch roof is sewn over the gable, a twisted cord goes at the peak, and a scalloped trim around the base finishes the house. The three houses are not joined to each other.
Finished Size and Construction
- Finished height: about 4.5 in (11.4 cm), excluding cord
- Body: 2.5 in (6.4 cm) diameter x 4.0 in (10.2 cm) tall
- Skill level: Easy-intermediate
- Terminology: US crochet terms
- Yarn weight: Worsted (#4)
- Hook: 4.0 mm (G-6)
- Number of pieces: 3 separate ornaments, each with 1 body, 1 roof and 1 cord
- Layout: The three houses hang side by side on a wall-mounted rod with black knobs
- Piece size (roof, after edging): 5.0 x 3.0 in (12.7 x 7.6 cm)
- Size before border: 2.5 in (6.4 cm) diameter x 4.0 in (10.2 cm) tall
- Border depth: base scallop trim about 0.5 in (1.3 cm)
Materials
Use a smooth worsted-weight cotton or acrylic. Cotton holds the cylinder shape crisply and makes the cream outlines stand out clearly. Acrylic is softer and lighter. Avoid fuzzy yarns, because they blur the moss-stitch texture and the slip-stitch outlines.
Yarn:
– Tan/brown: 15 g (about 30 m)
– Burgundy red: 15 g (about 30 m)
– Forest green: 15 g (about 30 m)
– Cream/off-white: 30 g (about 60 m), for 3 roofs, trims, outlines and cords
All quantities include a margin of about 20%.
Tools:
– 4.0 mm (G-6) crochet hook
– Stitch markers (at least 4)
– Tapestry needle
– Polyester fiberfill (a small handful per house)
– Scissors
– Blocking pins and a steam iron or garment steamer
Abbreviations (US Terms)
- ch: chain
- sl st: slip stitch
- sc: single crochet
- dc: double crochet
- inc: 2 sc in the same stitch
- BLO: back loop only
- FLO: front loop only
- sk: skip
- st(s): stitch(es)
- sp: space
- rep: repeat
Special stitches:
- Surface slip stitch: Hold the yarn behind the fabric. Insert the hook from front to back between stitches, pull up a loop, then pull that loop through the loop on your hook. This creates a chain-like line on the surface of the fabric.
- Shell: 5 dc in the same stitch.
- Moss stitch: Alternate (sc, ch 1). Each sc goes into the ch-1 space below, and each ch-1 skips over the sc below.
Gauge and Checkpoints
Gauge: 5 sc and 5 rounds = 1 in (2.5 cm) in joined sc rounds. Moss stitch is worked to the same gauge: 5 sts and 5 rows = 1 in (2.5 cm).
Test one piece first. Make the base and the first 10 body rounds of your first house before you commit to all three. Measure at each checkpoint below.
- After Round 5 (base): 2.4-2.6 in (6.1-6.6 cm) across. The base should lie flat or be very slightly cupped.
- After Round 10: the body wall measures 1.0 in (2.5 cm) tall above the base edge.
- After Round 25: the body wall measures 4.0 in (10.2 cm) tall.
- After Round 26 (top closed): the flat top seam measures 4.0 in (10.2 cm) wide.
- Roof after Row 13: 4.6 x 2.6 in (11.7 x 6.6 cm).
- Roof after edging: 5.0 x 3.0 in (12.7 x 7.6 cm).
If your piece is too big: go down to a 3.5 mm hook.
If your piece is too small: go up to a 4.5 mm hook.
Your tension should also feel firm, so that the fiberfill does not show through the stitches.
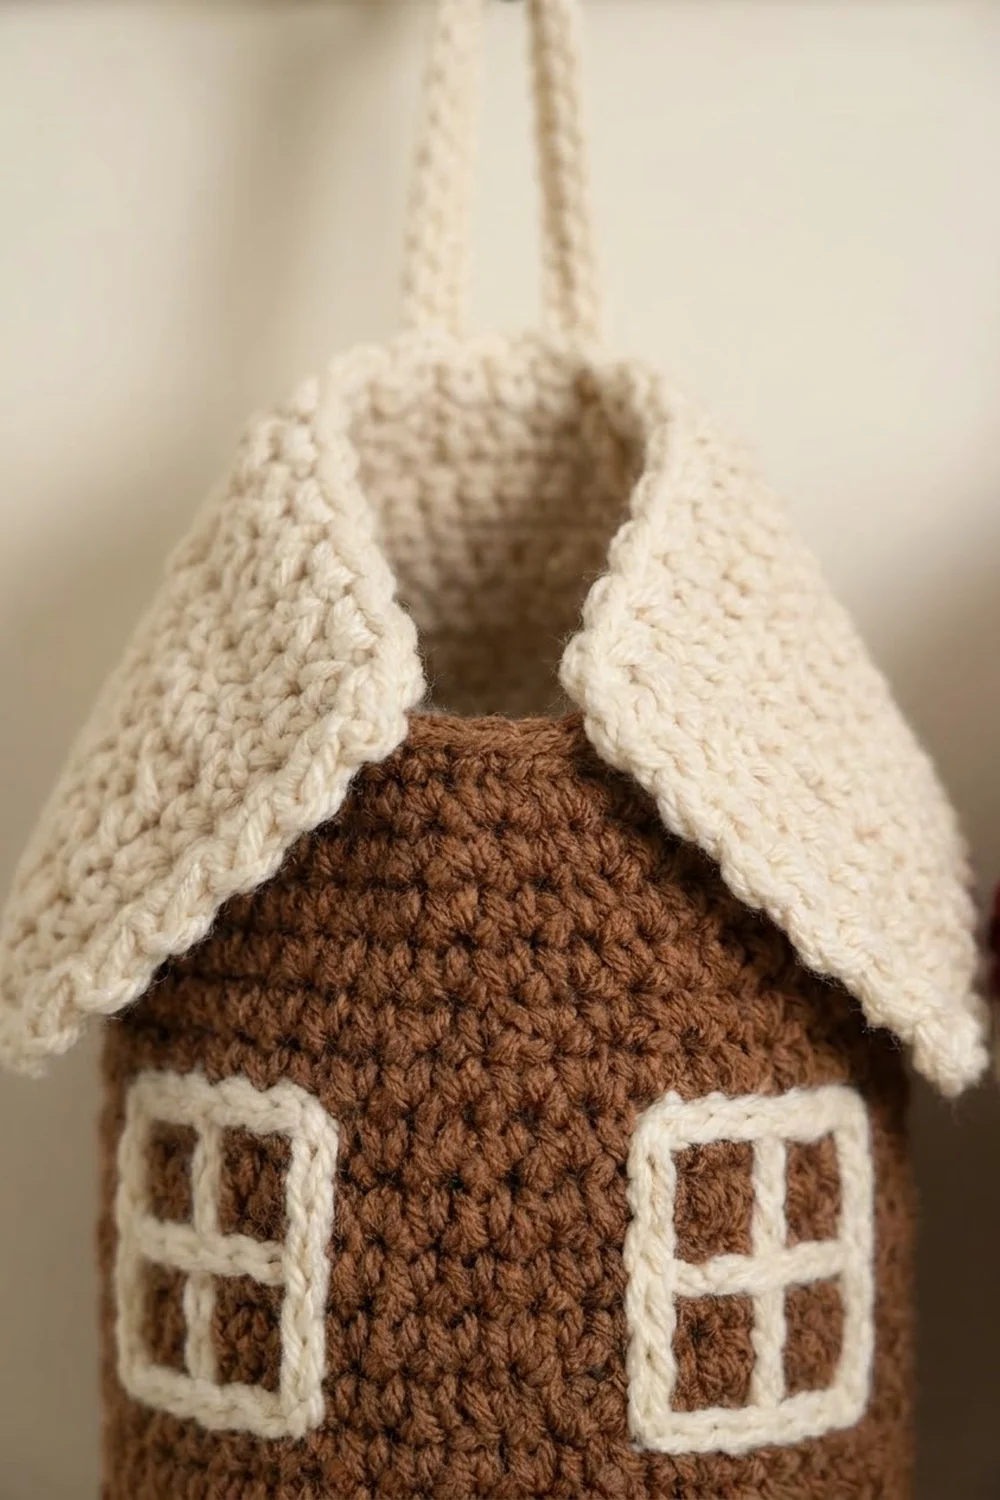
Base and Body (make 1 per house, in body color)
Work in joined rounds rather than a spiral. This keeps the stitches stacked vertically, so the windows and door line up. At the start of each round, the ch 1 does not count as a stitch. Work the first sc into the same stitch as the join.
Round 1: Make a magic ring. Ch 1, work 8 sc in the ring, then sl st to the first sc. (8)
Round 2: Ch 1, work inc in each st around, join. (16)
Round 3: Ch 1, sc 1, inc, rep 8 times, join. (24)
Round 4: Ch 1, sc 2, inc, rep 8 times, join. (32)
Round 5: Ch 1, sc 3, inc, rep 8 times, join. (40)
Round 6: Ch 1, work sc in BLO of each st around, join. (40)
The unworked front loops of Round 5 now form a ridge around the bottom edge. You will use these 40 front loops for the scalloped trim later.
Rounds 7-25: Ch 1, sc in each st around, join. (40 per round)
The body wall is Rounds 6-25. That is 20 rounds, which equals 4.0 in (10.2 cm).
Do not fasten off. Place a marker in the working loop and set the body aside.
Mark the front. The joins all sit at the left side of the house. Stitches 1-20 of each round form the front, and stitches 21-40 form the back. Place markers in Round 7 at sts 1 and 20 to frame the front.
Windows and Door (cream, surface slip stitch)
Work these now, while the top is still open and your hand fits inside the body. Use a loose, even tension.
Door:
– The door spans sts 8-13 (6 sts = 1.2 in / 3.0 cm wide).
– Start at the base of the gap before st 8 in Round 7.
– Surface sl st straight up through Round 11.
– Curve across the top through Rounds 12-13 to form the arch, with the peak centered between sts 10 and 11.
– Come down the gap after st 13 to Round 7.
– Fasten off and weave in the ends on the inside.
– Finished door: 1.2 x 1.4 in (3.0 x 3.6 cm).
Windows (make 2):
– Window 1 spans sts 3-6. Window 2 spans sts 15-18.
– Both windows sit in Rounds 15-18.
– Each window is 4 sts x 4 rounds = 0.8 x 0.8 in (2.0 x 2.0 cm).
– Surface sl st a square outline around each window block.
– To divide the panes, add one vertical line between the 2nd and 3rd stitches and one horizontal line between the 2nd and 3rd rounds.
Check the spacing. The windows are centered 6 sts on either side of the door’s center line, so the front is symmetrical.
Top Closing
Stuff: Fill the body lightly with fiberfill. Stuff enough that the cylinder holds its shape, but not so much that it bulges.
Round 26 (closing row): Flatten the top so the front half (sts 1-20) lies against the back half (sts 21-40). St 1 should line up with st 40, st 2 with st 39, and so on, down to st 20 with st 21.
Ch 1. Working through both layers together, sc in sts 1 and 40, then 2 and 39, and continue across to sts 20 and 21. (20 sc)
Top up the stuffing before you finish the last few stitches. Fasten off and hide the tail inside.
The seam runs left to right across the top. This flattening creates the gable: the roof slopes face front and back, and the roof flaps project to the left and right.
Roof (make 1 per house, in cream)
Foundation: Ch 24.
Row 1: Sc in the 2nd ch from the hook and in each ch across. Turn. (23)
Row 2: Ch 1, sc in the first sc, ch 1, sk next st, sc in next st, rep 11 times. Turn. (23: 12 sc + 11 ch)
Row 3: Ch 1, sc in the first sc, sc in next ch-1 sp, ch 1, sk next sc, rep 9 times, sc in the last ch-1 sp, sc in the last sc. Turn. (23: 13 sc + 10 ch)
Rows 4-13: Repeat Rows 2 and 3 alternately, ending with a Row 3. (23 per row)
The roof now measures 4.6 x 2.6 in (11.7 x 6.6 cm). Row 7 is the center row, and it will become the ridge.
Edging round: Ch 1, then work around the whole roof in sc as follows:
- Along Row 13: In the first st, work (sc, ch 3, sc). Sc in the next 21 sts. In the last st, work (sc, ch 3, sc).
- Down the row ends: Work 1 sc in each of the 11 row ends between the corner rows.
- Along the foundation edge: In the first st, work (sc, ch 3, sc). Sc in the next 21 sts. In the last st, work (sc, ch 3, sc).
- Up the other row ends: Work 11 sc.
- Join with a sl st to the first sc and fasten off.
Edging count:
– Each long side (the eaves) has 23 sc between its corner ch-3 spaces: 1 + 21 + 1.
– Each short side (the gable ends) has 13 sc: 1 + 11 + 1.
– Total: 2 x 23 + 2 x 13 = 72 sc, plus 4 ch-3 points.
The ch-3 corners become the pointed, ear-like flaps. After the edging, the roof measures 5.0 x 3.0 in (12.7 x 7.6 cm), so each slope is 1.5 in (3.8 cm).
Hanging Cord (make 1 per house, in cream)
- Cut a 36 in (91.4 cm) strand of cream yarn and fold it in half to 18 in (45.7 cm).
- Anchor the fold and twist the ends firmly until the strand kinks.
- Fold it in half again and let it twist back on itself. This makes a cord about 9 in (22.9 cm) long.
- Knot the ends together so that the cord forms a 6 in (15.2 cm) loop, which stands 3 in (7.6 cm) tall when hung.
Make All Pieces
Totals for the set:
– Tan/brown: 1 body
– Burgundy red: 1 body
– Forest green: 1 body
– Cream: 3 roofs, 3 cords, 3 base trims, 3 doors and 6 windows
Hanging layout (left to right):
ROW 1: BROWN BURGUNDY GREEN
The houses stay separate. They are grouped only by hanging them on the same rod.
Joining (Assembling Each House)
Method: Assemble each house individually. Use whipstitch for the roof and tack-stitch the cord.
Cord first:
1. Center the cord’s knot on the top seam, between seam sts 10 and 11.
2. Sew the knot down securely through the seam with matching cream yarn.
Roof:
1. Fold the roof along Row 7 and drape it over the seam. Push the cord loop up through the moss stitches at the center of the ridge.
2. Center the roof left to right. The roof is 5.0 in (12.7 cm) long and the seam is 4.0 in (10.2 cm) wide, so each end should overhang by 0.5 in (1.3 cm).
Stitch-to-stitch logic:
– Row 7 has 23 sts and the seam has 20 sc.
– Whipstitch the ridge to the seam, easing the 23 ridge sts over the 20 seam sts so that the extra 3 are spread evenly.
– Do not stitch the overhanging ends to anything.
– Leave the eaves free so the slopes sit naturally against the body.
Tension: Pull each whipstitch just snug. If the ridge puckers or the cord tilts, you are pulling too hard.
Size checkpoint:
– The roof slopes hang evenly front and back, about 1.5 in (3.8 cm) each.
– All four flaps project equally.
– The house stands about 4.25 in (10.8 cm) tall before the base trim is added.
Border (Base Scalloped Trim)
Border gauge: 1 scallop per 4 sts, which equals 0.8 in (2.0 cm) per scallop.
Setup: Turn the house upside down. Join the cream yarn with a sl st in the free front loop of st 1 of Round 5 (at the left-side join).
Trim round: Sk next st, shell in next st, sk next st, sl st in next st. Rep 10 times. The final sl st lands in st 1, so it doubles as the join. Fasten off.
Counts per side:
– Front (sts 1-20): 5 shells, in sts 3, 7, 11, 15 and 19.
– Back (sts 21-40): 5 shells, in sts 23, 27, 31, 35 and 39.
– Total: 10 shells.
Why the math works: The trim is worked one stitch at a time into the 40 front loops of Round 5, which match the 40 stitches of the body. Each repeat uses exactly 4 sts, and 40 ÷ 4 = 10 repeats. Each half has 20 sts, and 20 ÷ 4 = 5 scallops, so the front and back match and there is no leftover stitch.
The scallops flare outward and slightly downward, adding about 0.5 in (1.3 cm) at the base. Of that, roughly 0.25 in (0.6 cm) extends below the bottom edge. This brings the house to its full 4.5 in (11.4 cm) height.
Final Blocking
- Weave in any remaining ends inside the body or under the roof.
- Pin each of the four roof flaps into a sharp point.
- Hold a steamer 1 in (2.5 cm) above the roof and steam lightly. Do not press, because pressing will flatten the moss texture.
- Steam the scalloped trim and use your fingers to spread each shell into an even fan.
- Roll the body gently between your palms to round out the cylinder.
- Let everything dry completely before you remove the pins.
Final Quality-Control Checklist
- The base is 2.5 in (6.4 cm) across and the body wall is 4.0 in (10.2 cm) tall.
- The joins run straight up the left side.
- The door is centered between sts 10 and 11, and both windows are square and level.
- The top seam is 4.0 in (10.2 cm) wide, with no stuffing showing.
- The roof is 5.0 x 3.0 in (12.7 x 7.6 cm), with a 0.5 in (1.3 cm) overhang at each end.
- All four flaps are pointed.
- There are 10 scallops, 5 on the front and 5 on the back.
- The cord stands 3 in (7.6 cm) tall and is centered at the peak.
- The finished house is about 4.5 in (11.4 cm) tall.
Troubleshooting
- Base ruffles: Your tension is too loose. Go down a hook size for Rounds 1-5 only.
- Body leans or twists: You may have skipped a join or worked an extra sc after the join. Recount each round to 40.
- Windows are uneven: Count the stitches from the join marker. Do not judge the position by eye.
- Outlines are puckered: Your surface slip stitches are too tight. Redo them with looser loops.
- Roof edges curl: Steam-block the roof flat before you sew it on.
- Flaps are rounded: Re-pin and steam, or work the corners as (sc, ch 4, sc) instead.
- Scallops are crowded: Make sure you skipped exactly 1 st before and after each shell.
Care
Spot clean with a damp cloth. To store the houses, wrap them in tissue so the roof points and scallops keep their shape.
Final Notes
The measurement chain for each house is:
- 40 sts at 5 sts per in gives a base 2.5 in (6.4 cm) across.
- 20 body rounds give a wall 4.0 in (10.2 cm) tall.
- The 20-st closing row gives a 4.0 in (10.2 cm) seam.
- A 5.0 in (12.7 cm) roof leaves a 0.5 in (1.3 cm) overhang at each end.
- 10 scallops fit evenly around the 40 front loops.
If each checkpoint matches, all three houses will match each other. Hang them side by side, about 2 in (5.1 cm) apart.
Optional: if you would like a bigger village, make extra houses in other colors using the same pattern.
Happy crocheting!