
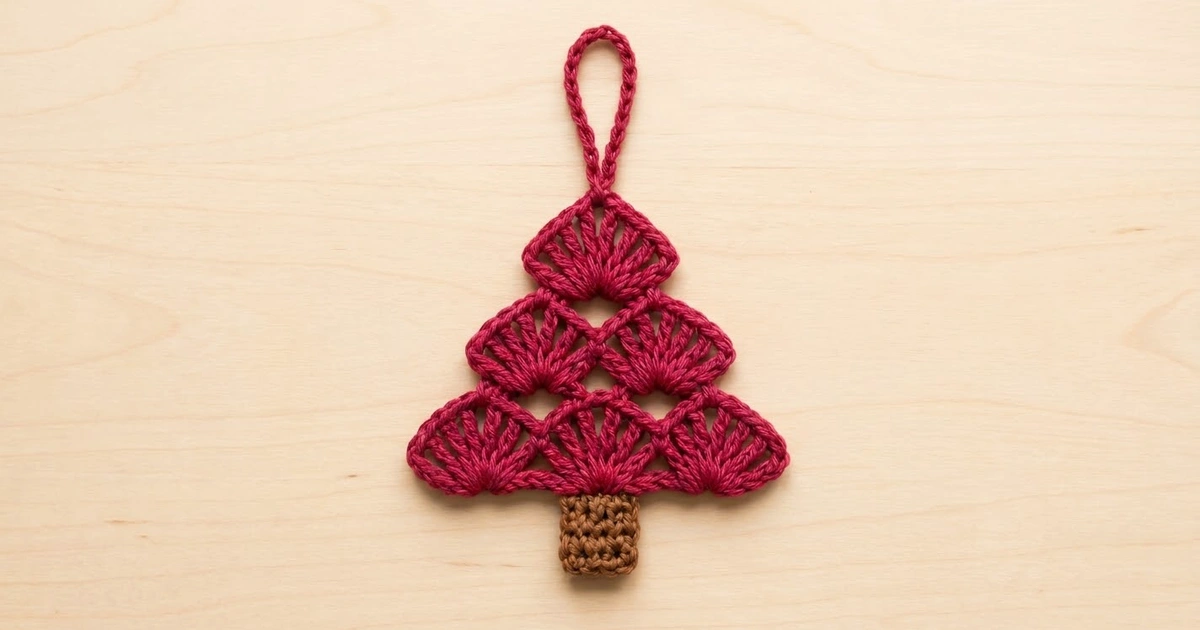
This little tree ornament is made from three tiers of fan shells in cranberry red, sitting on a brown single-crochet trunk. The fans stack like a pyramid of 3, then 2, then 1, so the tree gets its stepped silhouette without any shaping math. A neat outline round and a chain hanging loop finish it off.
The colors are cranberry red for the tree and warm brown for the trunk. The style is classic and slightly lacy, and it looks good on a real tree, on a gift tag, or hanging in a window.
This pattern uses US crochet terms. The finished ornament is 4.5 in (11.4 cm) wide and 4.5 in (11.4 cm) tall without the loop, or 6.25 in (15.9 cm) tall including the loop.
Here’s how it’s built. You work the trunk first in short rows of single crochet. You then make the tree flat in rows, starting with a chain-loop base and adding one tier of fans per row. Last comes a border round that joins the trunk, outlines the tree and makes the hanging loop in one pass, followed by a slip-stitch finishing round.
Finished Size and Construction
- Finished size: 4.5 in (11.4 cm) wide x 4.5 in (11.4 cm) tall without the loop; 6.25 in (15.9 cm) tall with the loop
- Skill level: Easy / advanced beginner
- Terminology: US crochet terms
- Yarn weight: DK / light worsted (#3), cotton or cotton blend
- Hook: 3.5 mm (E-4)
- Number of pieces: 1 tree and 1 trunk, joined into one ornament during the border
- Layout: fans stacked 3-2-1, with the trunk centered under the bottom tier
- Trunk size: 1 in (2.5 cm) wide x 1.1 in (2.8 cm) tall
- Tree size before border: 4.25 in (10.8 cm) wide x 3.25 in (8.3 cm) tall
- Border depth: about 0.125 in (0.3 cm) on each edge
Materials
Yarn advice: Mercerized cotton or a cotton blend in DK weight works best. It shows the fan spokes clearly and blocks to a crisp, flat shape. Avoid fuzzy yarns, which blur the openings between the fans.
- Color A, Cranberry Red (tree, border, loop): 10 g, about 25 m
- Color B, Warm Brown (trunk): 3 g, about 8 m
These quantities include a margin for your gauge swatch and weaving in ends.
Tools:
– 3.5 mm (E-4) crochet hook
– Tapestry needle
– Scissors
– 2 stitch markers
– Rustproof pins and a blocking mat or folded towel
– Spray bottle with water
– Optional: fabric stiffener or a light starch spray
Abbreviations (US Terms)
- ch: chain
- sl st: slip stitch
- sc: single crochet
- dc: double crochet
- sk: skip
- sp: space
- st(s): stitch(es)
- RS: right side
- rep: repeat
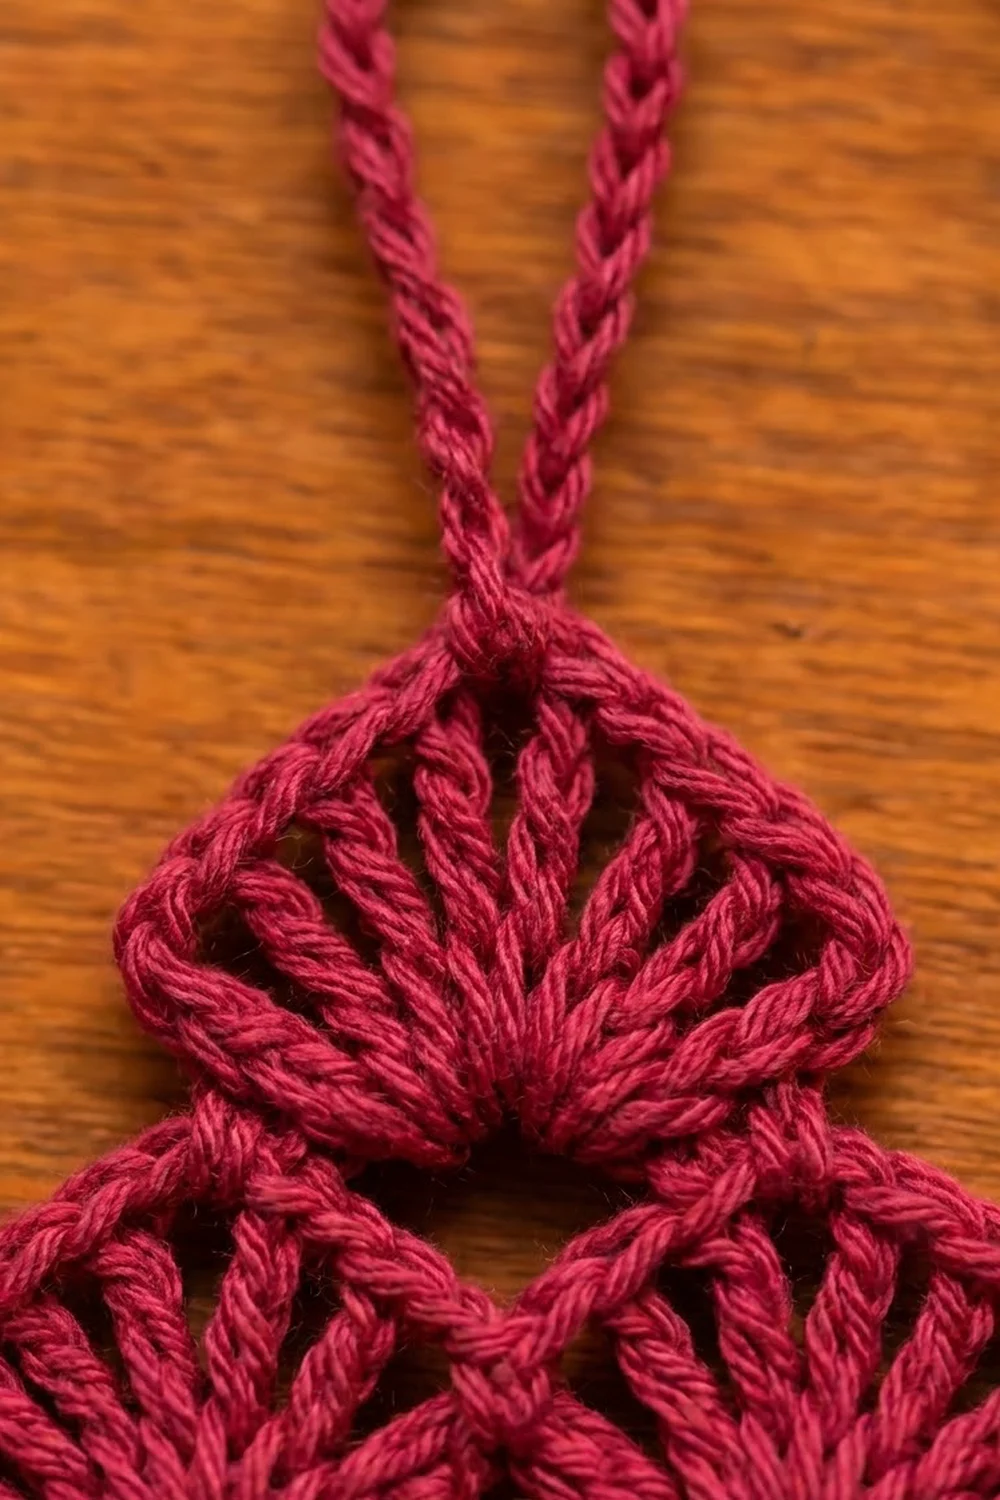
Special stitch: Fan. Work 9 dc in the stitch or space given. The middle (5th) dc of a fan is called its center dc. Later rows use it as an anchor point.
Gauge and Checkpoints
Gauge: 20 sc and 22 rows = 4 in (10.2 cm) with a 3.5 mm hook.
Fan gauge: One fan from Row 2, measured from the sc on one side to the sc on the other, is about 1.5 in (3.8 cm) wide.
Gauge your hook on the trunk before you start the tree. It only takes a few minutes and tells you right away whether your tension matches.
Checkpoints:
– Trunk: 1 in (2.5 cm) wide x 1.1 in (2.8 cm) tall
– After Row 2: 4.25 in (10.8 cm) wide x 1.25 in (3.2 cm) tall
– After Row 3: 2.25 in (5.7 cm) tall
– After Row 4: 3.25 in (8.3 cm) tall
– After the border: 4.5 in (11.4 cm) wide x 3.5 in (8.9 cm) tall for the tree alone
If your piece is too big: go down to a 3.25 mm (D-3) hook. Also check that your fan stitches aren’t loose at the base.
If your piece is too small: go up to a 3.75 mm (F-5) hook. Tight fans also tend to cup, so loosening up helps the tree lie flat too.
Trunk
Use Color B.
Ch 6.
Row 1 (RS): Sc in 2nd ch from hook and in each ch across. (5 sc)
Rows 2–6: Ch 1, turn, sc in each st across. (5 sc per row)
Fasten off and leave a 4 in (10.2 cm) tail. The trunk should measure 1 in (2.5 cm) wide x 1.1 in (2.8 cm) tall. Set it aside. You’ll attach it during the border, so there’s no sewing.
Tree
Use Color A. The tree is worked flat in 4 rows. Each fan row starts in the dips between the fans below it, which is what makes the stepped tree shape.
Foundation: Ch 20.
Row 1 (chain-loop base, RS): Sc in 2nd ch from hook, ch 5, sk next 5 ch, sc in next ch; rep from * 2 more times. (4 sc and 3 ch-5 loops)*
Chain positions, for reference: the sc are in chains 1, 7, 13 and 19, and each loop skips 5 chains between them. The middle loop sits over chains 8–12, which matters when you join the trunk later.
Row 2 (bottom tier, 3 fans): Ch 1, turn, sc in first sc, Fan (9 dc) in next ch-5 loop, sc in next sc; rep from * 2 more times. (31 sts: 27 dc + 4 sc)*
Stitch order: sc (st 1), fan (sts 2–10), sc (st 11), fan (sts 12–20), sc (st 21), fan (sts 22–30), sc (st 31). Spread the fans out so each one opens into a smooth half circle.
Checkpoint: 4.25 in (10.8 cm) wide x 1.25 in (3.2 cm) tall.
Row 3 (middle tier, 2 fans): Turn. Sl st in first 5 sts (sts 1–5). Ch 1, sc in next st (st 6, the center dc of the first fan), sk next 4 sts, Fan in next sc (st 11), sk next 4 sts, sc in next st (st 16, center dc), sk next 4 sts, Fan in next sc (st 21), sk next 4 sts, sc in next st (st 26, center dc). Leave the last 5 sts (sts 27–31) unworked. (21 sts: 18 dc + 3 sc; slip stitches not counted)
Each new fan sits in the dip between two lower fans. Its spokes lie across the top halves of those fans, and small openings form where the fan tips meet. The outer 5 stitches on each side of Row 2 stay exposed, which makes the first step of the tree.
Checkpoint: 2.25 in (5.7 cm) tall.
Row 4 (top tier, 1 fan): Turn. Sl st in first 5 sts (sts 1–5). Ch 1, sc in next st (st 6, center dc), sk next 4 sts, Fan in next sc (st 11), sk next 4 sts, sc in next st (st 16, center dc). Leave the last 5 sts (sts 17–21) unworked. (11 sts: 9 dc + 2 sc)
Do not fasten off. Ch 1, sl st down to the bottom corner along the side row-ends, and pull up a loop to hold your place. If you’d rather fasten off, you can rejoin at the bottom corner for the border.
Checkpoint: 3.25 in (8.3 cm) tall and 4.25 in (10.8 cm) wide at the base.
Border
Use Color A. Border gauge: the border uses 1 sc per exposed stitch and 1 sc per sc row-end. That matches the 5-sc-per-inch gauge, so the edge stays flat with no ruffling or pulling.
Rnd 1 (outline, trunk join and loop): With RS facing, start at the bottom corner below the first sc of Row 1.
- Bottom edge: Working into the remaining loops of the foundation chain, work 2 sc in the first ch and 1 sc in each of the next 6 ch. Hold the trunk behind the tree with its last row lined up under chains 8–12. Working through the foundation ch and the matching trunk stitch together, sc in each of the next 5 sts. Then sc in each of the next 6 ch, and 2 sc in the last ch. (21 sc: 19 foundation chains + 1 extra at each corner)
- First side: 1 sc in the row-end of Row 1. Sc in each of the 5 outer sts of Row 2 (end sc + 4 dc). Sc in each of the 5 outer sts of Row 3 (end sc + 4 dc). On the side where you slip-stitched across, work into the tops of those sl sts. (11 sc)
- Top fan: Sc in each of the first 5 sts of Row 4. In the center dc, work (sc, ch 20, sc). Sc in each of the last 5 sts. (12 sc + 1 ch-20 loop)
- Second side: Sc in each of the 5 outer sts of Row 3, sc in each of the 5 outer sts of Row 2, and 1 sc in the row-end of Row 1. (11 sc)
Join with a sl st to the first sc. Rnd 1 total: 55 sc (21 + 11 + 12 + 11) + 1 ch-20 loop.
Rnd 2 (crisp edge): Sl st in each sc around. When you reach the loop, sl st in each of the 20 ch, then carry on in the sc. Join to the first sl st. (75 sl sts: 55 + 20)
Fasten off and weave in all ends.
Why the math works: Row 3 leaves exactly 5 stitches exposed on each side of Row 2, and Row 4 leaves exactly 5 on each side of Row 3. That’s why each side gets 1 + 5 + 5 = 11 sc. The bottom edge has 19 foundation chains plus 2 corner increases, for 21 sc. The top fan’s 11 stitches get 1 sc each, plus 1 extra sc where the loop splits the center, for 12 sc. Because the trunk is joined through the 5 center chains, its 5-stitch width matches the 5 border stitches exactly. The border adds about 0.125 in (0.3 cm) per edge, which takes the tree from 4.25 in (10.8 cm) to 4.5 in (11.4 cm) wide and from 3.25 in (8.3 cm) to 3.5 in (8.9 cm) tall.
Final Blocking
- Lightly mist the ornament with water until it’s damp but not dripping.
- Lay it RS up on the blocking mat.
- Pin the 2 bottom corners 4.5 in (11.4 cm) apart.
- Pin the top point so the tree is 3.5 in (8.9 cm) tall, measured from the bottom edge.
- Open each fan into a smooth half circle and press the spokes flat with your fingers.
- Pin each side step so the two sides mirror each other.
- Straighten the trunk so it hangs centered. About 1 in (2.5 cm) should show below the tree.
- Lay the hanging loop flat and straight.
- Optional: apply a light coat of stiffener for a crisper ornament.
- Let it dry completely before you unpin it.
Final Quality-Control Checklist
- The tiers have exactly 3, 2 and 1 fans.
- Every fan has 9 dc and opens evenly.
- The small openings between the fans are even in size.
- The trunk is 5 sts wide and centered under the middle fan.
- Each side of the tree has 11 border sc, and the two sides match.
- The tree measures 4.5 in (11.4 cm) wide x 3.5 in (8.9 cm) tall.
- The overall height is 4.5 in (11.4 cm), or 6.25 in (15.9 cm) with the loop.
- The hanging loop sits exactly at the top center.
- All ends are woven in securely and hidden on the WS.
Troubleshooting
The fans ruffle or cup. Your dc are too tight or too loose for the space. Check that you put exactly 9 dc in each fan, then adjust your hook size.
The upper fans sit off-center. You probably miscounted the slip stitches at the start of the row. It’s always 5 sl sts, then the sc goes in the 6th st.
The trunk is lopsided. It was lined up wrong during the border. Rip back to the bottom edge and line the trunk up again under chains 8–12.
The sides pull inward. You skipped stitches along the steps. Make sure you have 11 sc on each side.
The loop twists. Check that you didn’t twist the ch-20 before working back into the center dc. A light block with a pin straightens it.
Care
Hand wash in cool water with mild soap, press out the water in a towel, and dry flat. If you stiffened it, re-block and stiffen again after washing.

Final Notes
Here’s the measurement chain from start to finish:
- The trunk measures 1 in (2.5 cm) x 1.1 in (2.8 cm).
- Row 2 sets the base at 4.25 in (10.8 cm).
- Rows 3 and 4 bring the tree to 3.25 in (8.3 cm) tall.
- The border adds 0.125 in (0.3 cm) per edge, for a finished tree of 4.5 in (11.4 cm) x 3.5 in (8.9 cm).
- The visible trunk brings the total to 4.5 in (11.4 cm), and the loop brings it to 6.25 in (15.9 cm).
If you hit each checkpoint, the ornament will come out right. Make one in cranberry, then try a few in other colors for a full set of tree ornaments.
Happy crocheting!